How-To Geek
How to use speaker notes in google slides.
Remember all the talking points for your presentation with speaker notes.

Quick Links
View and add speaker notes in google slides, edit or remove speaker notes, display speaker notes during a presentation.
Speaker notes are helpful for talking points as you present a slideshow. In Google Slides , you can add notes to each slide, edit or remove them as needed, and of course, display them during the presentation.
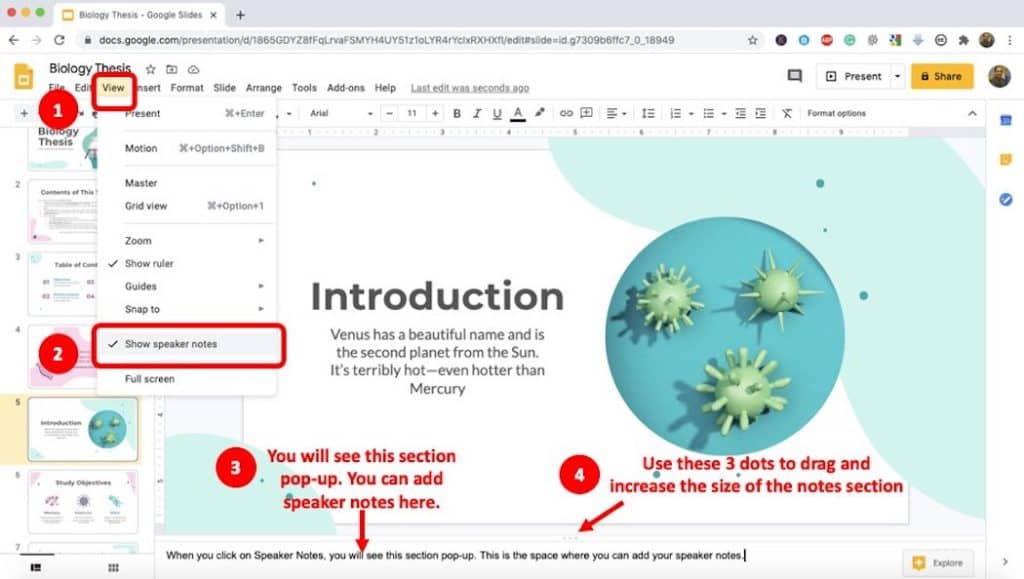
You have a few convenient ways to open the Speaker Notes section below your slide as you create your presentation.
- Double-click the three dots at the bottom of the Google Slides window.
- Drag up using the three dots at the bottom to resize the Speaker Notes section as you please.
- Click View > Show Speaker Notes in the menu to select it.
Once you have the Speaker Notes area displayed below your slide, you can simply click inside the section to add your notes.
You can also use the Google Slides toolbar to format your notes. Change the font style or size, apply color, bold, or italics, or use a numbered or bulleted list.
To hide the Speaker Notes again, reverse the action you did for opening them.
- Double-click the three dots at the top of the Speaker Notes section.
- Drag down using the three dots until the section vanishes.
- Click View > Show Speaker Notes in the menu to deselect it.
To edit your speaker notes, open them and just make your changes. Your edits are saved automatically just like any other changes you make as you create your presentation.
To remove speaker notes, select all of the text and press Delete on your keyboard.
You can begin a Google Slides presentation by hitting "Present" at the top of the screen or by clicking the arrow and selecting " Presenter View " or "Present From Beginning."
To start the show with your notes in hand, choose "Presenter View." This displays your slideshow in your main browser window and places your presenter notes in a smaller external window that you can move or resize.
If you use the "Present" or "Present From Beginning" options, you can still access your notes using the Presenter Toolbar . Be sure to take your presentation out of full-screen view first. Otherwise, your notes will display in full-screen mode.
Move your cursor to the bottom left of the slideshow and you'll see this toolbar display. Open the Options Menu using the three dots on the right and select "Exit Full Screen."
Then to view your notes, open the Options Menu and select "Open Speaker Notes."
Like Presenter View, this opens your notes in a smaller window that you can place where you like.
Since the above options all place your Speaker Notes in their own window, you can click the X to close that window at any time if you no longer need your notes.
Speaker notes are not only useful when practicing your presentation, but also when showtime comes. If you're still getting used to all that Google Slides has to offer, check out our helpful beginner's guide to Google Slides for additional tips.
- Slidesgo School
- Google Slides Tutorials
How to Use the Presenter View in Google Slides

Google Slides, like PowerPoint, has different presentation modes that can come in handy when you’re presenting and you want your slideshow to look smooth. Whether you’re looking for slides only, speaker notes or the Q&A feature, in this new Google Slides tutorial, you’ll learn about these and their respective settings. Ready? Then let’s explore the presenter view!
Types of presentation modes in Google Slides
Presenter view, start from beginning, present on another screen.
There are three presentation modes in Google Slides.
If you click the “Slideshow” button or press Ctrl/Cmd + F5, your presentation will start directly without any speaker notes. This is the most widely used and the simplest option.
Next to the “Slideshow” button, there’s a drop-down arrow. Click on it to see the different presentation modes:
In this mode, you’ll be able to see the speaker notes, check the timer and adjust other settings, such as questions from the audience. For more information about the speaker notes, please refer to this Google Slides tutorial .
To view the different tools, after clicking “Presenter View”, move your mouse to the lower left-hand corner of the screen. You’ll see the slide number, previous and next slide arrows and three dots. Click on the dots and here are your options:
Open speaker notes
This enables the speaker notes and makes them visible. If you click this button, you might exit fullscreen mode. To go back to fullscreen, press Ctrl/Cmd + Shift + F or click the “Fullscreen” button. For more information, please refer to this Google Slides tutorial .
Turn on the laser pointer
You’ll see a red dot on the screen, which you can move around to point out any element from your presentation.
Full screen
Click this button (or press Ctrl+Shift+F) to enter or exit fullscreen mode.
Click this button to finish the presentation or just press Esc.
If you click on “Auto-play,” more options will appear: Click “Play” and the slides will advance automatically (by default, every two seconds, but there are other options available. You can also choose to play the slideshow on a loop).
Captions preferences
If you have a mic set up, you can enable captions. Click the drop-down arrow to adjust the size of the text and its position on the screen.
If you click on “more”, you can enable the Audience Q&A panel by clicking on the first option that appears. For more information, please refer to this Google Slides tutorial .
More: Downloads, printing, info and options
Under the “More” tab, you can also choose different download formats for your slideshow or print it out. This tab also contains a handy list of keyboard shortcuts (if you prefer handling keys to using your mouse) and the possibility to report problems.
Your presentation will begin from the first slide (Ctrl/Cmd + Shift + F5).
Your presentation will be shown on a different screen via a media display device, such as Chromecast. This option will be available only if there’s another screen available.

Now you’ve mastered the presenter view in Google Slides, which, with a bit of practice, will be a game-changer! Not only will it make you look like a presentation pro, but it will also streamline the process of nailing those crucial talking points. So go out there and strut your stuff – with presenter view on your side, you are unstoppable! And if you’ve found this tutorial helpful, check out more of them on our blog !
Do you find this article useful?
Related tutorials.

Top 10 tips and tricks for creating a business presentation!
Slidesgo is back with a new post! We want your presentations and oral expositions to never be the same again, but to go to the next level of presentations. Success comes from a combination of two main ingredients: a presentation template suitable for the topic and a correct development of the spoken part. For templates, just take a look at the Slidesgo website, where you are sure to find your ideal design. For tips and tricks on how to make a presentation, our blog contains a lot of information, for example, this post. We have focused these tips on business presentations, so that, no matter what type of company or...

How to present survey results in PowerPoint or Google Slides
A survey is a technique that is applied by conducting a questionnaire to a significant sample of a group of people. When we carry out the survey, we start from a hypothesis and it is this survey activity that will allow us to confirm the hypothesis or to see where the problem and solution of what we are investigating lies.We know: fieldwork is hard work. Many hours collecting data, analyzing and organizing it until we have our survey results.Well, we don't want to discourage you (at Slidesgo we stand for positivism) but this is only 50% of the survey work....

Best 10 tips for webinar presentations
During the last couple of years, the popularity of webinars has skyrocketed. Thousands of people have taken advantage of the shift to online learning and have prepared their own webinars where they have both taught and learned new skills while getting to know more people from their fields. Thanks to online resources like Google Meet and Slidesgo, now you can also prepare your own webinar. Here are 10 webinar presentation tips that will make your speech stand out!

How to create the best presentation for an onboarding process
Slidesgo was once a small project with a handful of people working on it. We’re not making this up! But our passion and effort has brought us to where we are today. In the process, our staff has also grown, and let us tell you: it has grown a lot!Do you remember that time when you were the newly-hired employee? You went to the office and thought that everything was too much for you to handle. Lots of faces you’ve never seen before. Lots of tasks that are suddenly your responsibility. Nearly as much new information as a library could...

Cloud Storage

Custom Business Email

Video and voice conferencing

Shared Calendars

Word Processing

Spreadsheets
Presentation Builder

Survey builder

Google Workspace
An integrated suit of secure, cloud-native collaboration and productivity apps powered by Google AI.
Tell impactful stories, with Google Slides
Create, present, and collaborate on online presentations in real-time and from any device.
- For my personal use
- For work or my business

Jeffery Clark
T h i s c h a r t h e l p s b r i d g i n g t h e s t o r y !

E s t i m a t e d b u d g e t

Make beautiful presentations, together
Stay in sync in your slides, with easy sharing and real-time editing. Use comments and assign action items to build your ideas together.

Present slideshows with confidence
With easy-to-use presenter view, speaker notes, and live captions, Slides makes presenting your ideas a breeze. You can even present to Google Meet video calls directly from Slides.

Seamlessly connect to your other Google apps
Slides is thoughtfully connected to other Google apps you love, saving you time. Embed charts from Google Sheets or reply to comments directly from Gmail. You can even search the web and Google Drive for relevant content and images directly from Slides.

Extend collaboration and intelligence to PowerPoint files
Easily edit Microsoft PowerPoint presentations online without converting them, and layer on Slides’ enhanced collaborative and assistive features like comments, action items, and Smart Compose.

Work on fresh content
With Slides, everyone’s working on the latest version of a presentation. And with edits automatically saved in version history, it’s easy to track or undo changes.

Make slides faster, with built-in intelligence
Assistive features like Smart Compose and autocorrect help you build slides faster with fewer errors.

Stay productive, even offline
You can access, create, and edit Slides even without an internet connection, helping you stay productive from anywhere.
Security, compliance, and privacy

Secure by default
We use industry-leading security measures to keep your data safe, including advanced malware protections. Slides is also cloud-native, eliminating the need for local files and minimizing risk to your devices.
Encryption in transit and at rest
All files uploaded to Google Drive or created in Slides are encrypted in transit and at rest.
Compliance to support regulatory requirements
Our products, including Slides, regularly undergo independent verification of their security, privacy, and compliance controls .
Private by design
Slides adheres to the same robust privacy commitments and data protections as the rest of Google Cloud’s enterprise services .

You control your data.
We never use your slides content for ad purposes., we never sell your personal information to third parties., find the plan that’s right for you, google slides is a part of google workspace.
Every plan includes

Collaborate from anywhere, on any device
Access, create, and edit your presentations wherever you are — from any mobile device, tablet, or computer — even when offline.

Get a head start with templates
Choose from a variety of presentations, reports, and other professionally-designed templates to kick things off quickly..

Photo Album

Book Report

Visit the Slides Template Gallery for more.
Ready to get started?
Home Blog Google Slides Tutorials How to Add Speaker Notes in Google Slides
How to Add Speaker Notes in Google Slides

Speaker notes during a presentation help the presenter view instructions without using cue cards or paper notes. The notes appear on the presenter’s screen, making it possible to view instructions while keeping them hidden from the audience. Adding and viewing Google Slides speaker notes is similar to PowerPoint, which we covered earlier in our speaker notes PowerPoint guide. Let’s take a look at how to add and view speaker notes in Google Slides.
How to use Speaker Notes in Google Slides
You can view or hide speaker notes when editing your Google Slides Templates by going to View > Show Speaker Notes . Alternatively, you can double-click the three dots at the bottom of a slide to open the speaker notes pane.

Once opened, you can begin typing speaker notes. Every slide has its own speaker notes, so you can add instructions for various slides to remember important details you need to mention during the presentation. This can also help you avoid cramming your slides with too many details and use the speaker notes as cues to discuss important information during your presentation.

How to See Speaker Notes while Presenting in Google Slides
Speaker notes in Google Slides can be viewed during a presentation by starting your slideshow in Presenter view. You can do this by expanding the Slideshow option via the arrow button. Select Presenter View to run the presentation with speaker notes.

This will open speaker notes alongside your slideshow. The audience will not be able to see your speaker notes.

Speaker notes have been a widely used feature in other presentation apps such as PowerPoint. Google Slides provides an easy enough method to use them seamlessly while presenting your slideshow. Speaker notes can help avoid missing important details during a presentation while making the presenter appear more confident before the audience.

Like this article? Please share
Google Slides, Presentation Tips Filed under Google Slides Tutorials
Related Articles

Filed under Business • April 10th, 2024
Discovering Coaching Presentation Tools
Discover the best PPT templates to use as coaching presentation tools with this article. Tools explained + examples.

Filed under Google Slides Tutorials • March 22nd, 2024
How to Share a Google Slides Presentation
Optimize your presentation delivery as we explore how to share a Google Slides presentation. A must-read for traveling presenters.

Filed under Education , Presentation Ideas • January 1st, 2024
How to Create Presentations with AI using ChatGPT
We tested ChatGPT for helping us create better presentations. Join us in this article to know a first-hand experience on AI content generators and their potential role for presenters.
Leave a Reply
How to Make Your Presentation More Interactive With Google Slides' Presenter View
Want to make sure your presentation goes smoothly? Here's how Google Slides' Presenter view can help you in presenting more effectively.
When making a presentation, it would be helpful to have notes and other information readily available on the screen. However, if you add notes to your slideshow directly, your audience will see it.
So, how can you add notes that only you can see on Google Slides? Let’s explore the Speaker Notes feature in the browser and mobile apps.
1. How to Add Speaker Notes in Google Slides
Adding notes to each slide will help you have a smoother presentation. This feature ensures that you don’t have to use an external app, sticky notes, or a physical notebook, thus reducing distractions. But how do you add notes when you’re creating a presentation in Google Slides ? Find out below.
Using Google Slides for the Web
When using the browser version on your PC, you can add notes by clicking on the Click to add speaker notes subwindow at the bottom of the screen. After clicking on it, you’re free to type and add notes for that slide. Once you’re done, you only need to click away, and your notes are automatically saved.
When you move to another slide, you’ll notice that the speaker notes field is empty. You can click on this again to fill it with notes for this specific slide.
Using the Google Slides iOS and Android App
Adding speaker notes on the app version is a bit more complicated. First, open the Slides app and the presentation you want to work on. Tap on the slide you want to add notes to, then choose Edit slide .
Once the slide loads into the edit view, tap on the menu in the upper-right corner, then choose Show speaker notes . You’ll then see a Tap to add speaker notes subwindow appear at the bottom of the screen. Tap on it, and it will fill your screen. You are then free to type the notes you need.
Once you’ve finished adding your notes, tap on the Check Mark on the upper-left corner of the screen. You will return to the edit view with your notes shown at the bottom. To add notes to other slides, you need to swipe to the slide you want to edit, then repeat the process noted above.
2. Viewing Speaker Notes While Presenting
When you’re launching your presentation, you have to launch it under Presenter view to see the notes you added earlier. Here’s how you can open your presentation in the said view.
Opening Presenter View on Your Browser
When you’re ready to show your presentation, don’t click on the Slideshow button. Instead, click on the down-pointing arrow beside it to show a dropdown menu, then choose Presenter view .
Once the slideshow starts, you’ll see your presentation appear on the main tab; then, you’ll see a Presenter view window open. In the small window, you should see your notes appear under the Speaker Notes tab on the right side. You can also control your slideshow by clicking on the Next and Previous slide previews on the left side of the Presenter view window .
Opening Presenter View on the Mobile App
If you’re using the mobile app, you can only see your notes if you present at a Google Meet meeting. To do so, tap on the Play icon at the top menu. In the options that appear, choose Present to a meeting . You then have to input the Meeting ID of the Google Meet you’re presenting to. Once you have typed the correct code, tap on Done .
You’ll then join the Google Meet room in presentation mode. Your slide will appear as the main window, but you’ll see your notes on the lower part of your mobile device’s screen.
3. Asking Your Audience
One way you can interact with your audience is to answer their questions. However, this isn’t easy if you’re presenting to a large crowd. You may not be able to get to all the participants, or some might be too intimidated to ask a question publicly. So, to help you interact with your audience, you can launch Audience Tools .
How to Ask for Questions With the Browser
In the presenter view, click on the Audience Tools tab. Under it, you’ll see a Start New button. Click on it, and this flag will appear on top of your presentation:
Ask a question at slides.app.goo.gl/[code] .
All your audience needs to do is type the link on their browser, and they’ll be redirected to a new tab where they can type their questions. There, they can type in their questions and submit them to you. They can even ask anonymous questions by clicking on the Ask anonymously check box .
When your audience sends their questions, you’ll receive them under the Audience Tools tab. If you find a particular question interesting, you can click on the Present button under the question, so you can flash it on your presentation. You’ll also see audience reactions to the question, with the number of positive or negative reactions the audience has to it.
If you want to move on and want to stop receiving questions, click on the On slider to switch it off.
How to Ask for Questions With a Mobile App
When you’re in the presenter view, tap on the Audience Q&A icon. It’s in the upper-right corner of your screen, the one before the right-most speaker notes icon. You must then tap Start New in the next view.
Once you’ve turned on Audience Q&A, your audience will see the Ask a question flag on top of your presentation. They then need to type that address on a browser to see the questions page.
You will see the questions they typed on your mobile device, and you can then tap on it to flash it on your presentation. If you want to move to the next slide, you must press the back button in the upper-left corner of the screen. Once you’re done answering questions, you can slide the toggle at the upper-right corner of the Audience Q&A view.
4. Draw on the Screen in Your Google Slides
One other nifty feature of Google Slides is that it allows you to draw on the presentation screen. However, you can only do it from a tablet, like an iPad. To use this feature, you must again launch your presentation under Present to a meeting .
Once you’re in the presenter view, tap on the pen icon in the upper-right corner of the screen, beside the Q&A icon. After it’s activated, you’re free to scribble on the active slide. However, once you change slides, all your on-screen annotations will disappear. To turn off the feature, you just need to tap on the pen icon again.
Create an Interactive Presentation With Google Slides
Google Slides provides many features that let you have an interactive presentation. You can become an effective speaker and pass your knowledge to others more efficiently with these tools. And if you’re having difficulty creating a design, why not check out these sources for Google Slides themes.
How to Show Speaker Notes in Google Slides: A Step-by-Step Guide
Showing speaker notes in Google Slides is a straightforward process that can be accomplished in a few simple steps. Once you’re in your Google Slides presentation, click on “View” in the top menu, and then select “Show speaker notes.” This will open a pane at the bottom of the screen where you can see and edit your notes for each slide.
After you complete this action, you’ll be able to see the notes that you’ve prepared for each slide at the bottom of the screen. This is helpful when practicing your presentation or during the actual presentation, as it allows you to stay on track and remember key points without cluttering your slides with too much text.
Introduction
When it comes to presenting, preparation is key. But even the best-prepared speakers can benefit from a little help on stage or in the meeting room. That’s where speaker notes come in handy. Google Slides, the popular presentation software from Google, offers a feature that allows you to add notes to each slide, visible only to you, the presenter. Why is this important? Well, imagine you’re standing in front of an audience, and you suddenly forget what to say next.
Having speaker notes can save you from an awkward silence and keep your presentation flowing smoothly. They’re like a cheat sheet that no one else can see! This feature is relevant to anyone who uses Google Slides for presentations, whether you’re a student, teacher, business professional, or just about anyone who needs to convey ideas in a visual format.
Step by Step Tutorial: How to Show Speaker Notes in Google Slides
Let’s delve into the steps that will let you take advantage of this nifty feature.
Step 1: Open your Google Slides presentation
Begin by opening the Google Slides presentation for which you want to view or add speaker notes.
Accessing your presentation is the first step in preparing to show your speaker notes. Ensure you’re logged into your Google account and navigate to the presentation within Google Drive or by visiting slides.google.com.
Step 2: Click on “View” in the top menu
Once your presentation is open, click on “View” in the top menu.
The top menu is your gateway to various features in Google Slides. By clicking on “View,” you’re one step closer to enabling your speaker notes.
Step 3: Select “Show speaker notes”
In the dropdown menu under “View,” select “Show speaker notes.”
By doing so, you’ll activate the speaker notes pane, which typically appears at the bottom of your presentation window. You can now see the notes you’ve prepared for each slide.
Additional Information
While showing speaker notes in Google Slides is a great way to keep yourself on track during a presentation, there are a few additional tips to consider. Firstly, practice with your speaker notes well before the actual presentation. This will help you become familiar with where each note fits into your talk, so you’re not scrambling to find the right note for the right slide. Also, keep your notes concise and in bullet points, if possible.
You don’t want to end up reading verbatim from your notes, as this can come across as unengaging. Instead, use them as prompts to jog your memory. Another handy feature in Google Slides is the ability to print your slides with the speaker notes included, which is perfect for rehearsals or if you prefer a physical copy as a backup. Lastly, remember that while speaker notes are a great tool, engaging with your audience and maintaining eye contact are also key aspects of a successful presentation.
- Open your Google Slides presentation
- Click on “View” in the top menu
- Select “Show speaker notes”
Frequently Asked Questions
Can i edit my speaker notes in presenter view.
Yes, you can edit your speaker notes in presenter view by simply clicking in the notes pane and making your changes.
Will the audience be able to see my speaker notes during the presentation?
No, your speaker notes are not visible to the audience. They are for the presenter’s eyes only.
Can I print my slides with the speaker notes?
Yes, you can print your slides with the speaker notes by selecting “Print settings and preview” from the File menu and adjusting the settings accordingly.
What happens to the speaker notes if I convert my Google Slides presentation to a different format?
If you convert your Google Slides presentation to another format, like PowerPoint, your speaker notes will typically be preserved in the conversion.
Are speaker notes saved automatically?
Yes, speaker notes in Google Slides are saved automatically along with your presentation.
In the world of presentations, being prepared is everything. Speaker notes in Google Slides are a game-changer for anyone looking to deliver a seamless, engaging presentation without the fear of losing their place or forgetting key points. While there are a few potential drawbacks, the advantages of using speaker notes far outweigh them.
Remember, your speaker notes are your secret weapon; they provide that extra layer of security that can make all the difference when you’re in the spotlight. So, the next time you’re gearing up for a big presentation, don’t forget to show your speaker notes in Google Slides and give yourself the peace of mind you deserve.

Matt Jacobs has been working as an IT consultant for small businesses since receiving his Master’s degree in 2003. While he still does some consulting work, his primary focus now is on creating technology support content for SupportYourTech.com.
His work can be found on many websites and focuses on topics such as Microsoft Office, Apple devices, Android devices, Photoshop, and more.
Share this:
- Click to share on Twitter (Opens in new window)
- Click to share on Facebook (Opens in new window)
Related Posts
- How to Add a Hyperlink on Google Slides
- How to Make Google Slides Vertical (5 Quick Steps)
- Can You Print a Google Slide?
- How to Rotate a Powerpoint Slide Presentation
- How to Do a Powerpoint Google Slides Presentation Conversion
- How to Bring an Image to the Front in Google Slides
- How to Set Google Docs Background Image
- Can You Download Google Slides Files?
- How to Stop Hiding a Slide in Google Slides
- How to Skip a Slide in Google Slides
- How to Flip an Image in Google Docs
- How to Create a New Notes Folder on an iPhone 14
- How to Rotate an Image in Google Slides
- How to Save a Single Slide as a Picture in Google Slides
- How to Change Slide Size in Powerpoint 2016
- How to Move a Note to Another Folder on iPhone 14
- How to Change Margins in Google Docs (A Quick 4 Step Guide)
- How to Make Text Vertical in Google Docs
- How to Remove Slide Numbers from Google Slides
- How to Change Google Docs Language
Get Our Free Newsletter
How-to guides and tech deals
You may opt out at any time. Read our Privacy Policy
View speaker notes while presenting Google Slides in Google Meet
What’s changing, getting started .
- Admins: There is no admin control for this feature.
- End users:
- Select "Present a Tab" in Meet > choose a Google Slide presentation > click the speaker notes button in the controls at the bottom corner of the presentation.
- Visit the Help Center to learn more about controlling Slides presentations in Google Meet .
Rollout pace
- Rapid Release domains : Gradual rollout (up to 15 days for feature visibility) starting on January 10, 2023
- Scheduled Release domains : Gradual rollout (up to 15 days for feature visibility) starting on January 30, 2023
Availability
- Available to Google Workspace Business Standard, Business Plus, Enterprise Essentials, Enterprise Standard, Education Standard, Enterprise Plus, Education Plus, the Teaching and Learning Upgrade, and Nonprofits customers
- Not available to Google Workspace Essentials, Business Starter, Education Fundamentals, Frontline, as well as legacy G Suite Basic and Business customers
- Not available to users with personal Google Accounts
Resources
- Google Help: Control Slides presentations in Google Meet
- Google Workspace Updates Blog: Present Google Slides directly in Google Meet
- Cloud Blog: Introducing innovations in Google Workspace to help your organization thrive in hybrid work
Filter by product
- Accessibility
- Admin console
- Cloud Search
- Directory Sync
- Drive for desktop
- Education Edition
- G Suite for Education
- G Suite for Government
- Google Apps Script
- Google Calendar
- Google Chat
- Google Classroom
- Google Cloud Directory Sync
- Google Docs
- Google Drawings
- Google Drive
- Google Forms
- Google Hangouts
- Google Keep
- Google Maps
- Google Meet
- Google Meet Hard
- Google Meet Hardware
- Google Photos
- Google Sheets
- Google Sites
- Google Slides
- Google Tasks
- Google Vault
- Google Voice
- Google Workspace
- Google Workspace Add-ons
- Google Workspace for Education
- Google Workspace Marketplace
- Google Workspace Migrate
- Marketplace
- Microsoft Exchange
- Microsoft Outlook
- Premier Edition
- Rapid Release
- Rapid Releases
- Scheduled Release
- Security and Compliance
- Weekly Recap
- What's New
Filter by date
Subscribe by feed, subscribe by email, localized google workspace updates, useful links, join the official community for google workspace administrators.
In the Google Cloud Community, connect with Googlers and other Google Workspace admins like yourself. Participate in product discussions, check out the Community Articles, and learn tips and tricks that will make your work and life easier. Be the first to know what's happening with Google Workspace.
______________
Learn about more Google Workspace launches
On the “What’s new in Google Workspace?” Help Center page, learn about new products and features launching in Google Workspace, including smaller changes that haven’t been announced on the Google Workspace Updates blog.
- Help Center
- Get started
- Learn by product
- Learn by role & industry
- Hybrid workplace tips
- Gen AI tips
- Productivity tips
- Business tutorials
- Switch from Microsoft & others
- Support & accessibility
- Google Workspace
- Privacy Policy
- Terms of Service
- Submit feedback
- What's new?
- Get started Welcome Get ready to switch What to do on your first day Your first week & beyond Cheat sheets & reference guides Open Google Workspace apps
- Learn by product Calendar Chat Chrome browser Docs Drive Gemini Gmail Meet Sheets Slides Managed teams Mobile & device setup All products
- Learn by role & industry Administrative assistants Digital marketing Finance Healthcare Human resources Law practices Manufacturing Media & entertainment Nonprofits Professional services Project management Research & development Retail Sales & marketing Technical support UX design Visual design Web development
- Hybrid workplace tips Hybrid work training & help Use Meet Companion mode Stay connected when working remotely Work from home Work with remote teams Plan & hold meetings from anywhere Hold large remote events Work with non-Google Workspace users
- Gen AI tips Generative AI training & help Get started with Gemini Gemini cheat sheet Role-specific prompts & use cases Tips for writing prompts for Gemini Gemini usage limits Learn about generative AI
- Productivity tips Set up business meetings Discuss topics with your team Brainstorm with colleagues Improve communication Make video conference calls Create great presentations Create strong proposals Onboard team members Optimize your inbox Analyze data Clean up data Go paperless
- Business tutorials Use generative AI at work Plan & manage a project Plan & hold meetings from anywhere Hold large remote events Stay connected when working remotely Collaborate with decision makers Share a final document Free up storage space Plan a project with external clients Delegate work when you're OOO Get up to speed after time off Additional training resources
- Switch from Microsoft & others Switch from Microsoft Switch from Slack Switch from Zoom, Skype, or Webex Switch from Box, Dropbox, or C:\ drive Switch from HCL Notes
- Support & accessibility Support for users Support for administrators Accessibility Save or customize Learning Center guides
Bring your best ideas to life with Gemini for Google Workspace. Get tips & real-life use cases for using gen AI at work .
Get started with Slides in Google Workspace
Create your first presentation in slides.
On this page
Create or import a presentation, add slides to your presentation.
- Update your presentation
Want advanced Google Workspace features for your business?
Try Google Workspace today!
Create your presentation
- Open the Slides home screen at Google Slides .
You can also create new presentations from the URL https://slides.google.com/create .
Import and convert an existing presentation
Converting your file from another program creates a copy of your original file in a Docs, Sheets, or Slides format. You can then edit the file in your browser.
If you have existing files, you can import and convert them to Docs, Sheets, or Slides.
- Go to Drive .
- Choose the file you want to import from your computer to add it to Drive.
Have a Microsoft file?
If you've already stored Microsoft files in Drive, you can also update them without converting them .
Add a slide with the same layout as the current slide
- On your computer, open a presentation in Google Slides .
Add a slide with a different layout
- Choose a slide.
Add a slide with your organization's branding
- At right, click the template you want to use.
Note: The Templates option appears only if your administrator makes organization-branded slides available.
Update your presentation
Choose a theme and layout.
When you first create a presentation, you can choose a theme for your slides. A theme is a preset group of colors, fonts, background, and layouts. Your presentation's layout is the way your text and images are arranged on a slide.
Change your presentation's theme
- On the right, click the theme you want.
Change the layout of your presentation
- Select a slide.
- At the top, click Layout .
- Choose the layout you want to use.
Arrange slides
Move slide —Drag the slide to a different position in the presentation. To move several slides at once, Ctrl+click multiple slides before dragging them.
Delete slide —Right-click the slide and select Delete .
Duplicate slide —Right-click the slide in the sidebar and select Duplicate slide .
Add pictures, text, speaker notes, and more
Rename your presentation —Click Untitled presentation and enter a new name.
Add videos, shapes, charts, and more —Click Insert to add videos, shapes, charts, slide numbers, and other features to your presentation. You can also move, delete, or re-size these inserted features.
Add speaker notes —Use speaker notes to keep track of your talking points for each slide. In the presentation editor, speaker notes appear beneath the current slide. When you present your slides, your speaker notes show in a separate window.
Google, Google Workspace, and related marks and logos are trademarks of Google LLC. All other company and product names are trademarks of the companies with which they are associated.
Was this helpful?
Learn how to print Learning Center guides, save them as PDFs, or customize them for your organization.
- PRO Courses Guides New Tech Help Pro Expert Videos About wikiHow Pro Upgrade Sign In
- EDIT Edit this Article
- EXPLORE Tech Help Pro About Us Random Article Quizzes Request a New Article Community Dashboard This Or That Game Popular Categories Arts and Entertainment Artwork Books Movies Computers and Electronics Computers Phone Skills Technology Hacks Health Men's Health Mental Health Women's Health Relationships Dating Love Relationship Issues Hobbies and Crafts Crafts Drawing Games Education & Communication Communication Skills Personal Development Studying Personal Care and Style Fashion Hair Care Personal Hygiene Youth Personal Care School Stuff Dating All Categories Arts and Entertainment Finance and Business Home and Garden Relationship Quizzes Cars & Other Vehicles Food and Entertaining Personal Care and Style Sports and Fitness Computers and Electronics Health Pets and Animals Travel Education & Communication Hobbies and Crafts Philosophy and Religion Work World Family Life Holidays and Traditions Relationships Youth
- Browse Articles
- Learn Something New
- Quizzes Hot
- This Or That Game New
- Train Your Brain
- Explore More
- Support wikiHow
- About wikiHow
- Log in / Sign up
- Computers and Electronics
- Website Application Instructions
- Google Applications
How to Print Google Slides with Speaker Notes on PC & Mac
Last Updated: September 27, 2023 Fact Checked
Printing Slides with Notes
Adding notes to slides.
This article was co-authored by wikiHow staff writer, Darlene Antonelli, MA . Darlene Antonelli is a Technology Writer and Editor for wikiHow. Darlene has experience teaching college courses, writing technology-related articles, and working hands-on in the technology field. She earned an MA in Writing from Rowan University in 2012 and wrote her thesis on online communities and the personalities curated in such communities. This article has been fact-checked, ensuring the accuracy of any cited facts and confirming the authority of its sources. This article has been viewed 13,304 times. Learn more...
When you print a Google Slides presentation, it's easy to add your speaker notes to each slide's printed page. Printing Google Slides with notes can come in handy when you want to provide more context on audience handouts or just have a physical version of your own speaker notes. Whether you're using Windows or a Mac, you can print slides with notes easily, although you won't find the option on Android or iOS. This wikiHow article teaches you how to print Google Slides with notes on your computer.
Things You Should Know
- Print your speaker notes with your Google Slides in "File > Print preview > 1 slide with notes > Print."
- You can also opt to skip printing slides that don't have notes or hide the background when printing.
- Add speaker notes by clicking in the "Click to add notes" field below the slide.

- You can also click + to create a new presentation .

- If you want to save your slideshow as a PDF, click Download as PDF before continuing.

- Your slideshow will print along with your speaker notes! [2] X Research source

- You can also easily delete slides that you don't want in your presentation by right-clicking the thumbnail preview in the panel on the left and selecting Delete .
Expert Q&A
- You can help your slideshow be even more interactive and entertaining by adding GIFs and videos . Thanks Helpful 0 Not Helpful 0
- If you're intending to create a slideshow specifically for phone or tablet screens, you can change the orientation of your slides to make them vertical instead of horizontal. Thanks Helpful 0 Not Helpful 0
You Might Also Like

- ↑ https://support.google.com/docs/answer/143346?hl=en&co=GENIE.Platform%3DDesktop#zippy=%2Cprint-a-presentation
- ↑ https://support.google.com/docs/thread/31643428/how-do-i-print-slide-showing-speaker-notes?hl=en
About This Article

- Send fan mail to authors
Is this article up to date?

Featured Articles

Trending Articles

Watch Articles

- Terms of Use
- Privacy Policy
- Do Not Sell or Share My Info
- Not Selling Info
wikiHow Tech Help:
Tech troubles got you down? We've got the tips you need
How do you see speaker notes when presenting on google slides
Enhance your Google Slides presentation by discovering how to view speaker notes during your delivery.
Sanskar Tiwari
Step 1: Open Your Google Slides Presentation

Step 2: Locate the Speaker Notes Text Field

Step 3: Show Speaker Notes (If Necessary)

Step 4: Write Your Speaker Notes

Conclusion:
Frequently asked questions:, have a look @these info blogs:.
- How To Mirror Images In Powerpoint: https://www.magicslides.app/blog/How-to-mirror-images-in-powerpoint
- How To Add Gif In Google Slides: https://www.magicslides.app/blog/How-to-add-gif-in-google-slides
- How To Turn A Powerpoint Into Google Slides: https://www.magicslides.app/blog/How-to-turn-a-powerpoint-into-google-slides
- How To Group Objects In Powerpoint: https://www.magicslides.app/blog/How-to-group-objects-in-powerpoint
Related Blogs
How to summarize blog posts text into visual slideshows, how to create concise presentations from lengthy articles: a step-by-step guide, how to quickly summarize meeting agendas for ppt presentations, how to group different objects together in google slides, how to convert selected text to capitals in google slides, how to convert pdf report to powerpoint presentation, how to convert pdf lecture notes to powerpoint, how to extract webinar highlights from youtube to powerpoint for quick references, how to create language learning materials by converting youtube videos to powerpoint slides, stunning presentations in seconds with ai.
Install MagicSlides app now and start creating beautiful presentations. It's free!

~1M Installs, rated 4.5/5 ⭐️ by 424 reviews
- Tech Gift Ideas for Mom
- Hot Tech Deals at Target Right Now
How to Print Google Slides With Notes
Prep for a presentation with speaker notes
:max_bytes(150000):strip_icc():format(webp)/Lifewire_Molly-McLaughlin_webOG-327b0af1832c48a6b565fb20f3a87090.jpg "google slides presentation with notes")
What to Know
- Open a presentation and select File > Print settings and preview . Open the drop-down menu and choose 1 slide with notes .
- Save your presentation as a PDF or print it.
- To add notes to slides, open a presentation and select Click to add speaker notes .
If you want a hard copy of a Google Slides presentation for you and other participants, print it with speaker notes or without. Here's how to do it, plus how to add speaker notes. These instructions apply to the desktop version of Google Slides on a Mac or Windows computer. You can print Google Slides from an Android or iOS app, but you can't print slides with notes or print multiple slides per page.
How to Print Google Slides
You can print Google Slides with speaker notes, one to a page, so you can read them away from a computer. Another reason to print slides is to provide handouts at an event. You can fit up to nine slides per page to save paper. These options are in the print and preview settings in Google Slides. Here’s how to print Google Slides with speaker notes.
Go to slides.google.com and open a presentation.
Click File.
Scroll to the bottom of the menu.
Select Print settings and preview .
Click the down arrow next to 1 slide with notes to access the drop-down menu. Select 1 slide with notes . (This option prints out one slide per page with your notes.)
Other options include hiding the background (to save ink) and including skipped slides (those that you've left blank.)
To save your presentation as a PDF file, click Download as PDF .
Otherwise, click Print . Choose the pages you want to print (if not all of them), how many copies you want, and the color settings. You can also print double-sided and change the paper size if necessary.
Click Print again.
How to Add Notes to Google Slides
Adding notes to Google Slides is a good way to sum up each of your slides to keep them from being too text-heavy and keep participants engaged. It's easy to add and delete notes in Google Slides.
Go to slides.google.com and open a presentation.
At the bottom of any slide, select Click to add speaker notes .
Type your notes and then click elsewhere in the presentation to save them.
To delete the notes, simply highlight them and press the Delete key or right-click and select Delete on a Windows computer.
Get the Latest Tech News Delivered Every Day
- How to Print PowerPoint Slides With Notes
- How to Print PowerPoint Slides
- How to Use Google Duet in Slides
- Different Ways to View Slides in PowerPoint
- How to Use Speaker Notes in PowerPoint
- How to Print From a Samsung Tablet
- The 8 Best Google Drive Add-ons for 2024
- How to Print Multiple Slides on One Page in PowerPoint
- How to Link Slides in Google Slides
- How to Use Google Slides to Make a Presentation
- 9 PowerPoint Presentation Tips for Students
- Converting PowerPoint Slides to Word Documents
- Converting PowerPoint Presentations to Word Documents
- How to Add a Border in Google Slides
- How to Make Google Slides Portrait
- How to Insert a GIF Into Google Slides
[SOLVED!!] How to Use Google Slides Speaker Notes on Zoom?
By: Author Shrot Katewa
![[SOLVED!!] How to Use Google Slides Speaker Notes on Zoom?](https://artofpresentations.com/wp-content/uploads/2020/09/Featured-Image-How-to-Use-Google-Slides-Speaker-Notes-on-Zoom-light.jpg "google slides presentation with notes")
Presentations can get quite lengthy, and it’s hard to remember everything, no matter how well you prepare for it! This is where speaker notes are really helpful! They help you highlight and remember the important points you want to discuss and also stay on track in case you lose your chain of thought. But, how does one use Google Slides Speaker notes on Zoom?
To use Google Slides Speaker Notes on Zoom, click on the down arrow on the ‘Present’ button. Then, from the dropdown, select ‘Presenter View’. Google Slides will display your presentation and show notes in separate windows. Now, select ‘Share Screen’ on Zoom, and pick the window with your full-screen presentation.
Zoom is a very effective tool for video conferencing, as well as giving presentations to a large number of people, or taking a class. Since the pandemic, it has become quite relevant to us. Although many of us are accustomed to giving presentations, we seldom use Zoom.
If you’re here then chances are you’re struggling with using the speaker’s notes while giving a presentation through zoom.
In this article, you’ll learn how to use Google Slides Speaker Notes on Zoom. We’ll answer everything you need to know about speaker notes and how to use them on your Zoom account easily.
A Quick Note Before We Begin – if you want to make jaw-dropping presentations, I would recommend using one of these Presentation Designs . The best part is – it is only $16.5 a month, but you get to download and use as many presentation designs as you like! I personally use it from time-to-time, and it makes my task of making beautiful presentations really quick and easy!
How to Use Google Slides Speaker Notes on Zoom?
To use Google Slides on your Zoom account, you need a have your presentation created in Google Slides.
A good part about Zoom is that it lets you select what you want to share on your screen. You can either share your entire screen, or just one window.
There are a couple of different methods that you can use to see the speaker notes from Google Slides while giving the presentation via Zoom.
If you have only one screen, go with the single screen setup described below. However, if you have a spare screen handy, or if you need more than one screen, go for the dual-screen setup.
Method 1 – Single Screen Setup
Most of us have only 1 screen accessible and attached to our computer. Thus, this method is perhaps going to be applicable to most of you.
To set up your Google Slides presentation with Speaker Notes in a single screen, the steps are given below –
Step 1 – Prepare Your Google Slides for Presentation
The first steps is to make sure that your presentation is complete and ready to be shared with your audience.
Also make sure that you have your notes present in the notes section. Otherwise, even you will not be able to see the notes despite following the remaining of the steps mentioned below –
Step 2 – Enable the Presenter View
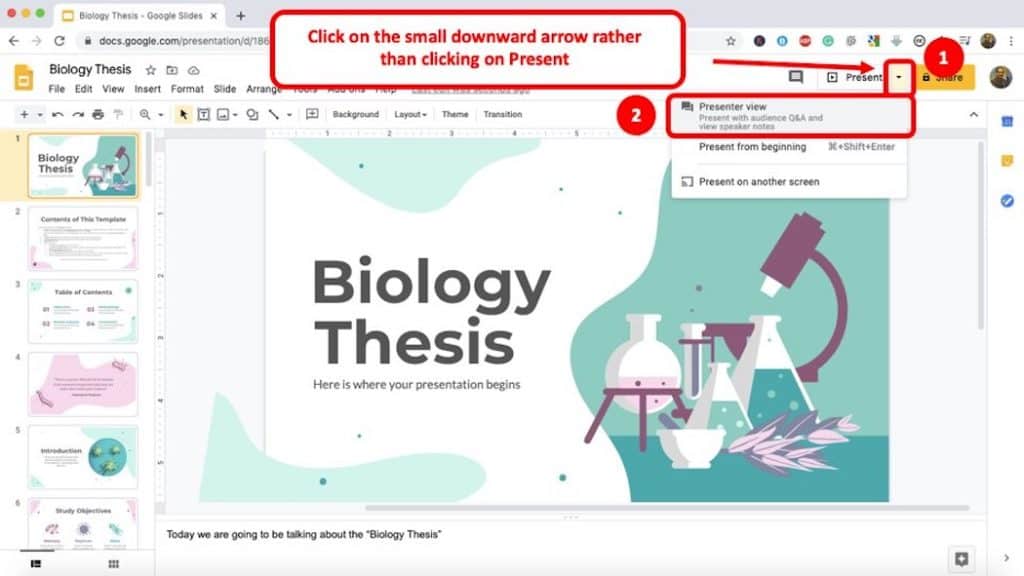
Go to the first slide of your presentation, and at the top right corner of your screen, try and locate “Present”.
You’ll see a downward facing arrow right next to “Present” . Click on it. A dropdown will appear. Choose “Presenter View” from the dropdown .
Step 2 – Adjust the Presentation to See the Notes
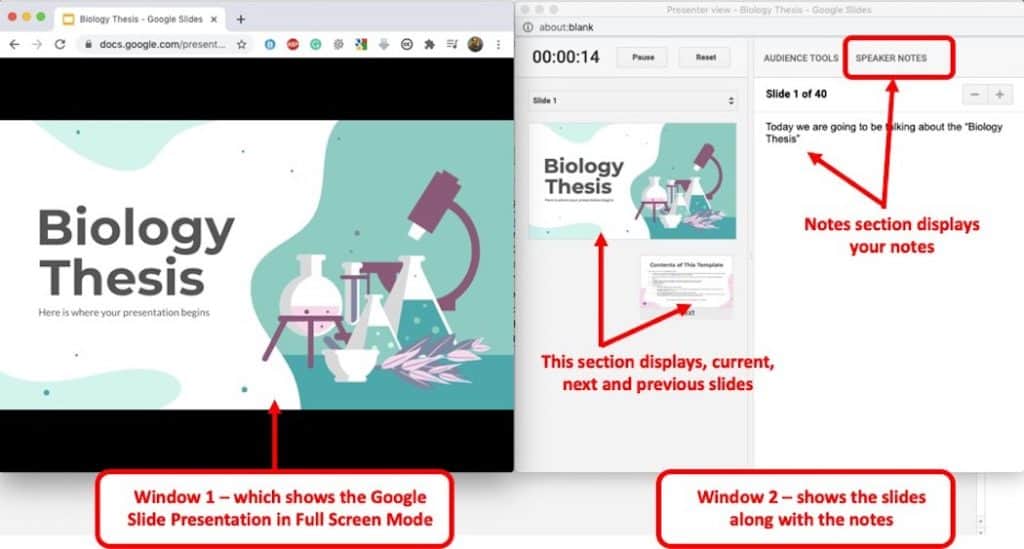
As soon as you click on the “Presenter View” option, you will notice that a new window pop-ups. Furthermore, the browser containing your Google Slides will now be visible in full-screen mode.
Adjust both the window in such a manner that you are able to see both the presentation as well as the notes section.
Step 3 – Share your Screen on Zoom
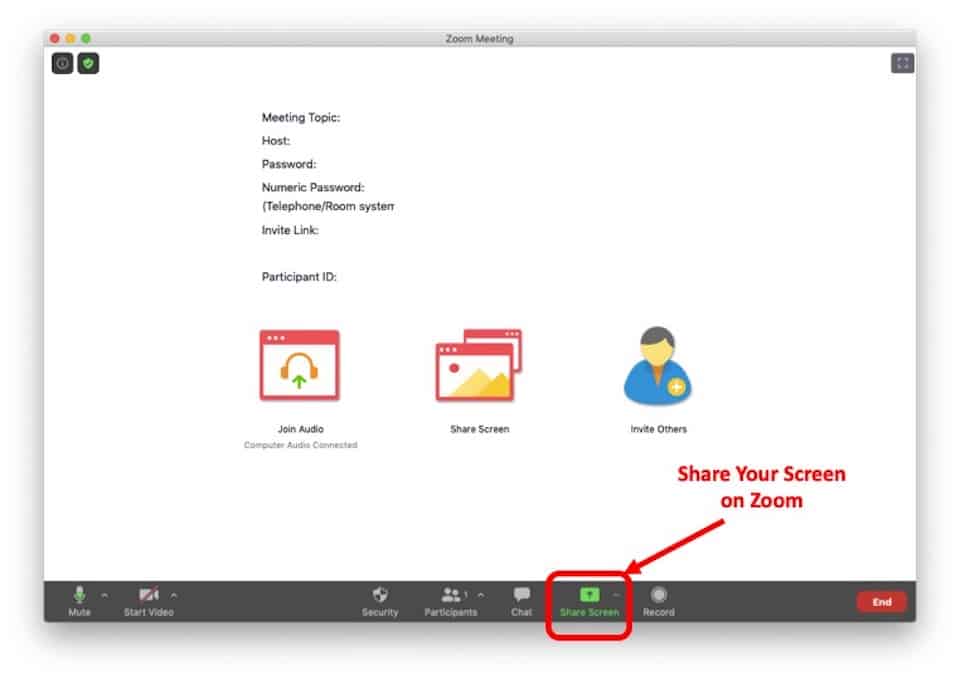
Once you’ve setup your browser window and setup the screen, it is now time to share your screen.
To do that, go to the Zoom application, and click on “Share Screen” option in the bottom panel of the window (as indicated in the image above).
Zoom will then prompt you with several options to choose in order to share your screen.
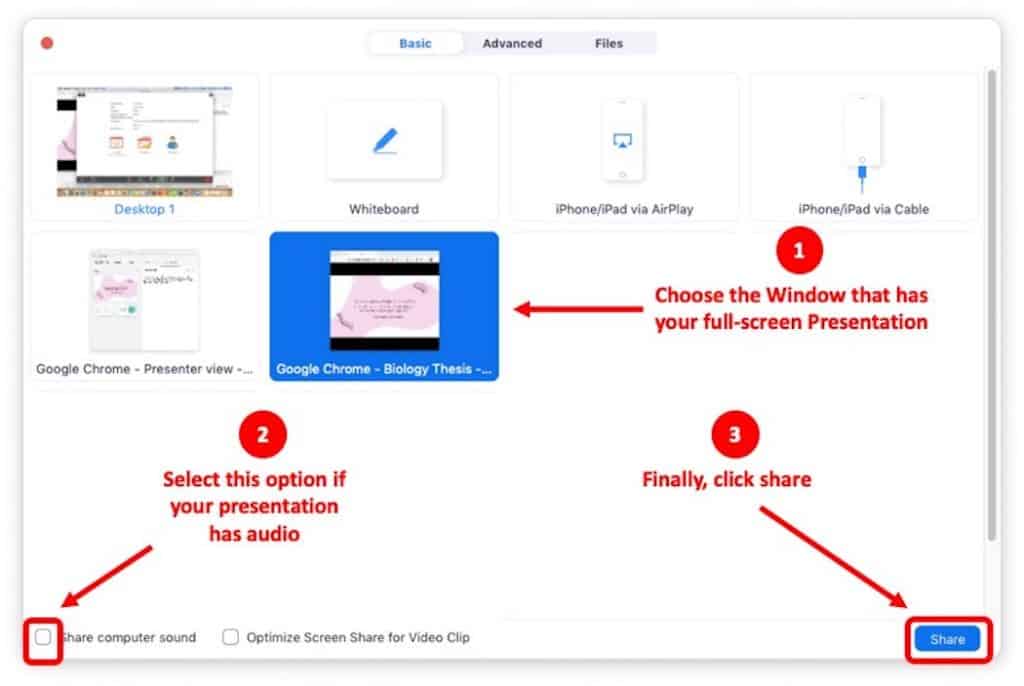
In the next step, you want to make sure that you don’t choose to share your Desktop. Instead, locate the Browser Window containing your full screen presentation view (as indicated by the image above).
If your presentation has audio or video with sound, make sure you check the “ Share Computer Sound ” option.
Finally click “ Share “.
Lastly, just double-check that you have the correct window selected for your Zoom call. An easy way to do that is to see if there is a green border around the window with your presentation.
If there is a green border, this indicates that the specific window is being shared with other participants of the Zoom call.
You can now deliver your presentation without any hesitation!
Method 2 – Dual Screen Setup
It is highly unlikely that you have two screens for the same computer. Nevertheless, if you do have more than one screen, then this method is for you.
It is easier to deliver a Google Slides presentations with notes on a Zoom call when you have more than one screen. You can simply display the notes on another screen and use Zoom to display just the presentation.
Here are the detailed steps involved. For the sake of brevity, I’ll not be sharing any screenshots, but the steps are simple and straightforward so that you can follow along –
- On your computer, first enable the dual-screen settings.
- Open your Google Slides Presentation.
- Click on the Speaker Notes button. When the Speaker Notes appear, put them on your secondary screen and enable full screen for your slides.
- Open your Zoom account.
- Enable screen share, and select your primary screen with the slides. In this way, you can view your slides in full screen, and your audience won’t be able to see the Speaker Notes.
- Lastly, deliver your presentation with confidence!
What Are Speaker Notes in Google Slides?
If you want any extra notes to attach to the presentation slides that only you can see, to help yourself to remember important key points during a presentation, there’s an option called Speaker Notes. It’s available on both Microsoft PowerPoint and Google Slides.
Speaker notes are very helpful. They help you –
- Remember the important key points during a presentation.
- Keep your chain of thought intact during delivering a presentation.
- Build a clear structure in your head.
How to Add Speaker Notes in Google Slides?
Adding speaker notes to your Google Slides is rather easy. The steps are given below –
- Open a blank presentation in Google Slides
- Open a slide. At the bottom of your screen, you’ll find a box that says ‘Click to add speaker notes’. Click on it.
- If you can’t find this box, go to the upper left part of the menu bar, and click ‘View’ → ‘Show Speaker Notes’. Whatever you add in this box will be visible to only you. Your audience won’t be able to see it.
- Now, as you slide through your presentation, you’ll see individual speaker notes attached to every single slide. If you haven’t added a speaker note to a particular slide, the box under the slide will appear empty.
How to Share Google Slides on Zoom Using iPad?
You can easily deliver your Google Slides presentation from your iPad too. However, it may be slightly different than using it on a web browser.
The steps to share Google Slides presentation on Zoom using an iPad are given below –
- Download both Google Drive and Google Slides on your iPad from Apple Store.
- Open the Zoom app on your iPad.
- Sign-in into your Zoom account, and select the “ New Meeting ” button.
- Use your personal meeting ID, and then tap on “ Start A Meeting “
- This will enable your iPad camera. Go to the middle of the menu and click on Share Content.
- Select Screen.
- Go to Google Slides to open your presentation. You should store your presentation in Google drive, that way it is easier to navigate.
- Click on Presenter View.
- Deliver your presentation.
How to Hide Speaker Notes in Google Slides?
If you feel like you don’t need to or want to view the Speaker Notes, you can simply hide them. The steps are given below –
- Open your presentation on Google Slides.
- Go to the upper left part of the menu bar and click ‘View’ → ‘Hide Speaker Notes’.
- The slides will no longer show the speaker notes attached to them. It doesn’t mean the notes are gone or deleted. They’re simply hidden.
What is Google Slides Presenter View?
Google Slides has different presentation modes that enable you to easily deliver your presentation. One of them is the Presenter View.
The Presenter View in Google Slides allows you to showcase just the presentation to your audience while giving you the flexibility to view the notes as well as the current, previous and upcoming slides so that you can plan the choice of words appropriately for your presentation.
The Presenter View is there to help you easily move through your presentation and improve your overall experience.
Enabling the Presenter view is easy. The steps are given below –
- Open your presentation in Google Slides.
- Go to the top right corner of the window. You’ll find a small box ‘Present’. Next to it, click the Down arrow.
- Click Presenter View
Presenter View has various options. Let’s learn a bit about them.
- Previous Slide, Play, and Next Slide: These buttons will help you maneuver your presentation. The previous button allows you to go one slide back, and the next button goes one slide forward. The play button allows you to advance through the slides without any manual direction. The slides move every 2 seconds. You can change this setting from the “Settings” button.
- List of Slides: This list will show you an overview of all the slides of your presentation. You can select any slide from here with a single click.
- Q&A: There is an option called the Audience Q&A. It allows you to take questions from your audience. You can open a question panel by clicking this button.
- Speaker Notes: This button enables you to view the speaker notes. By clicking this button, you will exit full screen mode. To go back to full screen, press Ctrl + Shift + F or click the ‘Full screen’ button.
- Pointer: This is like an arrow, but you can use it to point out any element of your slides or presentation. It’s a helpful tool to make the slides easier to understand for your audience. Just click on the Pointer button to enable this.
- Captions: If you want to add captions to your slides, you can simply click this button. It will enable you to add specific captions to individual slides. You can easily make them appear or disappear by clicking this button, or a connected remote.
- Tips: This button is strictly for your help, in case you can’t remember a command, it will show you shortcuts.
- Full Screen: Click this button to go to full screen or minimize your screen, in case you want to view something else or open another window.
- Settings: This button will help you adjust any matter, such as opening the speaker notes, or downloading the presentation.
- Exit: Click exit to finish the presentation or press ‘Esc’ on your keyboard.
Final Thoughts
Google Slides can be a magical tool to deliver presentations. And with the help of Zoom, you can easily share it with a large number of people. Navigating through a presentation has never been so easy, with the help of Speaker Notes. It’s wonderful how the world can stay connected with the help of technology.
In this age of Corona, it is imperative to stay connected. I hope this article has been helpful in answering your questions, and helped you understand how to use Google Slides Speaker Notes on Zoom. Thank you.
How To Download Google Slides As PDF With Speaker Notes

- How-To Guides
- Software Tutorials

Introduction
Welcome to this step-by-step tutorial on how to download Google Slides as a PDF document with speaker notes. Google Slides is a powerful tool for creating visually stunning presentations, and sometimes it becomes necessary to share these presentations with others in a more accessible format. By converting your Google Slides into a PDF, you can ensure that your audience can view your presentation on any device without the need for specialized software.
Speaker notes are a crucial part of any presentation, as they allow presenters to include additional information, talking points, or reminders for each slide. When you download your Google Slides as a PDF, enabling the speaker notes allows you to have a comprehensive document that includes both the slides and accompanying notes.
While the process may seem daunting at first, it’s actually quite straightforward. In just a few simple steps, you’ll be able to download your Google Slides as a PDF document that includes your speaker notes. Whether you need to share it with colleagues, clients, or students, this guide will walk you through the process, ensuring that you have a clear understanding of each step.
Before we dive into the details, it’s important to note that this tutorial assumes you have a Google account and have already created a presentation using Google Slides. If you haven’t done so already, make sure to create and customize your presentation before following along with this guide.
So, without further ado, let’s get started on downloading Google Slides as a PDF with speaker notes. Follow the step-by-step instructions below, and in no time, you’ll have a PDF document that includes all your slides as well as valuable speaker notes.
Step 1: Open Google Slides
The first step in downloading Google Slides as a PDF document with speaker notes is to open Google Slides. You can do this by going to the Google homepage and signing in to your Google account. Once you’re signed in, click on the “Google Apps” icon in the top-right corner of the screen, and then click on “Slides” from the dropdown menu.
If you have previously created presentations, you will see them listed on the main Google Slides page. If you want to start a new presentation, simply click on the “+ Blank” button in the top-left corner of the screen.
Google Slides offers a wide range of templates to choose from if you don’t want to start from scratch. To access these templates, click on the “Template Gallery” button in the top-right corner of the screen. From there, you can browse through various categories and select a template that suits your needs.
Once you have opened Google Slides and either selected a template or started a new blank presentation, you are ready to proceed to the next step. Make sure to have all your slides and speaker notes prepared before moving forward.
Remember to save your progress regularly by clicking on the “File” tab in the top-left corner of the screen and selecting “Save” from the dropdown menu. This ensures that you don’t lose any changes or updates made to your presentation.
Step 2: Access File Menu
After opening your Google Slides presentation, the next step is to access the File menu. The File menu contains various options for managing and editing your presentation, including the option to download your slides as a PDF document with speaker notes.
To access the File menu, locate the top-left corner of the screen. You should see a tab labeled “File” with a downward-facing arrow next to it. Click on this tab to open the File menu.
Upon clicking the File tab, you will see a dropdown menu with a range of options. These options allow you to perform various actions on your presentation, such as making a copy, renaming the presentation, sharing it with others, or printing it.
For the purpose of this tutorial, we will focus on the “Download” option within the File menu. This option allows you to download your Google Slides presentation in different formats, including PDF.
Take a moment to familiarize yourself with the other available options in the File menu since they can be useful for managing and formatting your presentation.
It’s worth mentioning that the options available in the File menu may vary slightly based on your device and operating system. However, the basic functionality remains the same, and you should be able to find the relevant options mentioned in this tutorial.
Now that you have accessed the File menu, it’s time to move on to the next step and proceed with downloading your Google Slides presentation as a PDF document with speaker notes.
Step 3: Click Download As
Once you have accessed the File menu in Google Slides, the next step is to click on the “Download” option. This will open a submenu with different file formats that you can choose from to download your presentation.
Locate and click on the “Download” option in the File menu. A new dropdown menu will appear with several file formats to select from, including Microsoft PowerPoint (.pptx), PDF Document (.pdf), and others.
In this step, we will focus on the PDF Document option since it allows us to download our Google Slides presentation in the PDF format that includes speaker notes.
When you click on the “Download” option, a prompt will appear asking you to select the file format for the download. Scroll through the options and select “PDF Document” to proceed. This will initiate the download process.
During the download, Google Slides will convert your presentation into the selected file format (in this case, PDF) and package it for you to download to your device.
Please note that depending on the size and complexity of your presentation, the download process may take a few moments. Be patient and allow Google Slides to complete the conversion before moving on to the next step.
Now that you have clicked on the “Download” option and selected the PDF Document format, let’s move on to the next step to enable speaker notes in your downloaded PDF.
Step 4: Choose PDF Document
After clicking on the “Download” option in the File menu, you will see a dropdown menu with various file formats to choose from. In this step, we will focus on selecting the PDF Document format to download your Google Slides presentation.
Scroll through the available options in the dropdown menu until you find “PDF Document” or a similar option related to PDF. Click on this option to select it as the desired format for your download.
Choosing the PDF Document format allows you to download your Google Slides presentation as a PDF file, which is widely supported and easy to share with others. Additionally, it enables the inclusion of speaker notes in the downloaded PDF.
Once you have selected the PDF Document format, Google Slides will initiate the conversion process. This process involves transforming your presentation into a PDF file, preserving the layout, formatting, and speaker notes.
Please note that the time it takes to convert your presentation into a PDF format may vary depending on the size and complexity of your slides. Larger presentations with multiple slides and extensive speaker notes may take longer to convert than smaller ones.
While the conversion process is taking place, make sure to stay connected to the internet and avoid closing the Google Slides window or interrupting the download process. It’s important to allow Google Slides to complete the conversion successfully.
Now that you have chosen the PDF Document format, let’s proceed to the next step to enable the inclusion of speaker notes in the downloaded PDF of your Google Slides presentation.
Step 5: Enable “Publish notes on the web” option
Enabling the “Publish notes on the web” option is crucial if you want to include your speaker notes in the downloaded PDF of your Google Slides presentation. This option allows Google Slides to publish your speaker notes along with the slides, ensuring that they are accessible in the PDF format.
To enable the “Publish notes on the web” option, follow these steps:
- Click on the “File” tab in the top-left corner of the Google Slides window.
- In the dropdown menu, click on “Publish to the web”.
- A dialog box will appear with publishing options. Select the “Embed” tab.
- Under the “Publish content” section, check the box next to “Notes” to enable the publishing of speaker notes.
- Make sure that the “Auto-advance slides” option is set to “Off” unless you want the slides to advance automatically.
- Review the other available options to customize the publishing settings based on your preferences.
- Once you’re satisfied with the settings, click on the “Publish” button.
- A URL will be generated. Copy this URL and save it for later reference.
Enabling the “Publish notes on the web” option allows Google Slides to include your speaker notes in the PDF download. These notes will appear below each slide in the downloaded PDF, providing additional information and context.
Keep in mind that when you enable the “Publish notes on the web” option, you are essentially making your speaker notes accessible to anyone who has the link to the published web version. If you don’t want to share your speaker notes publicly, make sure to keep the published URL private.
Now that you have enabled the “Publish notes on the web” option, it’s time to move on to the final step of downloading your Google Slides presentation as a PDF with speaker notes.
Step 6: Download PDF with Speaker Notes
With all the necessary settings in place, you are now ready to download your Google Slides presentation as a PDF document with speaker notes. By following this final step, you’ll have a comprehensive PDF file that includes your slides along with the accompanying speaker notes.
To download the PDF with speaker notes, follow these steps:
- Return to your Google Slides presentation.
- Click on the “File” tab in the top-left corner of the screen.
- In the dropdown menu, click on the “Download” option.
- From the submenu that appears, select “PDF Document”.
- Google Slides will convert your presentation into a PDF file with the speaker notes included.
- The download process will begin, and the PDF file will be saved to your device.
- Once the download is complete, navigate to the location where the PDF was saved.
- Open the PDF file to verify that it contains your slides and speaker notes.
Congratulations! You have successfully downloaded your Google Slides presentation as a PDF document with speaker notes. You now have a portable and shareable file that can be accessed on any device without the need for specialized software.
Take a moment to review the PDF file to ensure that all your slides and speaker notes are accurately reflected. Make any necessary adjustments or corrections if needed.
By following these six steps, you can download your Google Slides presentation as a PDF with speaker notes to enhance its accessibility and provide valuable information to your audience. Whether you need to share it with colleagues, clients, or students, this method ensures that your presentation is comprehensive and ready to be delivered.
Now that you have the PDF file with speaker notes, you can easily distribute it through email, file-sharing platforms, or even upload it to your website or learning management system.
Downloading your Google Slides presentation as a PDF document with speaker notes provides a convenient way to share your slides and additional information with others. By following the step-by-step instructions outlined in this tutorial, you can easily convert your presentation into a PDF file that includes all the slides and speaker notes.
Throughout this guide, we have covered the essential steps required to download Google Slides as a PDF with speaker notes :
- Open Google Slides and access your presentation.
- Access the File menu to view available options.
- Click on “Download” to choose the PDF Document format.
- Enable the “Publish notes on the web” option to include speaker notes.
- Finally, download the PDF with speaker notes.
By following these steps, you can ensure that your audience has access to your slides, as well as the additional context and information provided through the speaker notes.
Remember to save your progress regularly and review the downloaded PDF to verify its accuracy. Adjustments can be made within Google Slides before downloading again if necessary.
Now that you have successfully created a PDF version of your Google Slides presentation with speaker notes, you can easily distribute it to colleagues, clients, or students. Whether it’s for sharing during a meeting, presenting to a remote audience, or providing study materials, the PDF format allows for easy access and compatibility on various devices.
Continue exploring the features and possibilities within Google Slides to enhance your presentations and engage your audience. With its intuitive interface and powerful tools, Google Slides offers a versatile platform for creating visually stunning slideshows.
Thank you for following this tutorial. We hope it has been helpful in guiding you through the process of downloading Google Slides as a PDF with speaker notes. Enjoy sharing your presentations and delivering impactful content!
Leave a Reply Cancel reply
Your email address will not be published. Required fields are marked *
Save my name, email, and website in this browser for the next time I comment.
- Crowdfunding
- Cryptocurrency
- Digital Banking
- Digital Payments
- Investments
- Console Gaming
- Mobile Gaming
- VR/AR Gaming
- Gadget Usage
- Gaming Tips
- Online Safety
- Tech Setup & Troubleshooting
- Buyer’s Guides
- Comparative Analysis
- Gadget Reviews
- Service Reviews
- Software Reviews
- Mobile Devices
- PCs & Laptops
- Smart Home Gadgets
- Content Creation Tools
- Digital Photography
- Video & Music Streaming
- Online Security
- Online Services
- Web Hosting
- WiFi & Ethernet
- Browsers & Extensions
- Communication Platforms
- Operating Systems
- Productivity Tools
- AI & Machine Learning
- Cybersecurity
- Emerging Tech
- IoT & Smart Devices
- Virtual & Augmented Reality
- Latest News
- AI Developments
- Fintech Updates
- Gaming News
- New Product Launches
- AI Writing How Its Changing the Way We Create Content
- How to Find the Best Midjourney Alternative in 2024 A Guide to AI Anime Generators
Related Post
Ai writing: how it’s changing the way we create content, unleashing young geniuses: how lingokids makes learning a blast, 10 best ai math solvers for instant homework solutions, 10 best ai homework helper tools to get instant homework help, 10 best ai humanizers to humanize ai text with ease, sla network: benefits, advantages, satisfaction of both parties to the contract, related posts.

How To Download Google Slides With Speaker Notes

How To Download A Google Slide As A PDF

How To Download A Picture From Google Slides

How To Download Slides From Google Slides

How To View Slides Without A Projector

Google Unveils New AI-Powered Features For Education At Bett Ed-Tech Event

How To Download Slideshare PPT

How To Download A Google Doc To Your IPhone
Recent stories.

How to Find the Best Midjourney Alternative in 2024: A Guide to AI Anime Generators

How to Know When it’s the Right Time to Buy Bitcoin

How to Sell Counter-Strike 2 Skins Instantly? A Comprehensive Guide

10 Proven Ways For Online Gamers To Avoid Cyber Attacks And Scams

- Privacy Overview
- Strictly Necessary Cookies
This website uses cookies so that we can provide you with the best user experience possible. Cookie information is stored in your browser and performs functions such as recognising you when you return to our website and helping our team to understand which sections of the website you find most interesting and useful.
Strictly Necessary Cookie should be enabled at all times so that we can save your preferences for cookie settings.
If you disable this cookie, we will not be able to save your preferences. This means that every time you visit this website you will need to enable or disable cookies again.

Google Slides: How to draw on your presentations
Google Slides has features like a digital pen, speaker notes, and autoplay that help you create impressive presentations. It works flawlessly on any device, including Android phones, iPhones, laptops, Macs, PCs, and affordable Chromebooks . One feature that's often overlooked is the drawing option. If you like to sketch, add a unique twist to your slides. It's a fun way to create a visually pleasing presentation. This tutorial shows you how to draw on Google Slides and spruce up your presentations.
When should you use the drawing feature in Google Slides?
There are no rules for drawing on Google Slides if it's an informal presentation for friends or classmates. But exercise restraint if you're making a slideshow for the office or school. You can add annotations, diagrams, and handwritten notes for workplace presentations.
How to add a hanging indent in your Google Slides presentation
How to draw on google slides using the scribble tool.
Google Slides has several shapes and lines in the Insert menu, but that might not be enough for the image you want to create. You can use the Scribble tool to make freehand drawings.
The Scribble feature is unavailable on the mobile app. You can only access basic shapes and lines. Your only option is to create the presentation on the desktop version of Google Slides.
Here's how to draw on Google Slides with the Scribble option:
- Open Google Slides and log in to your account.
- Choose a new slide.
- Click Insert from the toolbar.
- Choose Line .
- Select Scribble from the drop-down menu.
- You'll see a plus sign as your cursor.
- Hold the left mouse button until you finish drawing.
The drawing is selected after you let go of the left mouse button. The toolbar displays customization options, allowing you to modify the line color and weight. You can also change the start and end points.
Go to Format > Format options to change the size and position. You can also add drop shadows and reflections to your drawings. Google Slides doesn't offer a fill option. However, you can fill shapes with color.
How to insert Google Drawings in Slides
Google Drawings is a simple drawing tool for creating illustrations. It gives you a checkered drawing board to doodle on. You can import the final image to other apps like Google Slides after you finish drawing.
Here's how to make a drawing:
- Open Google Drive and click New in the upper-left corner of the screen.
- Select More from the drop-down menu and choose Google Drawings .
- Click Insert and select Shape . Choose any shape you want.
- Other options include Table , Chart , Diagram , and Word Art .
- You can add your drawing by navigating to Insert > Line > Scribble .
- After you complete your drawing, click File and choose Share .
- Click Publish to the web .
- Select your image size and click Publish .
- Copy the link.
Here's how to use the drawing in Google Slides:
- Open Google Slides .
- Click Insert .
- Choose Image and select By URL .
- Paste the link and click Insert Image .
Google Drawing is only available on the web. It doesn't have Android or iOS app versions.
How to draw on Google Slides with the Annotate extension
You can use the Annotate Chrome extension to draw on Google Slides. Here's how to add and pin the extension:
- Open Google Chrome and visit the Chrome Web Store .
- Type Annotate in the search bar.
- Select Find Annotate: Web Annotations with Screen Sharing .
- Click the Add to Chrome button.
- Click Add extension .
- After installation is complete, pin the extension so that it's easily accessible.
- Click the puzzle piece button at the top of the screen.
- Click Pin next to the extension name.
Here's how to use the Annotate extension:
- Go to your Google Slides tab and click the Annotate extension in the upper-right corner.
- Register for a free Annotate account and click Show annotation toolbar in Google Slides.
- Click the Pen button and choose a color.
- Press and hold the left mouse button until you finish drawing.
- The drawing remains on the original slide even if you go to a new one.
- Save your drawing. Go to the Annotate toolbar and click the save icon (shown as a floppy disk).
- Click Save .
What's the difference between Google Slides templates and themes?
Your annotations appear in your Annotate account under Web Annotations . Don't be alarmed when your drawing disappears if you navigate away from your slide and return. Click Load previous annotations to view your drawings. Although you can't see it in the left sidebar, the drawing appears when you present your slideshow.
Add some quirkiness to make your Google Slides presentations stand out
The tips in the guide should help you include your drawings in your Google Slides presentations and make them unique. Add more flair to your slideshows by adding sound effects, voiceovers, and other audio clips . If you're short on time yet want to impress your audience, try these beautiful Google Slides templates to create professional-looking slideshows in a jiffy.

IMAGES
VIDEO
COMMENTS
Double-click the three dots at the bottom of the Google Slides window. Drag up using the three dots at the bottom to resize the Speaker Notes section as you please. Click View > Show Speaker Notes in the menu to select it. Once you have the Speaker Notes area displayed below your slide, you can simply click inside the section to add your notes.
Adding Speaker Notes. Open your presentation in Google Slides. At the bottom of the screen there's a text field with the message "Click to add speaker notes". The text that you enter here will be visible for you during your presentation, but not for your audience. Adding speaker notes. If you can't see this text field, click View → ...
Select a slide you'd like to add notes. Locate the Notes pane positioned beneath each slide. You'll find a blank space with the prompt "Click to add speaker notes." Enter your notes there, and you're all set. Remember, you can always edit speaker notes on Google Slides. You only need to click inside the Notes pane to edit the content and click ...
If you click the "Slideshow" button or press Ctrl/Cmd + F5, your presentation will start directly without any speaker notes. This is the most widely used and the simplest option. Next to the "Slideshow" button, there's a drop-down arrow. Click on it to see the different presentation modes: Presenter View.
Giving presentations can be stressful, especially over video chat because you can't see your audience's reactions. Using the speaker notes in Google Slides, ...
Present slideshows with confidence. With easy-to-use presenter view, speaker notes, and live captions, Slides makes presenting your ideas a breeze. You can even present to Google Meet video calls ...
1. Visit Google Slides on the web and sign in using Google account credentials. 2. Open a presentation that you want to edit or add speaker notes to. 3. Choose a slide and click the bottom space that says Click to add speaker notes to add notes. 4.
In this video you will learn how you can create and use speaker notes in Google Slides.00:00 Intro00:09 Add speaker notes01:09 See speaker notes#SpeakerNotes...
You can do this by expanding the Slideshow option via the arrow button. Select Presenter View to run the presentation with speaker notes. This will open speaker notes alongside your slideshow. The audience will not be able to see your speaker notes. Speaker notes have been a widely used feature in other presentation apps such as PowerPoint.
First, open the Slides app and the presentation you want to work on. Tap on the slide you want to add notes to, then choose Edit slide . Once the slide loads into the edit view, tap on the menu in the upper-right corner, then choose Show speaker notes. You'll then see a Tap to add speaker notes subwindow appear at the bottom of the screen.
Step 3: Select "Show speaker notes". In the dropdown menu under "View," select "Show speaker notes.". By doing so, you'll activate the speaker notes pane, which typically appears at the bottom of your presentation window. You can now see the notes you've prepared for each slide.
On your browser, open a presentation in Google Slides. At the top right corner, click Slideshow . At the bottom left, click Options Enable pen tool. To draw or annotate, click and drag on your slide. Optional: To change the pen color, at the bottom, click Pen tool Select a color. To erase annotations on the current slide, at the bottom, click ...
Step 2: Edit and format a presentation. You can add, edit, or format text, images, or videos in a presentation. Insert and arrange text, shapes, and lines; Add, delete & organize slides; Add animations to a slide; Step 3: Share & work with others. You can share files and folders with people and choose whether they can view, edit, or comment on ...
Select "Present a Tab" in Meet > choose a Google Slide presentation > click the speaker notes button in the controls at the bottom corner of the presentation. Visit the Help Center to learn more about controlling Slides presentations in Google Meet.
Rename your presentation—Click Untitled presentation and enter a new name.. Add images—Click Insert Image to add images from your computer, the web, Google Drive, and more. You can also move, delete, or resize images. Add text—Click Insert Text box to add new text boxes. Then, click a text box to enter text. You can move, delete, or re-size text boxes.
When you print a Google Slides presentation, it's easy to add your speaker notes to each slide's printed page. Printing Google Slides with notes can come in handy when you want to provide more context on audience handouts or just have a physical version of your own speaker notes.
Step 2: Locate the Speaker Notes Text Field. At the bottom of your screen, you'll find a text field with a prompt: "Click to add speaker notes." This field is where you'll input your valuable speaker notes. This information is for your eyes only and won't be visible to the audience during the presentation.
Go to slides.google.com and open a presentation. Click File. Scroll to the bottom of the menu. Select Print settings and preview . Click the down arrow next to 1 slide with notes to access the drop-down menu. Select 1 slide with notes. (This option prints out one slide per page with your notes.)
Follow the steps below to download your presentation as a PDF with speaker notes: Open your Google Slides presentation in your web browser. Click on the "File" menu at the top left corner of the screen. From the drop-down menu, select the "Download" option, then choose "PDF Document (.pdf)" as the file format.
To use Google Slides Speaker Notes on Zoom, click on the down arrow on the 'Present' button. Then, from the dropdown, select 'Presenter View'. Google Slides will display your presentation and show notes in separate windows. Now, select 'Share Screen' on Zoom, and pick the window with your full-screen presentation.
To download the PDF with speaker notes, follow these steps: Return to your Google Slides presentation. Click on the "File" tab in the top-left corner of the screen. In the dropdown menu, click on the "Download" option. From the submenu that appears, select "PDF Document".
Is there a good way to export the speaker notes out of a presentation in Google Slides and keep the formatting? The things I tried are. Printing—this works fine only if the notes are short. Longer text is being cut off. ... @SightSpirit your edit is fine; though, the google-slides UI literally says (for me) "1 slide without notes", and this ...
Google Slides has features like a digital pen, speaker notes, and autoplay that help you create impressive presentations. It works flawlessly on any device, including Android phones, iPhones ...