Product Area
Feature impact.

- Get Started
- Equivalent Features in Flows and Workflow Rules
- Browser Requirements
- Use the Migrate to Flow Tool
- Planning Your Switch to Flow Builder
- Migrate to Flow Tool Considerations
- Sample Workflow Rule Migration
- Flow Builder Tour
- Building Blocks
- Flow Trigger Explorer
- Schedule Triggers
- Record Triggers
- Trigger Run Order Guidelines
- Scheduled Paths
- Data Cloud Triggers
- Example of Field Generation Flow
- Example of Sales Email Flow
- API Version for Running a Flow
- Flows in Slack
- Override Finish Behavior
- Transactions
- Bulkification
- Apex-Defined Data Type
- Best Practices
- Add and Edit Elements in Auto-Layout
- Add and Edit Elements in Free-Form
- Define Conditions
- Flow Formula Builder
- Save a Draft of Your Flow as You Build
- Connect Nonconsecutive Elements in Auto-Layout
- Route a Flow in Free-Form
- Default Error Handling
- Send Yourself an Email
- Customize the Error Message
- Other Examples
- HTTP Callout Considerations
- Guidelines for Authenticating HTTP Callout Actions
- Configure an HTTP Callout Action
- Update an Existing HTTP Callout Action (Beta)
- Change Named Credential (Beta)
- Delete an HTTP Callout Action
- Transform Data
- Generate Flow Choice Options From External Data
- Sum or Count Items in Collections
- Flow Example: Send and Log an Email to a New Contact
- Flow Translation Best Practices
- Use Multilingual Labels in Data Table Column Headers
- Create a Flow to Run in Slack
- Send a Flow to Run in Slack
- Run a Screen Flow from a Button in a Slack View (Beta)
- Run a Screen Flow from a Slack Shortcut (Beta)
- Make a MuleSoft RPA Process Available to Flows
- Invoke a MuleSoft RPA Process in a Flow
- Reactive Screen Flow Components
- Reactive Screen Flow Formula Operators
- Recommendations for Building Reactive Screens
- Flow Example: Calculate a Discount In Real Time
- Apex Actions
- Model JSON Objects with an Apex Class
- Create an Apex Action
- Configure an Apex Action
- Add a Custom Icon to an Apex-Defined Action
- Screen Components
- Local Actions
- Activate or Deactivate a Flow Version
- Limit User Access to Execute Flows
- Change the Flow Run Context
- Lightning Runtime vs. Classic Runtime
- Lightning Page
- Object-Specific Action
- Actions & Recommendations Component
- Utility Bar
- Choose a Runtime Experience
- Control Finish Behavior
- Set Variable Values
- Control Layout
- Custom Lightning Component
- Let Users Pause
- Add Record Context
- Display Interviews by User
- Display Interviews by Record
- Customize Access
- Restrict Who Can Resume
- Delete Interviews
- Lightning Community
- Visualforce Page
- Define Flow Trigger
- Associate Trigger with Workflow Rule
- Lightning Bolt Solutions
- Deploy as Active
- Control Your Views of Flows, Paused Interviews, and Scheduled Actions
- Analyze Flows and Processes (Beta)
- Require Access to Automation Home Charts (Beta)
- Debug a Flow in Flow Builder
- Troubleshooting Flow URLs
- Control Error Email Recipients
- Usage-Based Entitlements
- General Limits
- Per-Transaction Limits
- Flow Builder
- Security Considerations for Flows
- External Object Considerations for Flows
- Which Custom Lightning Component Attribute Types Are Supported in...
- Design Attribute Considerations for Flow Screen and Action Components
- Runtime Considerations for Flows That Include Aura Components
- Considerations for Reactivity in Screen Flows
- Which Fields Are Inaccessible When a Flow Creates or Updates Records?
- Control What Happens When a Flow Tries to Set Values for Read-Only...
- Remove Read-Only Fields from a Record Variable
- Considerations for the Apex-Defined Data Type
- Flow Conditional Visibility Considerations
- Considerations for Flow Choice Components with Default Values
- Flow Variable Considerations
- Multi-Select Components
- Paused Flows
- Two-Column Layout
- Schedule-Triggered Flows
- Record-Triggered Flows
- Flow Data Considerations
- Accessibility
- Considerations for Packaging Flows
- Change Set Considerations for Flows
- Considerations for Flows Installed from Packages
- Considerations for Troubleshooting Flows
- Collection Choice Set
- Global Constants
- Picklist Choice Set
- Record Choice Set
- Breadcrumbs
- Text Template
- Populate a Collection Variable
- Add Prompt Instructions
- Apex Action
- Apex Action (Legacy)
- Collection Filter
- Collection Sort
- Activate Session-Based Permission Set
- Deactivate Session-Based Permission Set
- Einstein Discovery
- Post to Chatter
- Flow Core Action: Prompt Template Actions
- Quick Action
- Create Quip Document
- Create Quip Chat
- Create Quip Folder
- Copy Quip Document
- Copy Quip Content
- Copy with Live Paste
- Attach Quip Document to Record
- Edit Quip Document
- Lock Quip Document
- Lock Quip Section
- Export Quip Document to PDF
- Send Message in Quip Chat
- Send Message in Document
- Add Quip Document to Folder
- Add Members to Document
- Add Members to Quip Chat
- Remove Quip Document from Folder
- Remove Members from Quip Document
- Remove Members from Quip Chat
- Flow Core Action for Checkout Flow: Activate Order
- Flow Core Action for Checkout Flow: Calculate Cart Promotions
- Flow Core Action for Checkout Flow: Calculate Cart Shipment Costs
- Flow Core Action for Checkout Flow: Calculate Cart Taxes
- Flow Core Action for Checkout Flow: Cancel Cart Async Operation
- Flow Core Action for Checkout Flow: Cart to Order
- Flow Core Action for Checkout Flow: Check Cart Inventory
- Flow Core Action for Checkout Flow: Checkout Session Action
- Flow Core Action for Checkout Flow: Price Cart
- Flow Core Action for Checkout Flow: Update Checkout Session Action
- Flow Core Action for Commerce Checkout Flow: Add Cart Item
- Flow Core Action for Commerce Checkout Flow: Create Cart
- Flow Core Action for Commerce Checkout Flow: Delete Cart
- Flow Core Action for Commerce Checkout Flow: Get Cart Items
- Flow Core Action for Commerce Checkout Flow: Get Cart Promotions
- Add Order Item Summary
- Adjust Order Item Summaries Preview
- Adjust Order Item Summaries Submit
- Authorize Payment
- Cancel Fulfillment Order Item
- Cancel Order Item Summaries Preview
- Cancel Order Item Summaries Submit
- Confirm Held Fulfillment Order Capacity
- Create Credit Memo
- Create Fulfillment Order
- Create Fulfillment Orders
- Create an Invoice from Change Orders
- Create an Invoice from Fulfillment Order
- Create Order Payment Summary
- Create Order Summary
- Create Return Order
- Ensure Funds Async
- Ensure Refunds Async
- Find Routes with Fewest Splits
- Find Routes with Fewest Splits Using OCI
- Get Fulfillment Order Capacity Values
- Hold Fulfillment Order Capacity
- Order Routing Rank By Average Distance
- Release Held Fulfillment Order Capacity
- Return Order Item Summaries Preview
- Return Order Item Summaries Submit
- Return Return Order Items
- Create Reservation
- Fulfill Reservation
- Get Availability
- Release Reservation
- Transfer Reservation
- Send Conversation Messages
- Send Custom Notification
- Send Notification
- Send Surveys
- Flow Core Action: Perform Survey Sentiment Analysis
- Get Assessment Response Summary
- Archive Slack Channel
- Check If Users Are Connected to Slack
- Create Slack Channel
- Edit Slack Message
- Get Information About Slack Conversation
- Invite Users to Slack Channel
- Pin or Unpin Slack Message
- Send Slack Message
- Send Message to Launch Flow
- Submit for Approval
- Flow Core Action for Salesforce Anywhere: Create a Salesforce...
- Flow Core Action for Salesforce Anywhere: Add a Message to a...
- Flow Core Action for Salesforce Anywhere: Add Users to a Salesforce...
- Flow Core Action for Salesforce Anywhere: Send Salesforce Anywhere...
- Create Records
- Custom Error
- Get Records
- Delete Records
- Email Alert
- Example Implementation
- Wait Conditions
- Specific Time
- Platform Event Message
- Single Event
- Multiple Events
- Platform Event
- Wait for Amount of Time
- Wait Until Date
- Recommendation Assignment
- Make Flow Screens Dynamic with Conditional Visibility
- Validate User Input
- Record Fields on Flow Screens Considerations
- Place Record Fields Directly on Flow Screens
- Update Records
- Send Email Message
- Send SMS Message
- Wait Until Event
- Checkbox Group
- Choice Lookup
- Date & Time
- Dependent Picklists
- Display Image
- Enhanced Message
- File Upload
- Long Text Area
- Multi-Select Picklist
- Order Management Product Selector
- Radio Buttons
- Slack Channel Selector
- Slack Workspace Selector
- Display Text
- Use the Repeater Screen Component (Beta)
- Options for Choices
- Choose a Lookup Option for a Flow Screen
- Assignments
- Record Filters
- Orchestrations
- Background Steps
- Interactive Steps
- MuleSoft Steps
- Evaluation Flows
- Anatomy of an Orchestration
- Orchestration Types
- Triggers for Orchestrations
- What’s the Difference Between a Flow and an Orchestration?
- Running User of an Orchestration
- Orchestration Versioning
- Use Decision Elements
- Define Requirements for Stages and Steps
- Assign an Interactive Step
- Add an End Element to an Orchestration Path
- Use Automatic Output
- Trigger an Evaluation of Orchestration Stage and Step Conditions
- Publish an Orchestration Event
- Create an Orchestration Template
- Add an Orchestration Work Item List Object Page to an Experience...
- Add the Work Guide to a Record Page Layout
- Add the Work Guide to an Experience Cloud Site
- Set Up an Org-Wide Email Address
- Activate or Deactivate an Orchestration
- Use Change Sets
- Orchestration Run
- View Work Items
- Add Comments to the Orchestration Run Log
- Add a Comments Column to the Orchestration Run Log
- Reassign a Work Item
- Disable Default Email Notifications for Work Item Assignments
- Cancel a Running Orchestration
- Use Orchestration Reports
- Orchestration Statuses and Milestones
- Emails about Orchestration Errors
- Debug an In-Progress Orchestration
- Debug a Failed Orchestration
- Considerations for Orchestrations
- Considerations for Evaluation Flows
- Security Considerations for Orchestrations
- Entitlements
- Version Properties
- Get Started with Einstein Next Best Action
- Create an Action Flow
- Create a Recommendation Record
- Create a Recommendation Strategy Flow
- Display the Next Best Action Recommendation
- Create Action Flows
- Create Recommendation Records
- Display the Next Best Action Recommendations
- Einstein Next Best Actions Considerations
- Next Best Action Request
- Recommendation Fields
- Launch a Flow When a Recommendation Is Accepted
- Launch a Flow When a Recommendation Is Accepted or Rejected
- Add a Limit Repetitions Element to a Next Best Action Flow
- Build a Strategy Flow Using Predefined Recommendations
- Build Strategy Using On-the-Fly Recommendations
- Tour the Strategy Builder Interface
- Write a Strategy Builder Expression
- Create a Strategy Builder Action Strategy Connection
- Create a Custom Notification Flow for Next Best Action
- Create, Package, and Distribute a Strategy Builder Template
- Save Strategy Builder Action Strategies
- Test Strategy Builder Action Strategies
- Troubleshoot Strategy Builder Action Strategies
- Inspect Strategy Builder Element Results
- Strategy Builder Enhance Element
- Strategy Builder Generate Element
- Strategy Builder Load Element
- Strategy Builder Filter Element
- Strategy Builder Limit Reoffers Element
- Strategy Builder Map Element
- Strategy Builder Sort Element
- Strategy Builder Branch Merge Element
- Strategy Builder Branch Selector Element
- Strategy Builder First Non-Empty Branch Element
- Einstein Next Best Action Component
- Report On and Track a Recommendation
- Task Actions
- Email Alert Actions
- Value Options for Field Update Actions
- Create an Outbound Message Notification
- View an Outbound Message Notification Request
- Track the Delivery Status of an Outbound Message
- Import a Client Certificate for Your Endpoint URL
- Define a Flow Trigger for Workflow (Pilot)
- Cross-Object Field Updates
- Field Updates That Reevaluate Workflow Rules
- Considerations for Outbound Messages
- Flow Trigger Considerations (Pilot)
- Prepare to Create an Approval Process
- Create an Approval Process with the Jump Start Wizard
- Default Selections for the Approval Process Jump Start Wizard
- Control Which Records Apply to an Approval Process
- Choose Approval Request Notification Templates
- Choose an Automated Approver Throughout an Approval Process
- Specify Who Can Edit Locked Records
- Design the Approval Request Page
- Specify Who Can Submit Records to an Approval Process
- Control Which Records Apply to an Approval Step
- Identify Assigned Approvers for an Approval Step
- Specify Rejection Behavior for an Approval Step
- Groups of Automated Actions in an Approval Process
- Add an Automated Action to Your Approval Process
- Add an Existing Automated Action to Your Approval Process
- Activate an Approval Process
- Let Users Submit for Approval
- Override the Sender for Email Approval Notifications
- Let Users Respond to Approval Requests from Your Org
- Considerations for Email Approval Response
- Default Template for Email Approval Response
- Enable Email Approval Response
- Prepare to Enable Approvals in Chatter
- Considerations for Approvals in Chatter
- Enable Approvals in Chatter
- Where Do Approval Request Posts Appear?
- Considerations for Chatter Post Templates for Approval Requests
- Create a Chatter Post Template
- Considerations for Approvals in Slack
- Enable Approval Notifications in Slack
- Where Do Slack Approval Notifications Appear?
- Approval Limits
- Considerations for Configuring Approvals
- Merge Fields for Approvals
- Considerations for Setting Approvers
- Considerations for Managing Approvals
- Considerations for the Salesforce Mobile App
- Sample Approval Process: PTO Requests
- Sample Approval Process: Expense Reports
- Sample Approval Process: Discounting Opportunities
- Sample Approval Process: Job Candidates
- Fields Available for Approval History Reports
- Examples of Approval History Reports
- Considerations for Approval History Reports
- Transfer Pending Approval Requests
- Remove Pending Approval Requests
- Submit a Record for Approval
- Withdraw an Approval Request
- Respond to an Approval Request via Email
- Troubleshoot Email Responses to Approval Requests
- What Does This Approvals Error Mean?
- Approval History Status
- Opt Out of Approval Request Posts in Chatter
- What Happens When You Opt Out of Chatter Approval Requests?
- Approval Process Terminology
- Set the Criteria for Your Workflow Rule
- Add an Immediate Action to Your Workflow Rule
- Add a Time-Dependent Action to Your Workflow Rule
- Identify Your Salesforce Org’s Default Workflow User
- Associate Actions with Workflow Rules or Approval Processes
- Activate Your Workflow Rule
- Daily Allocations for Email Alerts
- Workflow for the User Object (Beta)
- Considerations for Time-Dependent Actions and Time Triggers
- Workflow Rule Examples
- Monitor Pending Workflow Actions
- Workflow Terminology
- Opportunity Management
- Printer Management
- Quip Document Management
- Process Limits
- Process Usage-Based Entitlements
- When Do Processes Evaluate Record Changes?
- Best Practices for Designing Processes
- Process Builder Accessibility Considerations
- Considerations for Event Processes
- Compatibility Considerations for Processes
- Process Formula Limitations
- Process Schedule Limitations
- How Does Salesforce Process Scheduled Actions?
- Transactions and Scheduled Actions
- Considerations for Processes that Send Custom Notifications
- Considerations for Processes That Post to Chatter
- Considerations for Processes That Update Records
- Considerations for Managing Processes
- Considerations for Deploying Processes
- Considerations for Processes in Transactions
- Field Picker
- Process Builder Value Types
- Multi-Select Picklists in the Process Builder
- Process Builder Advanced Option Considerations
- Reevaluate Records in the Process Builder
- Nest Processes in the Process Builder
- Avoid Unwanted Actions in Processes
- Define the Process Properties
- Configure the Process Trigger
- Add Process Criteria
- Specify When Your Actions Execute with a Schedule
- Create a Record from a Process
- Invoke a Process from Another Process
- Post to a User’s Chatter Feed from a Process
- Post to a Chatter Group from a Process
- Post to a Record’s Chatter Feed from a Process
- Mention a User or Group in a “Post to Chatter” Process Action
- Use a Quick Action from a Process
- Create a Document, Folder, or Chat Room from a Process
- Add a Document to a Folder from a Process
- Remove a Document from a Process
- Add a Live App to a Template from a Process
- Attach a Document to a Record from a Process
- Copy a Document from a Process
- Add Members to a Document or Chat from a Process
- Add Members with Different Access Levels to a Document from a Process
- Remove Document Members from a Process
- Copy Content from a Process (Retired)
- Edit a Document from a Process
- Update a Template Section from a Process
- Copy Content with Live Paste from a Process
- Update Content Based on a Document Range from a Process
- Edit a Spreadsheet from a Process
- Edit a Slide from a Process (Retired)
- Lock Document Edits from a Process
- Lock Section Edits from a Process
- Export a Document to a PDF from a Process
- Send a Message from a Process
- Copy Comments from a Process
- Launch a Flow from a Process
- Send an Email from a Process
- Send a Custom Notification from a Process
- Send a Survey Invitation from a Process
- Submit a Record for Approval from a Process
- Update Records from a Process
- Call Apex Code from a Process
- Execute Actions for Multiple Criteria
- Process Status
- Clone a Process
- Activate a Process
- Delete a Process Version
- Monitor Your Processes’ Pending Scheduled Actions
- Delete Unexecuted Scheduled Actions
- Common Reasons Why Processes Fail
- Errors in the Process Builder
- What Happens When a Process Fails?
- Troubleshoot Processes with Apex Debug Logs
- Send Alerts When a Screen Flow Fails

Flow Element: Assignment
Set values in variables, collection variables, record variables, record collection variables, and global variables.
Required Editions
Each variable is modified by the operator and value combination. At run time, the variable assignments occur in the order you specify.

- Flow Elements
- Flow Operators in Assignment Elements
- Route a Flow
- Flow Resources
Cookie Consent Manager
General information, required cookies, functional cookies, advertising cookies.
We use three kinds of cookies on our websites: required, functional, and advertising. You can choose whether functional and advertising cookies apply. Click on the different cookie categories to find out more about each category and to change the default settings. Privacy Statement
Required cookies are necessary for basic website functionality. Some examples include: session cookies needed to transmit the website, authentication cookies, and security cookies.
Functional cookies enhance functions, performance, and services on the website. Some examples include: cookies used to analyze site traffic, cookies used for market research, and cookies used to display advertising that is not directed to a particular individual.
Advertising cookies track activity across websites in order to understand a viewer’s interests, and direct them specific marketing. Some examples include: cookies used for remarketing, or interest-based advertising.
Cookie List

Salesforce Flowsome!
An Easy Flow Guide For Admins
Flow: How To Use “Assignment”

Assignment is the equal sign of flow (As you see in the icon). If you want to change the value of your variables, you will have to do it through Assignments.

Some important notes before we dive into the details of Assignments:
1. Assignment Cannot Update Data Directly
If you have read my introduction of flow , you should know that Assignment is a logic element, so it does not have direct impact of your records. If you want to interact with your records, make sure you use a data element (Get, Create, Update, Delete).
2. Sometimes Assignment Can Be Skipped
Assignment is usually used for more complex operations (ex. in a loop or as a switch). If you simply want to change record fields, an Update Records element should be sufficient.
There are three main fields – Variable, Operator, and Value.
Assignment Fields
Assignment operators, check out how assignment can be used in real cases .
Flow: How To Use In / Not In Operators
Use Case: Connect Files to Multiple Records in Flow

Flow: How To De-duplicate Collection In 3 Ways
Use Case: Use Flow To Auto Close The Spam Case
Official Salesforce Help Article On Assignment
- ← Flow: How To Use Record Id
- Flow: How To Use “Delete Records” →

I am building out a record triggered task flow that uses a formula to update a field on the task. In the formula, I am using some lead record fields and used a get record element. I am trying to then populate that same value from the formula task to the lead. I came across your blog after trying to understand what I was doing wrong, currently I am using an assignment element to try to map the value from the formula to the lead field. Although, it works when I debug it doesn’t actually save the value on the record. Based on “1. Assignment Cannot Update Data Directly” on your blog I learned this is not possible, the introduction of flow link is not working for me, is that information available?

I want to assign a text variable to wo.serviceTerritory.SeriveResource. Can you please suggest me how can I do it with the Assignment component in flow ?Thanks

Hi, so is the field you want to update already exist in the Flow? If so, you can simply find that field and use the Equal operator. If not, you can use Update Records element to find the field and use Equal operator

Just want to say thank you so much Melody for putting these valuable information here, really easy to understand! There’s so much of effort that you’ve put into this blog. I really appreciate that you put the time and effort together to share your knowledge.

Cloud SYlla
Your Agile & Digital Partner
- sanasabirnet
- Dec 10, 2023
What is Assignment in Salesforce Flow – Detailed Guide

Salesforce is a rapidly growing customer relationship management platform that reshapes how businesses engage with their clients. It provides numerous features that assist in transforming your business's income by handling customer service, sales, marketing, and more.
At the heart of this transformation lies Salesforce Flow. It is an automation tool that helps users to create smooth workflows and improve operational efficiency. Now you must be thinking: what is Assignment in Salesforce Flow?
Don’t worry. We’ve you covered! In this blog, we’ll discuss a necessary component of the Salesforce system – Assignments in Salesforce Flow. Nowadays, every company wants to make its processes easier within the Salesforce ecosystem. It’s where Salesforce Flow Assignments come in.
This blog will provide all the necessary information to help understand Assignments in Salesforce Flow. So, let’s start!
Introduction to Salesforce Flow

Salesforce Flow is an automation tool within the Salesforce platform designed to simplify and automate complicated business procedures. It allows users to design, create, and manage workflows that guide users via a series of screens and collect data to perform specific actions.
Besides, with Salesforce Flow, you can automate repetitious tasks and integrate with external systems without extensive coding. You can use flow for various purposes, such as updating records, creating records, sending emails, and more.
In short, Salesforce flow provides a flexible and dynamic way to automate business processes, making it more effortless for organizations to adjust and optimize their workflows within the Salesforce environment.
For more details, visit How to Export Flow Salesforce.
What is Assignment in Salesforce Flow?

Understanding the Assignment element in Salesforce Flow seems a bit tricky at first, but there is nothing to worry about. We’ve created this guide in an easy-to-grasp way to help you understand quickly.
In Salesforce Flow, an "Assignment" is a fundamental building block that helps you manage and manipulate data and allows you to assign values to variables. Variables store and organize data within a flow, and Assignments enable you to control and modify these values as the flow progresses. It's like giving instructions to the flow on how to handle data.
In other words, Assignments are valuable when you need to perform calculations, update variables based on user interactions, or make decisions that dynamically affect the flow of your processes.
To simplify, imagine you're guiding a conversation in your flow, and Assignments are like the instructions you give to the system about what values variables should take on. This versatility allows you to create responsive flows, whether dealing with numbers, picklists, checkboxes, or text fields.
Benefits of Using Assignments in Salesforce Flow
Using Assignments in Salesforce Flow offers several benefits, such as:
Data Manipulation
Assignments allow you to manipulate data by changing the values of variables during the flow. It is especially beneficial for performing calculations or updating information based on specific conditions.
Dynamic Decision-Making
You can use Assignments to control the flow of your process dynamically. Depending on user inputs or other conditions, Assignments help set variables to different values to enable you to tailor the flow based on specific scenarios.
User Interaction Handling
In Visual Flows, Assignments are valuable for responding to user selections. You can adjust variables based on the user's choices within the flow by providing a more personalized and interactive experience.
Record Updates
Assignments are often used to update records. By assigning new values to fields in records, you can ensure that your Salesforce database stays up-to-date as your flow progresses.
Calculation Support
When dealing with numeric variables, Assignments excel in performing calculations. Whether it's summing up amounts from a query or applying mathematical operations, Assignments make complex calculations manageable.
Flexibility Across Field Types
Assignments aren't limited to numeric fields – you can use them with various field types, including checkboxes, picklists, and text fields. This versatility allows you to handle a wide range of data scenarios.
Customization and Adaptability
Knowing how to use Assignments effectively enhances the overall customization and adaptability of your Salesforce Flow. It allows you to create vibrant, responsive, tailored automation that aligns precisely with your business operations.
Basic Information About Assignments
What assignments do.
The Assignment element executes mathematical operations and transfers data between variables.
What Assignments don’t do?
They don't assess criteria to generate True/False results.
Assignments operate from the right to the left side.
Adding 1 to “Variable1” will increase the value of “Variable1.”
Setting “Variable1” to Equal “Variable2” transfers the value of “Variable2” to “Variable1.”
Assignment Fields
Variable [Place the variable you want to modify (change in value), whether it's an existing resource or one you intend to create.]
Operator (Specify how the variable changes based on the value. Remember, the available operators depend on the type of variable you are using.)
Value (It can be an existent resource or manually typed-in values.)
Popular Operators
Add (Available Variable Type: Number, Text, Date, Currency, Picklist, Collection.)
Subtract (Available Variable Type: Date, Number, Currency.)
Equals (Available Variable Type: Text, Number, Picklist, Date, Date/Time, Currency, Collection.)
Add Item (Multiselect Picklist)
Popular Collection Operations
Add At Start [Text Collections]
Remove After First [Text Collections]
Remove Uncommon
Equals Count
Essential Tips
If you want to run one assignment after another, employ two consecutive assignment elements.
Construct formula resources for complicated statements.
Utilize functions by incorporating them into a formula resource instead of using them directly.
Overall, the “Assignment” element is a necessary part of Salesforce Flow that enables users to change the value of variables and fields within a flow. It is a logic element that does not directly affect the contents of the Salesforce database but is used to interact with records and resources within the flow.
Additionally, the Assignment element helps set or change record values before creating or updating them and for using variables to perform logical functions. Besides, it’s important to note that Assignments cannot update data directly, and sometimes you can skip it if you can use a simple element like Update Records instead.
So, by understanding how to use the Assignment element, you can create more efficient and effective flows to automate your processes in Salesforce.
Recent Posts
What is Record-Triggered Flow in Salesforce? Detailed Guide
How to Get & Reset Security Token in Salesforce? (Detailed Guide)
What is Sharing Rules? How can you Create it in Salesforce? (Complete Guide)
- Partner With Venn
- Schedule A Consult
Salesforce Flow Basics Pt. 1: Data Elements, Decision, and Assignment
Written by Jonathan Davis
The goal of this four-part series is to provide foundational knowledge on how to use Flows in Salesforce . Flows are a powerful tool for automating processes in Salesforce and are something that every Salesforce Administrator or Consultant should be familiar with.
At a high level, a flow involves a few basic concepts:
- Elements - The pieces used to build the flow. Each type of element performs a different function.
- Resources - These are created and exist inside a specific flow (as opposed to records that exist in the database) to perform logic and store values when the flow runs.
- Trigger - The event that tells the flow to begin and usually provides the flow with some starting information, such as a Salesforce record.
- Logic - The flow uses logic that you configure in the flow to decide what to do within the flow.
- Result - The flow does one or more actions, such as creating or updating a record in Salesforce, displaying information to a user, sending an email to a customer, or some combination of those actions, and then ends.
Salesforce Flows are declarative, which means they do not require writing code to set them up. This makes them readily accessible to Administrators and Consultants who have not learned how to write code. Salesforce continuously adds features to Flow Builder , so it can do many things that were once impossible without code.
Flows are built with a series of elements connected to one another. When a flow is triggered to run, it works its way through the elements one at a time and performs different logic and actions based on which element is used and the way it is configured.
In this series, we will discuss all of the elements available to work with in the Flow Builder.
Jump to a section:
• Data Elements (Create, Update, Get, and Delete) • Assignment Element • Decision Element • Tips and Tricks
Data Elements (Create, Update, Get, and Delete)
In Flow Builder, there are three groups of elements: Interaction, Logic, and Data .
The Data Elements reach out from the flow instance and interact with Salesforce data, allowing the flow to retrieve information from or make changes to records in the database.
Create Records
The Create Records element allows you to create new records in your Salesforce org’s database. It can be used to create one or multiple records.
When creating one record, the simplest way is to select “Use separate resources, and literal values.” Choose the type of object you want to create a record for, and assign the field values you want the new record to have.
Once the record is created this way, you also can reference the newly created Record ID in other flow elements.
In this example, we created a new Account Record for Venn Technology:

You can also reference a record variable or collection of records used previously in the flow and create a new record using the values that were set previously. This is the only way to create multiple records with one Create Records element.
Update Records
The Update Records element is very similar to the Create Records element, except that it makes changes to existing records instead of creating new ones.
It is also similar to the Get Records element in that you are able to filter for the records you want to update when you use the “Use separate resources, and literal values” option. When filtering records this way, be aware that the Update element will revise all records in the database that meet the criteria, so it’s a good idea to be as specific as possible with your filters.
Alternatively, you can select “Use the IDs and all fields from a record or record collection” to update a record that was previously stored in the flow, such as one from a Get Records element. In this case, to make changes to the values on that record, you should have done so previously in the flow using the Assignment element.

In this example, we use the Update Records element to update the MailingState field of all contacts in the system that have an AccountID field value of “0014T000008zal9QAA.” If we only wanted to update a single contact, we would need to add more filters, such as the Contact ID, or FirstName and LastName fields.

Get Records
The Get Records element is used to “get” one or more records from the database based on filter criteria set in the component. Getting a record stores its values within the flow, as well as the values of records it looks up to (such as a Contact record looking up to an Account record in its AccountID field), allowing you to reference it in other flow elements and resources.
The filter criteria is based on values found on the specific record you’re getting, such as the ID or name of an account. Multiple criteria can be used, and the condition requirements can be set using “and,” “or,” or custom logic. When getting your criteria, the filter logic should be as specific as possible (such as an ID value), so that you only get the records you want to work with.
Get Records can be set to retrieve either the first record that meets the criteria, or all of the records that meet the criteria. Multiple records are stored together in a collection.
In the example below, this Get Record is retrieving the first account with a value of “Venn Technology” in the Name field and storing it for use in the flow.

Delete Records
The Delete Records element is used to delete records from the database. Similar to the Update Records element, you can either delete records stored in variables defined earlier in the flow, or specify the object and filter criteria needed to find the records you wish to delete. Similar to the Update Records element, the Delete Records element will delete all records that meet the filter criteria—make sure to be specific.
In this example, we use the Delete Records element to delete an account with the Id of “0014T000008zal9QAA.” By using the Id field in the filter, we ensure that only this specific account record is deleted.

Assignment Element
The Assignment element is one of the Logic elements, which means that it does not directly affect the contents of the Salesforce database. Instead, it is used to interact with records and resources within the flow by changing, adding, or subtracting the values of variables and fields. This is very useful for setting or changing record values before creating or updating them, and for using variables to perform logical functions.
Below, we use the Assignment element to change the StageName field of an opportunity to Closed Won and set the CloseDate field to today’s date with {!$Flow.CurrentDate}. This does not update the Account field in the database yet, but does set the values in preparation for the Data elements.

Decision Element
The Decision element is one of the most important elements in the Flow Builder, as it allows for the creation of multiple paths based on various criteria, allowing a single flow to output different results based on decision criteria.
When creating a Decision element, set the name and criteria for one or more outcomes. If the criteria is met in the flow, then the flow will follow the path for that outcome. If none of the criteria for the created outcomes are met, the “Default Outcome” is followed.
In this example, we create a Decision element that checks if the Opportunity record’s StageName field value is Closed Won.

If the Opportunity is Closed Won, the flow follows the “Yes, Opportunity is Closed Won” path to Create Contract. If the Opportunity is not Closed Won, the flow follows the Default Outcome and sends an email to the sales representative.

Tips and Tricks
Now that you know how to use the Data, Assignment, and Decision elements, here are some tips and tricks when using them.

Using a Decision after a Get Element
The Get Records element will not error out if it does not find anything with the filter criteria provided, but if later elements in the flow attempt to reference the record when there is not one, those elements may cause an error.
For this reason, unless you can ensure that your Get Records elements will find a record, it is a good idea to create a Decision element after your Get Records element to see if it found anything. Do this by checking if the variable from the Get Records element is not null, as shown below.

If the variable is null then the record was not found—the default path is followed and the flow ends. If records are found, the flow continues.
In this example, the flow checks for Opportunity Products, updates them if the flow finds any, and if none are found, the flow ends:

There may also be times when the requirements of your automation may change depending on if there is an existing record or not and, in those cases, you may want to check if the record is present. If the record is not present, check to see if there is an existing contract for an account. Update the contract if there is one and, if there isn’t, choose “Create Contract” instead.

Using Decision results later in the flow
The outcome of a Decision element is stored in the flow as a boolean (true/false) value that can be referenced later on in the flow by other decisions or formula resources.
This can be useful in various situations where a decision was made previously in the flow that you want to reference later.
Below you can see:
• The first decision checks the size of the account • The second decision determines if a new contract is needed • The third decision checks if a new contract was just created for a large account, thereby sending an email to a Sales Representative if it was

For more information on Salesforce Flows, check out our next blog post: Flow Element Basics Pt. 2 – Variables, Collections, and Formulas.

About the Author
Jonathan davis, subscribe for updates, filter by tags.
- Life at Venn
- Integration
- Sage Intacct
- Artificial Intelligence
FEATURED BLOG POSTS
Salesforce study notes, tips and tricks!
Home » Flow » Round Robin Assignment using Flow
- Analytics (1)
- Communities (1)
- Development (6)
- Sales Cloud (1)
- Welcome (1)
- The Complete Salesforce Certified Platform Developer I Course
- 0-Admin Introduction
- 1–Organization Setup–1%
- 2–User Setup–9%
- 3–Global User Interface–1%
- 4-Security and Access-15%
- 5–Standard and Custom Objects-18%
- 6-Sales and Marketing Applications-9%
- 7-Service and Support Applications-6%
- 8-Activity Management-3%
- 9-Chatter-1%
- 10-Data Management-11%
- 11-Content and Folder Management-2%
- 12-Analytics, Reports and Dashboards-13%
- 13-Workflow Automation-7%
- 14-Desktop and Mobile Administration-2%
- 15-AppExchange-2%
Recent Comments
- gouda ramesh on Build a simple Salesforce Community and give access to External Users
- Gabe Fuoco on Lightning Flow to copy File Links from Opportunity to Account
- ajay on Admin-1-Organization Setup–1%
- Abhi kori on Admin–0–Introduction
- vishal on Salesforce Spring 21 Release – New Lightning Flow features
- Entries feed
- Comments feed
- WordPress.org
Round Robin Assignment using Flow
Marie Sloan, a Salesforce Admin, is asked to build a Round Robin assignment tool to assign Survey records to Agent records following a Round Robin way, which means that the total number of Survey records to assign should be divided by the number of Agents, and each Agent should be assigned an equal number of Survey records. For example, if we have 3 Agents and 36 Surveys, each Agent will be asigned exactly 12 Surveys.
Object Model:
To tackle this requirement, let’s first explain the data model required to illustrate this example:
- Name : auto number field with display format: RR-{000}
- Number_of_Agents__c : Rollup-Summary field that counts the number of Agent__c records associated with this Round_Robin_Assigner__c record
- Number_of_Surveys__c : Rollup-Summary field that counts the number of Survey__c records associated with this Round_Robin_Assigner__c record
- Name : auto number field with display format: A-{000}
- User__c : lookup field to the User object
- Round_Robin_Assigner__c : Master-Details field to the Round_Robin_Assigner__c object.
- Name : auto number field with display format: S-{000}
- Tag__c : auto number field without any display format. This field simply represents the tag, or Id of eacj Survet record, it is automatically added to each survey, and no 2 surveys will have the same Tag number. This field will be used to calculate the Assignment_ID__c field below.
- Assignment_ID__c : formula field used to give the assignment ID to each Survey record, based on t he total number of Agents and the Tag on each Survey. More details to follow below.
- Round_Robin_Assigner__c : lookup field to the Round_Robin_Assigner__c object. This is the field that will be filled to assign an Agent to the Survey.
Here is the ERD:
To futher explain what’s going on,
- the main object (1) Round_Robin_Assigner__c is the parent of both:
- the object to assign, in this case (2) Survey__c
- the object to assign to, in this case (3) Agent__c .
In other words, if we want to assign Agent__c records to Survey__c records, first, we create a Round_Robin_Assigner__c record, second, we add to it all the Survey__c records that we want to assign, and third, we add all the Agent__c records that should be assigned to Survey__c records. The Round_Robin_Assigner__c record will hav a button that will launch a flow to assign the Surveys to the Agents in a Round Robin fashion! Simple!
Now, let’s explain the fields on each object…
First, the Round_Robin_Assigner__c object has 2 Rollup-Summary fields that count the number of Agent__c and the number of Survey__c associated with it. The field names are Number_of_Agents__c and Number_of_Surveys__c .
On the Survey__c object:
- The Tag__c field is simply an auto-number field that gives a unique number to the record. The first Survey__c record has Tag__c = 1, and so on.
- The Assignment_ID__c field is the field used to assign the Survey__c to the Agent__c. It is a Fomrula field with this Formula:
This MOD function will take the MOD of (1) the Tag number value of the Survey__c record – we uses the Value() function to take the number value of this auto-number field, and (2) the total number of Agent__c records associated with this Round_Robin_Assigner__c record. So, if we have 5 Agent__c records, and 100 Survey__c records,
- For example, the record wih tag 50 would have 1 + MOD(50,5) = 1 + 50 MOD 5 = 1 + 0 = 1,
- the next record would have 1 + MOD(51,5) = 1 + 51 MOD 5 = 1 + 1 = 2
- the next 1 + MOD(52,5) = 1 + 52 MOD 5 = 1 + 2 = 3
- the next 1 + MOD(53,5) = 1 + 53 MOD 5 = 1 + 3 = 4
- the next 1 + MOD(54,5) = 1 + 54 MOD 5 = 1 + 4 = 5
- the next 1 + MOD(55,5) = 1 + 55 MOD 5 = 1 + 0 = 1
This way, the Assignment_ID__c field will dictate which Survey record goes to which Agent, based on the above math.
Next, we will add a Flow to assign the Agent__c field to the Survey__c records.
Create the Flow:
Create a new Screen Flow, and in it first, create the variable that will hold the Id of the Round_Robin_Assigner__c record that will have the button to launch the flow. Remember, the variable name should exactly be ‘ recordId ‘ with the letter ‘I’ in a capital case.
To start, let’s create 3 “Get Records” elements:
- Get Assigner: to get the details of the 1 Round_Robin_Assigner__c record that has the Id recordId. Store the variable in the Record Variable sov_Assigner .
- Get Agents: to get all Agent__c records that are children of the above Round_Robin_Assigner__c record. Store the variable in the Record Variable socv_Agents .
- Get Sutveys: to get all Survey__c records that are children of the above Round_Robin_Assigner__c record. Store the variable in the Record Variable socv_Surveys .
- I will only show the screenshots of the first and second “Get Records” elements above.
Now, create 2 Number variables and an Assignment element to assign them values:
- v_Agent_Total_count = {! sov_Assigner . Number_of_Agents__c }. This is the rollup summary field that countsthe number of Agents related to this Round_Robin_Assigner__c record.
- v_Agent_Counter = 1. This will set the counter to 1.
Create the first loop:
- Purpose : loop through all the Agent__c records that are related to the Assigner__c record. For each agent, get all the Survey__c records with an Assignment Id equivalent to the Agent.
- Name : Loop through Agents
- Collection Variable : socv_Agents
- Iteration Direction : First item to last item
- Loop Variable : socv_agents_single
Inside this loop, get the Survey__c records with an Assignment Id equivalent to the Agent. For that, we will use use variable v_Agent_Counter . All these syrveys will be stored in a Record Variable called socv_Specific Surveys .
Create a second loop inside the first loop:
- Purpose : loop through all the Survey__c records with an Assignment Id equivalent to the Agent, and add these to a “Record Variable” to assign them at the end to the Agent.
- Name : Loop through specific Surveys
- Collection Variable : socv_Specific_Surveys
- Loop Variable : socv_Specific_Surveys_single
Inside this second loop, assign the Agent Id to the Agent__c field of the Survey. Then add this Survey to a new Record Variable called socv_Surveys_to_Update . To do so, create the Record Variable, then create an Assignment element to add the single Survey__c record to the socv_Surveys_to_Update.
After exiting the second loop, increase the Agent Counter variable by 1
Finally, update all the Survey__c records at once, using a Record Update element on the socv_Surveys_to_Update record variable.
You can then add a Screen element with any information you want:
And this is the final Flow:
Now, activate the Flow, then add a New Action that calls this Flow from within the Round_Robin_Assigner__c object.
Let’s run thre Assigner! Here is a screen before clicking on the button, and then the result aft.er. Notice that each Survey ois now assigned to a specific Agent!
You can modify the objects based on your requirements, but the idea is the same!
Thank you sir. very helpful.
Leave a comment Cancel reply
Your email address will not be published. Required fields are marked *
Powered by WordPress / Academica WordPress Theme by WPZOOM

Automation Champion
Automating Salesforce One Click at a Time

Running Lead Assignment Rules From Salesforce Flow
Last Updated on February 14, 2022 by Rakesh Gupta
To understand how to solve the same business use case using Process Builder . Check out this article Getting Started with Process Builder – Part 49 (Running Lead Assignment Rules From Process Builder) .
Big Idea or Enduring Question:
How do you run the lead assignment rule from the Salesforce flow? Lead assignment rules allow us to automatically assign Leads to the appropriate queue or user. A Lead assignment rule consists of multiple rule entries that define the conditions and order for assigning cases. From a Salesforce User interface, a user can trigger assignment rules by simply checking the Assign using the active assignment rules checkbox under the optional section.
The problem arises when you need to insert or update the Leads from Salesforce Flow and wants to trigger assignment rules. Using the Salesforce Flow a Lead will be inserted or updated but the assignment rule will not be triggered as there is no check box to use the organization’s assignment rule or a prompt to assign using the active assignment rule.
Let’s start with a business use case.
Objectives:
After reading this blog post, the reader will be able to:
- Running the lead assignment rules from Salesforce Flow
- Understand @InvocableMethod Annotation
- How to call an Apex method using Salesforce Flow
Business Use Case
Pamela Kline is working as a System administrator at Universal Containers (UC) . She has received a requirement from the management to update the following Lead fields when Lead Source changed to Partner Referra l .
- Status = Working – Contacted
- Rating = Hot
As data changed by the process, she wants to fire the assignment rule as soon as the process updates the lead record.
Automation Champion Approach (I-do):

Guided Practice (We-do):
There are 4 steps to solve Pamela’s business requirement using Salesforce Flow and Apex. We must:
- Setup a lead assignment rule
- Create Apex class & Test class
- Define flow properties for record-triggered flow
- Add a decision element to check the lead source
- Add an assignment element to update status & rating
- Add a scheduled path
- Add a decision element to check if lead source changed
- Add action – call an Apex class to invoke lead assignment rule
Step 1: Setting Up Lead assignment Rule
- Click Setup .
- In the Quick Find box, type Lead Assignment Rules .
- Click on the Lead Assignment Rules | New button .
- Now create an assignment rule, as shown in the following screenshot:

Step 2: Create an Apex class and Test class
Now, we have to understand a new Apex annotation i.e . @InvocableMethod . This annotation lets us use an Apex method as being something that can be called from somewhere other than Apex . The AssignLeadsUsingAssignmentRules class contains a single method that is passing the ids of the Leads whose Lead Source changed to Partner Referral . Create the following class in your organization.
- In the Quick Find box, type Apex Classes .
- Click on the New button .
- Copy code from GitHub and paste it into your Apex Class.
- Click Save.

Step 3.1: Salesforce Flow – Define Flow Properties for Before-Save Flow
- In the Quick Find box, type Flows .
- Select Flows then click on the New Flow .
- How do you want to start building : Freeform
- Object : Lead
- Trigger the Flow When : A record is created or updated
- Condition Requirements: None
- Optimize the Flow For : Fast Field Updates
- Click Done .

Step 3.2: Salesforce Flow – Using Decision Element to Check the Lead Source
Now we will use the Decision element to check the lead source to ensure that it is equal to Partner Referral.
- Under Toolbox , select Element .
- Drag-and-drop Decision element onto the Flow designer.
- Enter a name in the Label field; the API Name will auto-populate.
- Under Outcome Details , enter the Label the API Name will auto-populate.
- Resource: {!$Record.LeadSource}
- Operator: Equals
- Value: Partner Referral
- When to Execute Outcome : Only if the record that triggered the flow to run is updated to meet the condition requirements

Step 3.3: Salesforce Flow – Adding an Assignment Element to Update Rating and Status
- Drag-and-drop the Assignment Element element onto the Flow designer.
- Enter a name in the Label field- the API Name will auto-populate.
- Field: {!$Record.Rating}
- Add Condition
- Field: {!$Record.Status}
- Value: Working – Contacted

- Click Save .
- Enter Flow Label the API Name will auto-populate.
- Click Show Advanced .
- API Version for Running the Flow : 53
- Interview Label : Record-Trigger: Lead Before Save {!$Flow.CurrentDateTime}

Step 4.1: Salesforce Flow – Define Flow Properties for After-Save Flow
- Field : Lead Source
- Operator: Euqals
- Optimize the Flow For : Action and Related Records

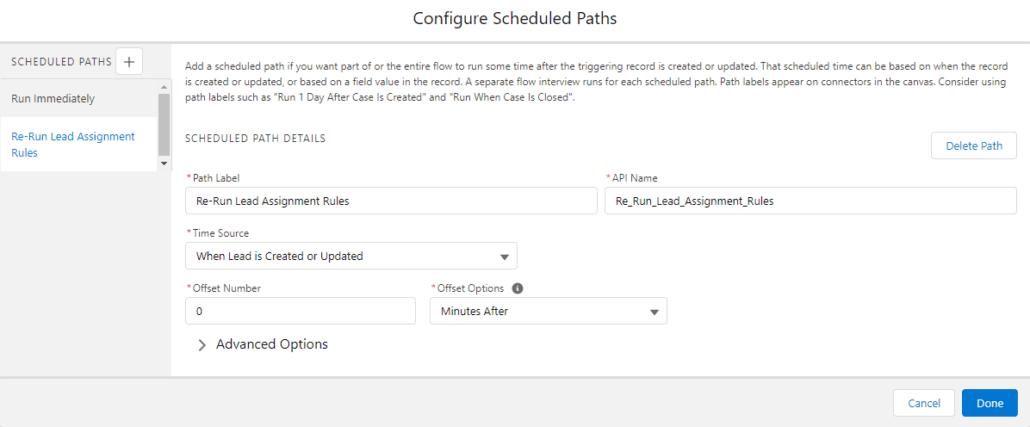
Step 4.2: Salesforce Flow – Add Scheduled Paths

- Under SCHEDULED PATHS , click on the New Scheduled Path .
- Under Scheduled Path Details , enter the Label the API Name will auto-populate.
- Time Source : Lead: Last Modified Date
- Offset Number : 1
- Offset Options : Minutes After

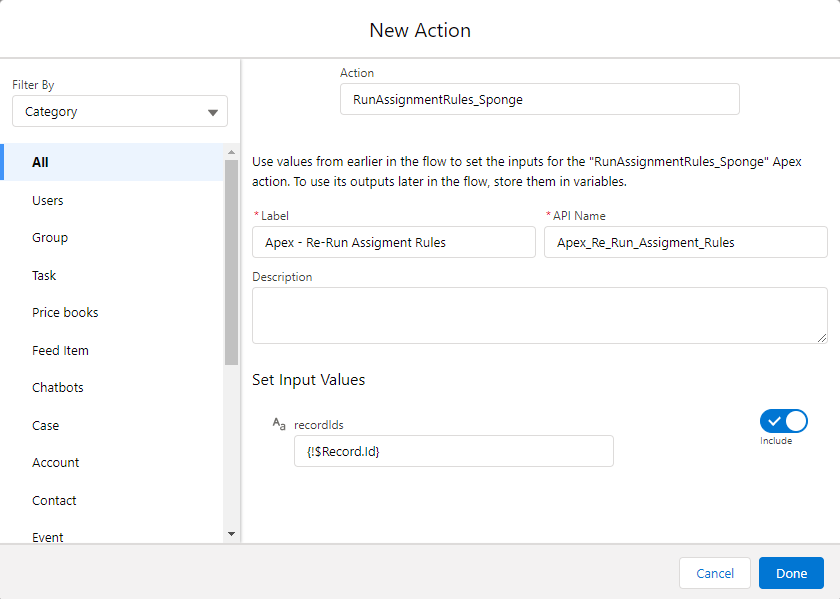
Step 4.3: Salesforce Flow – Adding an Action to Call Apex class to Trigger Lead Assignment Rule
- Drag-and-drop the Actions element onto the Flow designer.
- Select the AssignLeadsUsingAssignmentRules Apex class.
- Field: LeadIds
- Value: {!$Record.Id}

- Interview Label : Record-Trigger: Lead After Save {!$Flow.CurrentDateTime}

Proof of Concept
Now onward, if a business user updates the Lead Source to Partner Referral , Process Builder will automatically update Status , Type , and Assign it to the right user or queue based on the lead assignment rule.

Monitor Your Schedule Flow
To monitor Flows that are scheduled, navigate to the following path:
- Navigate to Setup (Gear Icon) | Environments | Monitoring | Time-Based Workflow .

- Use the Delete button to delete the time-based Flow job from the queue.
Formative Assessment:
I want to hear from you! What is one thing you learned from this post? How do you envision applying this new knowledge in the real world? Let me know by Tweeting me at @automationchamp , or find me on LinkedIn.
Submit Query!
Similar Posts

Automatically Refresh Your Salesforce Dashboard Every Hour or Minute

Easiest Way to Find if a Record Is in the Approval Process Using Salesforce Flow

Beyond Text: Exploring Image Use Cases in Salesforce Flows
8 thoughts on “ running lead assignment rules from salesforce flow ”.
I found that this ran repeatedly, every minute, over and over again. Was easy to spot because I modified the Apex to include sending the user notification email as well – so I was getting notification email every minute when testing.
When I updated the ‘Time Source’ in the flow scheduled path from ‘Time Source: Lead: Last Modified Date’ to ‘Time Source: When Lead is Created or Updated’ that seems to have solved the problem.
Was curious if you had the same experience or if there was some other nuance happening.
It also looks like you had originally intended to use a decision element in step 4.3 but changed that to flow entry requirements, likely because the scheduled path can’t assess the prior and current values the same way the starting node can.
Thank you for sharing your valuable feedback. I have a quick question for you: When executing the Apex class, do you utilize a Record-triggered Flow or a Scheduled-triggered Flow?
after the apex class fires, noticed the lead owner is assigned to default lead owner, instead of using lead assignment rule. Any clue?
Thank you for an excellent tutorial 🙂 you solved my problem! Very much appreciated
Anyone getting issues with an error on mass updates “Apex error occurred: System.QueryException: List has more than 1 row for assignment to SObject “? if each one is called individually, I don’t understand how there is more than 1 row for assignment. Sometimes I get an email with this error only to see that the trigger actually worked for the specified record so a bit odd. Thanks!
Thank you for the great tutorial. Why add the 1 minute wait? Is that just to take avoid too much synchronous automation? Or is it required for another reason?
You’re right Kevin (to make the process asynchronous).
- Pingback: Getting Started with Process Builder – Part 49 (Running Lead Assignment Rules From Process Builder) - Automation Champion
Leave a Reply Cancel reply
This site uses Akismet to reduce spam. Learn how your comment data is processed .
Discover more from Automation Champion
Subscribe now to keep reading and get access to the full archive.
Type your email…
Continue reading

How to Re-run Salesforce Lead Assignment Rules: Flows & Apex
Salesforce Lead assignment rules ensure Leads are assigned to the appropriate user or queue for follow up. They also liberate marketers from trying to maintain sales territory logic within their Marketing Automation Platform (MAP).
>> Related: How to Build a SLA Alert in Salesforce <<
When a new Lead is created, Salesforce will use logic you’ve configured to assign the record to the appropriate user or queue. But what if you need to re-run that logic on existing records ?
In this post:
Re-running Lead Assignments for just a few Leads
If you only need to do this for a single Lead record, the solution is simple. Edit the record and select the optional “ Assign using active assignment rule “ checkbox.

If you need to do a one-time batch reassignment of a number of records, export the relevant Lead Ids. Then use the Apex Data Loader to trigger assignment rules to fire. You can grab the ID of the appropriate Lead Assignment Rule from the URL bar when viewing the rule in Setup. It will always start with the prefix “01Q” .

But you may want to automatically re-run Salesforce Lead Assignments
But you may want to re-run assignment rules automatically under certain conditions. For example: you may assign Leads under a certain Lead Score to a Queue. When the Lead Score increases over the threshold, you then want to re-run assignment rules to assign to an inside sales rep for follow up.
To do this, we combine Flow and an Apex Invocable method. We take advantage of the power of Apex with the flexibility to declaratively (clicks, not code!) control the logic of when to re-run the assignment rules, without having to edit any code.
Using Apex for Salesforce Lead Assignment Rules
Let’s start with the code.
Since we’re writing code here, we’ll need to start in a sandbox org first before deploying to production. You’re smart and already knew that you’d NEVER make changes in production without first testing in a sandbox ( right?! ), but in this case, Salesforce doesn’t trust you either way and forces you to write your code in a sandbox org before moving to production.
We’ll be creating an Apex class with a single method with the @InvocableMethod annotation, which allows us to call our Apex from within a Flow. The method accepts a single parameter (a list of the Lead Ids to be assigned) that you’ll pass into the method from your Flow.
That’s it. Just those four lines are all you need in your code. The logic for firing the assignment rules will be configured in one or more Flows.
Now, in order to actually deploy this to your production org, you’ll also need to create a test class to cover your code and ensure that it functions as expected in your environment. A sample test class might look like this (but this is extremely basic):
Work with a developer to ensure you’re accounting for any requirements specific to your Salesforce instance.
Using Salesforce Flows for Lead Assignment Rules
Now we’ll create our declarative logic of when to fire the code, using a Flow.
1) Create a new Flow by searching for Flows under Setup and clicking the New Flow button in the top right. This example is for a Record-Triggered Flow , but you can design it a number of ways.
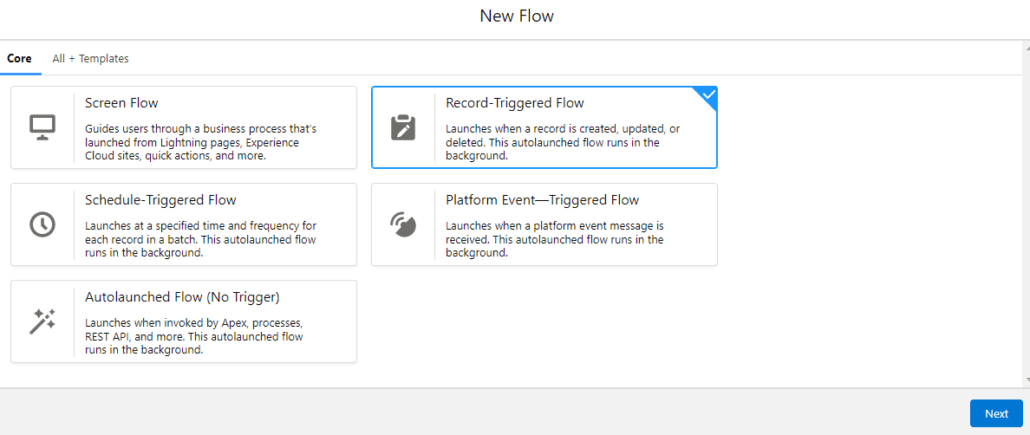
2) Select the Lead object for your Flow and configure the trigger for when a record is created or edited .
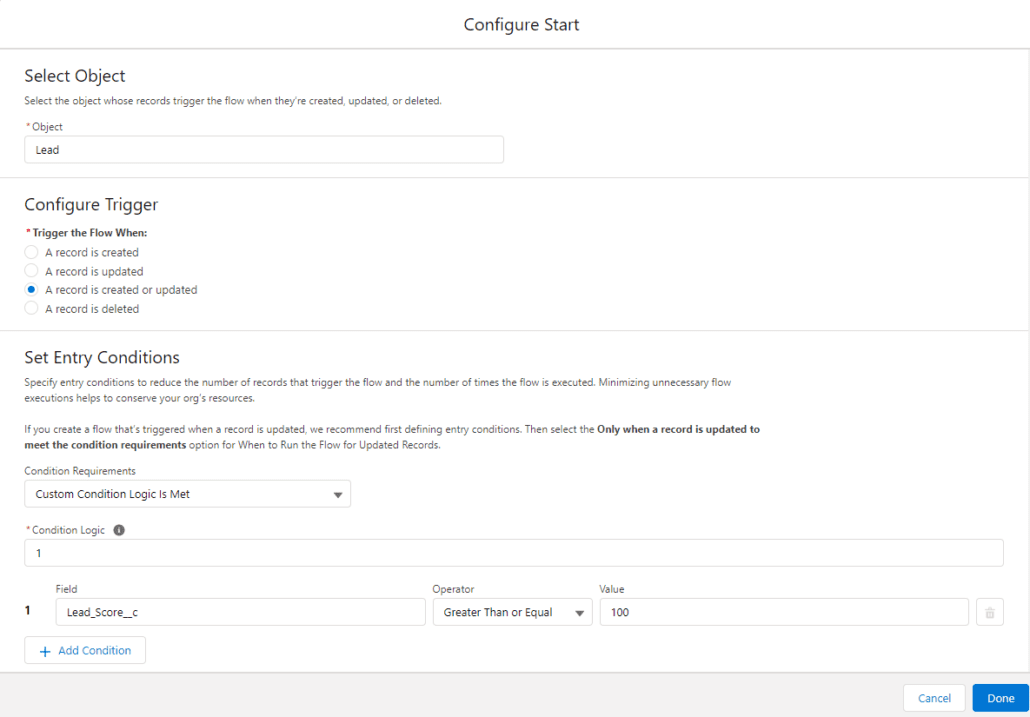
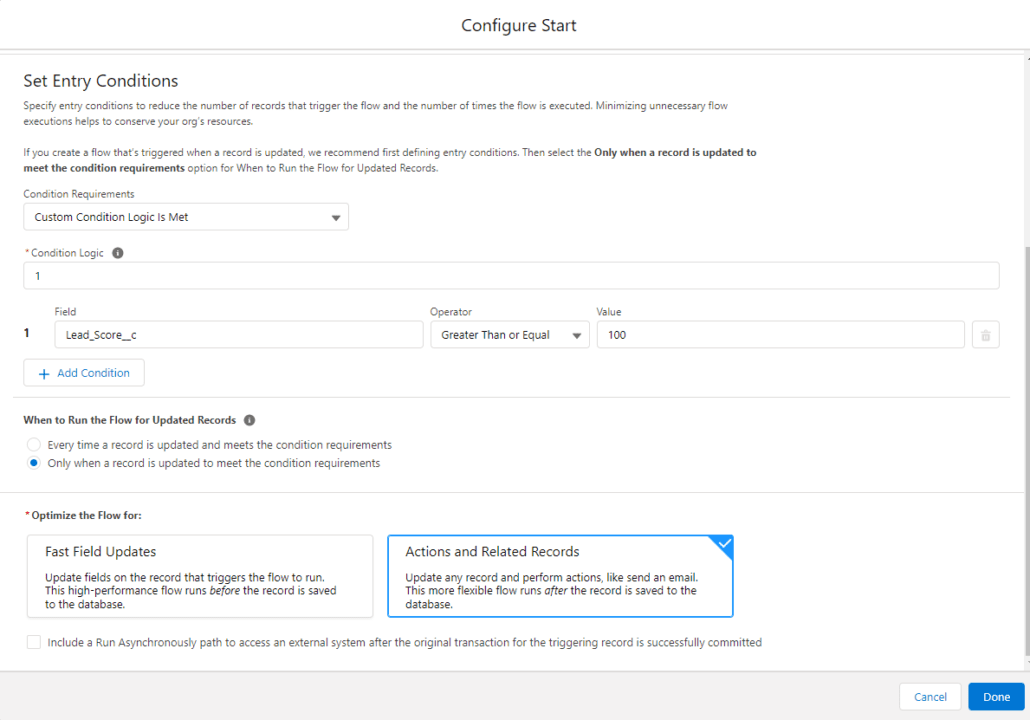
3) Then set the Entry Conditions. In this use case, we want to re-assign Leads after they meet a certain Lead Score. Select “custom condition logic is met. ” Set the condition that the Lead Score is greater than or equal to 100.
Under the “When to Run the Flow for Updated Records” section, select the option to only execute when a record is updated to meet the condition requirements . This means we’ll only execute the actions if the record previously did not meet the criteria, but now does after being updated.
4) Without getting into too much detail, because of Triggers and Order of Execution , we can’t call our code in an immediate action. Instead, we’ll create a scheduled path to call our Apex method.
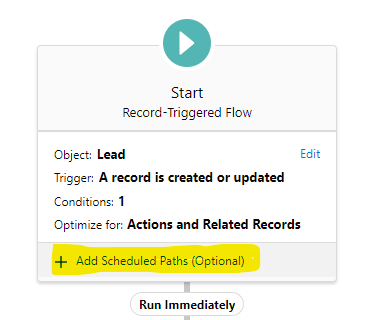
In this case, we want the logic to execute ASAP, so we’ll set the schedule for 0 minutes from now.
5) Once saved, we can create a new action. Click to Add a New Element , and select an Action type. Give your action a name, and select the Apex class you created earlier. Set the Apex Variables leadIds using the Field Reference of the Lead Id that started the process.
6) After saving, your Flow looks like this:

Activate your flow, test in your sandbox, and deploy to your production org. Since the code is fired under a scheduled action, there is a slight delay before the reassignment happens. In my experience, it’s usually <2 minutes, but you can monitor this under Setup > Flows and viewing the Paused and Waiting Interviews section.

The nice part about this approach is that if your requirements change – for example if your Lead Score threshold changes to 150 instead of 100 – you can change the logic in your Flow (Step 3) without having to touch any code.
You might also like
Sales Funnel ROI Calculator
8 Lead Management Process Samples
How to Measure Lead Follow-Up Beyond First Touch
Get our newsletter.
Get tips, tutorials, best practices, and other cool stuff delivered to your inbox every quarter.
- Name * First Last
Get a System Audit
Whether you inherited a new instance or just want a second opinion, we'll dive in and benchmark your tech stack.
- Full Name *
- Job Title *
- What systems and challenges do you have?* *
- Hidden utm_medium
- Hidden utm_source
- Hidden utm_campaign
- Hidden utm_content
- Hidden utm_term
Download Resource
Use this form to recieve your free resource in your inbox today!
Getting Started With Assignment Flows
For the most part, assignment rules are difficult to visualise and manage in salesforce. complete leads makes it easy to create and manage assignment rules, for teams of variable sizes and complexities, in a flow-chart-style ui. 5-aug-2022 • knowledge, the ‘what’.
Creating a New Flow
Activating your flow
Filter Records By Criteria
Multiple Criteria Filter
Assign Round Robin
Assign Matched Lead Owner (Lead records only)
Account Based Assignment (Lead records only)
Assign to User or Queue
Re-Run Salesforce Lead Assignment Rules (Lead records only)
Duplicate Rule Match
Custom Match
Create Record
Update Match
Field Update
Email Users
Slack Notification
Convert leads (lead records only).
Record Auto Merge
- Winning lead has a value for Phone, Email, Annual Revenue.
- Losing lead has a value for Phone, Email, Employee Count, Industry.
- Winning Lead retention will result in a lead with Phone, Email, Annual Revenue values preserved.
- Losing Lead retention will result in a lead with Phone, Email, Employee Count, Industry preserved.
- “Both” retention will result in a lead with Phone, Email, Annual Revenue, Employee Count, and Industry.
- If your winning lead is the newest lead, you may want to keep all values from the winning lead by default but keep a Do Not Call value set to TRUE if this value exists on the older lead.
- If you always want to keep a Lead Status that's further down the funnel, you can prioritize the value of SQL, then MQL, then AQL if either lead has that status.
Nested Flows
Additional Features
Response timer, lead conversion, implementation.
Contact your respective Customer Success Manager for any questions/assistance when creating your assignment flows.
System Information
Related articles.
- Number of Views 413
- Number of Views 445
- Number of Views 296
- Number of Views 302
- Number of Views 180
Trending Articles
- Internal Match Rules Setup
- Traction Hierarchies End User Guide
- Automerge for Leads, Contacts and Accounts
- How to use Nested Flows
- Display Child Object Tabs
Using Flow to Assign Permission Set
September 17, 2021 Yumi Ibrahimzade Automation , Flow 19

A permission set can be described as a collection of extra permissions and settings that extends users' existing permissions. Permission sets can be used to give extra permissions to users without modifying their profiles. User can have only one profile but they can have multiple permission sets assigned to them. This way, you can have minimum profiles in the system but give various permissions to specific people.
Permission sets can be assigned only to users. It is not possible to assign a them to a public group, role, or profile. Read this article to learn more about permission sets.
There are two different way to assign a permission set. First one is directly from the user record.

Second way is opening the permission set and clicking on the Manage Assignments button.

You have to go to the setup to perform both of these actions, which means that you need admin permissions.
However, using a flow, it is possible to build a screen that lets the current user select a user and a permission set to assign to him/her. This would be a great admin tool for manual assignments. It is also possible to build a record-triggered flow to automatically assign permission set(s) when a user becomes active. This is a great way to reduce manual work. You can read this post to learn about flow types and their differences.
Building a Screen Flow to Assign Permission Sets
1- Create a new screen flow and add screen element as the first element of the flow. Add the lookup element that will let the you select a user. Then add a picklist element, which will display the permission sets in the system. In order to do so, create a record choice set that will display only the permission sets. If you want the flow to display only a few permission sets and not all of them, add your criteria.

Picklist field should display the label of the permission set but store the Id of the selected record. Optionally, store the label of the selected record, it will be useful when displaying a message to the user.

Optionally, rename the Next/Finish button as "Assign". This will make the user think that he/she doesn't need anything else to do. And yes, actually the user doesn't need to do anything else, flow will do everything.
Your screen should look like this.

Optionally, you can set an expiration date for the permission set assignment. If you do so, assigned users receive access to all aggregate permissions until the expiration date. In order to set the expiration date, add a date/time input field.
2- Add a Get Record element and get the PermissionSetAssignment record to check if the selected user already has this permission set.

3- Add a Decision element to check if the user already has the selected permission set.

4- If it already exists, you cannot assign again. So, you will need to display a message to the user. Add a new Screen element to display a message. Optionally, rename the Previous button as "Assign Another". Since you stored the label of the selected permission set in the first step, use it in the error message. This will make the error more clear.

5- If it doesn't exist, then create a new PermissionSetAssignment record to assign the it to the selected user.

If you want to set an expiration date, don't forget to populate the ExpirationDate field.
6- At the end of the flow, display a success message. Like you did in the 4th step, rename the Previous button as "Assign Another" and use variables in the message.

At the end, your flow should look like this. Optionally, make the flow run in the system context.

Record-Triggered Flow to Automatically Assign a Permission Set
Let's create a record-triggered flow that will automatically assign a permission set called "SSO" when a user becomes active.
1- Create a Record-Triggered flow and choose to run it after create/update. Select User as the object and enter the criteria. So that the flow will run only when a user becomes active.

2- Add a Get Records element to get the "SSO" permission set. To assign it, you need the Id of the permission set. You can use a hardcoded value but if you do so, don't forget to change it after you deploy to other environments.

3- Add another Get Records to check if it is already assigned. In order to do so, you have to get the PermissionSetAssignment record according to the user Id and permission set Id that you got in the previous step.

4- Add a Decision element to check if the permission set is already assigned to the selected user.

5- If it doesn't exist, then add a Create Record element to create a PermissionSetAssignment record. This action will assign the permission set to the user.

Optionally, populate the expiration date field.
At the end, your flow should look like this.

These are some simple flows to assign permission sets. You can improve them and add more logic according to your needs. Don't forget, the idea is to help the users. Try to automate the process to reduce time or give the users more capabilities that they cannot perform using the standard permission set assignment screen.
Permission Assignment Expiration Considerations
If you set the ExpirationDate field on the PermissionSetAssignment record, assigned users receive access to all aggregate permissions until the expiration date. It means that, after the expiration date, user will not have those permissions anymore. However, PermissionSetAssignment record will still exist in the system as inactive.
Assignments that expire are treated as soft-deletes. Moreover, SOQL queries don’t return the expired permission set assignments. You can still retrieve them using the ALL ROWS clause. However, there is no standard option to use ALL ROWS clause in flow. Therefore, your Get Records element will not find the expired permission set assignments. This may cause an issue because if you try to create a PermissionSetAssignment record, the system will say that it is a duplicate value.
Read this post to learn how to use flow to assign a permission set with an expiration date.
17 Comments
But for standard user who without "Assign Permission Sets" AND "View Setup and Configuration", is this approach still available?
If you run the flow in the system context, then any user can run this flow and assign permission sets. I tried now and it is working.
Adding to Wayne's comment, even running in the system context, the 'non admin' user receives this error: "An error occurred while trying to update the record. Please try again. insufficient access rights on cross-reference id" I think they need Modify User permissions for this to actually work? Also tried updating another custom field on the User Object and received the same message. I don't think non-admin users have access, even if the Flow is running as System.
Hi Marcus, I tried it again with a non-admin user and it worked. However, I tried it with another user that has Salesforce Platform license, it didn't work for that user. I thought it was related to the license but then I saw that the user didn't have the Run Flows permission. After giving the permission, it worked for that user as well. So I can say that it is working for non-admin users too.
Thank you for this, it was very helpful.
I have followed the guidance for a Record Triggered Flow but got an error - This error occurred when the flow tried to create records: INVALID_CROSS_REFERENCE_KEY: We can't save this assignment because there's no permission set ID or permission set group ID.. You can look up ExceptionCode values in the SOAP API Developer Guide.
Are you able to advise?
In the step that the flow fails, do you see the permission set id? Looks like it is missing, at least it is what I understand from this error message.
If you set an expiration on the permission set and the permission set expires, the permission set assignment record persists. However, when you query the Permission Set Assignment object, you *cannot* retrieve the expired record, so you'll always get a duplicate permission set assignment error when trying to recreate the assignment.
Have you seen the same?
Hi Adam, Yes, that's right. In the official documentation it says "SOQL queries don’t return user assignment information for permission assignments that expire. Assignments that expire are treated as soft-deletes. You can retrieve the expiring assignment information using the ALL ROWS clause." So it is not possible to find this record using standard elements of flow. However, when you try to create a new one, it will say that it is duplicate. I think we may need an Apex action for this. I will try to find a solution.
I found a solution for this issue and wrote a post. Let me know if it answers your question.
https://salesforcetime.com/2023/05/04/using-flow-to-assign-a-permission-set-with-an-expiration-date/
My screen one is all good but for some reason the RTF is getting flagged at the Get permission Assignment Element more specifically the PermissionSetID EQUALS Permission Set From, can you explain what that is supposed to be?
Find all PermissionSetAssignment records where
AssigneeId Equals {!$Record.Id} (005Dn0000075DESIA2) AND PermissionSetId Equals {!Find_AC_Permission_Set.PermissionsViewDeveloperName} (false) Store the values of these fields in Get_Permission_Set_Assignment: Id Result
Info Failed to find records.
Hi, I see a problem here: PermissionSetId Equals {!Find_AC_Permission_Set.PermissionsViewDeveloperName} (false) You have to use the Id of the permission set.
Hi, I am attempting to assign two permissions sets with record triggered Flow, but I am keep getting an error. "This error occurred when the flow tried to create records: INVALID_CROSS_REFERENCE_KEY: We can't save this assignment because there's no permission set ID or permission set group ID.. You can look up ExceptionCode values in the SOAP API Developer Guide."
Hi, From the error message, I understand that the permission set id is missing. Can you check if you mapped that field?
Thank you for the article. Very helpful.
Would there be a way to add more than 1 permission while creating a new user in a flow?
For instance, I usually setup new users similarly to another user. This user may have 3 permission sets. Can I add all 3 at the same time, or would I need to build in the "Assign Additional Permissions" button like you did in the article?
You can get all these 3 permission sets, then use loop and assignment elements in order to prepare a PermissionSetAssignment collection in the flow. Then you can create all of them at once.
How can send email option to the end of the flow, after user assigned to a permission set?
Hi, I didn't understand the question well, but you can send an email using the Send Email core action.
2 Trackbacks / Pingbacks
- What does Group role mean? – Answersglobe
- Using Flow to Assign a Permission Set with an Expiration Date - Salesforce Time
Leave a Reply Cancel reply
Your email address will not be published.
Save my name, email, and website in this browser for the next time I comment.
Copyright © 2024 | SalesforceTime.com
- App Building
- Be Release Ready – Summer ’24
- Integration
- Salesforce Well-Architected ↗
- See all products ↗
- Career Resources
- Essential Habits
- Salesforce Admin Skills Kit
- Salesforce Admin Enablement Kit
Home » Video » Mass Create and Update Records in a Few Clicks | How I Solved It

- Mass Create and Update Records in a Few Clicks | How I Solved It
Welcome to another “How I Solved It.” In this series, we do a deep dive into a specific business problem and share how one Awesome Admin chose to solve it. Once you learn how they solved their specific problem, you’ll be inspired to try their solution yourself! Watch how Kim Strauss built an automation for non-technical users to mass create and update records with just a few clicks.
Key business problem
The James Beard Foundation is a nonprofit, and like all nonprofits, we have a board of directors who meet several times per year. I built a Salesforce Experience Cloud site as a one-stop shop where board members could log in and access materials they needed for each upcoming board meeting. They requested to see who attended each board meeting. I wanted to make attendance very clear and easy to see in the portal. Similarly, this was a good opportunity to build a solution that would enable my colleague to track RSVPs leading up to the meeting and then confirm attendance afterwards. I decided to create a screen flow using a data table component that would allow the user to see all board member contacts and mark whether they planned on attending the meeting or not, thereby creating multiple related records in one shot.
Here’s how I solved it
We already had a custom object called Board Meeting where each record represented an individual meeting. I created another custom object called Board Attendance which had three fields: a lookup to the Board Meeting, a lookup to the Contact object, and a picklist called RSVP Status.
I created a screen flow and embedded it on the Board Meeting record page. It presented two options to the user: “Take Attendance” or “Update Attendance”. The former option would be used to track RSVPs leading up to the meeting and would create Board Attendance related records. The latter option would be used after the board meeting to update the Board Attendance records based on their actual attendance.
If the “Take Attendance” option was selected, the screen flow shows a data table with all of the contacts marked as Board Members. The user could select multiple contacts and then select an RSVP Status (picklist) to assign to all of the selected contacts. Then, voila! Multiple Board Attendance records would be created in just a few clicks. The user would continue this process of selecting board members from the data table and then assign the relevant RSVP Status.

This is the front end of the screen flow where the user is presented with the two options. Once they go through the steps of the screen flow, multiple Board Attendance records are created.

When the user selects the “Take Attendance” option, the data table appears along with the picklist.

Related Board Attendance records are created without having to do a data import or manually create new records one at a time. This related list is exposed on the Experience Cloud site for board members to quickly see a list of attendees and their status.

When the user selects the “Update Attendance” option, the flow updates the existing Board Attendance records with the new picklist value.

Take Attendance path
Let’s step through the actions in the Take Attendance path.

I used a component called Quick Choice from UnofficialSF.com*, but using a radio button component was also an option. I chose Quick Choice because of the visual card interface, and the instant navigation where it proceeds to the next screen without having to press a “next” button.
*Note: Components available on UnofficialSF.com have not gone through Salesforce security review. We recommend you install these components in your sandbox and review the code in these components to ensure they adhere to your company’s coding standards before deploying them into production for use.

Use a Get Records element to retrieve all contacts that are marked as a current board member. Make sure to store “All records.”

Add a screen flow element and add the data table component. Use the results from the Get Records element in Step 2. This means that the data table will show all contacts that are marked as current board members.

Select the Manually assign variables box. Create a record collection variable called varSelected . This variable will “hold” all of the contacts that the user selects in the data table for later use.

The radio button component uses a Picklist Choice Set which pulls from an existing picklist on the Board Attendance object.

Insert a Loop element that loops through the collection variable varSelected.
Next, add an Assignment element. Create a single record variable for the Board Attendance object (varBoardAttend) . Then, assign the fields to be stamped onto the Board Attendance records along with the values.

Create a record collection variable varBoardAttendcollection and add the varBoardAttend variable. Note: We will take the records in the varBoardAttendcollection record collection variable later on to create the Board Attendance records.

It’s important to note that recordId is a text variable that captures the ID of the Board Meeting record. Once the screen flow is added to the Lightning record page, you must check the box that will pass the ID into the recordId variable.
![ass the ID into the recordId variable on the Lightning record page.]](https://d3nqfz2gm66yqg.cloudfront.net/images/20240327070914/Image-141.png "assignment in flow salesforce")
Use a Create Records element using the record collection variable varBoardAttendcollection from the Assignment element in Step 4.

The other path of the flow is used after the board meeting has occurred. We want to confirm their actual attendance, thereby updating the related records. This time, the data table shows all of the existing Board Attendance records. The user then selects the records and updates them with a new RSVP status.
Update Attendance path

This time, we’re using a Get Records element to get the related Board Attendance records for the meeting.

Use a Decision element to determine if there are Board Attendance records (otherwise, there’s nothing to update!).

Use a Screen element that contains a data table component showing the results from the Get Board Attendance element. We’ll save the selections in a record collection variable varSelectedAttendees .

Loop through the varSelectedAttendees. Use an Assignment element to assign the new RSVP status. Create a new record single variable called varBoardAttend2 (using the Board Attendance object). Assign the recordId and the RSVP Status, and add the varBoardAttend2 record variable to the varBoardcollection2 record collection variable.

Business results
Using a screen flow with a data table component is a great way to quickly mass create related records at once. This is a huge time saver because users don’t have to create or edit records one at a time. This avoids tons of clicks! Additionally, because a screen flow is very user-friendly, the end user can complete this task at their own pace and doesn’t need to rely on an admin to create the records through an import. I always like to empower my end users to be self-sufficient whenever possible.
Do try this at home
Using the data table component in a screen flow is pretty easy to learn. In your dev org or sandbox, create a new screen flow and test out the component (under the Screen element). Remember, you’ll first need a Get Records element to have data to expose in the data table.
Another way to use a data table is to simply display data without having a user make selections. It’s a great way to show a quick list of your organization’s Top 10 Donors/Customers This Week and put it on your home page, for example, or show a list of tasks that meet certain requirements that can’t be done from a list view. The options are endless. Have fun testing and exploring!
- Salesforce Admins Blog: 5 New Videos to Help You Understand Tricky Flow Concepts
- Salesforce Help: Create the recordId
- External site: Salesforce Ben: Salesforce Datatable Flow Component: Quick Overview
- External site: Salesforce Ben: Salesforce Flow Loops — Best Practices and Examples
Want to see more good stuff? Subscribe to our channel!
Kim strauss.
Kim Strauss is a 5x certified seasoned Salesforce professional with 20+ years in the nonprofit sector. She’s passionate about using her Salesforce wizardry to solve business challenges by designing easy-to-use and intuitive solutions for users of all levels.
Related Posts

Use a Screen Flow to Avoid Duplicates in a Private Sharing Model | How I Solved It
By Erick Mahle | March 13, 2024
Welcome to another “How I Solved It.” In this series, we do a deep dive into a specific business problem and share how one Awesome Admin chose to solve it. Once you learn how they solved their specific problem, you’ll be inspired to try their solution yourself! Watch how Erick Mahle improved user navigation within […]

Manage Permissions in a Sandbox with a Screen Flow | How I Solved It
By Karri Webster | February 21, 2024
Welcome to another “How I Solved It.” In this series, we do a deep dive into a specific business problem and share how one Awesome Admin chose to solve it. Once you learn how they solved their specific problem, you’ll be inspired to try their solution yourself! Watch how Karri Webster found a way to […]

How I Solved It: Sewing (& Flow-ing!) for Good at the Start of a Pandemic
By Rachel Park Brayboy | April 4, 2023
Welcome to another “How I Solved It.” In this series, we do a deep dive into a specific business problem and share how one #AwesomeAdmin chose to solve it. Once you learn how they solved their specific problem, you’ll be inspired to try their solution yourself! Watch how Rachel Park Brayboy used her sewing (and […]
IMAGES
VIDEO
COMMENTS
At run time, the variable assignments occur in the order you specify. Variable whose value you want to change. Select an existing variable, or create a one. The available operators depend on the data type selected for Variable. Variable and Value in the same row must have compatible data types. Example Change the value of a customer's credit ...
Flow: How To Use "Assignment". Assignment is the equal sign of flow (As you see in the icon). If you want to change the value of your variables, you will have to do it through Assignments. Some important notes before we dive into the details of Assignments: 1. Assignment Cannot Update Data Directly. If you have read my introduction of flow ...
In this Salesforce Flow tutorial we'll explain the Salesforce Flow Assignment Element in depth, showing examples of a flow assignments to set field values, u...
In Salesforce Flow, an "Assignment" is a fundamental building block that helps you manage and manipulate data and allows you to assign values to variables. Variables store and organize data within a flow, and Assignments enable you to control and modify these values as the flow progresses. It's like giving instructions to the flow on how to ...
Salesforce Flow empowers Administrators and Declarative Developers to do some pretty powerful things in Salesforce. If you've been putting in the effort to learn Salesforce Flow and are already getting the hang of it, you may be looking to push your knowledge further to really master the tool. ... Assignments can also be used to add variables ...
Salesforce Flow Cheat Sheet & Examples [Infographic] By Tim Combridge. November 06, 2023. Flow has solidified itself as the go-to automation tool that you can use to supercharge processes in your Salesforce org. However, there's so much to know when it comes to Flow! In this post, we'll cover everything Salesforce Flow - including the ...
Decision Element. The Decision element is one of the most important elements in the Flow Builder, as it allows for the creation of multiple paths based on various criteria, allowing a single flow to output different results based on decision criteria. When creating a Decision element, set the name and criteria for one or more outcomes.
In part twenty of our Salesforce Flow Builder tutorial series we continue building our before save record-triggered flow on the task object. We use an assign...
A Loop is a Salesforce Flow element that is used to iterate through a number of items in a collection variable. There are three main components of a Loop: Collection Variable: This is the Collection you want to loop through - the Collection contains multiple Variables, each of which you want to either assess or action.
Create a new Screen Flow, and in it first, create the variable that will hold the Id of the Round_Robin_Assigner__c record that will have the button to launch the flow. Remember, the variable name should exactly be ' recordId ' with the letter 'I' in a capital case. To start, let's create 3 "Get Records" elements:
Step 3.2: Salesforce Flow - Using Decision Element to Check the Lead Source . Now we will use the Decision element to check the lead source to ensure that it is equal to Partner Referral.. Under Toolbox, select Element.; Drag-and-drop Decision element onto the Flow designer.; Enter a name in the Label field; the API Name will auto-populate.; Under Outcome Details, enter the Label the API ...
Real-time Scenarios and Flow Solutions: Example 1: Lead Qualification and Assignment Flow. Scenario: Automating the lead qualification and assignment process to ensure that leads are distributed ...
When using the assignment element, operators depend on the type of the variable. For instance, if it is a text variable, only "Equals" and "Add" operators are available. On the other hand, if it is a collection variable, you will see more operator options. There are many assignment operators that you can use with collection variables.
Using Salesforce Flows for Lead Assignment Rules. Now we'll create our declarative logic of when to fire the code, using a Flow. 1) Create a new Flow by searching for Flows under Setup and clicking the New Flow button in the top right. This example is for a Record-Triggered Flow, but you can design it a number of ways.
Getting Started With Assignment Flows. For the most part, assignment rules are difficult to visualise and manage in Salesforce. Complete Leads makes it easy to create and manage assignment rules, for teams of variable sizes and complexities, in a flow-chart-style UI.
1- Install the action using the installation links below. 2- Add a new action to your flow and search for "Apply Case Assignment Rules", this is the name of the action that you installed. 3- Give a name to the action and provide the id of the case record that you want to assign. You can use this action in any flow type that supports the action ...
1- Create a Record-Triggered flow and choose to run it after create/update. Select User as the object and enter the criteria. So that the flow will run only when a user becomes active. 2- Add a Get Records element to get the "SSO" permission set. To assign it, you need the Id of the permission set.
Once the screen flow is added to the Lightning record page, you must check the box that will pass the ID into the recordId variable. Step 5. Use a Create Records element using the record collection variable varBoardAttendcollection from the Assignment element in Step 4. The other path of the flow is used after the board meeting has occurred.