

Use zoom for PowerPoint to bring your presentation to life
If you would like to make your presentations more dynamic and exciting, try using zoom for PowerPoint .

To add a zoom, go to Insert > Zoom .
To summarize the entire presentation on one slide, choose Summary Zoom
To show selected slides only, choose Slide Zoom
To show a single section only, choose Section Zoom

When you create a zoom in PowerPoint, you can jump to and from specific slides, sections, and portions of your presentation in an order you decide while you're presenting.
Note: See the Requirements table below regarding which versions of PowerPoint support the features described in this article.
Summary zoom
A summary zoom is like a landing page where you can see the pieces of your presentation all at once. When you're presenting, you can use the zoom to go from one place in your presentation to another in any order you like. You can get creative, skip ahead, or revisit pieces of your slide show without interrupting the flow of your presentation.
Create a summary zoom
Go to Insert > Zoom .

Select Summary Zoom .
The Insert Summary Zoom dialog box opens.
Select slides you want to include in your summary zoom. These become the first slides of your summary zoom sections . To learn more about using sections in PowerPoint, see Organize your PowerPoint slides into sections .

If you already have sections in your presentation, the first slide of each section is preselected by default. If you don't want to include certain sections in your zoom, deselect them. Then, if you want PowerPoint to get rid of any sections you didn't include in your summary zoom, clear the check box next to Keep unused sections in your presentation . Don't worry—the slides in the sections you're discarding will still be part of your presentation.

Once you've selected all the slides you want to use for your summary zoom, select Insert . Your summary zoom is created, and it appears as a new slide just before the first slide you included in your summary zoom.

Add or remove sections from your summary zoom
Once you've created a summary zoom, you might still want to add or remove sections of your presentation. If you've made changes since first making your summary zoom that you want to capture, you don't have to start from scratch—just update your summary zoom.
Select your zoom, and then select the Format tab on the ribbon.

Select Edit Summary , choose the sections you want to have in your summary zoom, and then select Update .
Note: You won't be able to add or remove sections from your presentation in this view, just from your summary zoom.
A slide zoom can help you make your presentation more dynamic, allowing you to navigate freely between slides in any order you choose without interrupting the flow of your presentation. They're a good option for shorter presentations without lots of sections, but you can use slide zooms for lots of different presentation scenarios.
Slide zooms help you drill down into multiple pieces of information while feeling as though you're staying on the same canvas.
Create a slide zoom
Select Slide Zoom .
The Slide Zoom dialog box opens. Select the slides you want to use in your slide zoom.
Once you've selected all the slides you want to use, select Insert .
An item for each slide you selected in step 3 is added to the slide. Select each item in turn and drag to arrange them on the slide.
Tip: If you want to, you can create a slide zoom quickly by simply selecting the slide you want from the thumbnail pane and dragging it onto the slide you'd like to have your slide zoom on. This way, you can create slide zooms and change them quickly, and arrange them however you like simply by clicking and dragging.
Change the preview image of your slide zoom
Your slide zoom by default will be a preview thumbnail image of the slide, but you can choose a new image from your PC or the web to represent the section or slide you'll be going to.

Select Change Image to choose a new picture from the web or your PC to use instead of the thumbnail.

Choose or search the web for the image you want. When you've selected the image you want, select Insert .

You can also choose various looks for your zooms from Zoom Styles —you can change the border, add visual effects, or pick from any of the border and effect combinations in the gallery.

Section zoom
A section zoom is a link to a section already in your presentation. You can use them to go back to sections you want to really emphasize, or to highlight how certain pieces of your presentation connect. To learn more about using sections in PowerPoint, see Organize your PowerPoint slides into sections .
Create a section zoom
Select Section Zoom .
Select the section you want to use as a section zoom.
Select Insert . Your section zoom will be created.
Tip: If you want to, you can create a section zoom quickly by simply selecting the section name you want in the thumbnail pane and dragging it onto the slide you'd like to have a section zoom on.
Change the preview image of your section zoom
Your section zoom by default will be a preview thumbnail image of the slide, but you can choose a new image from your PC or the web to represent the section or slide you'll be going to.
More zoom options
Zoom for PowerPoint truly lights up when you make it your own. Select the Format tab of the ribbon to get to the Zoom Tools , which you can choose to create just the look and feel you're going for when you present.
Choose to return to the home page or continue through your presentation
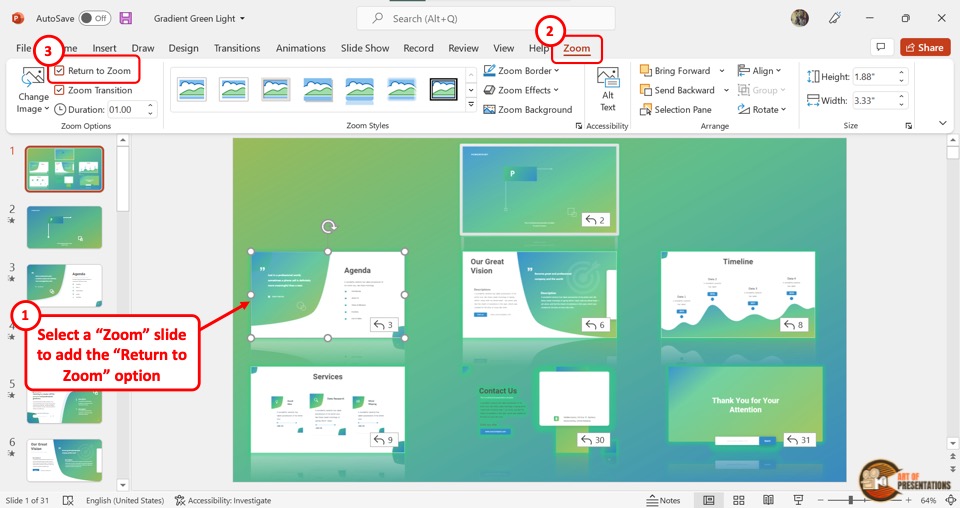
If you want to return to the zoom slide after viewing sections or slides in your summary, slide, or section zoom, make sure the Return to Zoom check box is selected. If you want to move on to the next slide after viewing part of your zoom, uncheck it.
(If you're working with a summary zoom or a section zoom, you'll return to the zoom slide by default when you're presenting after going to the section. If you're using a slide zoom, you'll move on to the next slide by default after viewing your slide zoom.)
Make the background of your zoom transparent
Another way you can change the look of your zoom is by choosing to adopt the background of the slide where your zoom lives to make the zoom almost indistinguishable from the main canvas while you present. Select Zoom Background to make your summary, section, or slide zooms blend in to their home slide.
In the Zoom Styles group, select Zoom Background . The zoom will adopt the background of the home slide.
Change the transition options of your zoom
By default, your zooms will use the zoom transition when you present, which is what helps make the zooms feel so lively. However, if you don't want to use the zoom transition, or if you want to change the duration of the transition, you can do so.
In the Zoom Options group, make sure the box next to Zoom Transition is checked if you want to use the zoom transition when presenting your zoom.
If you don't want to use the zoom transition when presenting, uncheck the box next to Zoom Transition .
To change the timing of the zoom transition, use the up and down arrows next to the Duration indicator to change how long the zoom transition lasts.
Requirements
See the following table for details on the minimum version numbers required in PowerPoint to create or play zoom links.

Need more help?
Want more options.
Explore subscription benefits, browse training courses, learn how to secure your device, and more.

Microsoft 365 subscription benefits

Microsoft 365 training

Microsoft security

Accessibility center
Communities help you ask and answer questions, give feedback, and hear from experts with rich knowledge.

Ask the Microsoft Community

Microsoft Tech Community

Windows Insiders
Microsoft 365 Insiders
Was this information helpful?
Thank you for your feedback.
How to Use the Zoom Effect in PowerPoint
Here are some tips on how to use the Zoom effect in PowerPoint to make your presentation more interactive.
PowerPoint offers many ways to make your presentations more interesting, and the zoom tool is one of the best, as it's attractive and practical.
Let’s explore what this feature is and how to use its zoom effect in your PowerPoint projects to quickly jump between slides, draw attention to important sections, and more.
What Is the Zoom Tool in PowerPoint?
As the name suggests, PowerPoint’s zoom lets you hone in on parts of your presentation while the slideshow is running. You may need to revisit slides you already mentioned, for example, or want to keep the presentation small.
All-in-all, there are three formats for your zoom effect: summary, section, and slide. With these at your disposal, as well as additional settings, you can make your project very impressive and interactive. There are some requirements in order to be able to use zooms, so check Microsoft’s support guide for more details on the feature.
How to Use Zoom on PowerPoint
On PowerPoint, go to Insert , and you’ll find the Zoom button in your Links section. If you click the arrow, you’ll find your three formats, which will open more options once set up.
Here’s a more detailed breakdown of what Zoom tools you have and how you can make the most of them. They can really come in handy when building engaging presentations in Microsoft PowerPoint .
1. Use Summary Zoom
Once you’ve created a few slides, select Summary Zoom to open a new window, where you select the slides your zoom is to highlight as your presentation’s milestones, whether you added actual sections or not.
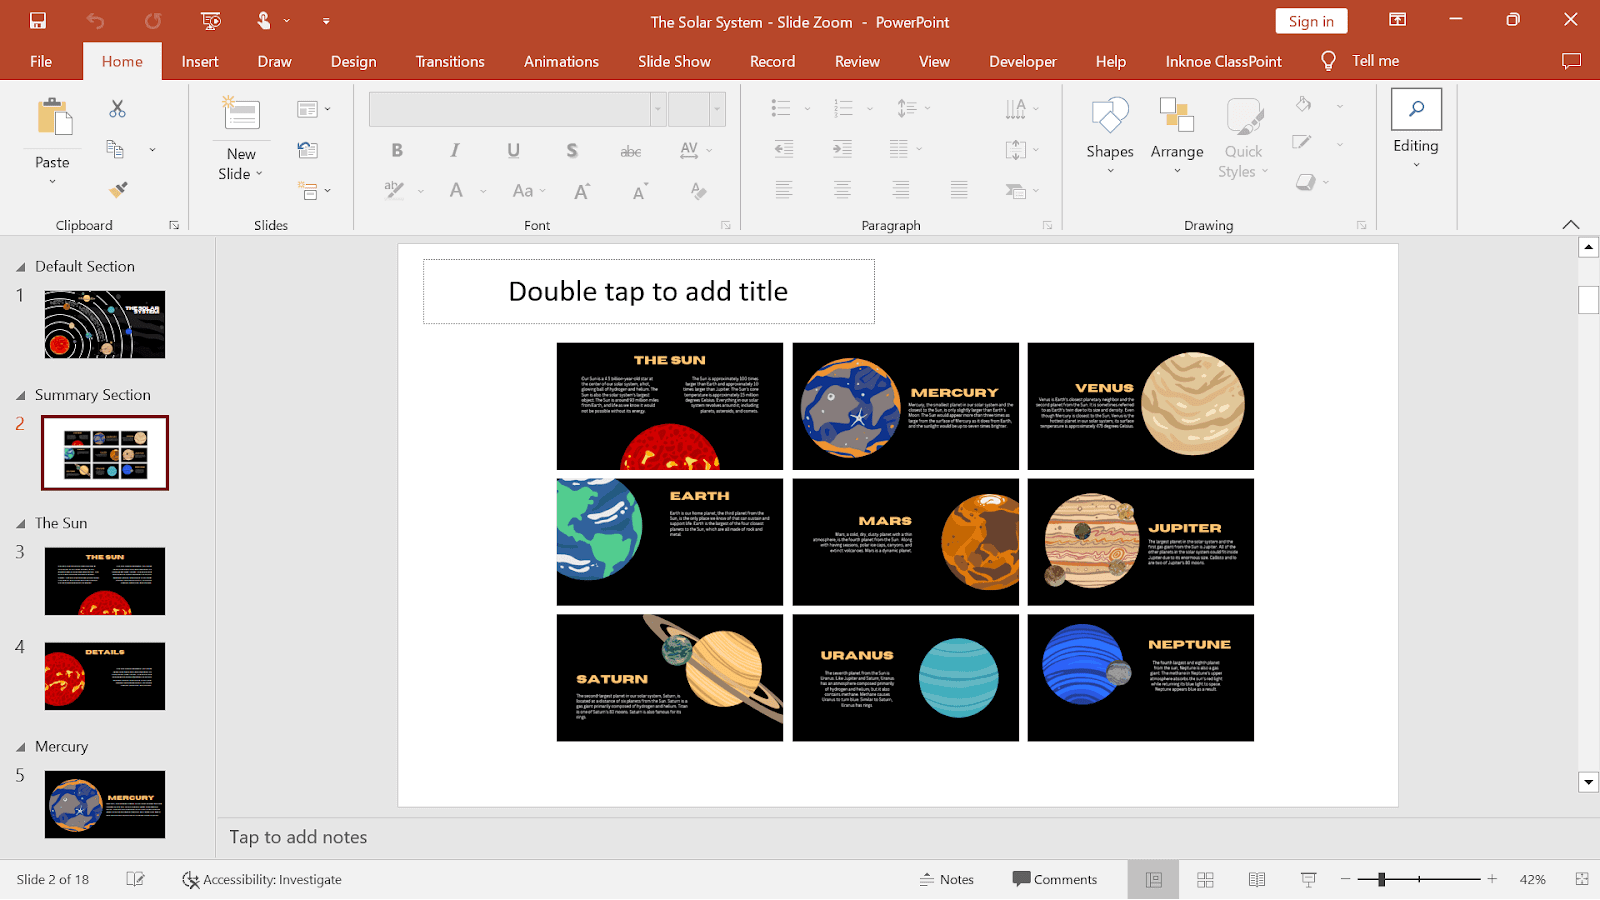
With your selection ticked, hit the Insert button, and a new slide will appear under Summary Section and containing your whole presentation behind the milestones you chose.
Basically, whatever comes after each of these slides will appear in your slideshow, but you can choose to zoom out of that section, move to another, and return later to go through these slides.
This is the beauty of Summary Zoom . It replaces your slideshow, putting it all onto a single slide instead, where you can easily jump in and out of the sections you need.
Finally, if you select the zoom feature on your summary slide, its toolbar will open and offer you options specific to this format, also available on the zoom’s menu when you right-click it:
- Edit Summary , taking you back to the slide selection window.
- Reset Layout , in case you regret adjustments you made to the summary.
- Change Image for the slides displayed in the summary.
2. Use Section Zoom
This effect is for jumping to a section from a particular slide. Let’s say you put a simple outline of your complex presentation on a slide, and you want to be able to quickly refer to it at different stages of the slideshow. PowerPoint has the answer.
Select a slide, go to your Zoom menu, and click Section Zoom . You’ll get a similar window as before, so you can choose the section you need to jump to.
Once done, PowerPoint will insert the zoom effect to your slide in the form of another slide, the one that starts the section you chose. It will also display how many additional slides the section contains.
You can resize and move the zoom feature around, as well as choose a better image for it from the Zoom toolbar or the feature’s right-click menu. So, even if you download PowerPoint templates from sites , you can add and customize zooms to your heart’s content.
3. Use Slide Zoom
If your presentation doesn’t have sections, but you want to jump to specific parts, try Slide Zoom . When setting it up, you only need to choose one or multiple slides you want to zoom to while presenting.
Like with Section Zoom , the feature will sit on a slide of your choice and will activate when you click on it, at which point you can run through its subsequent slides or go back to the feature’s home slide.
Keep in mind that you can go back and forth on PowerPoint presentations by clicking the arrow icons on each slide or using the arrows on your keyboard. Additionally, you can change the image of each Slide Zoom feature you add to your presentation using the same button as before.
How to Customize Your Zoom's Actions in PowerPoint
You can change many things about your zooms from their toolbar, starting with how they behave during your PowerPoint presentation.
These settings are in Zoom Options alongside the customization tools for each zoom type. You get three extra tools:
- Return to Zoom , which ensures that the presentation jumps back to your zoom’s home slide or section.
- Zoom Transition , which automates the return to your zoom.
- Duration refers to the above transition.
If you like using PowerPoint’s animations pane , feel free to explore how to make your zooms fly in and out of the screen in a pleasing way.
Choose Your Zoom's Style
The best thing you can customize is the zoom’s appearance, from its frame to its effects. This means you can blend it into your presentation very smoothly.
In the Zoom Style toolbar, you’ll find a range of outlines for your feature, which you can adjust further with the Zoom Border tool. Then, you have Zoom Effects , containing all sorts of impressive ways to make the feature pop, including Shadow , Glow , and 3D Rotation .
If you’d rather not deal with frames and effects, however, you can just click Zoom Background and use the home slide as the feature’s backdrop. Further changes may be necessary to blend the zoom and slide in effectively. You could even make your image’s background transparent before attaching it to the slide.
Arrange Your Zoom's Objects
PowerPoint also offers tools to rearrange zooms on their slides. First off, click on Selection Pane to see all the slide’s objects.
Then, you can bring any object forward or backward, change its alignment, and rotate them. So, it’s not just your zoom you can adjust, but everything else on the slide, too.
Change the Size of Your Zoom
While you can simply click and drag the edges of a zoom to make it bigger or smaller, you also have the Size section on the toolbar.
At first glance, you can only adjust the height and width of the zoom, but if you click the task pane icon, you’ll find several more options for the zoom’s size and position.
For example, besides choosing the dimensions and placement of your zoom, you can lock the aspect ratio you chose and even set the best resolution for your slideshow.
Add Alt Text to Your Zoom
A final cool tool for your presentation’s zoom effects lets you add alt text to them, so you can accommodate viewers who have low vision or blindness.
All you do is select a zoom and click Alt Text on the toolbar. A pane opens, where you can type in a description for the zoom or mark it as decorative.
Screen readers and apps for the blind and visually impaired , with the right tools, will be able to tell their users whether the zoom as a feature is informative or just an ornament.
Put PowerPoint’s Zoom Effects to Good Use
Now that you know what zooms can do for PowerPoint projects, consider how you can use them. Structure your slideshows well, and you’ll be able to create some highly interactive presentations, whether you’re there to present them or not.
A photographer, author, or job seeker could set up a portfolio that zooms into their works and achievements. Whole training sessions could be made compact and easier to follow thanks to PowerPoint’s zoom tool. Get to know its full capabilities.
TechRepublic
Account information.

Share with Your Friends
How to zoom in on small details in PowerPoint
Your email has been sent

Some Microsoft PowerPoint slides have a lot going on. There’s might be a lot of small details or some important content, and editing that content isn’t practical. When this happens, you can create a zoom shape and use the grow animation to zoom in on the detail or content you’re talking about. Doing so allows you to retain the big picture, both visually and conceptually, while focusing on the heart of the discussion. In this article, we’ll create a zoom effect by animating a special shape, which I’ll call the zoom shape.
SEE: 69 Excel tips every user should master (TechRepublic)
This technique is simple but has a few steps:
- We’ll create a duplicate slide with the same image.
- Using a shape, we’ll outline the zoom area to create a zoom shape—the area we want to draw attention to by making it larger. This is a term I made up; you won’t find it as a shape option or setting.
- We’ll merge the image and the zoom shape to remove everything but the zoom shape.
- Finally, we’ll move the zoom shape to the original slide and add the grow animation.
I’m using Microsoft 365 on a Windows 10 64-bit system, but you can use earlier versions. You can work with your own image or download the demonstration .pptx and .ppt file s. This article assumes you have basic PowerPoint skills, such as inserting shapes and applying settings.
SEE: Windows 10: Lists of vocal commands for speech recognition and dictation (free PDF) (TechRepublic)
How to create the zoom shape
We’re going to need two copies of the map image shown in Figure A . One will be the actual slide; the second will supply the zoom shape. To create a duplicate slide, right-click the original map slide in the Navigation pane and choose Duplicate Slide from the resulting submenu ( Figure A ). PowerPoint will add the second slide, which you’ll see in the Navigation pane just below the original.

Now we’re ready to create the zoom shape by covering that area with an oval shape and then merging the map image and the shape. Move to the second slide (if necessary) and then click the Insert tab. Grab the oval shape (in the Basic Shapes section) and while dragging it over the southern tip of South America hold down the Shift key to get a perfect circle, as shown in Figure B .

With the shape still selected, use the Shape Outline option on the contextual Shape Format tab to set the outline color to red and the weight to 3 points (or anything you like).
The next step is to merge the map and the zoom shape. To do so, select both objects by selecting one, holding down the Shift key and clicking the other. With both the map and the shape selected, click the Merge Shapes dropdown (in the Insert Shapes group), and choose Intersect. Figure C shows the results; PowerPoint hides everything but the image in the zoom shape. If the Merge Shapes option is dimmed, make sure to select both the map and the shape; this feature doesn’t work with only one selected object.

At this point, I want to mention that this effect won’t always be easy to apply if the zoom area has lots of surrounding or overlapping content. In Figure C , you can see that the zoom shape includes the longitude and latitude lines on the map. I did this on purpose; a picture is worth a thousand words. If those lines distract from the zoom shape, you can look for a new map that doesn’t include those lines. Or you can continue—that’s what we’re going to do. With the zoom shape created, it’s time to move it to the original slide and add the animation.
How to animate the zoom shape
We’re ready to add the zoom shape (in the duplicate slide) to the original slide and add the animation that “zooms in.” To do so, simply paste the zoom shape to the original slide and drag it until it’s a perfect match, as shown in Figure D . In this case, those lines we talked about are helpful! If you can’t line it up perfectly, use the Nudge feature to move the zoom shape a tad. To do so, hold down the Ctrl key and click the appropriate arrow key.

With the zoom shape in place, we’re ready to move on to the last step. Before applying the animation, let’s determine how we want to trigger it. Most likely, you’ll want to use a click event; that way you can trigger the animation when you’re ready. When applying this to your own work, you can choose any event you like.
With the zoom shape selected, click the Animations tab and then click the gallery’s More button (circled in Figure E ) to expose all the animations. In the Emphasis section, click Grow/Shrink. Next, from the Effect Options dropdown, choose Huge.

You’re done! To see the effect, run the show by pressing F5. When you’re ready to see the zoom effect, as shown in Figure F , click the slide.

This zoom technique requires a few steps and as shown, a bit of thought when selecting the best image, but it’s easy to implement considering the results.
Subscribe to the Developer Insider Newsletter
From the hottest programming languages to commentary on the Linux OS, get the developer and open source news and tips you need to know. Delivered Tuesdays and Thursdays
- 7 tips for working more efficiently with PowerPoint shapes
- Select multiple objects in a PowerPoint slide
- Microsoft 365: A cheat sheet
- Zoom vs. Microsoft Teams, Google Meet, Cisco WebEx and Skype: Choosing the right video-conferencing apps for you (free PDF)
- Checklist: Securing Windows 10 systems
- Everything you need to know about the Microsoft Exchange Server hack
- Must-read coverage: Windows 10

Create a TechRepublic Account
Get the web's best business technology news, tutorials, reviews, trends, and analysis—in your inbox. Let's start with the basics.
* - indicates required fields
Sign in to TechRepublic
Lost your password? Request a new password
Reset Password
Please enter your email adress. You will receive an email message with instructions on how to reset your password.
Check your email for a password reset link. If you didn't receive an email don't forgot to check your spam folder, otherwise contact support .
Welcome. Tell us a little bit about you.
This will help us provide you with customized content.
Want to receive more TechRepublic news?
You're all set.
Thanks for signing up! Keep an eye out for a confirmation email from our team. To ensure any newsletters you subscribed to hit your inbox, make sure to add [email protected] to your contacts list.
Zoom Feature in PowerPoint – How to Use it Correctly!
By: Author Shrot Katewa

It is hard to accept but even the most seasoned PowerPoint users find it hard to create a table of contents that is visually modern-looking and interactive! The “ Zoom ” feature can help not only with the table of contents but much more than that!
The zoom feature in PowerPoint helps create visual links between sections of your presentation. It makes the presentation interactive by adding a clickable thumbnail of a slide or a section in your presentation and allowing you to easily navigate within your presentation with cool effects!
Even if you use PowerPoint regularly, chances are you aren’t fully aware of the “Zoom” feature in PowerPoint.
And, by now if you are thinking about zooming in on the slides using the functions provided at the bottom-right corner of PowerPoint, then you really need to go through this article as you might not be aware of one of the most awesome features in PowerPoint called “ Zoom “.
1. What is Zoom in PowerPoint?
Imagine if you could just click on an image on your slide and it just zooms into that image, opening the section of your presentation that provides more information about that image! The “Zoom” feature in PowerPoint, does exactly that!
The zoom feature in Microsoft PowerPoint is a new feature that makes your presentations interactive and dynamic. Using the zoom feature in PowerPoint, you can create a zoom slide from which you can jump to and from specific slides or sections in any order you may need during the presentation.
Let’s explore this feature by checking out some of the different types of “zoom” that you can add to your presentation –
1a. Summary Zoom
The “Summary Zoom” in Microsoft PowerPoint is a landing page where you can see the summarized slides within a page.
In the summary zoom, you can select which slides to show. You can even create summary slides to show on the summary zoom. During the presentation, you can click on any slide on the summary to proceed according to the need of the audience rather than the preset slide progression.
1b. Section Zoom
In Microsoft PowerPoint, “Section Zoom” is a slide that contains the preview and the link to the sections within the presentation.
You can click on them to jump from one section to another to highlight the important parts of your presentation.
1c. Slide Zoom
The “Slide Zoom” feature in PowerPoint allows you to navigate freely through the slides in a presentation. In the slide zoom, you can add all the slides or a few selected slides.
From this section, you can move freely between slides, emphasize the important slides, and even cut the presentation short without seeming so to the audience.
2. How to Insert Slide Zoom in Microsoft PowerPoint?
To use the “Zoom” feature in PowerPoint, first, click on the “Insert” tab. Then, click on the “Zoom” button from the ribbon. Choose the type of zoom from “Summary”, “Section”, and “Slide” zoom. Next, select the slides from the window that pops up by holding the “Ctrl” key, and click on “Insert”.
Here’s a step-by-step process with visual aids on what you need to do –
Step-1: Click on the “Insert” tab
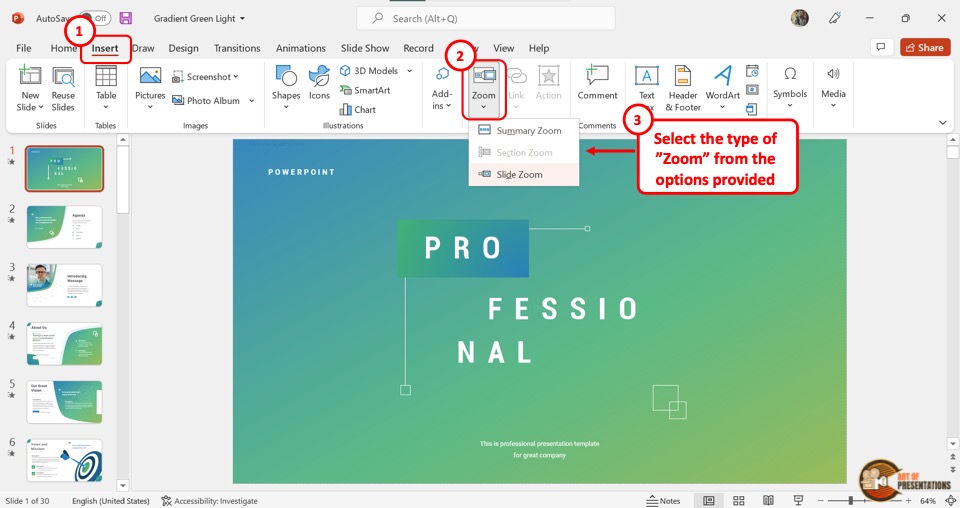
The first step is to open the “Insert” menu. Click on the “Insert” tab which is located in the menu ribbon at the top of the screen.
Step-2: Click on the “Zoom” button
In the “Links” section of the “Insert” menu, click on the “Zoom” button. This will open a dropdown menu. Click on the “Slide Zoom” option from the dropdown menu.
Step-3: Choose the Slide and Click on “Insert”
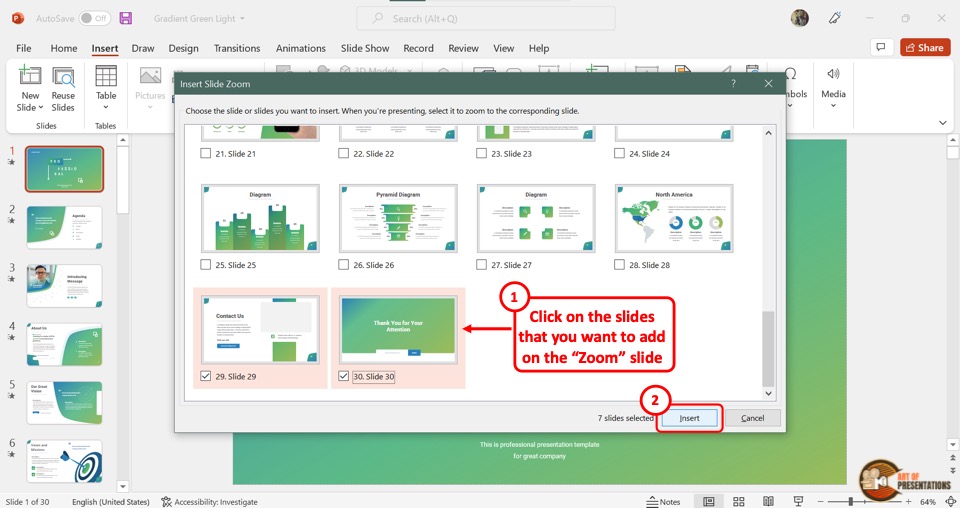
Clicking on the “Slide Zoom” option will open the “Insert Slide Zoom” dialog box.
Select the slides you want to include in the slide zoom and then click on the “Insert” button at the bottom of the dialog box. Now all you have to do is arrange the slides in the slide zoom according to your preference.
3. How to Edit Slide Zoom in PowerPoint?
Once you add the slide zoom to your presentation, you can easily edit it. To access the editing pane, all you have to do is click on the slide zoom. Then click on the “Zoom” tab in the menu ribbon.
3a. Change Borders in Slide Zoom
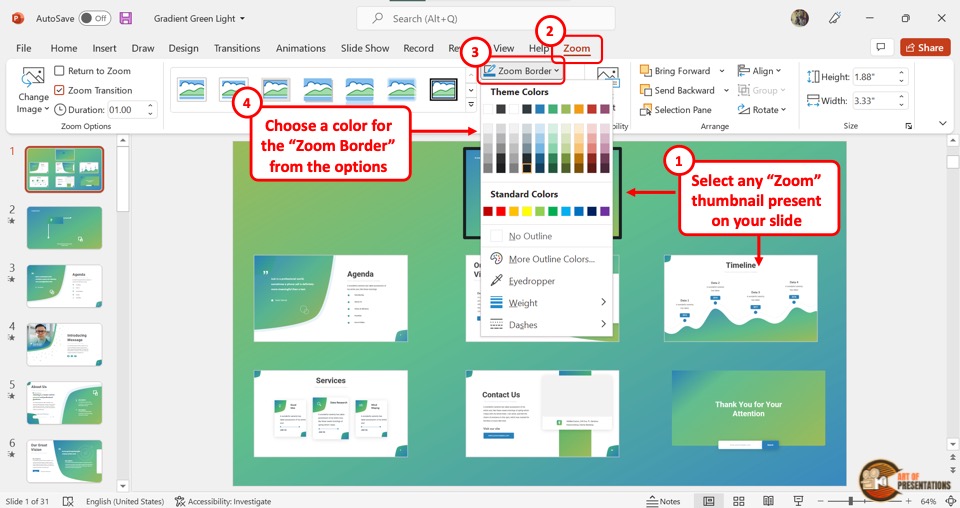
To add or change the border of the slides in slide zoom, click on the “Zoom Border” option. In the dropdown menu, you can click on your preferred color for the border.
You can also click on the “Weight” option and select the border width from the secondary menu. To change the border design, click on the “Dashes” option.
3b. Add Effects in Slide Zoom
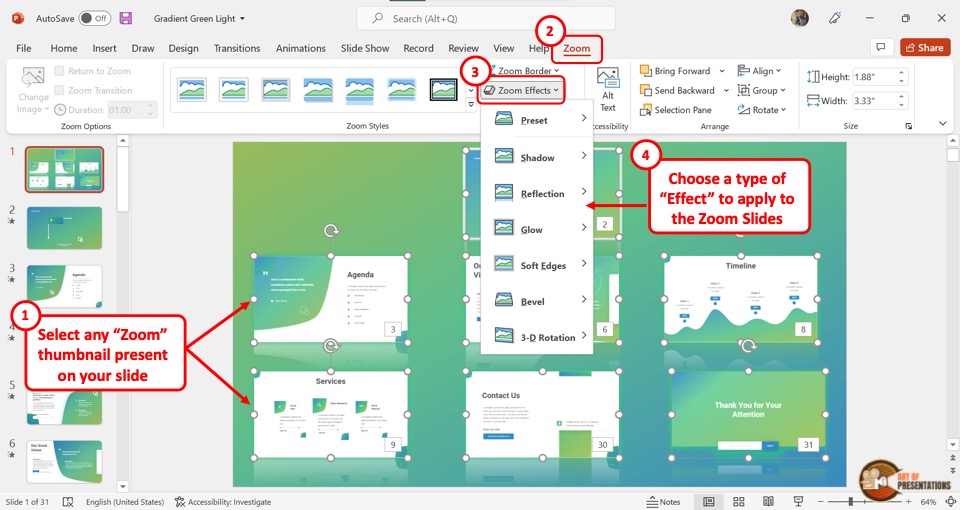
You can add various effects in the slide zoom. To do so, you have to first click on a single or multiple slides in the slide zooms where you want to add effects.
Then click on the “Zoom Effects” option. In the dropdown menu, you can click on any effect option to open a secondary pop-up menu. Click on your preferred effect. You can add multiple effects on a single zoom slide.
3c. Remove Background in Slide Zoom

In Microsoft PowerPoint slide zoom, you can remove the slide background of each slide in the slide zoom. Click on the “Zoom Background” option in the “Zoom Styles” section under the “Zoom” tab. This will remove the background of the selected slide.
4. How to Change Picture in Slide Zoom?
In Slide Zoom, the default thumbnail pictures are a screenshot of the slides. However, you can change the pictures if you want. All you have to do is follow the 4 easy steps.
Step-1: Click on the “Zoom” tab
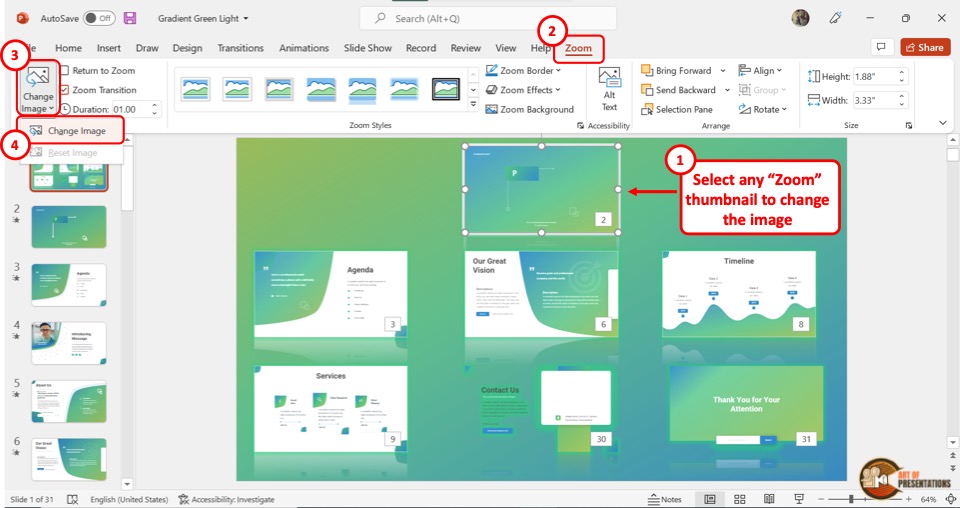
The first step is to click on the slide thumbnail that you want to change. Then click on the “Zoom” tab at which is the last tab in the menu ribbon.
Step-2: Click on the “Change Image” option
The second step is to click on the “Change Image” button which is the first option in the “Zoom Options” section of the “Zoom” menu (as shown in the image in step 1).
Then click on the “Change Image” option from the dropdown menu.
Step-3: Click on “From a File”
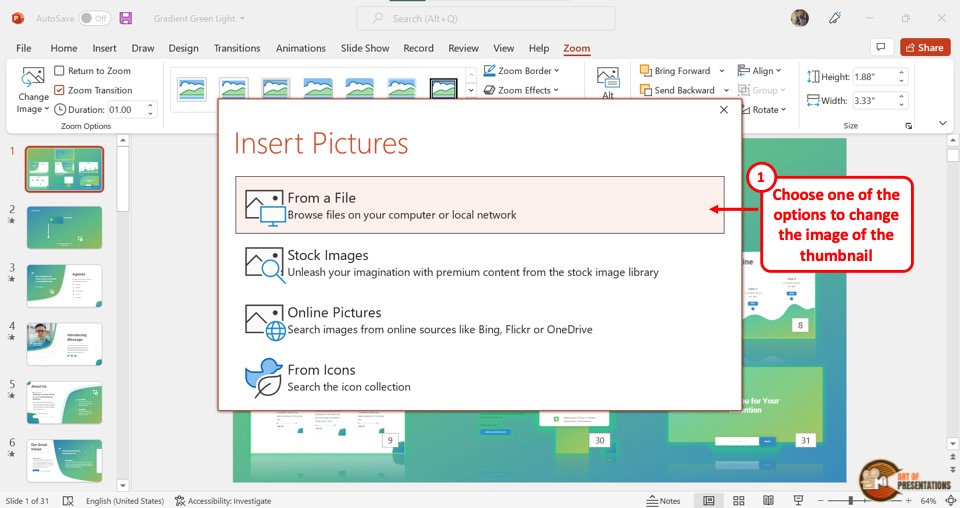
When you click on the “Change Image” option, it will open a dialog box. In the “Insert Pictures” dialog box, click on the “From a File” option. This will open another dialog box.
Step-4: Click on the “Insert” button
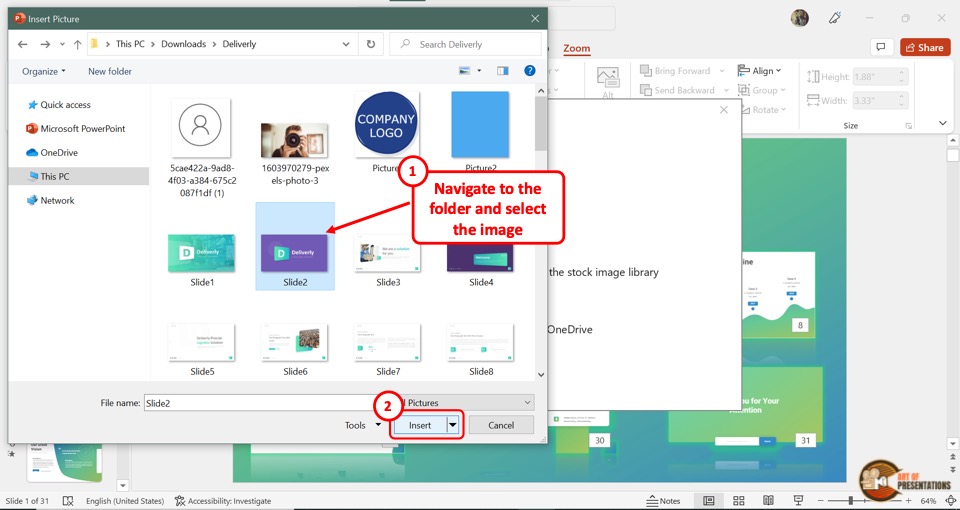
In the “Insert Picture” dialog box, click on the image which you want to add to the slide thumbnail in the slide zoom.
Then click on the “Insert” button at the bottom of the dialog box. In the slide zoom, the original thumbnail will be changed to the selected image.
4a. How to Reset Picture in Slide Zoom?
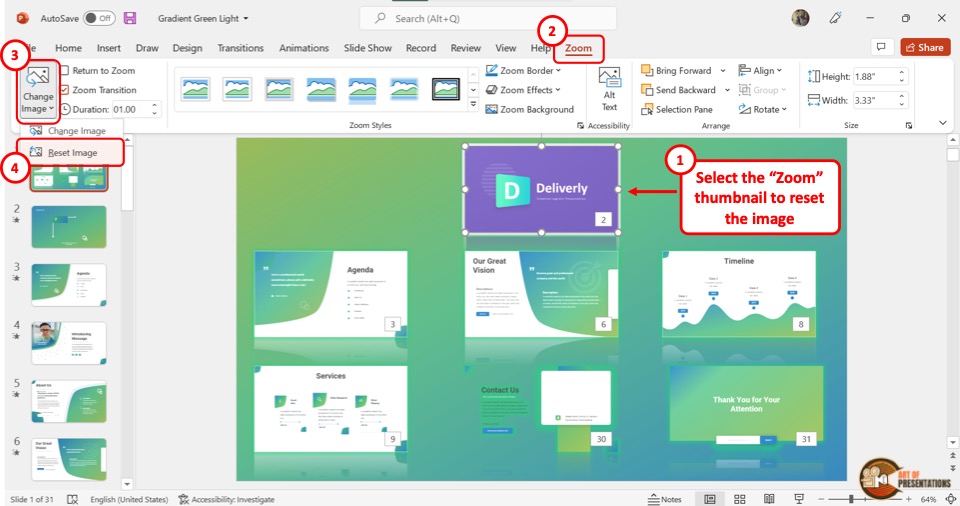
Once you change the picture of the slide thumbnail in the PowerPoint slide zoom, you can revert it to the original thumbnail.
All you have to do is click on the “Change Image” button in the “Zoom” menu. Then click on the “Reset Image” option from the dropdown menu.
5. How to Stop Slide Zoom?

In the Microsoft PowerPoint slide show, the presentation will return to the slide zoom, after each slide. To stop this, select the slide in the slide zoom and then click on the “Zoom” tab in the menu bar.
In the “Zoom” menu, click on the “Return to Zoom” option. The checkmark in the box next to it will disappear. This will stop the slides from returning to the slide zoom screen.
5a. How to Return to Slide Zoom?
Once you stop the slide zoom on Microsoft PowerPoint, you can turn on the feature again. All you have to do is select the slide again and click on the “Zoom” tab. Then click on the box next to the “Return to Zoom” option.
The checkmark will appear again. Now the screen will return to the slide zoom after the selected slide during the presentation.
Credit to nakaridore (on Freepik) for the featured image of this article (further edited)
Easy PowerPoint Zoom Tutorial (Free Templates & Examples)

Sara Wanasek

Tired of navigating your slides in a chronological order? Looking for ways to spice up the way you interact with your presentation and engage your audience?
Transform your boring presentations into something more engaging and captivating with PowerPoint’s Zoom feature. PowerPoint Zoom allows you to create dynamic, non-linear presentations. Think of it as building a Prezi inside PowerPoint. Jump from one point in your presentation to the next seamlessly by creating links to the different sections of your presentation.
By utilizing PowerPoint’s Slide Zoom, Section Zoom, and Summary Zoom, you can easily create an entertaining and engaging presentation for your audience. There are many different ways to add these to your presentation, so read on to learn how to use PowerPoint Zoom and implement it in the best ways!
Table of Contents
What is powerpoint zoom.
PowerPoint’s Zoom feature is a tool that allows you to create interactive PowerPoint presentations . It enables you to zoom in and out of specific sections or slides, creating a more dynamic and immersive experience for your audience. With PowerPoint Zoom , you can easily create links or “zoom areas” on your slides such that when clicked during a presentation, can allow you to navigate to specific slides or sections and focus on the content that is most relevant at any given time—there’s no need to be stuck with whatever slide is chronologically next.
Why Use PowerPoint Zoom?
PowerPoint Zoom lets you present in a more flexible and interactive way. For instance, you can create a dynamic menu that allows your audience to help you choose which topics to cover first. With just a click, you can jump to that slide or section and relay that information.
PowerPoint Zoom is also particularly useful for storytelling , guiding your audience through a series of complex information without being restricted to a traditional linear slide progression.
No need for hyperlinks, tedious work, or coding—PowerPoint Zoom allows for a seamless setup and flow of your presentation.
Let’s dive right in and discover how to make a zoom effect in PowerPoint!
How to Make a Zoom Effect in PowerPoint?
PowerPoint’s Zoom feature consists of three different options: Slide Zoom, Section Zoom, and Summary Zoom. While their setups are similar, the reasons for using each one vary.

Below we will delve into each of these PowerPoint Zoom options in depth.
Download our FREE PowerPoint Zoom template to follow along! 👇
Slide Zoom PowerPoint Templates
Turn your PowerPoint into an interactive experience today with this Slide Zoom template!
When to use Slide Zoom? ⏲️
Slide Zoom, as the name suggests, allows you to create links and “zoom in” on the content of another slide without following the traditional slide-to-slide progression. This comes in especially handy when you want to direct your audience’s attention to a particular image, chart, or piece of information on a slide instantly.
How to use Slide Zoom? 💻
1. Select the Main Starting Slide : To use PowerPoint Slide Zoom, first select the starting slide where you intend to apply the Zoom effect. In our example, we are using the Iceberg Model illustration as our starting slide. We want to zoom into the different description slides from our Iceberg Model slide.
2. Access the Slide Zoom Feature : Next, click Insert > Zoom > Slide Zoom . From here, choose the slide, or slides, that you want to zoom into. Click Insert and a thumbnail or thumbnails of the slides will appear on your current slide.

3. Rearrange the Thumbnails : Rearrange the thumbnails on your slide to match your design and layout.
4. Test the Slide Zoom: Now, in presentation mode, when you click on the slide thumbnails, you can zoom into the particular slides!
With a smooth Slide Zoom effect, you will notice that transitioning from slide to slide has become significantly more engaging!
Zoom Option: Zoom Background

Notice the thick outline of each slide you added to Zoom? Let’s remove that for a cleaner, more professional look on your slides.
To do that, click on the added Zoom slide thumbnail , then click the Zoom tab in the PowerPoint ribbon. Now, click on the Zoom Background option to hide the default background and match the background of the thumbnail to the background of your current slide.
Zoom Option: Return to Zoom
Another customizable option is the Return to Zoom feature.
With the current setup of Slide Zoom, once you click on the Zoom thumbnail and navigate to the zoomed in slide, you cannot return to the main starting slide. In other words, you will move on to the next slide in a linear order, with essentially an added zoom transition.
On the other hand, by applying Return to Zoom, you will be brought back to your main starting slide every time instead. This way you can click change the order of your slides. For example, with Return to Zoom enabled, when I can click on next slide after clicking on the “Phase #3 The Structure” slide, I will be brought back to the main starting slide instead of the “Phase #4 Mental Models” slide.

To make this happen, after selecting each of your Zoom slide thumbnails, simply click on the Return to Zoom option from the Zoom tab.
Section Zoom
When to use section zoom ⏲️.
While Slide Zoom allows you to zoom into one slide at a time, Section Zoom allows you to zoom into a specific section containing multiple related slides of your presentation. This is especially helpful for longer presentations or presentations with multiple topics.
How to use Section Zoom? 💻
Here, we have a deck about the Solar System. Each planet has its own section with a couple slides underneath each section. Our main slide has an overview of the whole Solar System. In this case, I would like to be able to click on a planet, then be able to learn more about that planet. You can easily do this with Section Zoom!
1. Select the Main Starting Slide : Similar to PowerPoint Slide Zoom, you have to select a starting slide where you intend to apply the Zoom effect for Section Zoom. Here we are using the Solar System slide as our main starting slide where we can zoom into the different planet sections.
2. Access the Section Zoom Feature : On the overview slide, click Insert > Zoom > Section Zoom . Then choose the sections you would like to Zoom into and click Insert . The thumbnails of the first slide of each section will appear in your current slide.
Zoom Option: Change the Image
Don’t like how the different thumbnails are making your slide looks cluttered, fret not, you can change the thumbnail image of your slides for easier viewing.
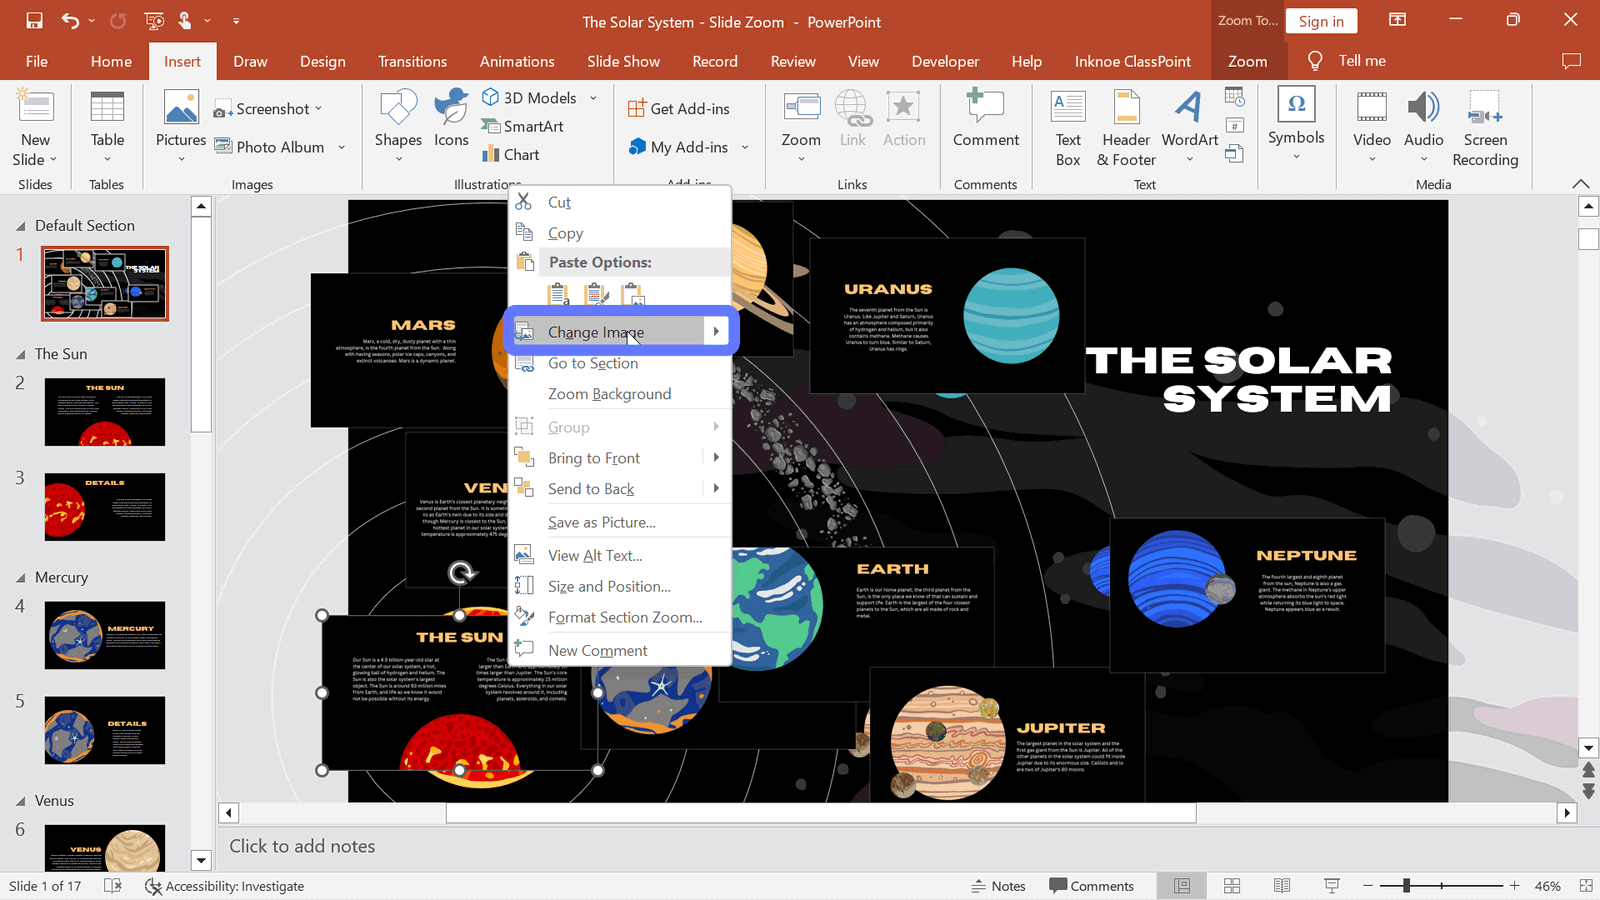
To do this, right-click on the zoom slide thumbnail and select Change Image . Then, substitute it with an image or screenshot from your device. For instance, you can take screenshots of the different segments in your slide to “hide” the zoom slide thumbnails underneath these screenshots.
Now, when you enter presentation mode, instead of clicking z zoom slide thumbnail, you can click on a planet to zoom into a desired section! Watch this video to learn exactly how to do it!
Summary Zoom
When to use summary zoom ⏲️.
The third and final PowerPoint Zoom feature is Summary Zoom. It lets you create a summary or overview slide that acts as a hub for your presentation. It is perfect for those times when you want to give your audience a quick recap or provide them with a visual roadmap of your presentation.
Similar to Section Zoom, Summary Zoom contains links to specific sections or slides in your presentation, allowing you to navigate to the most relevant parts of your presentation. The main distinction lies in the fact that the Summary Zoom feature will automatically generate a summary slide containing thumbnails of each section or slide for your convenience.
How to use Summary Zoom? 💻
1. Select the Main Starting Slide : Similar to both PowerPoint Slide Zoom and Section Zoom, you have to select a starting slide where you intend to apply the Zoom effect for Summary
2. Access the Summary Soon Feature : To use PowerPoint Summary Zoom, click Insert > Zoom > Summary Zoom . This will create a new slide that displays a summary of your presentation, with thumbnails of each slide.
3. Customize Appearance : You can customize the appearance of the Summary Zoom slide by selecting the Format tab. Here, you can choose from various layouts, fonts, and colors to make the slide visually appealing and aligned with your presentation’s theme.
During your presentation, easily navigate to any slide by clicking on the different Zoom slide thumbnails. It’s a great way to give your audience an easy-to-follow roadmap and ensure they stay engaged and focused throughout your presentation.
Real-World PowerPoint Zoom Examples to Engage Your Audience
Here are some real-life examples of how to use PowerPoint Zoom to create engaging and immersive presentations:
- Sales Pitch
Create interactive slides with zoomed-in images and key features for your products or services. By allowing the audience to explore products in detail, you can generate more interest and engagement during a pitch.
- Educational Lecture with Organised Sections
Similar to our Solar System deck, you can organize your presentation into sections so that students can go through the presentations at their own pace starting with what interests them the most.
Add interactive questions to the presentation using ClassPoint , to make it even more engaging.
- Team Meeting Roadmap
Create an engaging team meeting with Summary Zoom. Highlight key milestones and deliverables in a visual and clear roadmap to help the team stay focused and engaged throughout the meeting.
- Interactive Visuals
Use maps and charts as your overview slide and add zoom slide thumbnails of added information to showcase further data, information, and analytics.
- Virtual Tours or Walkthroughs
Simulate a virtual tour or walkthrough using images on your slides. Add the Zoom feature to replicate “moving” from one “location” to another.
PowerPoint Zoom FAQ
Here are some common FAQ’s about this powerful tool:
What are the differences between the PowerPoint Zoom Options?
Slide Zoom zooms from one slide to the next while Section Zoom zooms into a whole section of your presentation before bringing you back to the overview slide. The Summary Zoom option provides you with a Table-of-Contents-like slide for an easy overview of your whole presentation.
How to make Prezi in PowerPoint?
You can make a PowerPoint that looks similar to Prezi with PowerPoint’s Zoom feature. With your selected slide to Zoom into, click on the Insert tab, Zoom, and select Slide, Section, or Summary Zoom.
Can I use PowerPoint Zoom on any version of PowerPoint?
PowerPoint Zoom is available on PowerPoint 2019, PowerPoint 2016, and PowerPoint for Microsoft 365. Make sure you have the latest version to take advantage of this feature.
Will my audience need any special software to view the Zoom features?
No, your audience does not need any special software. The Zoom features will work seamlessly when you present your PowerPoint file on any device with PowerPoint installed.
Can I use Zoom in combination with other PowerPoint animations and transitions?
Yes, you can! PowerPoint Zoom works well with other animations and transitions, allowing you to create a truly immersive and engaging presentation.
Can I edit or remove Zoom features from my presentation?
Absolutely! You can easily edit or remove Zoom features from your presentation at any time. Just follow the steps outlined in this blog post to make any necessary changes.
Yay! You now can create an even more engaging presentation with PowerPoint’s Zoom feature.
The versatility and impact of PowerPoint Zoom can be used in various settings. By incorporating this feature into your presentations, you can captivate your audience, enhance information retention, and create a memorable experience for your listeners.
Experience the power of PowerPoint Slide Zoom firsthand! Begin by exploring our templates and seamlessly integrate this feature into your upcoming presentations.
About Sara Wanasek
Try classpoint for free.
All-in-one teaching and student engagement in PowerPoint.
Supercharge your PowerPoint. Start today.
500,000+ people like you use ClassPoint to boost student engagement in PowerPoint presentations.

- Tips & Tricks
- PowerPoint Templates
- Training Programs
- Free E-Courses
How To Zoom Into Your Picture in PowerPoint
Home > All Tutorials > PowerPoint Animation > Zoom effect in PowerPoint
Learn to create a focused zoom for photos in PowerPoint. Follow our simple step by step instructions to get more out of your graphics in business presentations.
Here is the focused zoom effect in PowerPoint you will learn today:
You can use the effect to focus on…
- A certain part of a map
- Certain steps in a process
- A certain person in a group photo etc.
Let us see how to achieve the effect in a step-by-step way…
Step 1: Decide the part you want to focus on
The first step after sticking a picture on your slide is to decide the area you want to focus on. Draw a circle around the area. To make it easier to identify the outline, remove the shape's fill and color it white.

In the Custom Animation Pane add an entrance animation called ‘Wheel’ to the white circle. In the animation effect setting, change the number of spokes to 1. This will be the first part of the animation we want to create.
Step 2: Make a copy of the part you want to focus on
The main idea in this step is to make a copy of the flower and place it right on top of the flower picture in the background. For this, make a copy of the photo. Using the ‘crop’ tool crop the photo till the four sides touch the edge of the white circle.

We don’t want this cropped image to be a square. We want it to be a circle. For this, we need to make a copy of the white circle, remove the animation and fill it with the picture of the flower.
So, first ‘copy’ the cropped photo. By doing this, the piece is stored in the clipboard.
Select the copied white circle and right click to go to the ‘Format shape’ dialog box. Go to Fill -> Picture or texture fill -> Clipboard. This fills the shape with the cropped photo. Remove the outline.
Increase the transparency of the circular flower image to position it in the right place on top of the background picture. Transparency should be restored to 0%.

Now, we have a picture in the background, a hollow white circle with a ‘wheel’ animation. In addition, we have a circle with the photo of the flower placed on top of the flower picture in the background.
Related: Transparent PowerPoint Sphere tutorial
Step 3: Apply ‘Grow/ Shrink’ animation
Click on the circle with the flower image. Apply the entrance effect 'Appear', and let the start be ‘After Previous’. Click on the flower image once again and add the ‘Grow/Shrink’ animation to make it grow to 150%. Set the speed to 'fast'. The animation should start 'After Previous’.
Now you can play the animation. Here is the sequence of what will happen:
- First, the hollow white circle appears with wheel animation to mark the area being zoomed in
- The picture of the flower ‘appears’ and ‘grows’ to 150%
- This creates the zoom effect in PowerPoint you saw at the start of this tutorial.
Isn’t the effect interesting? By learning the base technique, you can customize it to suit your needs.
If you have an issue with the quality of photos when using the 'grow' animation, you can find a solution in this tutorial .
Variations of the Zoom Effect in PowerPoint
It takes a lot of time and effort to create professional quality custom animated slides for your business slides. Most business presenters don’t have the time to create such high-quality slides for themselves. This is the reason we came up with a collection of 750+ Advanced Animated Templates for PowerPoint .
Here is a variation of the picture animation from the pack…
Here is a variation where we have used a ‘snapshot’ effect to showcase images.
Source: Graphics from Advance Animated Templates for PowerPoint
You can browse through the various animations in the Advance Animated Pack by clicking right here .
If you find this article useful, please leave us a comment below.
Related: PowerPoint Magnifying Glass Tutorial
Return to Main Animation Page
Return to Top of Zoom Effect in PowerPoint Page
Share these tips & tutorials
Get 25 creative powerpoint ideas mini course & members-only tips & offers. sign up for free below:.
PowerPoint Zoom: Bring Your Presentation to Life – Just Like in Prezi!
If you use Prezi, you’re used to spectacular zooms in your presentations. With just a few clicks, you can also create a PowerPoint zoom to navigate impressively through your presentation and open and close selected chapter slides.
Zooming in PowerPoint is more than zooming in or out on a slide. The feature creates small thumbnails of the desired slides which can be enlarged or opened in presentation mode with a click. With another click, you can reduce their size or close them to return to your overview.
Keep reading to learn how to add this dynamic effect to your presentation.
PowerPoint Zoom. What is it?
A PowerPoint zoom allows you to jump to specific sections and slides in your presentation. The order doesn’t have to be decided in advance — you can decide while presenting. The advantage of this is you don’t have to search for a slide during your presentation . This keeps your presentation flowing and your audience interested.
Zoom for PowerPoint is available in Microsoft 365 and PowerPoint 2019 and for Mac users starting from version 6.19.18110915.
Which PowerPoint versions support zoom?

Tutorial: Set PowerPoint zoom effects
To set a PowerPoint zoom, go to the Insert tab and select Zoom.

You’ll see several different zoom types under this option. In the next section, we will explain what Summary Zoom , Slide Zoom and Section Zoom are and how you can apply them to your presentation.

Summary zoom
Summary zoom provides an overview of your entire presentation on one slide . You can use it to jump from one place in your presentation to another however you like . The slides you include will become the first slides of your summary zoom sections.
You can create a summary zoom by going to Zoom > Summary Zoom . This will open the Insert Summary Zoom dialog box. You can now click the slides you want to display in your summary zoom. You can also unclick slides if you don’t want your entire presentation displayed.

Once you have selected your slides, click Insert. Your summary zoom will be created and displayed as a new slide in front of the first slide of your presentation. You can edit your summary zoom even after you’ve created it. To do this, go to the Format tab and then select Edit Summary .
Slide zoom is the optimal solution to make your presentation more dynamic and make it easier to present . It creates links to specific slides in the presentation so you can navigate freely in a sequence of your choice.
To create a slide zoom, go to Insert > Zoom > Slide Zoom to open the Slide Zoom dialog box. Now select the slides you want to use and click Insert to create your PowerPoint.

PowerPoint automatically sets your slide zoom as the preview thumbnail of the slide. To replace this image with one of your own, go to the Format tab . Then click Change Image to insert an image from your computer or the Internet.
Section Zoom
A section zoom is a link to a zoom that is already in your presentation . The
section zoom is great for switching between sections .
Go to Inser t > Zoom > Section Zoom . Now choose the section that you want to use as a section zoom. Click Insert .

As with the other zoom effect options, PowerPoint sets a preview thumbnail. You can change this to an image of your choice by following the same steps as mentioned under Slide Zoom .
Zoom options
To edit your zoom, go to Format > Zoom Tools . Here are some of the options available:
1. You can make the background of your zoom transparent by selecting Zoom Background under Zoom Styles .

2. You can also change the transitions of your zoom. To do this, select the Zoom Transition. You can use the arrows next to it to change the display duration of your zoom.

3. To return to your zoom slide after viewing sections or slides, make sure you’ve selected Return to Zoom . The box can be found in Format tab.

Conclusion: Discover PowerPoint Zoom!
If you want to bring your PowerPoint presentations to life, the various zoom functions are excellent. Your presentation will look more professional and you will be able to keep the attention of your audience.
Don’t hesitate to contact us if you have any questions or are looking for professional help and tips! Feel free to contact us at this mail: [email protected] .
These articles might also interest you:
- PowerPoint Morph
Share this post
- share
- save

Design Thinking: Problem Solving with a Difference

Why Corporate Mission Statements Are So Important

7 Tips & Learnings from the Apple Keynote
- PowerPoint Themes
- Latest PowerPoint Templates
- Best PowerPoint Templates
- Free PowerPoint Templates
- Simple PowerPoint Templates
- PowerPoint Backgrounds
- Project Charter
- Project Timeline
- Project Team
- Project Status
- Market Analysis
- Marketing Funnel
- Market Segmentation
- Target Customer
- Marketing Mix
- Digital Marketing Strategy
- Resource Planning
- Recruitment
- Employee Onboarding
- Company Profile
- Mission Vision
- Meet The Team
- Problem & Solution
- Business Model
- Business Case
- Business Strategy
- Business Review
- Leadership Team
- Balance Sheet
- Income Statement
- Cash Flow Statement
- Executive Summary
- 30 60 90 Day Plan
- SWOT Analysis
- Flow Charts
- Gantt Charts
- Text Tables
- Infographics
- Google Slides Templates
- Presentation Services
- Ask Us To Make Slides
- Data Visualization Services
- Business Presentation Tips
- PowerPoint Tutorials
- Google Slides Tutorials
- Presentation Resources
How To Highlight Certain Parts Of Your PowerPoint Presentation

PowerPoint includes several wonderful features that will make your presentation stand out and leave an impression on your audience. One such function is PowerPoint’s Zoom Effect.
You can use the Zoom feature to draw your audience’s attention to any part of your presentation. This is an excellent approach to direct your audience’s attention to the most crucial element of your presentation.
This is what a zoom effect looks like in a presentation:
30 60 90 Day Plan Zoom Animation Template
Source: 30 60 90 Day Plan Zoom Animation Template
What is Zoom Effect?
The Zoom feature in PowerPoint, which was introduced in 2016, enables you to show your slides in whatever sequence you desire. Traditionally, PowerPoint presentations have followed a tight linear style. They begin at the beginning and terminate at the conclusion, and if you need to return to an earlier slide, your viewers will simply have to wait as you cycle through them.
Not any longer. PowerPoint will construct a menu slide and all the hyperlinks for you with just a few clicks, allowing you to arrange your slides in whichever order you or your audience like.
Why use the Zoom Effect?
Interactivity can make the difference between a good presentation and a great one. Interactivity places your audience at the center of your story, gives them control, and fosters trust between viewer and speaker. It dismantles imagined barriers between people on and off the stage. When it comes to relationships, walls are never a good thing.
You can let your audience select where they want to go next by installing a menu system in PowerPoint, and you’ll be able to go to the slide that supports the conversation with only one click.
While menu systems have always been available in PowerPoint, they required a lot of human effort, duplicated slides, invisible triggers, and hyperlinks galore prior to Zoom. PowerPoint now handles all of the physical work for you.
Learn How To Create A Zoom Effect In Your PowerPoint Presentation
Here is a step-by-step tutorial that will help you in creating a zoom effect in your PowerPoint presentations.
Step 1: Firstly, open a blank slide in PowerPoint.
Step 2: Now, go to ‘Insert’ in the menu bar and click on ‘Zoom.’
Step 3: After this, select the ‘Slide Zoom’ option.
Step 4: This will open a window containing all the slides of your presentation. Now, you have to select the slides on which you wish to create a zoom animation.
Step 5: After selecting all the desired slides, click on ‘Insert’ at the bottom of the window.
Step 6: Now, you will get all your selected slides on the blank one. Just arrange them as per your requirement with proper alignment.
Step 7: Once you are done till here, click on ‘Zoom’ and then select the ‘Zoom Style’ as per your desire.
Step 8: Now, select each slide and click on the ‘Return to Zoom’ option. Repeat this step for all the slides.
Step 9: Lastly, click on the ‘Slide Show’ option, and you’re all done!
So, this was a super simple tutorial for creating a zoom effect in PowerPoint. Adding a zoom effect in your presentations is not a compulsion, but it gives you an extra edge for engaging with your audience in a better way.
In case you feel stuck in any step, you can check out our zoom effect tutorial video.
Wrapping It Up
The zoom effect can be a very powerful tool in a PowerPoint presentation. It can help to focus the audience’s attention on a particular element of the slide and can also be used to create a sense of movement or flow throughout the presentation. When used effectively, the zoom effect can really add to the overall impact of the presentation. Check out the additional variety of animated PowerPoint templates for your reference. In addition to these PowerPoint animations, you can also check out different types of engaging PowerPoint templates and Google slides templates to make world-class presentations.
![Best Professional PowerPoint Examples For Presentations [Premium Templates]](https://slideuplift.com/wp-content/uploads/2023/08/Best-professional-powerpoint-examples.jpg "Best professional powerpoint examples")
Privacy Overview
Necessary cookies are absolutely essential for the website to function properly. This category only includes cookies that ensures basic functionalities and security features of the website. These cookies do not store any personal information
Any cookies that may not be particularly necessary for the website to function and is used specifically to collect user personal data via ads, other embedded contents are termed as non-necessary cookies. It is mandatory to procure user consent prior to running these cookies on your website.
How-To Geek
How to add section and slide zooms in microsoft powerpoint.
Want more professional transitions for your presentation?
Quick Links
Create a section zoom in powerpoint, create a slide zoom in powerpoint, customize a section or slide zoom.
If you want to move to a different slide or section in your presentation, you can easily add a link on your slide . But by using a Section or Slide Zoom in PowerPoint, you can make that move look professional.
In Microsoft PowerPoint, a Section or Slide Zoom places an image on your slide instead of linked text. In addition, when you click to visit that section or slide, you'll see a nice zoom effect. You can customize the displayed image, duration of the zoom effect, and additional actions.
As of this writing at the beginning of April 2022, you can create a Section or Slide Zoom on Windows with Microsoft 365 and in PowerPoint 2019 or later. For Mac and mobile PowerPoint users, you can play a Zoom, but not create one.
Using sections in PowerPoint is a good way to divide your presentation into separate portions. Whether you use it to organize your slideshow or show only particular sections to certain audiences, sections are handy tools.
Related: How to Organize a Microsoft PowerPoint Slideshow Using Sections
To create a Section Zoom, you'll need your sections set up ahead of time. When you're ready, go to the slide where you want to add the Section Zoom.
Head to the Insert tab and Links section of the ribbon. Click the Zoom drop-down arrow and pick "Section Zoom."
In the Insert Section Zoom window that appears, check the box next to the section you want to use. You can also include zooms for multiple sections. Click "Insert."
You'll see the Section Zoom pop onto your slide. It's similar in appearance to a static image of the first slide in that section. You can move the zoom by selecting and dragging it or resize it by dragging a corner or edge.
When you present the slideshow, click the Section Zoom. You'll see the zoom effect as you land on the first slide in that section. By default, you'll advance through each slide in the section and return to the zoom. This can be changed as described in the customization options below.
Similar to a Section Zoom in PowerPoint is the Slide Zoom. If you don't use sections in your slideshow or simply want the ability to jump to a certain slide , this is the way to go.
Related: How to Link to Another Slide in the Same PowerPoint Presentation
Go to the slide where you want the Slide Zoom. Then, head to the Insert tab and Links section of the ribbon. Click the Zoom drop-down arrow and pick "Slide Zoom."
In the Insert Slide Zoom window that opens, check the box next to the slide you want to use. You can also include zooms for multiple slides; however, you might consider using a Summary Zoom in this case instead. Click "Insert."
Like the Section Zoom, you'll see the Slide Zoom on your slide where you can drag to move or resize it.
When you present the slideshow, click the Slide Zoom. You'll see the zoom effect as you land on the slide. You'll then advance through the remainder of your slideshow. However, you can return to the zoom if you prefer using a customization option below.
The customization options for Section and Slide Zooms are the same. You can adjust the zoom's actions, change the appearance, or use additional formatting tools .
Zoom Options
Select the Section or Slide Zoom you want to edit. Then, visit the Zoom tab that displays. On the left side, you have the following actions you can adjust in the Zoom Options section.
Change Image : If you prefer to display an image rather than the slide for the zoom, select this option. You can then insert a picture from a file, stock images, online pictures, or from icons.
Return to Zoom : To go back to the zoom on the slide, check this box. For a Section Zoom, you'll return after advancing to the last slide in the section. For a Slide Zoom, you'll return after viewing that particular slide.
Zoom Transition : While the intent of a Section or Slide Zoom is to provide a transition effect, you may prefer to use the feature without that effect. Uncheck the Zoom Transition box to remove the effect.
Duration : If you decide to keep the Zoom Transition , you can use the Duration field to change the length of the effect. Enter a number in seconds or use the arrows to increase or decrease the duration.
Related: How to Use the Morph Transition in PowerPoint
Zoom Tab Tools
Along with the above actions, you can change the zoom style, border, background, alt text, and more. Select the Section or Slide Zoom and use the tools on the Zoom tab.
Zoom Format Options
To change the fill or line, add a shadow or reflection, or scale the zoom, right-click and pick "Zoom Format Options" from the menu. The Format Section/Slide Zoom sidebar opens for you to adjust the formatting.
For a unique way to jump to a particular section or different slide in your PowerPoint presentation, check out the Section and Slide Zoom features.
Critical PowerPoint Shortcuts – Claim Your FREE Training Module and Get Your Time Back!
PowerPoint Zoom Animation Effect [Pro Trick]
- PowerPoint Tutorials
- November 21, 2017
You remember those Where’s Waldo books? Well this effect would be PERFECT for zooming in on his location and pointing him out in the crowd.
You are currently viewing a placeholder content from Vimeo . To access the actual content, click the button below. Please note that doing so will share data with third-party providers.
And it’s one of those “I can’t believe that was made in PowerPoint!” effects.
You can use this trick for things like zooming in on a section of a map to highlight a certain area, zooming in on a diagram to show some special features – like if you have lots of engine parts and want to highlight each part, one by one…or anything else you dream up!
I’ve also seen this animation used a lot in a series of static pictures, as well as in educational videos.
To overall process for creating this cool PowerPoint zoom animation effect (all detailed below), is to:
- Create your picture layers
- Add your zoom lines
- Add PowerPoint animations
[Watch] PowerPoint Zoom Tutorial
You are currently viewing a placeholder content from Youtube . To access the actual content, click the button below. Please note that doing so will share data with third-party providers.

Step #1: Create your picture layers
So, the first thing we do is, of course, we paste the picture that we want to use in here.
So let’s paste in this picture of a woman’s face that I’ll be working with – and just stretch that out to be the full slide size (though you can do this trick with whatever size picture you want).

Now that we have done that, we have to choose which area of the picture we want to zoom in on – in my case, I have chosen the eye and the eyebrow.
We now duplicate the image by hitting Ctrl + D (or Control C and Control V, essentially copy and paste) if you are on a PC.

So, now we put the second image exactly on top of the first image. So we align them up exactly like that.

Now we go to Format > Crop > and we crop out exactly the area that we want to zoom in on.

Crop around that eye here like this:
For more help with cropping your images in PowerPoint, see our how to guide here .

Now we have to decide how much we want to zoom in on this eye.
To play around with some zooming options we go to the Animations tab and go to the Grow/Shrink effect here:

This gives you an automatic 150%, but to see other options, we go to the Effect Options box.

From here, you can play around with different settings for the zoom. However, for this image, I actually like the default 150%, just the way it is. For this project, it gives just the right level of zoom – anything bigger looks kind of odd.
So find the right zoom level for your needs – you can keep testing and changing it in the Effect Options box.
Ok, now here comes the tricky part.
For the next step, we have to duplicate this eye, so we go to the Format tab and resize this with the same amount of zoom as we just choose in the Effect Options. Since I had 150% for mine, that is what I’ll go with. To begin, we go to the Size and Position box under the Format tab:

Then, we take out “Relative to original picture size.” Now you scale the height of this to 150.

Great. Now the next step here is very important. You actually have to align up this bigger eye exactly with the other, normal sized eye, that you had here – until it looks exactly like the below.
The center points of both images have to match perfectly (you can use PowerPoint’s built in guidelines for this).

ow that we’re done with that, I want to show you one last layering option here. If you saw the original example that I did, the image actually faded to gray after the zoom happened. If you want the same thing for your picture, follow the next step.
First, we duplicate the original picture again (CTRL +D as a shortcut). Then, under the Format Tab, we go to Color.

Then we can make it one of the gray tones. I chose this one here:

Again, we align this up to exactly match the original – use the guides if needed.

What we do now is we right click and mouse over Send to Back, then choose Send Backward because you want it to go just one layer down. This will help us make the picture fade to gray when we want to do that.
Ok, now that we have this; we are ready to add the Zoom Lines.
Step #2: Add your zoom lines
To add the Zoom Lines we just go to Insert, Shape and we select one of the lines here.

You just want two vertical lines and two horizontal lines.
To make sure the line is straight you hold down the Shift key while you are dragging it down or sideways. Recolor the line to black and feel free to change the thickness.
Note: It really doesn’t matter if the line goes off of the screen like this one does.

Your final result with all 4 lines should look like the below.

I recommend zooming in to make sure that lines are pretty close to exact – it looks like it.

Now that we have the lines done, let’s just bring them all to the front.
Select all of them by holding down Shift and then right click, then select Bring to Front.

Great, now we’re ready to animate these.
Step #3: Add your PowerPoint animations
To add animations, we go to the Animations tab and we open the Animation Pane so we can see what we’re working with.

First, make sure that there aren’t any animations on the top eye (the larger one in the front).
I had a grow animation still on it from duplicating the smaller eye (since animations also get copied with duplicated images). I just need to remove this first.

In simpler terms, it’s the formatting backbone of your PowerPoint presentation. It’s what ensures formatting consistency across your entire presentation as you build your slides.
The key is, making sure that your template is set up correctly, which a lot of template don’t have. They are instead what we call fake PowerPoint template.
To learn how to create your own PowerPoint template, read our guide here .

The idea here will be that the small eye gets bigger, then when it’s done, the large eye will fade on top of it. The reason we’ll do it this way is because PowerPoint currently has a glitch that when you use animations to make things larger, they don’t retain quality and become pixelated.
This workaround ensures the eye (or the zoomed part of whatever picture you use) still looks good.
At this point, we’re not going to worry about the timings, as will adjust those in a little bit.
For now, let’s work with the lines. To do that we first select the lines (as we did before) by holding Control or Shift while we click on them.
Once the lines are selected, we’ll add a Fly In animation under the Entrance effects to all of them.

Of course, we’ll change the settings on it. Let’s make the lines fly in from opposite directions (top flies in from bottom, right flies in from left, etc.).
So, this top one is fine already because it is already coming from the bottom as the default.

For the bottom one, we’ll make it start from the top, the right line from the left, and the left line from the right.

Great – we have the lines done. One thing you may want to do as this point (depending on your picture) is to give the zoomed picture (the large eye in my case) a black outline. This often makes the effect more polished (but not always – so check your own work).
Let’s go to Format and Picture Border and then just add a black border here.

Now the trick here is going to be lining up the zoom animation so that matches the animation of the lines, finishing right at the end along with them.
Let’s clean up the timing here a little bit.
Let’s select all the lines and drag them to the top here so they’re first in the sequence.

Now the zoom effect is going to be on the small eyeball that’s behind the large one.
However, in order to be able to work with it to adjust the timings, we need to send that black and white picture backwards so the small eye is visible – so let’s do that here… select the black and white picture and send it backward.

To summarize, the small eye is called Picture 7 and the large eye is called Picture 15 in the animation pane. As I mentioned earlier, what we need is for the small eye to grow, then right at the end, the big eye will fade in to replace it.
The tricky part now comes from trying to line up the timings so that the lines go across the small eye just as it zooms – so it looks like the lines are creating the zoom. You have to just test out the best combination of timing and duration for both the lines and the eye on your picture.
For example, I’m going to start by giving the eye zoom (Picture 7) a duration of .1 first. Nice round number and looks good with the size of the picture.

PowerPoint-Zoom-Step-3.14-lining-up-the-animations

Now I’ll give it a delay of .9. This is because we want the lines to start moving a bit before the zoom begins.
I also want the total of the delay and the duration for the eye zoom to equal the total duration of the lines (.9+.1 = 1 second).

Now we go to the large eye (Picture 15) and change that animation to start After Previous so it appears right when the small eye ball finishes its zoom. Also give it also a duration of .1 to make it blend in with the rest of the effect.

With this timing, we are close – it looks ok, but the small eyeball doesn’t zoom quite fast enough to keep up with the lines.
So, what that means is we actually have to make it start earlier and be a little bit slower so that it ends up finishing right when the lines do.
So, let’s make it .13 in duration and make the delay .87.
This still adds up to 1 but is slightly adjusted.

This looks much, much better. Small adjustments can really make a difference. Settling on this timing / delay combination has actually taken a lot of experimentation – so try various timings and delays on the Grow animation to match the lines (and/or change the timing of the lines too).
Once you get it, it’s magic.
Ok, the hard part is over.
To polish this further, let’s make the black and white picture come in right after the zoom effect happens. So make it start With Previous, and give it a .25 second duration.

Finally, let’s make the lines fade out after they come in (this part is optional, if you like the way it looks).
So, let’s select them again (by clicking and holding down SHIFT). Then, click on “add animation,” then go to Exit animation and select Fade.

Set these to also start With Previous so they fade out with the black and white picture.

Now just preview your work in Presentation mode and see what it looks like. Make any final adjustments you like.
And cool – you are all done!
Adding this effect to your presentation will instantly increase its level of professionalism and add some SERIOUS spice.
What’s Next?
Related Articles
- Bar chart trick: Right aligning categories (PPT, Word, and Excel)
- PowerPoint settings: program level vs. presentation level
- Set Up Slide Show: Customize how your PPT presentations run
- What is the Popup Toolbar in PowerPoint?
- Strikethrough Shortcut (l̶i̶k̶e̶ ̶t̶h̶i̶s̶) for Word, Excel & PowerPoint
About The Author

Popular Tutorials
- How to Strikethrough Text (l̶i̶k̶e̶ ̶t̶h̶i̶s̶) in Word, Excel & PowerPoint
- How to Make Animated Fireworks in PowerPoint (Step-by-Step)
- How to Create a Flash Card Memory Game in PowerPoint (Like Jeopardy)
- Keyboard Shortcuts Not Working: Solved
PowerPoint Tutorial Categories
- Strategies & Opinions
- Shortcuts & Hacks
- Presentation Design
- Pictures, Icons, Videos, Etc.
- New Features
- Miscellaneous
- Charts & Data Viz
We help busy professionals save hours and gain peace of mind, with corporate workshops, self-paced courses and tutorials for PowerPoint and Word.
Work With Us
- Corporate Training
- Presentation & Template Design
- Courses & Downloads
- PowerPoint Articles
- Word Articles
- Productivity Resources
Find a Tutorial
- Free Training
- For Businesses
We help busy office workers save hours and gain peace of mind, with tips, training and tutorials for Microsoft PowerPoint and Word.
Master Critical PowerPoint Shortcuts – Secure Your FREE Training Module and Save Valuable Time!
⌛ Master time-saving expert techniques.
🔥 Create powerful presentations.
🚀 Propel your career to new heights.
We value your privacy – we keep your info safe.
Discover PowerPoint Hacks Loved by Industry Giants - KKR, AmEx, HSBC!
Over 114,880 professionals in finance, marketing and sales have revolutionized their PPT skills with our proven methods.
Gain FREE access to a full module of our premium PowerPoint training program – Get started today!
We hate spam too and promise to keep your information safe.
You are currently viewing a placeholder content from Facebook . To access the actual content, click the button below. Please note that doing so will share data with third-party providers.
Home PowerPoint Templates Zoom
Zoom Templates for PowerPoint and Google Slides
The Zoom PowerPoint Templates are predesigned and ready-to-use pictorial designs that depict the zoom-in effect of your presentation content to your audiences. It is available in a variety of layouts and sizes. These templates are adaptable and can be used in various industries and organizations, and you can download and modify any of these templates to suit your needs.
Our Zoom PPT Templates are professionally designed and are made up of PowerPoint shapes, icons, colors, and other essential elements that make them visually appealing. You can use Zoom PowerPoint Templates to help you create engaging presentations that effectively communicate with your audiences.
Featured Templates
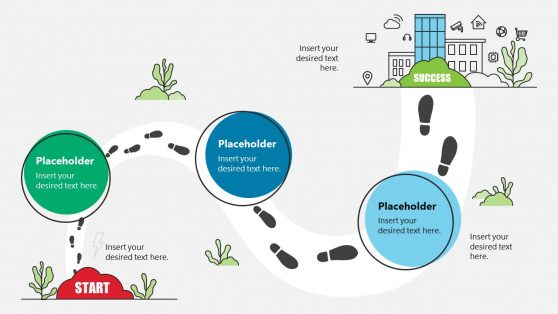
Zoom Footprint Path PowerPoint Timeline
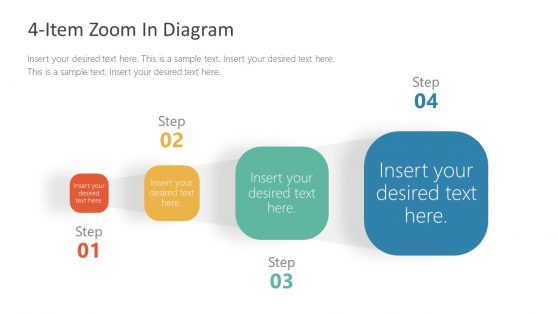
4-Item Zoom In Diagram PowerPoint Template

Zig Zag Process Flow Zoom Template for PowerPoint

Animated Business Navigational Zoom PowerPoint Template
Latest templates.
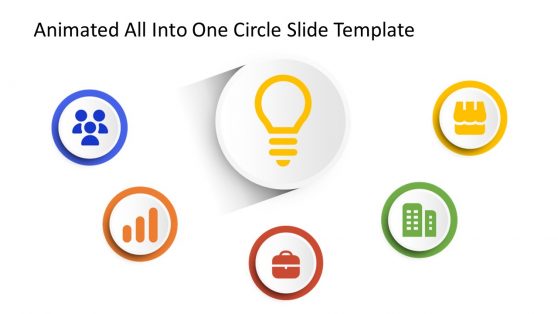
Animated All Into One Circle PowerPoint Template
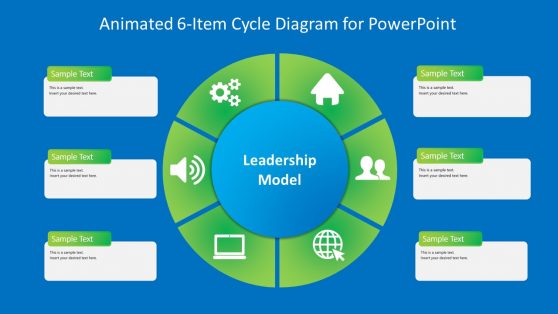
Animated 6-Item Cycle Diagram PowerPoint Template

5-Phase Animated Roadmap Concept PowerPoint Template

Research Cards PowerPoint Template with Zoom Animation
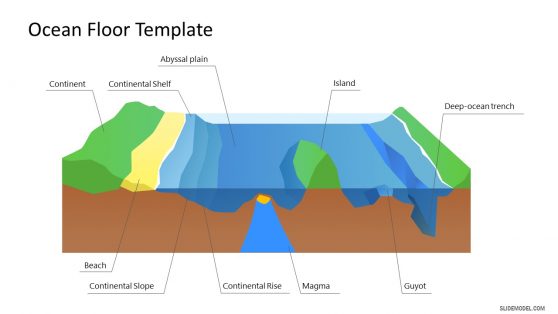
Ocean Floor PowerPoint Template
Editable El Salvador Map PowerPoint Template
Animated 3D Square Connected Block PowerPoint Templates

Navigational Business PowerPoint Timeline
Gear Zoom PowerPoint Timeline
3D Model Segmented Core PowerPoint Templates

Animated Navigational PowerPoint Template

Magnifier Glass Shape for PowerPoint
A Zoom Template is an informative template that gives your audience a close-up view of your presentation contents. The idea of zooming began in filmmaking as a technique to take a close-up shot of the scene. This technique helps focus on an important part of the scene.
It is used to depict cogent points and help your audience to understand them. You can use any of these templates for informal or formal presentations. They help save time, energy, and resources. Using these templates makes your presentation visually appealing and communicates efficiently to your audience without hassle.
Browse through our collection of Zoom Powerpoint Templates to select the one suitable for your next presentation. Also, our Zoom PowerPoint Templates are Mac and Windows-supported. You can also run them on Keynotes, Office365, and Google Slides. You can edit the templates’ placeholder content, color, fonts, and font size. It makes the slides personal, and your audience will pay attention.
What is the purpose of the Zoom PowerPoint Template?
Zoom PowerPoint Templates are used to return to sections of your presentation that you want to emphasize or to highlight how different parts of your presentation connect. It is significant because it depicts essential points and allows your audience to understand them quickly at a glance.
What Powerpoint Format Is Best For Zoom?
When giving a presentation, the best slide size for your PowerPoint is 16:9 or a widescreen layout. By default, PowerPoint presentations display content in a widescreen layout. On an iPad and other mobile devices, you can use the 4:3 format.
What should a Zoom PowerPoint Template include?
These templates should include the title of the presentation as well as the presenter’s title, organization, and department. The final slide should include contact information such as an address, phone number, website, email, and social media links.
Importantly, create a strong presentation by keeping your points simple and using examples. On the other hand, our Zoom PowerPoint Presentation Templates are designed to accommodate all necessary and required contents. These templates also include placeholder content that you can change to suit your needs.
How Can You Make A Zoom Slide?
You must follow the following Do-It-Yourself procedures to create a Zoom Slide:
- Click on insert.
- Scroll to Zoom and right-click.
- Open the Slide Zoom dialog box that appears.
- Choose which slides to use in your slide zoom.
- After you’ve chosen your preferred layout, click insert. Your slide zoom has been created.
Download Unlimited Content
Our annual unlimited plan let you download unlimited content from slidemodel. save hours of manual work and use awesome slide designs in your next presentation..
Effect of Co2 Injection on the Poromechanical and Multiphase Flow Characteristics of Subsurface Rock
Join Zoom Meeting This meeting is in-person/zoom and will not be recorded.
Meeting ID: 932 0137 7630 Passcode: 013011
Kiseok Kim, Ph.D. Assistant Professor Harold Vance Department of Petroleum Engineering Texas A&M University
Description
Geologic carbon storage has a great potential in reducing the atmospheric CO 2 emission by permanently storing large volumes of carbon dioxide in reservoir formations sealed with tight rock. During CO 2 injection, multi-physical processes occur, affecting the mechanical stresses, pore pressures, temperatures, and chemistry of the participating subsurface rocks and pore fluids. These processes are coupled, meaning that changes in each aspect do impact the others mutually. Thus, the interdependent factors need to be understood as a combined system, while it should also incorporate the time-dependent response, as CO 2 is projected to be stored for thousands of years. Furthermore, to avoid CO 2 leakage through the sealing layers, their poromechanical and hydraulic properties need to be thoroughly addressed.
Experimental techniques are introduced to characterize the poroviscoelastic and hydraulic behavior, including two-phase flow, with CO 2 treatment tests conducted under high-pressure conditions. Hydro-mechanical-chemical coupling constitutive model is adopted to address the chemo-poro-viscoelastic response of subsurface rock, with additional studies to explore the impact of the duration of CO 2 injection. Ultra-low permeability of the sealing formations is accurately measured in a few month-long experiments and is coupled to the mechanical and pore network characteristics of the rock. In summary, this presentation provides a comprehensive experimental work aimed at characterizing the poromechanical and hydraulic response during CO 2 injection, where the chemical effect is also investigated.

© 2021 Bureau of Economic Geology | Web Privacy Policy | Web Accessibility Policy
Now LIVE! Check out the NEW Zoom Feature Request space to browse, vote, or create an idea to enhance your Zoom experience.
Empowering you to increase productivity, improve team effectiveness, and enhance skills.
Communication
Productivity, apps & integration, employee engagement, business services, customer care, developer tools.
- Financial Services
- Manufacturing
- Small and Midsize businesses
- IT Professionals
- Customer Experience
- Sales and Revenue
- Marketing and Events
- Meeting SDK
- App Marketplace
- Developer Solutions
- Partner Solutions
- Find a Partner
- Become a Partner
- Partner Portal
- Partner Learning Center
- Resource Library
- Webinars & Events
- Customer Stories
- Zoom Trust Center
- Zoom Community
- Learning Center
- How-to Videos
- Global services
- Hardware options
- Customer Managed Key
- Customer Support
- Premier Support
- Developer Support
- Premier Developer Support
Download the Zoom app
Keep your Zoom app up to date to access the latest features.
Zoom Virtual Backgrounds
Download hi-res images and animations to elevate your next Zoom meeting.
- Plans & Pricing
- Join by Meeting ID
- Public Event List
- Screen Share Only
- With Video On
- With Video Off
AI Companion
- Phone System
- Mail & Calendar
- Marketplace
- Rooms and Workspaces
- Workspace Reservation
- Contact Center
- Virtual Agent
- Revenue Accelerator
- Events and Webinars
- Work Transformation Summit
- Customer Success Events
- Customer Success Forum
- Zoom Status
- Submit Feedback
- Community Terms and Guidelines
- Getting Started
- Community Center
- Happy Rewards
- Social Corner
- Community Champion Program
- Billing & Account Management
Virtual effects
- Subscribe to RSS Feed
- Mark Topic as New
- Mark Topic as Read
- Float this Topic for Current User
- Printer Friendly Page
- Looking for public worldwide (not restricted to US only) ongoing test meetings in Meetings 2024-04-24
- New to the Zoom Community! Seeking Tips and Collaboration in Zoom AI Companion 2024-04-23
- Is it possible to duplicate ticket information in Zoom Events? in Events and Webinars 2024-04-22
- Studio effects in Meetings 2024-04-19
- Mark as New
- Report Inappropriate Content
2024-04-21 06:08 PM
- Meeting Features
- All forum topics
- Previous Topic

An official website of the United States government
Here’s how you know
The .gov means it’s official. Federal government websites often end in .gov or .mil. Before sharing sensitive information, make sure you’re on a federal government site.
The site is secure. The https:// ensures that you are connecting to the official website and that any information you provide is encrypted and transmitted securely.
Take action
- Report an antitrust violation
- File adjudicative documents
- Find banned debt collectors
- View competition guidance
- Competition Matters Blog
New HSR thresholds and filing fees for 2024
View all Competition Matters Blog posts
We work to advance government policies that protect consumers and promote competition.
View Policy
Search or browse the Legal Library
Find legal resources and guidance to understand your business responsibilities and comply with the law.
Browse legal resources
- Find policy statements
- Submit a public comment

Vision and Priorities
Memo from Chair Lina M. Khan to commission staff and commissioners regarding the vision and priorities for the FTC.
Technology Blog
Data and models: a quote book from the tech summit on ai.
View all Technology Blog posts
Advice and Guidance
Learn more about your rights as a consumer and how to spot and avoid scams. Find the resources you need to understand how consumer protection law impacts your business.
- Report fraud
- Report identity theft
- Register for Do Not Call
- Sign up for consumer alerts
- Get Business Blog updates
- Get your free credit report
- Find refund cases
- Order bulk publications
- Consumer Advice
- Shopping and Donating
- Credit, Loans, and Debt
- Jobs and Making Money
- Unwanted Calls, Emails, and Texts
- Identity Theft and Online Security
- Business Guidance
- Advertising and Marketing
- Credit and Finance
- Privacy and Security
- By Industry
- For Small Businesses
- Browse Business Guidance Resources
- Business Blog
Servicemembers: Your tool for financial readiness
Visit militaryconsumer.gov
Get consumer protection basics, plain and simple
Visit consumer.gov
Learn how the FTC protects free enterprise and consumers
Visit Competition Counts
Looking for competition guidance?
- Competition Guidance
News and Events
Latest news, ftc sends refunds to ring customers stemming from 2023 settlement over charges the company failed to block employees and hackers from accessing consumer videos.
View News and Events
Upcoming Event
Informal hearing on proposed trade regulation rule on unfair or deceptive fees – april 24, 2024.
View more Events
Sign up for the latest news
Follow us on social media
--> --> --> --> -->

Playing it Safe: Explore the FTC's Top Video Game Cases
Learn about the FTC's notable video game cases and what our agency is doing to keep the public safe.
Latest Data Visualization

FTC Refunds to Consumers
Explore refund statistics including where refunds were sent and the dollar amounts refunded with this visualization.
About the FTC
Our mission is protecting the public from deceptive or unfair business practices and from unfair methods of competition through law enforcement, advocacy, research, and education.
Learn more about the FTC

Meet the Chair
Lina M. Khan was sworn in as Chair of the Federal Trade Commission on June 15, 2021.
Chair Lina M. Khan
Looking for legal documents or records? Search the Legal Library instead.
- Cases and Proceedings
- Premerger Notification Program
- Merger Review
- Anticompetitive Practices
- Competition and Consumer Protection Guidance Documents
- Warning Letters
- Consumer Sentinel Network
- Criminal Liaison Unit
- FTC Refund Programs
- Notices of Penalty Offenses
- Advocacy and Research
- Advisory Opinions
- Cooperation Agreements
- Federal Register Notices
- Public Comments
- Policy Statements
- International
- Office of Technology Blog
- Military Consumer
- Consumer.gov
- Bulk Publications
- Data and Visualizations
- Stay Connected
- Commissioners and Staff
- Bureaus and Offices
- Budget and Strategy
- Office of Inspector General
- Careers at the FTC
Fact Sheet on FTC’s Proposed Final Noncompete Rule
- Competition
- Office of Policy Planning
- Bureau of Competition
The following outline provides a high-level overview of the FTC’s proposed final rule :
- Specifically, the final rule provides that it is an unfair method of competition—and therefore a violation of Section 5 of the FTC Act—for employers to enter into noncompetes with workers after the effective date.
- Fewer than 1% of workers are estimated to be senior executives under the final rule.
- Specifically, the final rule defines the term “senior executive” to refer to workers earning more than $151,164 annually who are in a “policy-making position.”
- Reduced health care costs: $74-$194 billion in reduced spending on physician services over the next decade.
- New business formation: 2.7% increase in the rate of new firm formation, resulting in over 8,500 additional new businesses created each year.
- This reflects an estimated increase of about 3,000 to 5,000 new patents in the first year noncompetes are banned, rising to about 30,000-53,000 in the tenth year.
- This represents an estimated increase of 11-19% annually over a ten-year period.
- The average worker’s earnings will rise an estimated extra $524 per year.
The Federal Trade Commission develops policy initiatives on issues that affect competition, consumers, and the U.S. economy. The FTC will never demand money, make threats, tell you to transfer money, or promise you a prize. Follow the FTC on social media , read consumer alerts and the business blog , and sign up to get the latest FTC news and alerts .
Contact Information
Media contact.
Victoria Graham Office of Public Affairs 415-848-5121
IMAGES
VIDEO
COMMENTS
If you would like to make your presentations more dynamic and exciting, try using zoom for PowerPoint . To add a zoom, go to Insert > Zoom. To summarize the entire presentation on one slide, choose Summary Zoom. To show selected slides only, choose Slide Zoom. To show a single section only, choose Section Zoom.
PowerPoint has the answer. Select a slide, go to your Zoom menu, and click Section Zoom. You'll get a similar window as before, so you can choose the section you need to jump to. Once done, PowerPoint will insert the zoom effect to your slide in the form of another slide, the one that starts the section you chose.
When applying this to your own work, you can choose any event you like. With the zoom shape selected, click the Animations tab and then click the gallery's More button (circled in Figure E) to ...
🌟 Elevate your PowerPoint presentations to a whole new level with our comprehensive tutorial on mastering PowerPoint animation. In this tutorial, we'll dive...
Ever want to give some emphasis to certain parts of your presentation when you're presenting? In this video I'll show you two ways to zoom into a portion of...
Here's a step-by-step process with visual aids on what you need to do -. Step-1: Click on the "Insert" tab. The first step is to open the "Insert" menu. Click on the "Insert" tab which is located in the menu ribbon at the top of the screen. Step-2: Click on the "Zoom" button. In the "Links" section of the "Insert ...
2. Access the Summary Soon Feature: To use PowerPoint Summary Zoom, click Insert > Zoom > Summary Zoom. This will create a new slide that displays a summary of your presentation, with thumbnails of each slide. 3. Customize Appearance: You can customize the appearance of the Summary Zoom slide by selecting the Format tab.
Click on the circle with the flower image. Apply the entrance effect 'Appear', and let the start be 'After Previous'. Click on the flower image once again and add the 'Grow/Shrink' animation to make it grow to 150%. Set the speed to 'fast'. The animation should start 'After Previous'. Now you can play the animation.
Watch this short video tutorial to learn how to create a zoom effect in PowerPoint. This trick in PowerPoint allows you to zoom in on a particular location o...
A section zoom is a link to a zoom that is already in your presentation. The. section zoom is great for switching between sections. Go to Inser t > Zoom > Section Zoom. Now choose the section that you want to use as a section zoom. Click Insert. As with the other zoom effect options, PowerPoint sets a preview thumbnail.
Select the magnifying glass from the presenter view and then click the part of the slide you want to zoom. Once zoomed in, you can click and drag to move the slide around. When you're finished, click the magnifying glass again to zoom back out. One last tip: In both normal and slideshow view, you can hold the Ctrl key while scrolling your ...
PowerPoint animations allow you to add special effects to make your presentation creative. They make the presentation more dynamic and excitingly present the information. One such PowerPoint animation is the PowerPoint Zoom Effect. (Grow/shrink Animation) Sometimes while presenting large pictures in the presentation, you may be required to zoom in to a specific portion in your photos to show ...
Here is a step-by-step tutorial that will help you in creating a zoom effect in your PowerPoint presentations. Step 1: Firstly, open a blank slide in PowerPoint. Step 2: Now, go to 'Insert' in the menu bar and click on 'Zoom.'. Step 3: After this, select the 'Slide Zoom' option. Step 4: This will open a window containing all the ...
Zoom Transition: While the intent of a Section or Slide Zoom is to provide a transition effect, you may prefer to use the feature without that effect. Uncheck the Zoom Transition box to remove the effect. Duration: If you decide to keep the Zoom Transition, you can use the Duration field to change the length of the effect. Enter a number in ...
ALT + SHIFT + F5. Once you are in one of the presentation views of your slides, you can zoom in or zoom out by either using the CTRL + mouse spin wheel shortcut (if you have a mouse), or you can use the keyboard shortcuts listed below. Zoom in (Slide Show Mode) CTRL + =. Zoom out (Slide Show Mode) CTRL + -.
In this video tutorial, I will show you How to Create Zooming Effect in PowerPoint 2016. The new Office 365 version of PPT 2016 come with the MORPH transitio...
To play around with some zooming options we go to the Animations tab and go to the Grow/Shrink effect here: This gives you an automatic 150%, but to see other options, we go to the Effect Options box. From here, you can play around with different settings for the zoom. However, for this image, I actually like the default 150%, just the way it is.
Step 3: Share your screen on Zoom. From your Zoom meeting window, click on "Share Screen" and select the window with the Presenter view of your presentation. That's it! You'll now be able to look at the presenter notes on your screen while your audience views the slide open in your Presenter view window.
The Zoom PowerPoint Templates are predesigned and ready-to-use pictorial designs that depict the zoom-in effect of your presentation content to your audiences. It is available in a variety of layouts and sizes. These templates are adaptable and can be used in various industries and organizations, and you can download and modify any of these ...
In this article I am using the Zoom app in Windows 10. The six options are: Share your entire screen/desktop. Share the Slide Show window. Share the editing window with a clean look. Run the Slide Show in a window and share that window. Use Presenter View to show the audience your slides while you see Presenter View.
How to Create Stunning PowerPoint Zoom Animation. Simple step-by-step tutorial to present your slides in detail. Comprehensive All In One PowerPoint Templa...
Join Zoom Meeting This meeting is in-person/zoom and will not be recorded. Meeting ID: 932 0137 7630 Passcode: 013011 ... this presentation provides a comprehensive experimental work aimed at characterizing the poromechanical and hydraulic response during CO 2 injection, where the chemical effect is also investigated.
2024-04-21 06:08 PM. I need help. I do not have virtual effects in our account. Currently using desktop to access. Topics: Meeting Features. 0 Likes. Reply. All forum topics.
In this step-by-step tutorial video, learn how to use the new Summary Zoom, Section Zoom, and Slide Zoom features in Microsoft PowerPoint. Zoom in PowerPoint...
Fewer than 1% of workers are estimated to be senior executives under the final rule. Specifically, the final rule defines the term "senior executive" to refer to workers earning more than $151,164 annually who are in a "policy-making position.". The FTC estimates that banning noncompetes will result in: Reduced health care costs: $74 ...