
How to Make a PowerPoint on Mac? (A Step-by-Step Guide)
If you’ve ever wanted to create a professional-level PowerPoint on your Mac, you’re in luck! In this step-by-step guide, we’ll walk you through the entire process from start to finish.
You’ll learn what Keynote is and how to open it on your Mac, how to create a PowerPoint, customize the slides, add text, images, and media, utilize themes and animations, and finally, save and share your PowerPoint.
By the end of this guide, you’ll be a PowerPoint pro on your Mac!
Table of Contents
Short Answer
Making a PowerPoint on a Mac is easy.
First, open up the Pages application on your Mac.
Then, select the File menu and choose New from Template.
From there, you can select a PowerPoint template and customize it to fit your needs.
When you are finished, you can save your presentation and share it with others.
What is Keynote?
Keynote is a presentation software program developed by Apple Inc.
and is available on all Mac computers.
It is a powerful program that allows users to easily create engaging and professional presentations.
Keynote provides users with a wide range of tools and features, including customizable slides, themes, animations, and more.
With Keynote, users can create stunning presentations in minutes.
It is a great tool for creating presentations for business, education, and personal projects.
Keynote is easy to use and is a great choice for anyone who wants to make a professional-looking PowerPoint on a Mac computer.
How to Open Keynote on Mac
Opening the Keynote app on a Mac computer is quite simple.
To open the app, you can either use the “Finder” app in your Applications folder, or you can use the “Spotlight Search” tool to quickly find the Keynote app.
If you choose to use the Finder, simply open the Finder app and navigate to the Applications folder.
From there, you will find the Keynote app.
You can then double-click on the Keynote icon to open the app.
Alternatively, you can use the Spotlight Search tool to quickly locate the Keynote app.
To do this, click on the magnifying glass icon in the top-right corner of your screen.
You can then type in “Keynote” in the search bar and hit the “Enter” key.
The Keynote app should appear in the search results.
You can then click on the Keynote icon to open the app.
Once the Keynote app is open, you can begin creating your PowerPoint presentation.
You can customize your slides by adding text, images, and other media.
You can further customize your slides by using various themes and animations.
Once you have created your presentation, you can save it as a .pptx file and share it with others.
With the Keynote app, you can easily create a professional-looking PowerPoint on a Mac computer.
Creating a PowerPoint on a Mac
Creating a PowerPoint presentation on a Mac computer is a straightforward process, whether youre creating a presentation for work or school.
The first step is to open the Keynote app on the computer.
Keynote is the presentation software for Mac computers, and it makes creating a presentation simple and easy.
Once you have opened the Keynote app, you can begin customizing your presentation.
You can add text, images, and other media to your slides, as well as utilize various themes and animations to make your presentation look professional and eye-catching.
You can also customize the layout of your slides, allowing you to add different elements and adjust their placement.
When your presentation is complete, you can save it as a .pptx file and share it with your colleagues, classmates, or anyone else who needs to view it.
You can also export your presentation as a PDF, a movie file, an HTML file, or a JPG file, depending on your needs.
With the Keynote app, creating a professional-looking PowerPoint on a Mac computer is easy and stress-free.
All you need to do is open the app, customize your slides, and then save your presentation in the desired format.
Whether youre creating a presentation for work or school, the Keynote app will help you get the job done quickly and efficiently.
Customizing the Slides
Customizing the slides is an important part of creating a stunning PowerPoint presentation on a Mac.
The Keynote app provides a variety of tools and features to help you design your slides.
You can easily add text, images, and other media to customize your slides.
To add text to your slides, simply select the text box and type in your desired text.
To add images, you can either drag and drop them into the slide or use the Insert Image button.
You can also insert shapes, charts, and other media to customize your slides.
Additionally, Keynote offers a range of themes and animations to help you further customize your presentation.
Themes allow you to quickly change the overall look and feel of your slides.
Animations can be used to add a touch of flair to your slides, such as transitions between slides and animated text.
To access the themes and animations, simply click on the Themes or Animations tabs in the upper right-hand corner of the app.
By taking advantage of the Keynote apps customization features, you can easily create a professional-looking PowerPoint on a Mac computer.
With just a few clicks, you can customize your slides and make them look stunning.
So, if youre looking to create an impressive presentation, the Keynote app is the perfect tool for the job.
Adding Text, Images, and Media
When it comes to creating a professional-looking PowerPoint on a Mac computer, adding text, images, and other media is key.
With the Keynote app, you can easily customize your slides by adding text, images, and other media elements.
To add text, select the text box icon from the top menu, and then type in the text you want to include in the text box.
You can also adjust the font type, font size, font color, and other text properties.
Once you have finished editing the text, click the Done button to save your changes.
To add images, click the Add Image icon from the top menu, and then select an image from your computer, or add an image from the web.
You can also adjust the size, position, and transparency of the image to make it look more professional.
Finally, you can add other media elements such as audio and video to your slides.
To do this, click the Add Audio or Add Video icon from the top menu, and then select the audio or video file you want to include.
You can also adjust the size, position, and playback settings of the media element to make it look more professional.
By using these methods, you can easily add text, images, and other media elements to your PowerPoint slides on a Mac computer.
Once you have added all the elements, you can save your presentation as a .pptx file and share it with others.
Utilizing Themes and Animations
Creating a PowerPoint presentation on a Mac computer is made easier with the help of the Keynote app.
Not only can you easily create a professional-looking presentation, but you can also customize your slides with various themes and animations.
With the help of themes and animations, you can create a presentation that is visually appealing and engaging.
When creating a presentation, you can choose from a wide variety of themes and animations.
You can choose from a variety of colors, fonts, and designs to give your presentation a unique look.
You can also choose from several animation styles to give your presentation a more dynamic feel.
For example, you can choose to have your slides transition in with a fade or a slide, or you can animate specific objects within your slides.
Themes and animations can also help to emphasize certain points in your presentation.
For instance, you can use animations to draw attention to a particular slide or element in your presentation.
Additionally, you can use themes to create a professional and consistent look throughout your presentation.
Creating a presentation with themes and animations is easy.
In the Keynote app, simply select the themes tab to access the available themes and animations.
From there, you can customize your slides with the desired theme and animations.
You can also preview your slides and animations before you save them.
Creating a professional-looking and engaging presentation on a Mac computer is easy with the help of the Keynote app.
With the help of themes and animations, you can create a presentation that is visually appealing and will help to emphasize certain points you want to make.
With a few clicks, you can quickly create a presentation that will be sure to impress.
Saving and Sharing Your PowerPoint
Once you have finished creating your PowerPoint presentation, you can save it as a .pptx file and share it with others.
To save your PowerPoint, click the File menu at the top of the Keynote window and then click Save.
You will be given the option to save your file to your Macs hard drive or to the cloud.
If you wish to share your presentation with others, you can do so by exporting it as a PDF file or by sharing it directly with other users.
To export your presentation to a PDF file, click the File menu and then select Export.
You will be given the option to export your PowerPoint as a PDF file.
If you would like to share your presentation directly with other users, you can do so by clicking the Share menu at the top of the Keynote window and selecting Share with Others.
Here, you can enter the email addresses of the people you would like to share your presentation with.
You can also set a password for your shared presentation if you wish.
Once you have saved and/or shared your presentation, you can open it up again at any time by double-clicking on the .pptx file.
This will open up the presentation in the Keynote app and you can make any changes that you wish.
With the Keynote app, creating a professional-looking PowerPoint on a Mac computer is easy and convenient.
The steps outlined above will help you create a great presentation and save/share it with others in no time.
Final Thoughts
Creating a professional-looking PowerPoint on a Mac computer doesn’t have to be difficult.
With the help of the Keynote app, you can easily create slides with text, images, and other media, and customize your slides with themes and animations.
Now that you know how to make a PowerPoint on Mac, you’re ready to create your own presentations and share them with others.
So get to it and start making your own PowerPoint today!
James Wilson
James Wilson has extensive knowledge in the information technology industry.His second love, besides dealing with computers, is smart home technology. He is continually updating information to better comprehend this problem and has a deep understanding of the apartment’s support system.
Recent Posts
Can You Create a Poll in Microsoft Outlook Email? Here's How!
Do you want to get feedback from your contacts quickly and efficiently? If so, then creating a poll in Microsoft Outlook email is the perfect solution! Polls are a great way to quickly collect data...
How To Fix Microsoft Outlook Cannot Connect To Server? (Here's The Solution)
Have you ever experienced the frustration of not being able to connect to your Microsoft Outlook server? It can be a major inconvenience when you need access to your emails, and it can be hard to...
How to Use a Mac With PowerPoint: A Step-by-Step Guide
Using a Mac with PowerPoint is simple. First, make sure you have PowerPoint installed on your Mac. You can find it at the App Store or through a Microsoft 365 subscription. Open PowerPoint, and you’ll be greeted with a range of templates to start your presentation. From here, you can add text, images, and animations to create an engaging slideshow. Once done, you can present directly from your Mac or save your presentation to share with others.
After you’ve completed your PowerPoint presentation on your Mac, you’ll have a professional and compelling visual aid to support your speech or lecture. You can also share it with others or export it into different formats such as PDF, video, or even a web page.
Introduction
Are you ready to impress your audience with a stunning presentation? If you’re a Mac user, fear not – using PowerPoint on your macOS is as smooth as on any Windows PC. Let’s be honest, presentations are a part of life: whether you’re a student, a professional, or just someone with a story to tell, at some point, you’re going to need to put some slides together. PowerPoint for Mac has all the tools you need to create a presentation that’s both visually captivating and content-rich.
Why is this important? Well, PowerPoint presentations are a staple in the professional world. They’re used for everything from business pitches to academic lectures. Knowing how to create an effective PowerPoint presentation on your Mac could be the difference between persuading your audience or leaving them unimpressed. And who is this relevant to? Everyone! Whether you’re a newbie to presentations or a seasoned speaker looking to refine your skills, this guide will help you master PowerPoint on your Mac.
Step-by-Step Tutorial: Using PowerPoint on a Mac
Before jumping in, let’s clarify what you’ll achieve by following these steps. By the end, you’ll be able to create, edit, and present a PowerPoint slideshow on your Mac.
Step 1: Install PowerPoint
Install PowerPoint on your Mac from the App Store or through a Microsoft 365 subscription.
After installing PowerPoint, you’ll need to sign in with your Microsoft account to activate the software, then you’ll be ready to start creating your presentation.
Step 2: Open PowerPoint
Open PowerPoint and choose a template or open a blank presentation.
PowerPoint offers a variety of templates to suit different presentation styles. If you choose to start with a blank slate, you’ll have complete creative freedom.
Step 3: Add Content
Add slides and content such as text, images, and shapes to your presentation.
Remember to keep your slides simple and not clutter them with too much content. Visual aids should support your speech, not replace it.
Step 4: Customize Your Slides
Customize your slides’ design with themes, colors, and animations.
This step is where you can get creative with your presentation’s look and feel. Just be sure not to go overboard with animations – they should enhance your presentation, not distract from it.
Step 5: Present Your Slideshow
Present your slideshow directly from your Mac or save it to share with others.
You can start your presentation by clicking the ‘Slide Show’ tab and then ‘Play from Start’. Make sure you practice your presentation beforehand to ensure everything runs smoothly.
Additional Information
Now, let’s sprinkle in some extra tidbits that could elevate your PowerPoint game on a Mac. First off, did you know that PowerPoint for Mac supports real-time collaboration? Yup, you can work with your teammates on the same presentation at the same time, no matter where you are. And if you’re all about shortcuts, PowerPoint for Mac has plenty. For instance, pressing Command + Shift + N instantly creates a new slide.
Another neat feature is the Presenter View, which lets you see your notes, the upcoming slide, and a timer, all while the audience only sees the current slide. And for those who value accessibility, PowerPoint for Mac has tools to make presentations more accessible, including options for larger text and high contrast. Just remember, when using PowerPoint on a Mac, you have all the essentials at your fingertips to create presentations that are not just informational, but also memorable.
- Install PowerPoint on your Mac from the App Store or Microsoft 365.
- Open PowerPoint and select a template or start with a blank presentation.
- Add and customize your slides with text, images, and animations.
- Present directly from your Mac or save your presentation for later use.
Frequently Asked Questions
Can i use powerpoint on a mac.
Yes, PowerPoint is available for Mac users and can be downloaded from the App Store or included in a Microsoft 365 subscription.
Is PowerPoint for Mac different from Windows?
While there are some differences in design and available features, PowerPoint for Mac offers a comparable experience to the Windows version.
Can I collaborate with others using PowerPoint for Mac?
Absolutely! PowerPoint for Mac supports real-time collaboration, allowing multiple users to work on the same presentation simultaneously.
Can I open a PowerPoint presentation made on a Mac on a Windows PC?
Yes, presentations made in PowerPoint for Mac are compatible with PowerPoint for Windows, ensuring easy file sharing and collaboration.
Does PowerPoint for Mac support Presenter View?
Yes, Presenter View is available in PowerPoint for Mac, providing speakers with a private view of their notes and upcoming slides while presenting.
In conclusion, mastering the use of PowerPoint on a Mac can be a game-changer for anyone looking to create impactful and persuasive presentations. Whether you’re a student, educator, entrepreneur, or professional, the ability to present your ideas clearly and attractively is invaluable.
So, dive in, explore the features, and harness the power of PowerPoint on your Mac to captivate your audience. Remember, a well-crafted presentation can be the key to success. Happy presenting!

Matthew Burleigh has been writing tech tutorials since 2008. His writing has appeared on dozens of different websites and been read over 50 million times.
After receiving his Bachelor’s and Master’s degrees in Computer Science he spent several years working in IT management for small businesses. However, he now works full time writing content online and creating websites.
His main writing topics include iPhones, Microsoft Office, Google Apps, Android, and Photoshop, but he has also written about many other tech topics as well.
Read his full bio here.
Share this:
Join our free newsletter.
Featured guides and deals
You may opt out at any time. Read our Privacy Policy
Related posts:
- Can I Convert My Powerpoint to Google Slides?
- How to Save Powerpoint as PDF with Notes
- How to Drag Slides From One PowerPoint to Another: A Step-by-Step Guide
- How to Make a Powerpoint Slide Vertical in Powerpoint 2013
- How to Set Time for Slides in Powerpoint
- What Are Benefits of PowerPoint? A Comprehensive Guide
- How to Combine PowerPoint Presentations With Different Orientations
- How to Check Word Count on Powerpoint 2010
- How to Insert Slides from Another Presentation in Powerpoint 2010
- How to Change Hyperlink Color in Powerpoint 2010 (An Easy 5 Step Guide)
- How Is Microsoft PowerPoint Used in Business: A Comprehensive Guide
- How to Unhide a Slide in Powerpoint 2013
- How to Convert a PowerPoint to Word and Edit with Ease
- How to Loop a Slideshow on Powerpoint 2013
- How to: Effortlessly Create PowerPoint Looping Presentations
- How to Change the Font on All Slides in Google Slides
- How to Change Line Spacing in Powerpoint for Every Slide at Once
- How to Insert Check Mark in Powerpoint for Office 365
- How to Start PowerPoint: A Step-by-Step Guide for Beginners
- How to Email a PowerPoint Slideshow: A Step-by-Step Guide
PowerPoint for Mac: Best tips for a successful presentation
- 0 Shares Share

The maxim of “Death by PowerPoint” does not fit in today’s tech-savvy era. Numerous startups and corporates pitch their ideas to their clients through presentations every day. They leverage stunning templates to design them and sweep their stakeholders off their feet. Slideshows hold an enormous audio-visual appeal that helps you to hook your audience throughout.
Whether it is Keynote or PowerPoint, showcasing a slideshow on your Mac must appear seamless. Be it slide layout, design, visuals, or overall aesthetics, a collection of well-thought, pixel-perfect slides is the key to presentation success. So, how to craft splendid and eye-catching Mac presentations? This article will enlighten you perfectly. Let us begin!
Here are seven best tips for creating successful and compelling presentations on your Mac:
Minimalistic slides
Gone are the times when people assumed that designing a ppt meant overloading it with information. You’ll be doing your audience a huge favor if you opt for minimalism in your slide content. Often presenters overload the slides unnecessarily and thus, end up overwhelming the audience. Embed your decks with one topic per slide. Ensure that you build your pitch decks with less text and more graphics. Keeping the slide content simple and precise will bestow your MAC slideshow with a decluttered look. It will help you to further your brand aesthetics as well.
You may consider following the famous 10-20-30 rule of PowerPoint presentations. The rule states that your presentation should be no longer than ten slides. It must not take beyond 20 minutes to deliver the entire presentation. And at last, the slides should feature a font size of at least 30 px. The revolutionary 10-20-30 rule helps you keep your slides minimalistic, deliver a captivating presentation and engage with the audience like never before.
Engaging multimedia
Humans have a limited attention span. Keeping this in mind, you must always integrate enchanting visuals to liven up your presentation. Employ vector images, 1080p videos, infographics, and GIFs to render the slides attractive. The truth is, no one likes to read raw data right off the slides! As a presenter, you should consider transforming raw data into engaging visuals that bind the interest of the audience to the presentation.
The incorporation of audio and other media forms assists you with a seamless slideshow. You can infuse your slides with visuals corresponding to your presentation topic. It will work as a double-edged sword. First, it will garner your slides appealing. Second, it will reinforce the textual content in your audience’s minds as well. Hence, slides without dedicated multimedia contribute to the phenomenon ‘Death By PowerPoint’.
Top-notch templates
Breaking the monotony of stock templates in your Mac is essential to stay a step ahead of your competitors. Utilizing age-old templates will not impress your clients as effectively as you desire. There is a high chance that your audience is already familiar with the stock template from some other presentation. Hence, the wow factor goes for a toss!
Well, you can leverage ready-to-use PowerPoint templates from SlideModel that offer 100% customization, superior graphics, and pixel-perfect design. Users can utilize the avant-garde slide templates to boost their presentation goals. The goal here is to woo the audience with your presentations’ design! Gorgeous graphics and tailor-made slide content will save your precious time from making a presentation from scratch. This business Pitch Deck PowerPoint Template is a boon for all entrepreneurs to construct wow-worthy pitches.
Elegant color-palette
An excellent way to highlight the key points of your Mac slideshow is to create a color contrast on the slides. You can design your slides in relevance to your brand colors or choose a vibrant color scheme. A golden tip here is to blend your presentation with high-contrast colors. It will aid you and your audience in capturing the slide essence. Place the dark-toned text with a light-toned background and light-colored slide content on a dark background. It will bring out the effect of aesthetic contrast.
A great tip here is embedding your presentation with your brand colors for making it impressive beyond measure. Choose only two to three colors throughout to maintain an equilibrium. One should try not to use all the contrast colors to attract the audience. Design consistency in your slides is a key to presentation success. Rather than overwhelming the audience with different high-contrast, mismatching colors, try to include a couple of color schemes and palettes across your presentation.
Captivating data visuals
Whether you’re presenting to an assembly of investors, pitching to a client, or presenting a company’s quarterly results, always back your data with rich visuals. Rather than reading random numbers from the slides, you should introduce a wow factor to your slides by leveraging state-of-the-art data visualizations. Render your PowerPoint presentations on Mac an awe-inspiring look with data visuals such as 3D charts, diagrams, infographics & graphs.
Display your research and statistics with mind-blowing data visuals. Employ alluring charts, tables, diagrams, trend lines, shapes, and infographics. You can color-code them to show comparisons and differences. Choose data visuals for bullets to leave an indelible mark on your audience. Projecting data with these tools helps your clients to retain information and comprehend it as well. SlideModel offers innumerable templates with exemplary data visuals for influencing the audience.

Hierarchical structure
Many people do not know the fact that information displayed first captures the attention of your audience before others. Thus, visual hierarchy is a way to organize your slide content based on its importance. Every presentation is intended to initiate a call-to-action amidst the audience. Presenters can reinforce the critical subject content through rich hierarchical structures. Prioritize placing the slide content in a manner that you want your clients to see initially.
Recognize the slide elements in the order of their significance and place them accordingly. Use good contrast placements, bolder texts, and large visuals. This way, your stakeholders will view your highlighted information first and then move to the other content. Hence, with your presentations, be it remote or in-person, you can encourage your audience to close the deal with you rather than missing the opportunity.
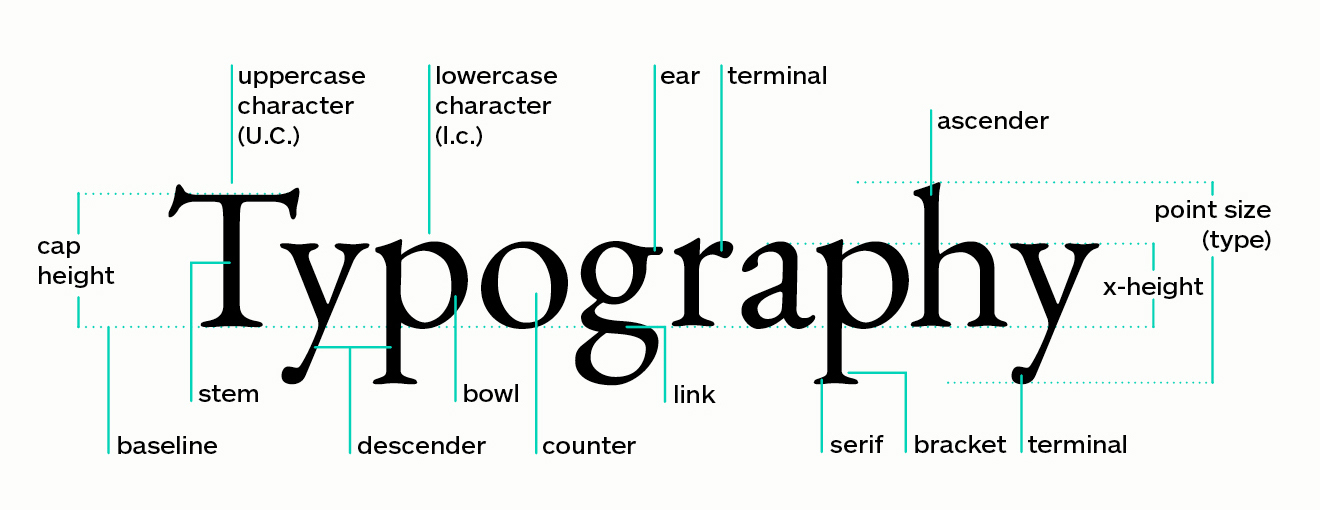
Master the typography
Every slideshow looks tidy when crafted with good typography. Apply corporate-grade typography fonts such as Helvetica instead of unprofessional or artistic Comic Sans. It assists in keeping easy readability for your slide content, plus helps in boosting the integrity of the content. Remember to place the size of your fonts as 30 px or more for your audience in the back as well. You won’t want your audience to squint their eyes while seeing your ppt.
As a presenter, you should always take care of the content length. One should avoid typing hefty paragraphs. Instead, go for one-liners and bullets. You may use six bullet points in each slide. Another great tip is to position the title of your slide to a slightly bigger font than the text. While presenting, you can further elongate the one-liners and help your audience understand the crux of the subject matter without throwing them off the track.
Mac PowerPoint presentations having a beautiful style can result in having a colossal effect on your audience. A well-crafted PowerPoint presentation can be a deciding factor between a closed deal and a missed opportunity.
Keep these seven enlightening and professional tips in your mind before structuring your next ideal presentation. Integrate a pinch of style, creativity, and vigor in your slide deck to create modernistic slides. The key is to attract your audience with minimalistic, yet engaging slide content.

News content on AppleMagazine.com is produced by our editorial team and complements more in-depth editorials which you’ll find as part of our weekly publication. AppleMagazine.com provides a comprehensive daily reading experience, offering a wide view of the consumer technology landscape to ensure you're always in the know. Check back every weekday for more.
- @http://twitter.com/applemagazine
- Follow me on Facebook
- Send me an email!
Related Stories
Can apple become a console gaming giant, apple rolls out new features for iwork suite across mac, ipad, and iphone, the lowdown on applecare+ (is it worth buying), demystifying apple pay: your ultimate guide, security features that keep your apple devices safe, apple eyes in-house design for future iphone camera sensors, end of an era: apple infinite loop store shuts down, why apple devices are better for media production, color lcds & outdoor color tft tech for improved readability, apple arcade rivals nintendo switch online & steam in weekly user volume, you may also like.

How Technology Helps Streamline & Simplify Payroll Processes

Exploring the Power of Tech Innovation for Advanced Salesforce Monitoring

How to Use TikTok Challenges to Stay Trendy & Promote Your Business

Ways to Make Your Life Easier as a Busy Business Owner

Does the Apple App Store Allow Gambling Apps?

How to Improve Your Workplace Dynamics

PowerPoint for Mac Help
Looking for something that’s not listed here? Use the Search box in the upper-right corner of this window.
Activate Office for Mac
Check for Office updates automatically
PowerPoint Essentials
Help articles, additional resources.

Need more help?
Want more options.
Explore subscription benefits, browse training courses, learn how to secure your device, and more.

Microsoft 365 subscription benefits

Microsoft 365 training

Microsoft security

Accessibility center
Communities help you ask and answer questions, give feedback, and hear from experts with rich knowledge.

Ask the Microsoft Community

Microsoft Tech Community

Windows Insiders
Microsoft 365 Insiders
Was this information helpful?
Thank you for your feedback.

How To Make An Impactful Presentation On Your Macbook: A Step-by-Step Guide
Do you want to make an impact when presenting your ideas or business pitches? Have you ever felt like the presentation tools available on a Macbook aren’t enough to create professional-looking slideshows? Well, look no further! Here’s a step-by-step guide that will show you how to use all of the features and resources available on your Macbook so that you can give presentations with confidence. With this guide, you’ll learn how to make powerful slides, captivate audiences and ensure that everyone remembers what they heard. So get ready: it’s time to start crafting amazing and impactful presentations!
Utilizing Mac’s Keynote for Engaging and Professional Presentations
When it comes to giving presentations, there is nothing quite as sleek and professional as utilizing Mac’s Keynote. This powerful presentation software brings a whole new level of engagement and visual appeal to your audience. With its user-friendly interface and vast array of features, you’ll be able to create captivating slideshows that will leave a lasting impact.
One of the standout features of Keynote is its ability to create stunning visuals. Whether you’re using pre-designed templates or starting from scratch, this software allows you to easily incorporate images, videos, charts, and graphs into your slides. You can even add elegant transitions between each slide for a seamless flow throughout your presentation.
Additionally, Keynote offers an extensive selection of stylish fonts and customizable text options. This means you can play around with different font sizes, colors, and styles to make sure your message stands out on every slide. Furthermore, the software allows you to animate text elements in creative ways – from fading in gradually to zooming in for emphasis – making it easier than ever before to keep your audience engaged.
Moreover (as fancy bullet list), Keynote provides ample opportunities for collaboration. Multiple users can work on the same slideshow simultaneously by sharing access through iCloud or other cloud-based platforms. This makes it ideal for team projects or when you need input from colleagues or clients who are located remotely.
In conclusion (stylistic line break), if you want your presentations to be engaging and professional-looking (bold tag), look no further than Mac’s Keynote software (bold tag). Its intuitive design tools coupled with its wide range of features make creating visually appealing slideshows a breeze (stylistic line break). So next time you have an important presentation coming up (bold tag), give Keynote a try – I guarantee that both you and your audience will be impressed!
Mastering The Art of Graphics and Images on Your MacOS For Presentation Impact
Graphics and images can be powerful tools to enhance your presentations and captivate your audience. If you’re a MacOS user, you’re in luck because the platform offers numerous features to help you master the art of graphics and images.
Firstly, let’s talk about using high-quality images. Whether you’re sourcing from stock photo libraries or taking your own pictures, make sure they are visually stunning and relevant to your topic. Bold tagsFor instance, if you’re presenting about wildlife conservation, include vibrant shots of endangered species that will instantly grab attention. Line breaksTo really make these images pop on your slides, take advantage of MacOS’ built-in editing tools such as Preview or Photos app. You can easily adjust brightness, contrast, and even apply filters to give them an artistic touch.
Next up is creating eye-catching charts and graphs using Numbers software on Mac. Bullet listsThis tool allows you to visually represent data in a clear and concise manner. Don’t just settle for plain bar charts – experiment with different chart types like pie charts or line graphs to present information dynamically.Bold tags Use contrasting colors for each element so they stand out distinctly when projected onto a screen.Line breaks And don’t forget to add titles or labels for clarity!
Lastly, let’s discuss the importance of typography in graphic design. Instead of relying on default system fonts like Arial or Times New Roman, explore MacOS’ extensive collection of pre-installed fonts.Line breaksChoose fonts that match the tone and message of your presentation – whether it’s professional and formal or playful bold tagsand creative.Line breaksDon’t go overboard with too many different font styles; stick to two complementary ones at most.Bullet listsRemember also to consider font size: choose larger sizes for headingsLine breaksand subheadings while keeping body text readable but not overpowering.Bold tagsYou want your audience focused on what’s being said rather than squinting their eyes trying to decipher tiny letters!Line breaksIn conclusion, by utilizing the various graphic and image-related features on MacOS, you can elevate your presentations to a whole new level.Bold tags Add stunning visuals, charts that are visually appealing yet informative, and typography that enhances the overall aesthetic. With these tips in mind, your audience will be left impressed and engaged throughout your entire presentation.
Leveraging Audio & Video Capabilities On Your Macbook To Enhance Your Presentation
When it comes to giving presentations, it’s always important to captivate your audience and leave a lasting impression. And what better way to do that than by leveraging the audio and video capabilities of your trusty Macbook? With its sleek design and powerful features, your Macbook can truly take your presentation game to the next level.
One great feature is the ability to add background music or sound effects to enhance your presentation. By incorporating some catchy tunes or subtle sounds, you can create a more engaging atmosphere for your audience. Just imagine their surprise when they hear a dramatic drum roll right before unveiling an important slide! To do this, simply find an audio file or track that complements your content, drag and drop it into Keynote (or any other presentation software you prefer), and adjust the settings accordingly.
Another way to leverage audio on your Macbook is through voiceovers. Instead of just reading out text-heavy slides in monotone fashion, why not record yourself narrating key points or providing additional insights? This not only adds a personal touch but also helps reinforce important information for your listeners. To do this with ease, open QuickTime Player on your Macbook (it’s pre-installed!) and select “New Audio Recording”. Hit record, speak clearly into the microphone built-in on most models, then save the recording as an mp3 file. Import it into Keynote or PowerPoint later – voila!
Now let’s talk about videos – one of the most impactful ways to grab attention during a presentation. Whether you want to showcase product demos, customer testimonials, or highlight key moments from events – adding videos will surely elevate the overall experience for everyone present in that room (or virtual space!). Simply insert video clips directly onto slides using Keynote’s “Media” button; make sure they are relevant and high-quality so as not to distract from the main message.
In conclusion: don’t be afraid to get creative with your presentations! Utilize the audio and video capabilities of your Macbook to add that wow factor, whether it’s through background music, voiceovers, or engaging videos. With these simple yet powerful tools at your disposal, you’ll be sure to leave a lasting impression on your audience.
Maximizing the Use of Interactive Features in a Macbook Powered Presentation
So you’ve got a shiny new MacBook and you want to impress your audience with a killer presentation. Well, lucky for you, MacBooks come packed with interactive features that can take your presentation to the next level. Let’s dive right into how you can make the most of these awesome tools!
First off, have you tried using Keynote? It’s Apple’s very own presentation software and it’s absolutely fantastic. With Keynote, you can create stunning slideshows that are not only visually appealing but also highly interactive. You can add animations, transitions, and even build in quizzes or polls to engage your audience. Plus, Keynote has this cool feature called Magic Move that allows objects on your slides to seamlessly transition from one location to another. Talk about smooth!
Another great way to maximize interactivity is by using AirPlay with your MacBook. By connecting wirelessly to an Apple TV or other AirPlay-enabled device, you can mirror your screen onto a bigger display for everyone to see. This is perfect for when you want to showcase videos or demonstrate how certain apps work in real-time.
Lastly, don’t forget about the power of gestures! Your MacBook trackpad supports all sorts of intuitive gestures that can enhance your presentation experience. Want to zoom in on something specific? Just pinch with two fingers and voila! Need a quick way to switch between slides? Swipe left or right with three fingers and there you go! These simple yet powerful gestures will not only save time but also give your presentation a more polished feel.
In conclusion, if you’re looking for ways to elevate your presentations on a MacBook, be sure to explore the many interactive features at your fingertips – like Keynote’s animations and Magic Move tool – as well as utilizing AirPlay for larger displays and incorporating trackpad gestures into your delivery style.

A late Apple convert, Dom has spent countless hours determining the best way to increase productivity using apps and shortcuts. When he's not on his Macbook, you can find him serving as Dungeon Master in local D&D meetups.
Read more from Dom
How To Eject a Disc From MacBook Pro: An Easy Step-by-Step Guide
How to record your macbook screen with internal audio: a step-by-step guide, leave a comment cancel reply.
Save my name, email, and website in this browser for the next time I comment.

Apps UK International House 12 Constance Street London, E16 2DQ
Privacy Policy
Keynote User Guide for Mac
- What’s new in Keynote 14.0
- Intro to Keynote
- Intro to images, charts, and other objects
- Create a presentation
- Choose how to navigate your presentation
- Open or close a presentation
- Save and name a presentation
- Find a presentation
- Print a presentation
- Undo or redo changes
- Show or hide sidebars
- Quick navigation
- Change the working view
- Expand and zoom your workspace
- Customize the Keynote toolbar
- Change Keynote settings on Mac
- Touch Bar for Keynote
- Create a presentation using VoiceOver
- Add or delete slides
- Reorder slides
- Group or ungroup slides
- Skip or unskip a slide
- Change the slide size
- Change a slide background
- Add a border around a slide
- Show or hide text placeholders
- Show or hide slide numbers
- Apply a slide layout
- Add and edit slide layouts
- Change a theme
- Add an image
- Add an image gallery
- Edit an image
- Add and edit a shape
- Combine or break apart shapes
- Draw a shape
- Save a shape to the shapes library
- Add and align text inside a shape
- Add 3D objects
- Add lines and arrows
- Animate, share, or save drawings
- Add video and audio
- Record audio
- Edit video and audio
- Add live video
- Set movie and image formats
- Position and align objects
- Use alignment guides
- Place objects inside a text box or shape
- Layer, group, and lock objects
- Change object transparency
- Fill shapes and text boxes with color or an image
- Add a border to an object
- Add a caption or title
- Add a reflection or shadow
- Use object styles
- Resize, rotate, and flip objects
- Move and edit objects using the object list
- Add linked objects to make your presentation interactive
- Select text
- Copy and paste text
- Use dictation to enter text
- Use accents and special characters
- Format a presentation for another language
- Use phonetic guides
- Use bidirectional text
- Use vertical text
- Change the font or font size
- Add bold, italic, underline, or strikethrough to text
- Change the color of text
- Change text capitalization
- Add a shadow or outline to text
- Intro to paragraph styles
- Apply a paragraph style
- Create, rename, or delete paragraph styles
- Update or revert a paragraph style
- Use a keyboard shortcut to apply a style
- Adjust character spacing
- Add drop caps
- Raise and lower characters and text
- Format fractions automatically
- Create and use character styles
- Format dashes and quotation marks
- Format Chinese, Japanese, or Korean text
- Set tab stops
- Format text into columns
- Adjust line spacing
- Format lists
- Add a highlight effect to text
- Add mathematical equations
- Add borders and rules (lines) to separate text
- Add or delete a table
- Select tables, cells, rows, and columns
- Add or remove rows and columns
- Move rows and columns
- Resize rows and columns
- Merge or unmerge cells
- Change the look of table text
- Show, hide, or edit a table title
- Change table gridlines and colors
- Use table styles
- Resize, move, or lock a table
- Add and edit cell content
- Format dates, currency, and more
- Create a custom cell format
- Highlight cells conditionally
- Format tables for bidirectional text
- Alphabetize or sort table data
- Calculate values using data in table cells
- Use the Formulas and Functions Help
- Add or delete a chart
- Change a chart from one type to another
- Modify chart data
- Move, resize, and rotate a chart
- Change the look of data series
- Add a legend, gridlines, and other markings
- Change the look of chart text and labels
- Add a chart border and background
- Use chart styles
- Animate objects onto and off a slide
- Animate objects on a slide
- Change build order and timing
- Add transitions
- Present on your Mac
- Present on a separate display
- Present on a Mac over the internet
- Use a remote
- Make a presentation advance automatically
- Play a slideshow with multiple presenters
- Add and view presenter notes
- Rehearse on your Mac
- Record presentations
- Check spelling
- Look up words
- Find and replace text
- Replace text automatically
- Set author name and comment color
- Highlight text
- Add and print comments
- Send a presentation
- Intro to collaboration
- Invite others to collaborate
- Collaborate on a shared presentation
- See the latest activity in a shared presentation
- Change a shared presentation’s settings
- Stop sharing a presentation
- Shared folders and collaboration
- Use Box to collaborate
- Create an animated GIF
- Post your presentation in a blog
- Use iCloud Drive with Keynote
- Export to PowerPoint or another file format
- Reduce the presentation file size
- Save a large presentation as a package file
- Restore an earlier version of a presentation
- Move a presentation
- Delete a presentation
- Password-protect a presentation
- Lock a presentation
- Create and manage custom themes
- Transfer files with AirDrop
- Transfer presentations with Handoff
- Transfer presentations with the Finder
- Keyboard shortcuts
- Keyboard shortcut symbols
Choose how to navigate your presentation on Mac
When you design your Keynote presentation, you can customize your slideshow’s navigation method. Normally, the presenter or viewer changes slides by pressing the Right Arrow or Left Arrow key, or by clicking the mouse or trackpad. However, you can also set your presentation to change slides automatically or only when the presenter or viewer clicks a link on the slide.
To set how to navigate your presentation, do the following:
Open the presentation.
Select one of the following options in the Presentation Type menu:
Normal: The presentation changes slides or starts animations when the presenter or viewer presses the Right Arrow or Left Arrow key, or clicks a link. This is useful if you want to present the slides sequentially.
Links Only: The presentation changes slides or starts animations only when the presenter or viewer clicks a link. This is useful if you want to present an interactive slideshow, or if you want to present slides in nonsequential order. To learn more about using links to create interactive slideshows, see Add linked objects to make your presentation interactive .
Self-Playing: The presentation advances and starts animations automatically, with no interaction needed to navigate between slides. To learn more about self-playing presentations, see Make a presentation advance automatically .
How To Connect Xbox Controller To iPhone Or iPad
How to refresh airtag location for improved tracking, iphone unavailable error here’s how to fix it, when did the iphone 15 come out.
- Zip-rar tool
- Zip browser
How To Prepare A Professional PowerPoint Presentation On Mac
Microsoft PowerPoint has always been the go-to software for making professional presentations. Many rely on it for their Business presentations, designs of fliers, and pamphlets and for carrying out their daily tasks at work.
If you have a MacBook or your place of work uses an iMac, and you are in the dark on how you can make great PowerPoint presentations on it, look no further. This article guides you through the best route to seamlessly use your Mac to make amazing presentations and designs for work.
The software could be obtained with a purchase of the Microsoft Office suite on your computer and other applications like Excel, Word, etc. Once you have it set up on your computer, you will be able to operate it in the same manner you would operate it on a Windows computer.
How To Install Microsoft PowerPoint on Your Mac
Installing the application on your Mac is an easy process; all you need to do is:
- Open the Mac App Store application on your computer.
- Type in “PowerPoint” in the search bar and click search.
- The result from your search should show you the application, but if that isn’t the case, scroll through the results till you see Microsoft PowerPoint.
- Click “Get” and then begin installation by clicking “Install”.
- If the case warrants, sign in with your Apple ID to continue the installation and then click on “get” at the bottom.
- The application should start downloading. When it’s done, click “open” in the top-right corner.
- Finally, click “get started” to log in with your Microsoft ID, or you can opt for a one-month free trial .
Few Tips On How To Create Your Professional Presentation
Let’s break down the basics of the design process step by step:
Content Is Most Important
It is very paramount that you set out your content first and foremost before you begin any design. Setting out your content and topic helps give you a mental picture of what you want to achieve. This will, in turn, help in determining the type and appearance of your design.
Content writing is a hard part of creating a presentation for many people.
This is because it needs to be original, comprehensive, and unique. Stuffing your slides and presentations with poor content is the most common spoiler of presentations. That’s why it is always better to try PowerPoint presentation writing services for interesting and comprehensive information. Some professionals write content on the use for presentation, which can help you learn more about the topic.
Choose The Color Scheme You Will Base Your Design On
Colors matter in a presentation. The right color scheme would determine whether your work would look beautiful and professional or amateurish and unprofessional.
You could use Adobe Color CC to build your color scheme. It would make your work of building perfect color schemes easier, or you could copy from schemes others have already built.
How To Create Your Cover Slide
Your design is one step simpler after you successfully get your color scheme. The next move is to pick one from the colors in your scheme, place it in the background and get ready to start typing. It may seem too simple, but it’ll look great if you get it right.
Selecting Fonts
Choosing fonts is a daunting task for many people when creating slides. There is always the temptation to avoid basic-looking fonts in favour of fancy-looking ones. However, thinking too much about it often leads to selecting hideous font combinations. You could look for an online writing service if you have no clue. Try out something basic, stick within a font family, and as much as possible, make sure you select styles that are different from each other.
Try to avoid center alignment as much as you can. Sticking to the edge for your presentation to have better readability is always preferable.
It is also important to note that you don’t have to fill up every space on your layout. Leaving some spaces empty can go a long way in giving your presentation a clean look.
You can also take advantage of a secondary display with your Mac for easier organization when creating layouts for your presentation.
Inputting Content Into Your Slides
The secret about this is keeping it as simple as possible. You don’t have to input everything you want to say into your slides. It makes it hard to follow and simply too much.
Slides are meant to give a visual perspective to what you are saying. Stick to using only bullet points of your content on the slides.
Why is Content Originality Important?
Most times, the originality of your content is what makes your presentation different from others. If your presentation is borne out of content from within you, it would be easier for you to express yourself and convince your audience to be interested in your work.
When your presentation is professional or a business proposal , your audience will often want to buy into your ideas if they can see a synergy between you and the presentation you make. In situations where your presentation is to get a competitive opportunity, the only thing that could make your PowerPoint presentation stand out from others is its originality and how well you can express yourself.
If you read through all that has been said, you shouldn’t have a problem using PowerPoint on your Mac to make amazing presentations. People are always very visual. You could have good and wonderful points to say, but having a great PowerPoint presentation can be the cherry on top to perfect the delivery of your content to prospective audiences. Amazing PowerPoint presentations will keep your audiences on the edge of their seats when you speak.

Leave a Reply Cancel reply
Your email address will not be published. Required fields are marked *
Notify me of follow-up comments by email.
Notify me of new posts by email.
This site uses Akismet to reduce spam. Learn how your comment data is processed .
Sign Up for Our Newsletters
Related posts, forgot apple id password here’s how to find it it on iphone, ipad and mac, how to find your apple id on iphone, ipad, and mac, how to type apple symbol () on iphone, ipad, and mac, apple announces wwdc 2024 for june 10.
- PDFelement for Windows
- PDFelement for Mac
- PDFelement on Mac App Store
- PDF Reader for Windows
- PDFelement for iPhone/iPad
- Get from App Store
- PDFelement for Android
- Get from App Google Play
- PDF Scanner for iPhone
Cloud & SDK
- Document Cloud
- PDFelement Pro DC
- PDFelement SDK

Educational Users
- Annotate PDF
- Combine PDF
Personal Users
- Convert PDF
- Compress PDF
- Organize PDF
Professional Users
- AI PDF Editor
- Extract Data from PDF
- Password Protect PDF
- eSign PDFs Legally
PDF Solutions for
- Mac Software
- OCR PDF Tips
- Online PDF Tips
- Edit PDF like Word
- PDF Converter Tips
- PDF Compressor Tips
Why PDFelement
- Customer Stories
- PDF Software Comparison
- Contact Support
- PDFelement for iOS
- InstaScan for iPhone
Explore More
- Reviews See what our users say.
- Free PDF Templates Edit, print, and customize free templates.
- PDF Knowledge PDF-related information you need.
- Download Center Download the most powerful and simple PDF tools.
- Download Download Pricing Pricing
How to Make a PowerPoint on Mac OS 10.15 Catalina

Elise Williams
2024-03-22 16:31:28 • Filed to: PowerPoint Tips • Proven solutions
The software that can be used to create a presentation on Mac includes, PowerPoint and keynote among others. In this case, we are going to learn how to make a PowerPoint on mac . There are a number of ways to go by on making a presentation on Mac which includes using Microsoft PowerPoint for Mac, creating a presentation using keynote, or Google docs and export as PowerPoint file (ppt or .pptx).
How to Make a PowerPoint on Mac
In this article, we will use Keynote on Mac to make a presentation and then export it to PowerPoint.
Step 1. Launch Keynote
Click on the “Keynote icon in the Launchpad to open it. A window displaying various theme templates “Theme chooser” will appear. In the case it does not appear, click the option key and on the “File” menu select “new” to open a new presentation template.
Step 2. Choose the Theme of the Presentation
Scroll to navigate in the theme chooser and choose the type of presentation you want to make then double click on it to open.

Step 3. Change the Layout
To change to a different layout, you can click on the “Layout” button, and then select your desired layout.

Step 4. Add Content
There are a number of activities you might need to perfume on the presentation which involves adding your content.
- To add a slide, click on "Add Slide" in the toolbar and then select a layout.
- To add text, there is a placeholder text on the slide which you should double click and type to replace it with your own.
- To add an image, drag and drop or copy and paste an image to the slide from your computer or webpage.
Step 5. Save the File
After you are done with adding your content to the slide and your presentation is ready, you can click on "Save" and enter the file name. Meanwhile, you need to choose the location to save your file, and finally click “Save”.
Step 6. Export to PowerPoint
It is always important to try playing your presentation by yourself before you present it to other people to familiarize with it and make any necessary changes.
- Step 1. To export the file, you can click on “Share” on the menu, and then select “export”.
- Step 2. Click on "PPT" from the menu and then click “Next”.
- Step 3. Navigate to the location you want to save your file and change name if necessary.
- Step 4. Click on “export”. Last but not least, you can open the exported PowerPoint file to confirm the content.

The Best PDF Software for Mac
Wondershare PDFelement - PDF Editor is the best PDF editor which can be described as an All-in-One PDF Editor. It is attributed to powerful features that can edit PDF text and images, convert documents to various formats, and also create fillable forms, protect and share documents. It has become one of the commonly used and preferred document software owing to its advanced features, flexible prices, and perfect performance. PDFelement offers full control of your work on editing and modifying with its custom tools without forgetting its easy-to-use interface. The following are some popular features of PDFelement.
Launch PDFelement on your Mac computer, and click "Open File" and search for the file you want to open. Then you can choose the "Edit" option, and then you can add text, crop, watermark, change font or background, add page numbers among others.

• Convert PDF
Launch PDFelement on your Mac computer and import the PDF document to this program. And you can click the "File" > "Export To" option, then you select the format in which you want to convert the file like excel, word, and image, and finally click "Save".

• Create PDF Forms
Open your PDFlelement program and click on "File" > "Create", and then choose the "Blank Document" option.

Now click on "Form" on the left column, and pick one of the displayed elements and move the cursor to the blank area of the document to execute it.

After that, you can set the properties of the form by double-clicking on it to either align, modify, adjust size or delete. Once you have drawn your forms, you can type in your text content. To open the created fields, you can double click on it, and then you can also open the properties window to set either calculation, options, or appearances. Finally, you can click “Save” when you are done.

Free Download or Buy PDFelement right now!
Buy PDFelement right now!
chief Editor
Speak Your Mind
Related articles.
- How to Add Page Numbers in PowerPoint
- Quicktime Not Available in PowerPoint? Solve It.
- How to Change Background in PowerPoint
- How to Create Video from PowerPoint
- How to Insert Notes to PowerPoint
- Apple Pencil
- Apple Watch
- All Smart TVs
In This Article
15 software used for mac presentation, 6 online presentation software for mac, does mac have presentation software, how do you create a presentation on mac, is there a mac version of powerpoint, is powerpoint better than keynote, let your presentation talk, related articles, 15 best presentation software for mac [reviewed & ranked].
Follow on Twitter
Updated on: February 08, 2024
Presentations are integral to any design: how else would you explain your idea to your client or team? People tend to leave presentations as the last possible step of their process and don’t give them as much time and attention as they need.

If you are a designer, architect, artist, businessman, or any other person that regularly makes subpar presentations, take your game to the next level with some of the best presentation software for mac !
You don’t want to download or install any App? Then check these 6 online presentation software for mac .
Here is some of the best presentation software for Mac that you can use to make your ideas and design extraordinary:

Price: Free Best for: Mac users
Keynote is one of the top presentation software for Mac and comes included with most Apple devices.
With its stunning features and powerful tools, you can bring your slides to life and create the most effective presentations for your clients or your boss.
- Best in-built presentation software for Mac
- Simple and intuitive
- Poor compatibility with windows presentation software
- Presentations can take too much storage
- Does not have as many editing tools as PowerPoint
2. FlowVella

Price: Free (limited version) or $10/month Best for: Mac users
This presentation software is excellent to combine words, images, videos, links, PDFs, and other media into a presentation.
This way, having an interactive presentation is easy.
It’s oriented towards marketing, HR professionals, and sales teams.
- Great Drag & Drop Feature
- Dozens of free templates
- You have to buy the software to use all the features and tools
3. Prezi for Mac

Price: Free (limited version) or starting at $10/month Best for: Mac users
Prezi for Mac is another great Mac presentation software that lets you create dynamic presentations. It has a trial version of 14 days.
The bad thing about making presentations is choosing a video or image to put into it. But not with Prezi.
Prezi is a leader in the video presentation movement and allows you to make the most interactive slides for your presentation.
- Great User Interface
- Zoom and overview feature
- Integration with Zoom Software
- It takes time and practice to learn how to work on Prezi.
- Not easy for beginners.

Price: Starting at $35 Best for: Mac users
Deckset is a unique presentation software that lets you put your ideas and thoughts into it and makes the slides for you.
This is great for people that want to spend less time and energy making slides for their presentation but is only for text-based presentations.
It includes a trial version to try before purchasing the complete presentation software.
- It designs your slides for you, taking off most of the pressure of creating a presentation
- Trial Version
- It is a very costly software to buy
5. PowerPoint

Price: Free (With a Microsoft 365 subscription) Best for: Mac users
PowerPoint for Mac is old but gold.
It is one of the oldest presentation software and allows you to create beautiful slides with multiple templates of your choice.
This software has many tools and features that make the presentation process fun and easy.
- Easy and simple to use
- Multiple free templates
- Lack of creativity in the included templates
- Display Compatibility issues
6. LibreOffice’s Impress

In this software for Mac, multiple editing and viewing modes make the process of editing and creating slides versatile and interactive.
This software is great for presentations that are mostly text-based.
- Free software
- It does not put a lot of strain on your system
- Not very good user interface
- Lack of integration with other presentation software
7. iSkySoft Slideshow Maker

Price: $59.95 Lifetime Best for: Mac users
iSkyDoft Slideshow Maker has to be one of the best presentation software for Mac.
It allows the user to add text, photos, and videos to the slides and music, which makes the entire experience of watching a presentation even better.
This presentation software can be used to beautifully commemorate an event, activity, design process, or team activity in one file.
Moreover, the software also has a ton of features and aftereffects that can be added to make the presentation even better.
- Easy-to-use interface with a ton of incredible features
- It has a steep subscription fee that might not be good for beginners or one-time users
8. Focusky 3D

Price: starting at $9.9 Best for: Mac users
If you want to make a presentation on your desktop but also want it to work on other devices, such as your phone or tablet, Focusky is the perfect software for you.
Focusky is a powerful 3D presentation software for Mac with a wide range of tools that allows you to customize your presentation according to your taste.
to customize your presentation according to your taste.
- It works great offline and doesn’t require any internet
- Powerful export functionality (slides into gift/flash)
- Unexciting slide visual effects
- It requires a bit of learning before you can successfully use it
9. TouchCast Pitch

TouchCast Pitch is one of the presentation software that you automatically gravitate towards when you want to make a meaningful, impactful, and interactive presentation.
Pitch turns boring presentations into winning experiences that make it hard to forget.
- It has a huge library of tools and interesting features for your use
- A bit hard to learn and teach students

If you’re trying to make a presentation in less time with the least effort and still hoping it will come out beautiful, Canva is the perfect software to use.
With its extensive features and tools, the software allows you to edit, customize, and create your slides for presentation in record time.
- It is free, simple, and has a good user interface.
- It allows you to create stunning designs in mere minutes
- It is not a specific software for presentations.
- It does not have as many interesting features as other presentation software

Price: Free or $8/month Best for: Mac users
If the presentations that Pitch lets you make are half as interactive and fun as their website, there is no better software for Mac to do presentations.
It has multiple great tools, effects, templates, and designs available for you to use for your presentation or get inspired to create your own.
- Team Collaboration feature
- Great Support Team
- It has a bit of a learning curve, especially for a beginner
- A limited selection of templates
12. WPS Office for Mac

Price: Free (limited version) or $ 25.21 / year Best for: Mac users
WPS Office must be the essential software on your desktop, whether it is Windows or Mac.
The WPS Office for Mac has all the features and tools that let you document your process and create some of the simplest and easiest presentations for your work meetings and project discussions.
- It allows for collaboration
- Easy documentation
- It doesn’t have a lot of tools for PDF editing or grammar-check for text
13. Premast Plus

Price: Free or $5.99/month Best for: Mac users
If you are a designer, or any other creative folk, looking for beautiful graphic presentation software, there is none better than Premast Plus.
It gives you a wide range of tools, templates, illustrations, and icons to use for your presentation to make it the best you can!
- Very simple
- Wide Range of rich templates
- A lot of the tools and features of this software are available only after you purchase a subscription
- A bit unstable.
14. Movavi Slideshow Maker

Price: Free Trial or $37 Best for: Mac users
Movavi Slideshow Maker is great for unconventional presentations as it lets you add images, videos, text, music, transitions, and effects to your file.
It allows you to create a movie out of your work, making the entire presentation fun and engaging.
- It has great and simple user-interface
- It lacks a lot of features and does not have the tools for professional editing and presentation-making
15. Propresenter – Church Presentations

Price: starting at $399 Best for: Mac users
Propresenter is a church presentation software for Mac that allows you to create a beautiful presentation for a sermon.
It can include worship lyrics, sermon notes, videos, images, etc., to create an impactful and powerful presentation.
The best thing about this software is that it is excellent for beginners.
- Perfect presentation software for church
- It has all the tools that you might need to add music, lyrics, sermon, and text.
- Very expensive software and only best for professionals
1. Slidesbean

Slidesbean is an innovative online presentation software for Mac that does most of the heavy lifting while making the presentation.
It has great features and interactive tools that offer everything you need to build the perfect pitch for your presentation!
Great for entrepreneurs who want to create a beautiful pitch deck.
- Great analytics
- The templates look great
- The result looks very professional
- Videos have to be uploaded to third-party platforms
- The AI feature is not too helpful
- Export for PowerPoint only exports as image
2. Renderforest

Looking for a great online presentation software for Mac that allows you to create stunning videos, animations, branding, mockups, presentations, and more?
Renderforest is the perfect site for beginners and professionals.
- High quality & professional looking templates
- Mind-blowing animations
- Video templates look great
- Free version available
- Limited customization
- Can be a bit pricy
- No iOS or Android app
- Video render time can take long
3. Zoho Show

The great thing about this online presentation software for Mac is that it allows for a group/team to collaborate on the process of creating a presentation.
It is a clean, simple, and easy software that makes creating presentations seamless and simple.
- Includes infographics
- Supports real-time collaboration
- It has good template designs
- It has a Chrome web browser extension that makes it easier to work on the slides.
- It allows broadcasting presentations
- Easy-to-use transitions
- Interface can be a bit slow on low-end devices
- Interface could be better
- No desktop App available

Visme is a fan favorite for brands, big and small, to create stunning presentations.
It has numerous templates and color pallets to choose from that make the entire process of making a presentation easy.
- Allows you to create a brand identity with “My brand” feature
- Disk capacity and usage limit can be low on basic and free plans
- No support for collaborators
- Learning curve
- Free version is way too limited
- The interface could be better
5. Google Slides

Google Slides is the most popular online presentation software that is used by millions worldwide.
It provides the basic tools and features necessary to create a striking presentation.
- Fast and easy to use
- Includes real-time collaborative mode
- It’s free
- Connected with Google services like Google Drive
- It doesn’t support non-Google-based fonts
- Limited templates
- Limited transitions and animations
- It won’t provide support for audio imports

Slides are one of the online presentation software that makes your presentation look extremely sleek and professional.
It is a must for all designers and project managers!
If you need to bring project management to the next level, then you must check out the best project management software for Mac .
- Supports custom HTML and CSS
- Supports two directions (vertical & horizontal)
- Smooth and fast interface
- Supports LaTeX
- It doesn’t provide templates
- It doesn’t support PowerPoint exports
Mac has a presentation software already preinstalled in all Apple devices called Keynote. It is completely free and it allows you to create stunning presentations for school projects, your business, your office, etc. It is available for Mac, iPhone, iPad, and even for PCs.
Keynote includes real-time collaboration with your team, which is an essential feature now that everything is done online.
You can create a presentation on Mac with the help of Keynote. To create a keynote presentation follow these 3 steps:
- Choose a theme.
- Add your content to the placeholder images and texts.
- Create a presentation from the slides.
Yes. Microsoft PowerPoint is available for download on Mac and your phone, tablet, or PC, but you would need a Microsoft 365 subscription on your device to use it on Mac. The software isn’t identical to the Windows one but is quite similar with only a few minor differences in menu and layout.
Where PowerPoint is the most common presentation software for everyone worldwide, Keynote has been declared a better presentation software for Mac users, especially for professionals.
But if you are looking for a variety of editing tools, features, and templates for your presentation, there is nothing that trumps PowerPoint.
Creating a powerful presentation is an essential part of your strategy, whether you are a businessman, a designer, an architect, or a project manager.
It would be best if you had a presentation that doesn’t bore your audience and manages to convey all the key information in the best possible way.
All the software mentioned above are some of the most extraordinary presentation software for Mac and can help you create a memorable presentation.
- How To Create A Page Like a PowerPoint Presentation
- 9+ Best Photo Management Software For Mac
- 13 Top Landspace Design Software For Mac
- 9 Best Database Software For Mac
- Top 19 Architect Software For Mac
Juwairiah Zia
Juwairiah Zia is a seasoned professional, a full stack developer and writer in her free time. She’s deeply immersed in various tech domains such as web and mobile application development and mentorship.
Don’t Miss…

- Legal Notice
- Terms & Conditions
- Privacy Policy
A project by Alvaro Trigo
Free All-in-One Office Suite with PDF Editor
Edit Word, Excel, and PPT for FREE.
Read, edit, and convert PDFs with the powerful PDF toolkit.
Microsoft-like interface, easy to use.
Windows • MacOS • Linux • iOS • Android

- Articles of PPT
How to Make A PowerPoint on Macbook [Totally Free]
Many users wonder how to make PowerPoint presentations on a MacBook without Microsoft Office. While some of PowerPoint’s features are only available on Windows, Mac users have great alternatives through Apple's Keynote app or the impressive WPS Office suite. This guide will walk through your options to easily create PowerPoints on a Mac.
Microsoft PowerPoint Version: Windows vs Mac
PowerPoint was originally created by Microsoft for Windows operating system. The Mac version was released later and had limited capability compared to the Windows version for a long time.
Over the years, Microsoft has considerably improved PowerPoint for Mac, bringing it closer to feature parity with Windows. But there are still some differences:
Presenter View Differences: Certain elements in Presenter View operate uniquely on Mac, providing a distinct user experience.
Additional Mac Features: Mac boasts exclusive features such as AppleScript and automator support, enhancing user capabilities.
Dynamic Reorder: a noteworthy addition on Mac, facilitates seamless adjustment of layered objects in presentations.
Missing Features on Mac : Notable omissions on Mac include the absence of Animation Painter, the inability to enter correctly formatted equations, the lack of support for video or animation triggers, and video trimming.
Zoom Functionality Discrepancy: Zoom, a valuable PowerPoint tool, is currently exclusive to PCs, posing a limitation for Mac users. Future availability on Mac is anticipated with Office updates.
Color Representation Variations: When opening the same Microsoft Office file on both platforms, subtle differences in color representation may be observed due to the distinct ways Macs and PCs interpret colors.
The distinctions between PowerPoint on Mac and Windows result in subtle variations in user experience.
Keynote – PowerPoint on Mac
Keynote is a presentation software developed by Apple, designed to create stunning and memorable presentations. Its powerful tools, dazzling effects, and intuitive interface stand out. Keynote enhances presentations by offering over 40 eye-catching themes, animations, and dynamic backgrounds. It allows real-time collaboration across Apple devices, including Mac, iPad, iPhone, and PC.
Keynote stands out with its user-friendly design, featuring Apple Pencil integration for illustrations and animations. It's compatible with PowerPoint – presentations can seamlessly switch between the two platforms, ensuring smooth collaboration for users of Microsoft PowerPoint.
How to Create a PowerPoint on Mac
Here are step-by-step instructions to make a PowerPoint presentation using Keynote on your Mac:
Step 1 : Open Keynote, located in the Applications folder on your Mac. You can choose a theme or start with a blank presentation when launched.
Step 2 : If using a theme, click to select one that fits your presentation style. Themed slides will automatically populate.
Step 3: Customize slides by adding text, changing layouts, inserting images, and more. Edit and arrange slides from the left sidebar.
Step 4: When finished, export your Keynote project to PowerPoint format. Go to File > Export To > PowerPoint.
Step 5: In the Export Your Presentation window, select a file format from the Advanced Options field and then click Next to save your presentation.
And that's it! You now have a PowerPoint presentation created completely on your Mac. The process is very intuitive for both new and experienced users.
Create a Presentation Using a Theme
Keynote offers many professionally designed themes to jumpstart your presentation building. Themed slides provide layouts, fonts, colors, and graphics matching your selected style.
Explore themes efficiently in the theme chooser by browsing categories. Double-click the one that aligns closely with your vision. Refine your options by selecting a category from the left sidebar.
Using a theme saves tons of time designing layouts and formatting – you can focus on the content! And themes are easy to make your own by tweaking fonts, colors, and images.
Free Alternatives to Make a PowerPoint – WPS Presentation
If you want a free Office suite that works seamlessly across Windows and Mac, WPS Office is an excellent choice. The WPS Presentation software has all the key features of PowerPoint for creating stunning slide decks.
Compared to older versions of Microsoft Office, WPS offers significant advantages:
Lightweight and Feature-Rich: WPS Office is a lightweight and feature-rich office suite.
High Compatibility: Recommended for low-configuration computers, ensuring widespread usability.
Comprehensive Suite: Includes Writer, Presentation, Spreadsheet, and PDF editing functionalities in one platform.
Effortless Creation and Collaboration: Users can effortlessly create, edit, and collaborate on Word, Spreadsheets, Presentations, and PDFs in a unified environment.
Airpage Cloud Documents: Real-time synchronization and seamless collaboration across platforms.
Extensive Template Library: Over 100,000 professional templates across categories for creative document designs.
User-Focused Segmentation: Tailored features for students, teachers, business users, and finance professionals.
How to Create a Presentation Using WPS on Mac
Follow these simple steps to make presentations using WPS Presentation on your Mac:
Step 1: Open WPS Office, and click on New.
Step 2: Choose Presentation.
Step 3 : Select a blank presentation or template.
Step 4: From now on, you can edit slides by adding text boxes, images, shapes, and charts using WPS Presentation.
Multiply Templates of WPS Presentation
WPS Presentation offers a wide selection of professional templates and themes for free. Some of the noticeable themes are:
Blue Business Strategy Planning

This template is likely for business presentations focusing on strategic planning. Expect a professional, blue-themed design with elements conducive to illustrating business strategies.
Green Business Activity Planning

This template seems suitable for business activity planning presentations. A green color scheme might convey a sense of growth and productivity, aligning well with business-oriented content.
Blue Technology Big Data Product Display

This template likely targets presentations related to technology and big data. Anticipate a blue-themed design, possibly with futuristic and data-centric visual elements to convey a tech-savvy vibe.
Business Style Investment Analysis

Enhance your investment pitches with our sophisticated business template designed for in-depth analysis. Boasting a significant download record, expect compelling financial charts and visuals for clear communication of intricate investment ideas.
Browse all the templates at: https://template.wps.com/
How to Download WPS Office
Step 1: Go to https://www.wps.com/download/
Step 2: Select your operating system – Windows, Mac, Linux, Android, iOS and click on the Free Download button.

Step 3: Click on the downloaded file to open WPS Office Installer.

Step 4: Click on Install Now and follow the prompts to complete the installation.

Use Word, Excel, and PPT for FREE, No Ads.
Edit PDF files with the powerful PDF toolkit.
Microsoft-like interface. Easy to learn. 100% Compatibility.
Boost your productivity with WPS's abundant free Word, Excel, PPT, and CV templates.
How do I open PowerPoint on my Mac keyboard?
To open PowerPoint on your Mac, press Command + Space to open Spotlight, type "PowerPoint," and hit return when it appears in the results.
As for useful shortcuts, here are some for Mac:
Open a new PowerPoint: Command + N
Open existing PowerPoint: Command + O
Open print preview: Command + Option + P
View and Zoom: Command + 1 (Normal), Command + 2 (Outline), Command + 3 (Slide Sorter), Command + Plus or Minus (Zoom In/Out)
Presenting: Shift + Command + Enter (Start Slideshow)
What are the disadvantages of using Keynote?
Keynote slides have limited compatibility with Microsoft systems, potentially causing issues when exporting to PPT format. Transitioning from PowerPoint to Keynote can be time-consuming and frustrating, especially for experienced PowerPoint users.
Can I collaborate on presentations with KeyNote or WPS Presentation?
Yes, both KeyNote and WPS Presentation offer collaboration features, making it easy for multiple users to work on a presentation simultaneously.
Mac users can create PowerPoint-style presentations, including Office for Mac, Keynote, or the free WPS Presentation. WPS provides a full-featured alternative with hundreds of free templates and easy compatibility for exporting PowerPoint files. Any Mac user can quickly make professional presentations by following the step-by-step instructions.
- 1. 5 Best Free Fonts That Make Your PowerPoint Presentations Visually Appealing
- 2. How to Make a PowerPoint on Mac (Easy Tutorial)
- 3. How to Make A Beautiful Slideshow in PowerPoint-- Make Your Presentations Better
- 4. How to Make a Shape Transparent in PowerPoint
- 5. How to make a timeline in PowerPoint
- 6. Professional Tips to Make Your PowerPoint Slides Appealing to the Audience

15 years of office industry experience, tech lover and copywriter. Follow me for product reviews, comparisons, and recommendations for new apps and software.
Présenter compatible PC et Mac / Present PC and Mac compatible.
J’ai un système d’exploitation Windows 10 pro.
Je souhaite faire un « présenter » sans passer par le cloud car c’est un gros fichier qui « rame » en passant par le cloud.
Sur Pc la présentation fonctionne, sous mac c’est impossible de l’ouvrir.
Qu’elles manipulations je dois faire pour que le « présenter » fonction sous Mac et Pc sans passer par le cloud ?
Merci pour vos réponses.
Cordialement.
Good morning.
I have a Windows 10 pro operating system.
I would like to make a “presentation” without going through the cloud because it is a large file that “trails” through the cloud.
On PC the presentation works, on Mac it is impossible to open it.
What manipulations do I need to do so that the “present” function under Mac and PC without going through the cloud?
Thank you for your answers.
TM version 2023.1
Windows 10 Professionnel (version 21H2).
Intel(R) Core™ i7-10700F CPU @ 2.90GHz 2.90 GHz.
Carte mère : msi Mag Z490 Tomahawk.
128 Go de mémoire Ram.
Carte graphique Nvidia Geforce RTX 3070.
Bonjour @Kjoline13 ,
Malheureusement c’est bien là un des avantages du cloud : pouvoir exploiter une présentation indépendamment de l’OS.
À ma connaissance, il n’y a que 2 solutions possibles pour exécuter une présentation Twinmotion sur OSX :
- Soit builder l’application directement depuis un système OSX (ce qui veut dire installer Twinmotion sur un ordinateur fonctionnant sous OSX et builder depuis cette version)
- Soit utiliser une machine virtuelle Windows depuis la machine OSX (cf. BootCamp par exemple) pour lancer le fichier .EXE
Bonjour Matt.
Merci pour ta réponse.
Malheureusement, je ne suis pas certain de pouvoir inciter une tiers personne à installer une machine virtuelle sur son Mac.
Partant de tes explications, je vais donc tenter le chemin en sens inverse en installant sur une de mes machines un Os en utilisant VirtualBox ou équivalent…et voir ensuite comme me dépatouiller avec TM.
C’est vraiment dommage que UE n’inclut dans le « présenter » une option (par exemple, 3dVista VT à cette option)… de visite Mac et PC…en pensant simplement que les concepteurs et leurs clients n’ont pas tous deux machines avec 2 systèmes d’exploitations…qui sait un jour peut-être…
Merci d’avoir pris le temps de m’expliquer les choses.
IMAGES
VIDEO
COMMENTS
To play the presentation, click in the toolbar, then press the arrow keys to advance through the slides. To end the presentation, press the Esc (Escape) key. For more ways to show a presentation, see Play a presentation on your Mac. To close the presentation, click the red close button in the top-left corner of the window.
Making a PowerPoint on a Mac is easy. First, open up the Pages application on your Mac. Then, select the File menu and choose New from Template. From there, you can select a PowerPoint template and customize it to fit your needs. When you are finished, you can save your presentation and share it with others.
How to Make a PowerPoint Presentation on a Mac. Part of the series: Using Apple Computers. Making a PowerPoint presentation on a Mac computer can be done usi...
Step 2: Open PowerPoint. Open PowerPoint and choose a template or open a blank presentation. PowerPoint offers a variety of templates to suit different presentation styles. If you choose to start with a blank slate, you'll have complete creative freedom.
Here are four steps you can take to learn how to use Keynote to make a presentation. 1. Explore the Keynote App Interface. If you're switching to the Keynote app from another piece of presentation software, my favorite tip is to spend time familiarizing yourself with the interface.
Make Great Presentations (Free eBook Download) We have a helfpul compliment to this tutorial, which will walk you through the complete presentation process. Learn how to write your presentation, design it like a pro, and prepare it to present powerfully. Download our new eBook: The Complete Guide to Making Great Presentations. It's available ...
How to Use Microsoft PowerPoint On a Mac - Tutorial 1 - Start a New Presentation - Basic Tutorial | New #office365 #computersciencevideos #MicrosoftPowerPoin...
How to create a keynote presentationStep 1 : To open Keynote, click the Keynote icon in the Dock, Launchpad or the Applications folder.If the theme chooser (...
Keeping the slide content simple and precise will bestow your MAC slideshow with a decluttered look. It will help you to further your brand aesthetics as well. You may consider following the famous 10-20-30 rule of PowerPoint presentations. The rule states that your presentation should be no longer than ten slides.
Apply or change slide layouts. Customize a slide master. Change the page orientation of your PowerPoint presentation. Create and use your own presentation template. Create your own theme in PowerPoint. Learn about SmartArt graphics. Compress the picture size. Crop a picture. Add a transparent picture (watermark) to your slides.
Step 1: Open the App Store on your Mac. App Store Icon on Mac Launcher. Step 2: In the search bar at the top right, type in "PowerPoint" and press Return. App Store Search Bar. Step 3: The Microsoft PowerPoint app should appear as the first result. Click on the Get button and then Install.
To do this with ease, open QuickTime Player on your Macbook (it's pre-installed!) and select "New Audio Recording". Hit record, speak clearly into the microphone built-in on most models, then save the recording as an mp3 file. Import it into Keynote or PowerPoint later - voila!
1. Apple Keynote. Keynote comes pre-installed on Mac computers and is basically Apple's answer to the ever popular Microsoft PowerPoint. If you're used to using PowerPoint, then you'd need to get yourself acquainted on how to use Keynote. As with most things Apple, Keynote is a thing of beauty.
To set how to navigate your presentation, do the following: Open the presentation. In the Document sidebar, click the Document tab. Select one of the following options in the Presentation Type menu: Normal: The presentation changes slides or starts animations when the presenter or viewer presses the Right Arrow or Left Arrow key, or clicks a link.
Open the Mac App Store application on your computer. Type in "PowerPoint" in the search bar and click search. The result from your search should show you the application, but if that isn't the case, scroll through the results till you see Microsoft PowerPoint. Click "Get" and then begin installation by clicking "Install".
How to create a powerpoint on Apple products of iMac or MacBook or MacBookAir
Zoho Show is a presentation software that brings together distributed teams that loves to collaborate on their project. It allows you to create, edit, and share professional slides online for free on both Mac and Windows OS. You'll get so many templates to cover all your professional necessities.
Step 1. Launch Keynote. Click on the "Keynote icon in the Launchpad to open it. A window displaying various theme templates "Theme chooser" will appear. In the case it does not appear, click the option key and on the "File" menu select "new" to open a new presentation template. Step 2. Choose the Theme of the Presentation.
1. Keynote. Price: Free. Best for: Mac users. Get Software. Keynote is one of the top presentation software for Mac and comes included with most Apple devices. With its stunning features and powerful tools, you can bring your slides to life and create the most effective presentations for your clients or your boss.
Follow these simple steps to make presentations using WPS Presentation on your Mac: Step 1: Open WPS Office, and click on New. create new file in wps office. Step 2: Choose Presentation. open wps presentation. Step 3: Select a blank presentation or template. "wps presentation templates".
I would like to make a "presentation" without going through the cloud because it is a large file that "trails" through the cloud. On PC the presentation works, on Mac it is impossible to open it. What manipulations do I need to do so that the "present" function under Mac and PC without going through the cloud? Thank you for your ...