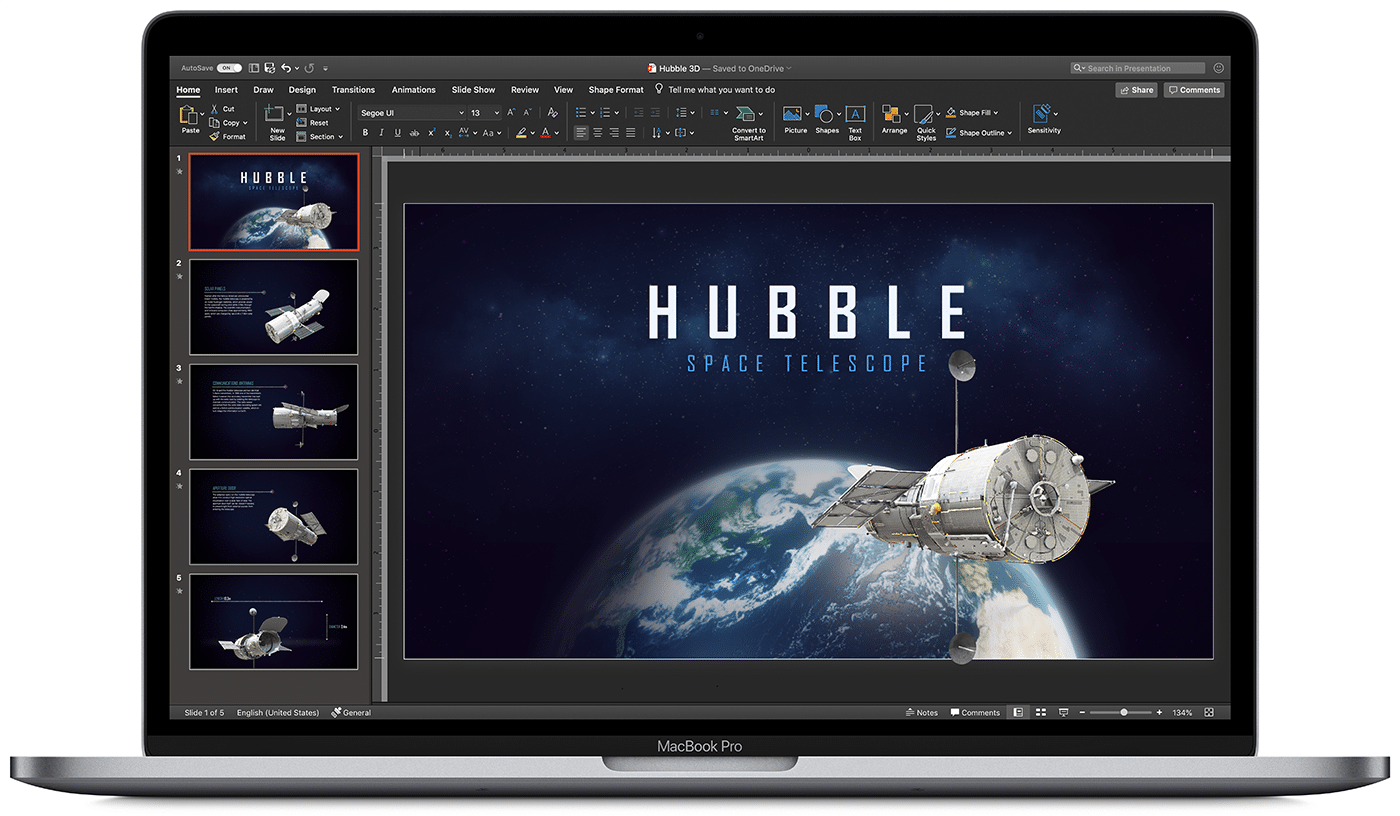
Microsoft PowerPoint 4+
Create impactful presentations, microsoft corporation.
- 4.7 • 393.6K Ratings
- Offers In-App Purchases

Screenshots
Description.
This application requires a qualifying Microsoft 365 subscription. Microsoft 365 includes premium Word, Excel, and PowerPoint apps, 1 TB cloud storage in OneDrive, advanced security, and more, all in one convenient subscription. With Microsoft 365, you get features as soon as they are released ensuring you’re always working with the latest. Create, edit, collaborate, and share presentations using PowerPoint for Mac. Now it’s easier than ever to create, edit, and share presentations seamlessly across your devices and with others. Share your files and collaborate in real time within a document or edit Office docs attached to emails. Get smart assistance features as soon as they are released in Word, Excel, and PowerPoint so you’re always working with the latest. Whether you need to show off your school project, business plan, or family vacation photos, PowerPoint is your go-to app for presentations. Kickstart your creativity • Achieve more and enhance your documents with access to a growing catalog of premium templates for Word, Excel, and PowerPoint. • Advanced formatting and layout options produce beautifully pristine documents on any device including laptops, iPads, and iPhones. Present with confidence • Get your ideas across with beautiful design, rich animation, cinematic motion, 3D models, and icons. • Save documents right to Microsoft OneDrive or another cloud provider to access them on any device and at any time you have internet access. • Dark Mode allows you to focus on creating presentations in low-light environments. Accomplish more together • Whether it’s a school project, sales pitch, or family slideshow, seamlessly work with others with real-time co-authoring to bring your ideas and plans together faster. • Share your documents with the click of a button to invite others to edit in real time. Easily manage permissions and see who’s currently working in a document. • Add comments or assign tasks to people in your group for clean editing and organization. Learn more about Microsoft 365 Microsoft 365 is a cloud-based subscription service that brings together premium versions of Word, Excel, PowerPoint, Outlook and OneDrive, with the best tools for the way people work today. Please visit: http://go.microsoft.com/fwlink/?linkid=2015120 for information on Licensing Terms. Unlock the full Microsoft Office experience with a qualifying Microsoft 365 subscription for your phone, tablet, PC, and Mac. Microsoft 365 annual subscriptions purchased from the app will be charged to your App Store account and will automatically renew within 24 hours prior to the end of the current subscription period unless auto-renewal is disabled beforehand. You can manage your subscriptions in your App Store account settings. This app is provided by either Microsoft or a third-party app publisher and is subject to a separate privacy statement and terms and conditions. Data provided through the use of this store and this app may be accessible to Microsoft or the third-party app publisher, as applicable, and transferred to, stored, and processed in the United States or any other country where Microsoft or the app publisher and their affiliates or service providers maintain facilities. Please refer to the Microsoft Software License Terms for Microsoft Office. See “License Agreement” link under Information. By installing the app, you agree to these terms and conditions.
Version 16.84.1
• Fixes keyboard shortcut for Paste Text Only
Ratings and Reviews
393.6K Ratings
Canvas Rearranges Design Elements when Uploading
If you are a college student and you create a PPT on Mac and you save and then upload itt as an assignment on Canvas, a lot tof tthe design elements get moved around and it makes a mess of the presentaion. pics and texts boxes are no longer where you placed hem, so your design looks bad. What I have to do no is export the presentation to a PDF an dupload that as the assignment, and then email the instructor to tell them that Canvas is wrecking my presentaion so I sent a pdf instead. My college moved from Moodle to Canvas last year and I have had this trouble ever since. When the PPT presentation is saved as a PDF, you lose all the extras you added like voice narration and sound effects, music, notes, etc.
You're getting better but the product still has many frustrating parts. For instance the open folder is now gone on this version and on other versions I use with different customers, it's there and useful. The library of icons and art that you can use is also lacking. Why don't you allow all the types of icons that Visio uses? It would make it usable. Also, the section part is great but it's clumbsy and when you open you always have to collapse. Why can't you select a flag that lets you open collapsed. that would make the tool much more usable. Integration with teams is still terrible and with email if the product is open, you can't send the file. Why? just version it and send. Theres' much more but it's useful but not a product that has the power of things like Lucid, or visio, but it could be much more usable, so you get a three for teasing me with function and ideas, then falling short when I try to use it my way as the main unit. It's keeping this type of work, design and developent documentation, a dark art...who knows maybe AI might help you.
Printing Slides is a Joke
To my knowledge, this is mainly an issue with PowerPoint for Mac as my colleagues who use PCs don't have this issue. When you go to print the slides, they look fine if there are multiple on a page or if you print the notes version, but if you try to print 1 slide per page the images blur when printing! And not just a little fuzzy, they turn out with lines going through them and just look like they never completed loading. This also happens when exporting to a PDF. The PDF looks fine on the screen, and then as soon as you go to print it, a random image will blur out like that. Is it the same image everytime? NOPE! It picks and chooses which image it wants to blur out each time it prints. There is no rhyme or reason to this issue. I exported to PDF, Exported each slide to jpeg, even took screen shots as a last resort and had to just deal with the fact that the color was completely different on the printed screen shot slides. This has been an issue for MONTHS and is all over every forum - the fact that this hasn't been addressed by the MS team is unacceptable! If I'm printing client copies of proposal presentations it shouldn't take me all day due to troubleshooting!
App Privacy
The developer, Microsoft Corporation , indicated that the app’s privacy practices may include handling of data as described below. For more information, see the developer’s privacy policy .
Data Linked to You
The following data may be collected and linked to your identity:
- Contact Info
- User Content
- Identifiers
- Diagnostics
Privacy practices may vary, for example, based on the features you use or your age. Learn More
Information
English, Arabic, Czech, Danish, Dutch, Finnish, French, German, Greek, Hebrew, Hungarian, Indonesian, Italian, Japanese, Korean, Norwegian Bokmål, Polish, Portuguese, Russian, Simplified Chinese, Slovak, Spanish, Swedish, Thai, Traditional Chinese, Turkish
- Microsoft 365 Personal $69.99
- Microsoft 365 Personal Monthly $6.99
- Microsoft 365 Family $99.99
- Microsoft 365 Family $9.99
- Microsoft Copilot Pro $20.00
- Microsoft 365 Personal $119.99
- Developer Website
- App Support
- Privacy Policy
Featured In
More by this developer.
Microsoft Outlook
Microsoft Teams
Microsoft Authenticator
Microsoft Word
Microsoft Excel
How to Make a PowerPoint on Mac? (A Step-by-Step Guide)
If you’ve ever wanted to create a professional-level PowerPoint on your Mac, you’re in luck! In this step-by-step guide, we’ll walk you through the entire process from start to finish.
You’ll learn what Keynote is and how to open it on your Mac, how to create a PowerPoint, customize the slides, add text, images, and media, utilize themes and animations, and finally, save and share your PowerPoint.
By the end of this guide, you’ll be a PowerPoint pro on your Mac!
Table of Contents
Short Answer
Making a PowerPoint on a Mac is easy.
First, open up the Pages application on your Mac.
Then, select the File menu and choose New from Template.
From there, you can select a PowerPoint template and customize it to fit your needs.
When you are finished, you can save your presentation and share it with others.
What is Keynote?
Keynote is a presentation software program developed by Apple Inc.
and is available on all Mac computers.
It is a powerful program that allows users to easily create engaging and professional presentations.
Keynote provides users with a wide range of tools and features, including customizable slides, themes, animations, and more.
With Keynote, users can create stunning presentations in minutes.
It is a great tool for creating presentations for business, education, and personal projects.
Keynote is easy to use and is a great choice for anyone who wants to make a professional-looking PowerPoint on a Mac computer.
How to Open Keynote on Mac
Opening the Keynote app on a Mac computer is quite simple.
To open the app, you can either use the “Finder” app in your Applications folder, or you can use the “Spotlight Search” tool to quickly find the Keynote app.
If you choose to use the Finder, simply open the Finder app and navigate to the Applications folder.
From there, you will find the Keynote app.
You can then double-click on the Keynote icon to open the app.
Alternatively, you can use the Spotlight Search tool to quickly locate the Keynote app.
To do this, click on the magnifying glass icon in the top-right corner of your screen.
You can then type in “Keynote” in the search bar and hit the “Enter” key.
The Keynote app should appear in the search results.
You can then click on the Keynote icon to open the app.
Once the Keynote app is open, you can begin creating your PowerPoint presentation.
You can customize your slides by adding text, images, and other media.
You can further customize your slides by using various themes and animations.
Once you have created your presentation, you can save it as a .pptx file and share it with others.
With the Keynote app, you can easily create a professional-looking PowerPoint on a Mac computer.
Creating a PowerPoint on a Mac
Creating a PowerPoint presentation on a Mac computer is a straightforward process, whether youre creating a presentation for work or school.
The first step is to open the Keynote app on the computer.
Keynote is the presentation software for Mac computers, and it makes creating a presentation simple and easy.
Once you have opened the Keynote app, you can begin customizing your presentation.
You can add text, images, and other media to your slides, as well as utilize various themes and animations to make your presentation look professional and eye-catching.
You can also customize the layout of your slides, allowing you to add different elements and adjust their placement.
When your presentation is complete, you can save it as a .pptx file and share it with your colleagues, classmates, or anyone else who needs to view it.
You can also export your presentation as a PDF, a movie file, an HTML file, or a JPG file, depending on your needs.
With the Keynote app, creating a professional-looking PowerPoint on a Mac computer is easy and stress-free.
All you need to do is open the app, customize your slides, and then save your presentation in the desired format.
Whether youre creating a presentation for work or school, the Keynote app will help you get the job done quickly and efficiently.
Customizing the Slides
Customizing the slides is an important part of creating a stunning PowerPoint presentation on a Mac.
The Keynote app provides a variety of tools and features to help you design your slides.
You can easily add text, images, and other media to customize your slides.
To add text to your slides, simply select the text box and type in your desired text.
To add images, you can either drag and drop them into the slide or use the Insert Image button.
You can also insert shapes, charts, and other media to customize your slides.
Additionally, Keynote offers a range of themes and animations to help you further customize your presentation.
Themes allow you to quickly change the overall look and feel of your slides.
Animations can be used to add a touch of flair to your slides, such as transitions between slides and animated text.
To access the themes and animations, simply click on the Themes or Animations tabs in the upper right-hand corner of the app.
By taking advantage of the Keynote apps customization features, you can easily create a professional-looking PowerPoint on a Mac computer.
With just a few clicks, you can customize your slides and make them look stunning.
So, if youre looking to create an impressive presentation, the Keynote app is the perfect tool for the job.
Adding Text, Images, and Media
When it comes to creating a professional-looking PowerPoint on a Mac computer, adding text, images, and other media is key.
With the Keynote app, you can easily customize your slides by adding text, images, and other media elements.
To add text, select the text box icon from the top menu, and then type in the text you want to include in the text box.
You can also adjust the font type, font size, font color, and other text properties.
Once you have finished editing the text, click the Done button to save your changes.
To add images, click the Add Image icon from the top menu, and then select an image from your computer, or add an image from the web.
You can also adjust the size, position, and transparency of the image to make it look more professional.
Finally, you can add other media elements such as audio and video to your slides.
To do this, click the Add Audio or Add Video icon from the top menu, and then select the audio or video file you want to include.
You can also adjust the size, position, and playback settings of the media element to make it look more professional.
By using these methods, you can easily add text, images, and other media elements to your PowerPoint slides on a Mac computer.
Once you have added all the elements, you can save your presentation as a .pptx file and share it with others.
Utilizing Themes and Animations
Creating a PowerPoint presentation on a Mac computer is made easier with the help of the Keynote app.
Not only can you easily create a professional-looking presentation, but you can also customize your slides with various themes and animations.
With the help of themes and animations, you can create a presentation that is visually appealing and engaging.
When creating a presentation, you can choose from a wide variety of themes and animations.
You can choose from a variety of colors, fonts, and designs to give your presentation a unique look.
You can also choose from several animation styles to give your presentation a more dynamic feel.
For example, you can choose to have your slides transition in with a fade or a slide, or you can animate specific objects within your slides.
Themes and animations can also help to emphasize certain points in your presentation.
For instance, you can use animations to draw attention to a particular slide or element in your presentation.
Additionally, you can use themes to create a professional and consistent look throughout your presentation.
Creating a presentation with themes and animations is easy.
In the Keynote app, simply select the themes tab to access the available themes and animations.
From there, you can customize your slides with the desired theme and animations.
You can also preview your slides and animations before you save them.
Creating a professional-looking and engaging presentation on a Mac computer is easy with the help of the Keynote app.
With the help of themes and animations, you can create a presentation that is visually appealing and will help to emphasize certain points you want to make.
With a few clicks, you can quickly create a presentation that will be sure to impress.
Saving and Sharing Your PowerPoint
Once you have finished creating your PowerPoint presentation, you can save it as a .pptx file and share it with others.
To save your PowerPoint, click the File menu at the top of the Keynote window and then click Save.
You will be given the option to save your file to your Macs hard drive or to the cloud.
If you wish to share your presentation with others, you can do so by exporting it as a PDF file or by sharing it directly with other users.
To export your presentation to a PDF file, click the File menu and then select Export.
You will be given the option to export your PowerPoint as a PDF file.
If you would like to share your presentation directly with other users, you can do so by clicking the Share menu at the top of the Keynote window and selecting Share with Others.
Here, you can enter the email addresses of the people you would like to share your presentation with.
You can also set a password for your shared presentation if you wish.
Once you have saved and/or shared your presentation, you can open it up again at any time by double-clicking on the .pptx file.
This will open up the presentation in the Keynote app and you can make any changes that you wish.
With the Keynote app, creating a professional-looking PowerPoint on a Mac computer is easy and convenient.
The steps outlined above will help you create a great presentation and save/share it with others in no time.
Final Thoughts
Creating a professional-looking PowerPoint on a Mac computer doesn’t have to be difficult.
With the help of the Keynote app, you can easily create slides with text, images, and other media, and customize your slides with themes and animations.
Now that you know how to make a PowerPoint on Mac, you’re ready to create your own presentations and share them with others.
So get to it and start making your own PowerPoint today!
James Wilson
James Wilson has extensive knowledge in the information technology industry.His second love, besides dealing with computers, is smart home technology. He is continually updating information to better comprehend this problem and has a deep understanding of the apartment’s support system.
Recent Posts
How to Use Airtable Automations? Master Workflow Efficiency with These Tips
To use Airtable automations, start by creating a base with the desired tables and fields. Then, navigate to the "Automations" tab and click on "Create an automation." Choose a trigger (such as a new...
Can You Do Conditional Formatting in Airtable? (A Comprehensive Guide)
Yes, you can definitely do conditional formatting in Airtable. Conditional formatting allows you to automatically format cells based on specific criteria. To set up conditional formatting in...
PowerPoint for Mac: Best tips for a successful presentation
- 0 Shares Share

The maxim of “Death by PowerPoint” does not fit in today’s tech-savvy era. Numerous startups and corporates pitch their ideas to their clients through presentations every day. They leverage stunning templates to design them and sweep their stakeholders off their feet. Slideshows hold an enormous audio-visual appeal that helps you to hook your audience throughout.
Whether it is Keynote or PowerPoint, showcasing a slideshow on your Mac must appear seamless. Be it slide layout, design, visuals, or overall aesthetics, a collection of well-thought, pixel-perfect slides is the key to presentation success. So, how to craft splendid and eye-catching Mac presentations? This article will enlighten you perfectly. Let us begin!
Here are seven best tips for creating successful and compelling presentations on your Mac:
Minimalistic slides
Gone are the times when people assumed that designing a ppt meant overloading it with information. You’ll be doing your audience a huge favor if you opt for minimalism in your slide content. Often presenters overload the slides unnecessarily and thus, end up overwhelming the audience. Embed your decks with one topic per slide. Ensure that you build your pitch decks with less text and more graphics. Keeping the slide content simple and precise will bestow your MAC slideshow with a decluttered look. It will help you to further your brand aesthetics as well.
You may consider following the famous 10-20-30 rule of PowerPoint presentations. The rule states that your presentation should be no longer than ten slides. It must not take beyond 20 minutes to deliver the entire presentation. And at last, the slides should feature a font size of at least 30 px. The revolutionary 10-20-30 rule helps you keep your slides minimalistic, deliver a captivating presentation and engage with the audience like never before.
Engaging multimedia
Humans have a limited attention span. Keeping this in mind, you must always integrate enchanting visuals to liven up your presentation. Employ vector images, 1080p videos, infographics, and GIFs to render the slides attractive. The truth is, no one likes to read raw data right off the slides! As a presenter, you should consider transforming raw data into engaging visuals that bind the interest of the audience to the presentation.
The incorporation of audio and other media forms assists you with a seamless slideshow. You can infuse your slides with visuals corresponding to your presentation topic. It will work as a double-edged sword. First, it will garner your slides appealing. Second, it will reinforce the textual content in your audience’s minds as well. Hence, slides without dedicated multimedia contribute to the phenomenon ‘Death By PowerPoint’.
Top-notch templates
Breaking the monotony of stock templates in your Mac is essential to stay a step ahead of your competitors. Utilizing age-old templates will not impress your clients as effectively as you desire. There is a high chance that your audience is already familiar with the stock template from some other presentation. Hence, the wow factor goes for a toss!
Well, you can leverage ready-to-use PowerPoint templates from SlideModel that offer 100% customization, superior graphics, and pixel-perfect design. Users can utilize the avant-garde slide templates to boost their presentation goals. The goal here is to woo the audience with your presentations’ design! Gorgeous graphics and tailor-made slide content will save your precious time from making a presentation from scratch. This business Pitch Deck PowerPoint Template is a boon for all entrepreneurs to construct wow-worthy pitches.
Elegant color-palette
An excellent way to highlight the key points of your Mac slideshow is to create a color contrast on the slides. You can design your slides in relevance to your brand colors or choose a vibrant color scheme. A golden tip here is to blend your presentation with high-contrast colors. It will aid you and your audience in capturing the slide essence. Place the dark-toned text with a light-toned background and light-colored slide content on a dark background. It will bring out the effect of aesthetic contrast.
A great tip here is embedding your presentation with your brand colors for making it impressive beyond measure. Choose only two to three colors throughout to maintain an equilibrium. One should try not to use all the contrast colors to attract the audience. Design consistency in your slides is a key to presentation success. Rather than overwhelming the audience with different high-contrast, mismatching colors, try to include a couple of color schemes and palettes across your presentation.
Captivating data visuals
Whether you’re presenting to an assembly of investors, pitching to a client, or presenting a company’s quarterly results, always back your data with rich visuals. Rather than reading random numbers from the slides, you should introduce a wow factor to your slides by leveraging state-of-the-art data visualizations. Render your PowerPoint presentations on Mac an awe-inspiring look with data visuals such as 3D charts, diagrams, infographics & graphs.
Display your research and statistics with mind-blowing data visuals. Employ alluring charts, tables, diagrams, trend lines, shapes, and infographics. You can color-code them to show comparisons and differences. Choose data visuals for bullets to leave an indelible mark on your audience. Projecting data with these tools helps your clients to retain information and comprehend it as well. SlideModel offers innumerable templates with exemplary data visuals for influencing the audience.

Hierarchical structure
Many people do not know the fact that information displayed first captures the attention of your audience before others. Thus, visual hierarchy is a way to organize your slide content based on its importance. Every presentation is intended to initiate a call-to-action amidst the audience. Presenters can reinforce the critical subject content through rich hierarchical structures. Prioritize placing the slide content in a manner that you want your clients to see initially.
Recognize the slide elements in the order of their significance and place them accordingly. Use good contrast placements, bolder texts, and large visuals. This way, your stakeholders will view your highlighted information first and then move to the other content. Hence, with your presentations, be it remote or in-person, you can encourage your audience to close the deal with you rather than missing the opportunity.
Master the typography
Every slideshow looks tidy when crafted with good typography. Apply corporate-grade typography fonts such as Helvetica instead of unprofessional or artistic Comic Sans. It assists in keeping easy readability for your slide content, plus helps in boosting the integrity of the content. Remember to place the size of your fonts as 30 px or more for your audience in the back as well. You won’t want your audience to squint their eyes while seeing your ppt.
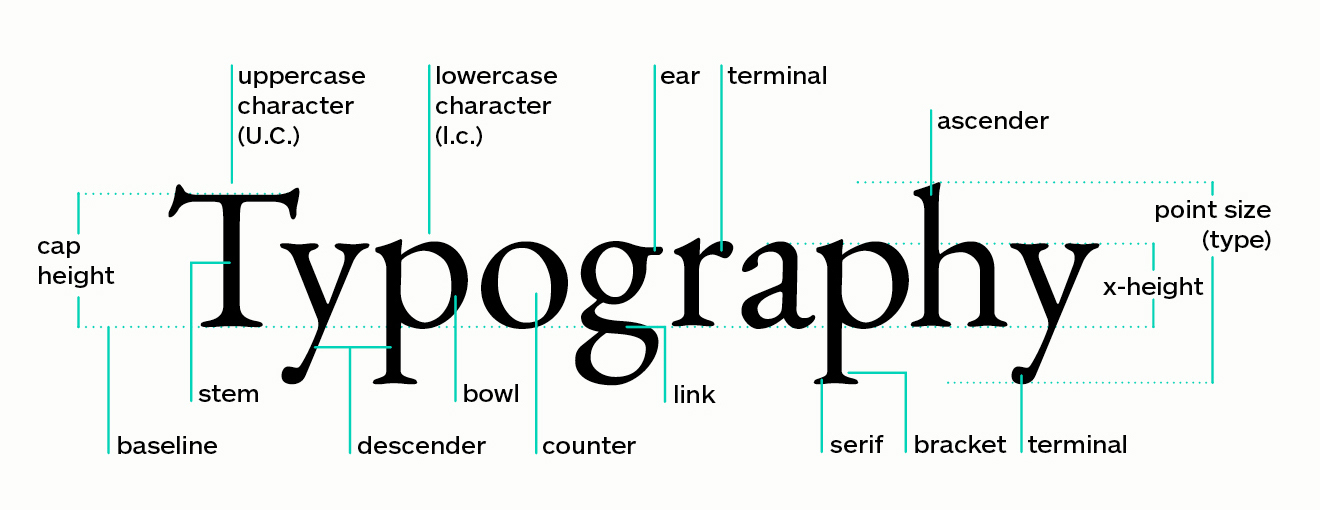
As a presenter, you should always take care of the content length. One should avoid typing hefty paragraphs. Instead, go for one-liners and bullets. You may use six bullet points in each slide. Another great tip is to position the title of your slide to a slightly bigger font than the text. While presenting, you can further elongate the one-liners and help your audience understand the crux of the subject matter without throwing them off the track.
Mac PowerPoint presentations having a beautiful style can result in having a colossal effect on your audience. A well-crafted PowerPoint presentation can be a deciding factor between a closed deal and a missed opportunity.
Keep these seven enlightening and professional tips in your mind before structuring your next ideal presentation. Integrate a pinch of style, creativity, and vigor in your slide deck to create modernistic slides. The key is to attract your audience with minimalistic, yet engaging slide content.

News content on AppleMagazine.com is produced by our editorial team and complements more in-depth editorials which you’ll find as part of our weekly publication. AppleMagazine.com provides a comprehensive daily reading experience, offering a wide view of the consumer technology landscape to ensure you're always in the know. Check back every weekday for more.
Editorial Team | Masthead – AppleMagazine Digital Publication
- @http://twitter.com/applemagazine
- Follow me on Facebook
- Send me an email!
Related Stories
Can apple become a console gaming giant, apple rolls out new features for iwork suite across mac, ipad, and iphone, the lowdown on applecare+ (is it worth buying), demystifying apple pay: your ultimate guide, security features that keep your apple devices safe, apple set to discontinue ‘my photo stream’ service in july 2023, end of an era: apple infinite loop store shuts down, apple unveils ‘vision pro’ headset & visionos, why apple devices are better for media production, apple showcases ‘scary fast’ event filming techniques with iphone 15 pro max, you may also like.

Can HEIC Really Dethrone JPEG, or Is It Just Hype?

Getting Ready for Valorant Mobile: Helpful Tips for Beginners

Apple Pay: How Apple Is Shaping the Future of Digital Wallets

Understanding the Purpose of a Special Limited Partnership

Apple Tools for Students Enhancing Learning & Study Efficiency

Maximizing Efficiency: Integrating Virtual Receptionists with Your Existing Systems
- Editor's Choice: Tech Gifts for Mom
- iPad Pro vs. Surface Pro: What's the Difference?
How to Get PowerPoint on a Mac
Get the widely used presentation tool
:max_bytes(150000):strip_icc():format(webp)/SamCostello-d7fcf106ec2048ccb06d1e2190b3396d.jpg "powerpoint presentation in macbook")
- Ithaca College
:max_bytes(150000):strip_icc():format(webp)/ryanperiansquare-de5f69cde760457facb17deac949263e-180a645bf10845498a859fbbcda36d46.jpg "powerpoint presentation in macbook")
- Western Governors University
What to Know
- From the Mac App Store: Apple Menu > App Store > search for PowerPoint > Get > Install > enter Apple ID if prompted > Open .
- PowerPoint requires a subscription from Microsoft. You can sign up via In-App Purchase or at the Microsoft website.
- Keynote, Apple's alternative to PowerPoint, comes pre-installed on new Macs (and can be downloaded from the Mac App Store).
This article explains how to get PowerPoint on Mac, its requirements—including a subscription—and some free alternatives available on the Mac.
How Do I Get PowerPoint on Mac?
Getting PowerPoint on your Mac is very easy. Just a few clicks, and you'll be ready to start making slides and building presentations. Here's what to do:
Open the Mac App Store by going to the Apple menu > App Store or the Applications folder > App Store .
You can also download PowerPoint directly from Microsoft , but these instructions focus on the Mac App Store.
Search for PowerPoint .
On the search results screen, click Get .
Click Install .
Enter your Apple ID password when prompted.
When the download is finished, click Open to launch PowerPoint.
Once you've opened PowerPoint, you'll need to sign into your Microsoft account or use a free trial.
Is PowerPoint Free for the Mac?
PowerPoint is not free on the Mac (or on Windows, for that matter). Microsoft offers a free, 30-day trial after you download PowerPoint. Once the free trial expires, you need to pay to keep using the app. Options include a one-time purchase price or a monthly or annual subscription , which provides cloud storage features and ongoing technical support. You can subscribe through Microsoft's website or use in-app purchases via your Apple ID.
Do Macs Come With PowerPoint?
No. To get PowerPoint on your Mac, you need to download and install it using the steps from the first section of this article (or, as noted before, directly from Microsoft).
What Is the Mac Version of PowerPoint?
While PowerPoint may be the most well-known program for making slides and creating presentations, it's far from the only one. Your Mac probably came with one of the alternatives pre-installed.
Apple makes a program called Keynote which is a direct competitor to PowerPoint. It offers all of the core features of PowerPoint—creating slides and presentations, animations, templates, presenter mode, etc. It integrates tightly with Apple's other software and services like iCloud.
Keynote comes pre-installed for free on all modern Macs. It's likely in your Applications folder as you read this. If it's not, and if your Mac and version of the macOS are compatible with it, you can download it for free from the Mac App Store by searching for "Keynote."
Need to make slides and want to avoid both PowerPoint and Keynote? There are many other PowerPoint alternatives , but one place to start is Google Slides , which is free, web-based, and integrates with your Google account and other Google productivity tools.
To print PowerPoint slides with Notes on a Mac, open your presentation and select Print . In the Print dialog box, select Show Details . In the Layout box, select Notes . Configure the rest of your printing options and select Print .
The easiest way to record a voiceover in PowerPoint on a Mac is to record by slide. Select the slide where you want to add the narration, then select Insert from the menu bar and click Audio > Record Audio . Enter a name for the narration, select Record , read your script, and select Stop when you're finished recording.
To convert PowerPoint to video on a Mac, open the presentation you want to save and select File > Export . In the export window, next to File Format , select a file format option, such as MP4 or MOV . Choose your video quality, choose whether you want to include narrations, adjust timing, and select Export .
Get the Latest Tech News Delivered Every Day
- How to Use Copilot in Powerpoint
- How to Install Mac OS on PC
- The Best Free Productivity Apps for the iPad
- 4 Ways of Transferring Files From Android to Mac
- How to Use WhatsApp on a Mac
- The 10 Best Word Processing Apps for iPad in 2024
- How to Use Microsoft's Free PowerPoint Viewers
- The 20 Best Mac Apps of 2024
- What Is Microsoft PowerPoint and How Do I Use It?
- What Is Microsoft Word for Mac?
- How to Transfer Files Between an iPhone and a Mac
- How to Convert PowerPoint to Video
- How to Update PowerPoint on Windows and Mac
- What Is an Animation in Presentation Software?
- How to Fix 'Cannot Be Opened Because the Developer Cannot be Verified' Error on Mac
- How to Make a Poster in PowerPoint
How To Turn Off Vibration On iPhone
How to set a timer on iphone camera, how to set default card in apple wallet, best portable travel routers for wi-fi in 2024.
- Accessories
- Zip-rar tool
- Zip browser
How To Prepare A Professional PowerPoint Presentation On Mac
Microsoft PowerPoint has always been the go-to software for making professional presentations. Many rely on it for their Business presentations, designs of fliers, and pamphlets and for carrying out their daily tasks at work.
If you have a MacBook or your place of work uses an iMac, and you are in the dark on how you can make great PowerPoint presentations on it, look no further. This article guides you through the best route to seamlessly use your Mac to make amazing presentations and designs for work.
The software could be obtained with a purchase of the Microsoft Office suite on your computer and other applications like Excel, Word, etc. Once you have it set up on your computer, you will be able to operate it in the same manner you would operate it on a Windows computer.
How To Install Microsoft PowerPoint on Your Mac
Installing the application on your Mac is an easy process; all you need to do is:
- Open the Mac App Store application on your computer.
- Type in “PowerPoint” in the search bar and click search.
- The result from your search should show you the application, but if that isn’t the case, scroll through the results till you see Microsoft PowerPoint.
- Click “Get” and then begin installation by clicking “Install”.
- If the case warrants, sign in with your Apple ID to continue the installation and then click on “get” at the bottom.
- The application should start downloading. When it’s done, click “open” in the top-right corner.
- Finally, click “get started” to log in with your Microsoft ID, or you can opt for a one-month free trial .
Few Tips On How To Create Your Professional Presentation
Let’s break down the basics of the design process step by step:
Content Is Most Important
It is very paramount that you set out your content first and foremost before you begin any design. Setting out your content and topic helps give you a mental picture of what you want to achieve. This will, in turn, help in determining the type and appearance of your design.
Content writing is a hard part of creating a presentation for many people.
This is because it needs to be original, comprehensive, and unique. Stuffing your slides and presentations with poor content is the most common spoiler of presentations. That’s why it is always better to try PowerPoint presentation writing services for interesting and comprehensive information. Some professionals write content on the use for presentation, which can help you learn more about the topic.
Choose The Color Scheme You Will Base Your Design On
Colors matter in a presentation. The right color scheme would determine whether your work would look beautiful and professional or amateurish and unprofessional.
You could use Adobe Color CC to build your color scheme. It would make your work of building perfect color schemes easier, or you could copy from schemes others have already built.
How To Create Your Cover Slide
Your design is one step simpler after you successfully get your color scheme. The next move is to pick one from the colors in your scheme, place it in the background and get ready to start typing. It may seem too simple, but it’ll look great if you get it right.
Selecting Fonts
Choosing fonts is a daunting task for many people when creating slides. There is always the temptation to avoid basic-looking fonts in favour of fancy-looking ones. However, thinking too much about it often leads to selecting hideous font combinations. You could look for an online writing service if you have no clue. Try out something basic, stick within a font family, and as much as possible, make sure you select styles that are different from each other.
Try to avoid center alignment as much as you can. Sticking to the edge for your presentation to have better readability is always preferable.
It is also important to note that you don’t have to fill up every space on your layout. Leaving some spaces empty can go a long way in giving your presentation a clean look.
You can also take advantage of a secondary display with your Mac for easier organization when creating layouts for your presentation.
Inputting Content Into Your Slides
The secret about this is keeping it as simple as possible. You don’t have to input everything you want to say into your slides. It makes it hard to follow and simply too much.
Slides are meant to give a visual perspective to what you are saying. Stick to using only bullet points of your content on the slides.
Why is Content Originality Important?
Most times, the originality of your content is what makes your presentation different from others. If your presentation is borne out of content from within you, it would be easier for you to express yourself and convince your audience to be interested in your work.
When your presentation is professional or a business proposal , your audience will often want to buy into your ideas if they can see a synergy between you and the presentation you make. In situations where your presentation is to get a competitive opportunity, the only thing that could make your PowerPoint presentation stand out from others is its originality and how well you can express yourself.
If you read through all that has been said, you shouldn’t have a problem using PowerPoint on your Mac to make amazing presentations. People are always very visual. You could have good and wonderful points to say, but having a great PowerPoint presentation can be the cherry on top to perfect the delivery of your content to prospective audiences. Amazing PowerPoint presentations will keep your audiences on the edge of their seats when you speak.

Leave a Reply Cancel reply
Your email address will not be published. Required fields are marked *
Notify me of follow-up comments by email.
Notify me of new posts by email.
This site uses Akismet to reduce spam. Learn how your comment data is processed .
Sign Up for Our Newsletters
Related posts, 5 data security best practices to protect your business, ai-driven cybersecurity: 8 top use cases, how to check if your apple device has applecare, airdrop not working on mac or iphone fix here.

Reinvent productivity with Copilot for Microsoft 365.
Microsoft PowerPoint

Copilot in PowerPoint
Turn your inspiration into stunning presentations. Get it now when you add Copilot Pro or Copilot for Microsoft 365 to your Microsoft 365 subscription.
Turn your inspiration into stunning presentations
Turn a spark of inspiration into personalized presentations with Copilot in PowerPoint. Copilot will turn existing Word documents into presentations, create new presentations from simple prompts or outlines, or find the best places for impactful imagery—and will help you leave audiences dazzled with skillful storytelling.

Designing slides has never been easier
Create well-designed, impactful slides with the help of Designer and Ideas in PowerPoint.
3D isn't just for the movies
Now you can easily insert 3D objects and embedded animations directly into PowerPoint decks from your own files or a library of content.

Interact naturally using voice, touch, and ink
Easily ink onto a slide, then convert handwritten notes into text and make hand-drawn shapes perfect in seconds.
Nail your next presentation
With Presenter Coach, practice your speech and get recommendations on pacing, word choice, and more through the power of AI.

Be on the same page
Always know where you are in the editing process. With the while you were away feature, track recent changes made by others in your decks.
Task management with PowerPoint and Microsoft 365
Tell your story with captivating presentations.
Originally starting from Free now starting from Free
Sharing and real-time collaboration
PowerPoint for the web
Basic templates, fonts, icons, and stickers
Dictation and voice commands
Works on web, iOS, and Android™
5 GB of cloud storage
Microsoft 365 Personal
Originally starting from $6.99 now starting from $6.99
$6.99 $6.99
(Annual subscription–auto renews) 1
PowerPoint for the web and PowerPoint desktop app for offline use
Premium templates, fonts, icons, and stickers with thousands of options to choose from
Dictation, voice commands, and transcription
Advanced spelling and grammar, in-app learning tips, use in 20+ languages, and more
1 TB (1000 GB) of cloud storage
Premium desktop, web, and mobile apps
Advanced security
Ad-free experience
Works on Windows, macOS, iOS, and Android™
Copilot Pro available as an add-on. *
Microsoft 365 Family
Originally starting from $9.99 now starting from $9.99
$9.99 $9.99
One to six people
Up to 6 TB of cloud storage, 1 TB (1000 GB) per person
Premium desktop, web, and mobile apps
Advanced security
Microsoft Powerpoint
One person
Microsoft 365 Apps for business
Originally starting from $8.25 now starting from $8.25
$8.25 $8.25
Available for up to 300 employes
Desktop versions of Word, Excel, PowerPoint, and Outlook
1 TB of cloud storage per user
Anytime phone and web support
Microsoft 365 Business Standard
Originally starting from $12.50 now starting from $12.50
$12.50 $12.50
Everything in Microsoft 365 Apps for business, plus:
Web, and mobile versions of Word, Excel, PowerPoint, and Outlook
Custom business email ([email protected])
Chat, call, and video conference with Microsoft Teams
10+ additional apps for your business needs (Bookings, Planner, Microsoft Forms, and others)
Automatic spam and malware filtering
Webinars with attendee registration and reporting
New: Collaborative workspaces to co-create using Microsoft Loop
New: Video editing and design tools with Clipchamp
Copilot for Microsoft 365 available as an add-on. **
Add Copilot to your Microsoft plan
Achieve more than ever using AI integrated with Word, Excel, PowerPoint, Outlook, and other Microsoft 365 apps.

Get the PowerPoint mobile app
Ready to create great presentations with Microsoft 365?
See more from microsoft powerpoint.
Collaborate on shared projects
Get commonly used Office features and real-time co-authoring capabilities through your browser.
Jumpstart your design
Show your style and professionalism with templates, plus save time. Browse PowerPoint templates in over 40 categories.
Connect with experts
See what’s new and get classic tips and editors' tricks to help you create, edit, and polish presentations like a pro.
Read about slide presentations
6 slide presentation software tips to impress, host large-scale virtual presentations, how to make a slide show, what’s new in powerpoint.
- [1] Once your paid subscription begins, cancelation policies vary based on your status as a new customer, product, and domain selections on Microsoft. Learn more. Cancel your Microsoft 365 subscription any time by going to the Microsoft 365 admin center. When a subscription is canceled, all associated data will be deleted. Learn more about data retention, deletion, and destruction in Microsoft 365 . Microsoft PowerPoint with a Microsoft 365 subscription is the latest version of PowerPoint. Previous versions include PowerPoint 2016, PowerPoint 2013 , PowerPoint 2010 , PowerPoint 2007 , and PowerPoint 2003. iTunes, iPhone, and iPad are registered trademarks of Apple Inc., registered in the U.S. and other countries. Android is a trademark of Google Inc.
- [*] Copilot Pro benefits are currently available on web, Windows, and macOS and iPadOS. A Microsoft 365 Personal or Family subscription is required to access Copilot in select apps, including Word, Excel, PowerPoint, OneNote, and Outlook. Excel features are currently in preview in English only. Microsoft 365 Personal or Family and Copilot Pro are not available in the same transaction and must be purchased in two separate transactions.
- [**] Copilot for Microsoft 365 may not be available for all markets and languages. To purchase, enterprise customers must have a license for Microsoft 365 E3 or E5 or Office 365 E3 or E5, and business customers must have a license for Microsoft 365 Business Standard or Business Premium.
Follow Microsoft 365

Powerpoint and Macbooks: How to use mirrored Presenter View in a 3 screen setup
Mac + Powerpoint
Using Powerpoint Presenter View for speakers on Corporate Events
When a presenter shows their Powerpoint-presentation from a stage or a studio, they usually want to see the presenter-view while they are talking. Here they can see their slides and presenter-notes.

The presenter-view in Powerpoint for mac.
In corporate events, there are two ways to play the presentation. For smaller events, the presenter can bring their own laptop to the stage and use this to play the presentation. By plugging the laptop straight to the projector, the presenter can see the presenter-view on the internal display, and the actual presentation is shown on the external display.
But for bigger events, the A/V team wants more control of the presentation-computer, so the presentation needs to be played from a computer placed at the Front of House. From there it can feed the projector, the streaming-device, and send the presenter-view to a separate monitor on the stage.
In order to display Presenter View on a separate display using laptops, you normally want to mirror your internal display with the stage monitor. Then both monitors will show the presenter view, and the external display will show the full presentation.

Screen setup when using a laptop placed at FOH to play the presentation. The laptop-display is mirrored with a monitor on the stage, and the projector shows the full presentation
MacBook screen setup for mirrored display
With Macs you can set up the screen-configuration from the Displays settings in System Preferences. (Example below is from Mac OS Ventura)

One of the external displays can mirror the main display.

When you go to “arrange”, the stacked images shows which screens are mirrored.
In Powerpoint, make sure that presenter-view is enabled from the settings. Go to Slide Show from the preferences in the top menu bar.

Go to “Set up slide show” from the Slide Show tab above the edit-window. Select Monitor 2 or Auto as the Slide Show monitor.

You would assume that this would be enough to ensure that the presenter-screen is mirrored and the presentation shown on the external display. But, to our surprise, when we play the presentation, the presenter-view is no longer mirrored on the stage-monitor. Instead, only the desktop is shown:

In PC this works seamlessly. So why doesn’t it work in Mac? And can we solve it? Yes! After years of grey hair and frustration, I think I have finally found a way around this issue:
How to solve the problem – what works for me
- Identify what Powerpoint means by Monitor 2
First you must stop all mirroring on your MacBook. Have your internal display set up as the Main display, and the two connected displays as extended. You will then have 3 separate displays in the display settings

Now go to Powerpoint. In the Slide Show settings, go to Set up slide show. Set the Monitor to Monitor 2, or Automatic. (same as earlier before)
Then play the presentation, and take note of what is the screen where the presentation is displayed. In this example, Monitor 2 from Powerpoint is the stage monitor. This won’t work. (see next step)

2. Make sure that Monitor 2 in Powerpoint is routed to the display where you want to show the presentation
From step 1: If Monitor 2 is the display used to show the presentation to the audience, then you can proceed to step 3. If Monitor 2 is the stage-monitor that you want for presenter-view, then you need to swap the routing of two hdmi-outputs from your Macbook . If you send the hdmi-cables through a hardware switcher, then you can do this internally in the switcher. This would be my preferred way of action as it doesn’t involve any physical unplugging and patching. Also, the Macbook wouldn’t be aware of these changes, so you won’t change any internal mac-settings.

Routing the HDMI-outputs from the Macbook throug video switcher. Pictured is Roland v-1hd

After swapping HDMI cables from the MacBook, we change what is defined as Monitor 2 in Powerpoint
3. Turn on Mirrored screen
Now you can turn the mirror back on, with the stage monitor mirroring the internal display on the mac

We have identified that DAC70 is the stage-monitor, and we set that as mirrored display.
4. Check that the Monitor in Powerpoint is set to Automatic or Monitor 2

Now you are good to go: If you play the presentation, you will get the configuration with presenter view on the stage-monitor

Hurra, it finally works!
Equipment used for testing
To reach the conlusions above, I have tested with these Macs: – 15″ Macbook Pro 2015 – 14″ Macbook Pro 2021 – 15″ MacBook Pro 2018. OS: Monterey. Powerpoint-version: 16
Using this method with APS
Auto Presentation Switcher , gives you more ways to open, display and switch presentations. When opening presentations on Mac with APS, the monitor where the presentation is shown is taken from the Powerpoint settings. So you don’t need any additional preparation to use this method with APS.
Update 5. October 2022:
Since I wrote this text I have used the 3-screen Powerpoint Mac setup on several events. It hasn’t failed me so far. I feel more confident now than before that this article describes how you can use the 3 screen setup with Powerpoint for Mac. However, there is no guarantee that this solution will work for every Mac that has 3 screen outputs. It would be very interesting if more people could test this method, and share how it works for them.
Written by Morten Brekke Stensland
Subscribe to our Newsletter
Be the first to know about the latest news from PresentationTools
Contact & Follow
Company Invoicing
© PresentationTools A/S 2024
- Insider Reviews
- Tech Buying Guides
- Personal Finance
- Insider Explainers
- Sustainability
- United States
- International
- Deutschland & Österreich
- South Africa

- Home ›
- tech ›
- how-to »
How to share your Microsoft PowerPoint presentation on a Mac, PC, or web browser

- It's easy to share a PowerPoint presentation on your Mac or PC app.
- You can also share a presentation if you use the online version of PowerPoint.
- Sharing a presentation can help you collaborate with friends or coworkers.
When creating Microsoft PowerPoint presentations for work or school, it's often necessary to collaborate with others on your projects.
Thankfully, it's easy to share a PowerPoint presentation no matter what version you use. The process looks fairly similar on both Mac and PC programs, as well as on the online version that can be accessed from any web browser. The online option is helpful if you don't have the Microsoft Office program downloaded to your desktop.
For all of these options, you can add a collaborator (which operates similarly to sharing Google Slides ) or opt to send your file as a presentation or PDF via email. There are also alternative methods, such as sending via social media.

Here's how to share a presentation.
Check out the products mentioned in this article:
Apple macbook pro (from $1,299.00 at apple), acer chromebook 15 (from $179.99 at walmart), microsoft office (from $149.99 at best buy), samsung chromebook (from $269.00 at amazon), how to share a powerpoint presentation on a pc.
Sharing a presentation on the PC version of PowerPoint should look similar on most computer types. The following steps and accompanying photos detail the process on a Samsung Chromebook.
1. Open the PowerPoint presentation you wish to share on your PC.
2. Click the "Share" symbol in the upper right hand corner of the screen. This should give you the option to share either the full document or just the current slide.
- If you prefer to add a collaborator instead (similar to Google Slides functions), you will need to click the orange button to save a copy of the file to your OneDrive.

How to share a PowerPoint Presentation on a Mac
1. Open the PowerPoint presentation on your Mac desktop or laptop.
2. Click the "File" tab in the top left corner.
3. Select "Share" from the dropdown menu. This will grant you the option to either send or copy a link to share, send the file as a presentation or PDF, or manage access to a shared file. Select whichever option you'd like and follow the directions to add contact information.
- If you wish to manage access and add collaborators, you will have to make sure the file has been uploaded to your OneDrive before proceeding. (If it hasn't, PowerPoint should prompt you to do so at this time.)
4. Sending the file as an email is the most common choice. Selecting this option will automatically open a new draft with the file attached. (Be sure to select "Send PDF" if you'd prefer it to send as a PDF file instead of as a presentation.) Add an address, subject, and body text before sending.
You can also share a presentation by clicking the "Share" button in the upper right hand corner. (This is similar to how it appears on a PC.)
This option is extremely helpful as it provides all of your possible options in a single pop-up. Enter a name or email address (along with an optional message) to send the document.
You can change the permissions settings at the top before clicking "Send," "Copy Link," or "Mail" to share your work. Click "More Apps" to browse additional options, such as sending via social media or text message. Lastly, you can select "Send a Copy" to send as a traditional attachment.
How to share a PowerPoint presentation on a web browser
You can access PowerPoint online on either a Mac or PC, as long as you have your login information for Microsoft Office . Regardless of what browser you prefer to use, the steps to share a presentation are exactly the same.
1. Log in to your Microsoft Office account on your preferred web browser and open the presentation you wish to share.
2. Click the "Share" button in the upper right hand corner of the screen.
3. This will open a pop-up in the center of the page. Enter a name or email address (along with an optional message) to send the document. You can change the permissions settings at the top before sending the link by clicking the "Send" or "Copy Link" option. (Those who have followed these steps on a Mac will recognize that it looks similar.)
Additionally, when you open the main menu, you can click the "Share" tab on the left hand side. This will allow you to invite others to edit the presentation or embed the presentation for a blog or website.
If you are looking to embed online, this will open a different pop-up that will generate a code for you. Select the dimensions desired and then paste the text as needed. Click the "Close" or "X" buttons to minimize the window.
Related coverage from Tech Reference :
How to embed a youtube video into your microsoft powerpoint presentations using a mac or pc, how to convert a powerpoint to google slides in two different ways, how to convert google slides to a powerpoint presentation in 4 easy steps, how to copy or duplicate a powerpoint slide and put it anywhere in your slideshow, how to download and access microsoft powerpoint on your mac computer.

- Current Location in Google
- Hide Whatsapp Messages
- Phone is hacked or not
- Whatsapp Deleted Messages
- Download photos from Whatsapp
- Instagram Messages
- How to lock facebook profile
- Unfollowed on Instagram
- Best printers for Home
- Best Mixer Grinder
- Best wired Earphones
- Best 43 Inch TV in India
- Best Wi Fi Routers
- Best Vacuum Cleaner
- Best Home Theatre in India
- Smart Watch under 5000
- Best Laptops for Education
- Best Laptop for Students

- Advertising
- Write for Us
- Privacy Policy
- Policy News
- Personal Finance News
- Mobile News
- Business News
- Ecommerce News
- Startups News
- Stock Market News
- Finance News
- Entertainment News
- Economy News
- Careers News
- International News
- Politics News
- Education News
- Advertising News
- Health News
- Science News
- Retail News
- Sports News
- Personalities News
- Corporates News
- Environment News
- Nothing Phone (2a) India-exclusive edition launched
- JNK India IPO allotment
- JioCinema New Subscription Plans
- Realme 70X 5G Launched
- Apple Let Loose Launch event
- Top 10 Richest people
- Cibil Score vs Cibil Report
- Top 10 Largest Economies
- Lucky Color for 2023
- How to check pan and Aadhaar
- Deleted Whatsapp Messages
- How to restore deleted messages
- 10 types of Drinks
- Instagram Sad Face Filter
- Unlimited Wifi Plans
- Recover Whatsapp Messages
- Google Meet
- Check Balance in SBI
- How to check Vodafone Balance
- Transfer Whatsapp Message
Copyright © 2024 . Times Internet Limited. All rights reserved.For reprint rights. Times Syndication Service.
Can a PowerPoint Presentation Created on a PC Run on a Mac? Here’s How
Have you ever found yourself in a situation where you need to run a PowerPoint presentation created on a PC, on a Mac? Well, you’re in luck because it’s definitely possible! In this article, we’ll walk you through the simple steps to make sure your presentation goes off without a hitch, regardless of the platform you’re using.
Step by Step Tutorial for Running a PowerPoint Presentation on a Mac
Before we dive into the steps, it’s important to understand that PowerPoint presentations are generally compatible across PC and Mac platforms thanks to Microsoft’s efforts to create cross-platform software. With that in mind, let’s get started.
Step 1: Save the PowerPoint Presentation Correctly
Make sure to save your PowerPoint presentation in a format that is compatible with Mac. The best option is to use the .pptx file format.
Saving your presentation in the .pptx format ensures that most of the formatting and features you used on your PC will be preserved when you open the presentation on a Mac. This format is the default for newer versions of PowerPoint, so you likely won’t need to change anything unless you’re using an older version.
Step 2: Transfer the File to Your Mac
You can transfer the PowerPoint presentation to your Mac using a USB drive, email, or cloud storage service like Google Drive or Dropbox.
When transferring files between a PC and a Mac, it’s important to ensure that the file does not get corrupted. Be sure to safely eject your USB drive from your PC and properly mount it on your Mac to avoid any data loss.
Step 3: Open the Presentation on Your Mac
Once the file is on your Mac, simply double-click the .pptx file to open it in PowerPoint for Mac.
If you don’t have PowerPoint installed on your Mac, you can use the pre-installed Apple Keynote app to open the presentation, though some features might not work perfectly. Alternatively, you can view the presentation for free using PowerPoint Online through your web browser.
After completing these steps, your PowerPoint presentation should open on your Mac, just like it would on your PC. You can now present, edit, or share your presentation without any platform-related issues.
Tips for Running a PowerPoint Presentation on a Mac
- Always double-check your presentation after opening it on a Mac to ensure all features and animations work as expected.
- If you’re using custom fonts in your presentation, make sure to install those fonts on your Mac as well, since missing fonts can cause formatting issues.
- Keep your presentation files organized in a cloud storage service for easy access from any device, including Mac and PC.
- Familiarize yourself with PowerPoint for Mac’s interface, as it may have slight differences from the PC version.
- Consider converting your PowerPoint presentation to a PDF if you’re only planning to present the information without any interactive elements, as PDFs are universally compatible across platforms.
Frequently Asked Questions
Can a powerpoint presentation with embedded videos run on a mac.
Yes, PowerPoint presentations with embedded videos can run on a Mac, but make sure the video file formats are compatible with macOS.
What if I use PowerPoint-specific features like transitions and animations?
Most transitions and animations should work on a Mac, but it’s always best to test the presentation beforehand to ensure everything runs smoothly.
Can I edit the PowerPoint presentation on a Mac after it’s been created on a PC?
Absolutely! You can edit the presentation on a Mac just as you would on a PC, provided you have PowerPoint for Mac installed.
Is there a free way to view PowerPoint presentations on a Mac?
Yes, you can view PowerPoint presentations for free using PowerPoint Online through a web browser or by using Apple’s Keynote app, though some features may be limited.
Will hyperlinks and action buttons work when running a PowerPoint on a Mac?
Hyperlinks and action buttons should work as intended when running a PowerPoint presentation on a Mac, but it’s always good practice to test them out before your actual presentation.
- Save the PowerPoint presentation in .pptx format.
- Transfer the file to your Mac using a USB drive, email, or cloud storage.
- Open the presentation on your Mac using PowerPoint for Mac, Keynote, or PowerPoint Online.
So there you have it – running a PowerPoint presentation created on a PC on a Mac is not just a possibility, it’s quite straightforward. By following the steps outlined above, you can ensure that your presentation is not only compatible but also maintains the integrity of its content and design. Remember, while both platforms offer different experiences, Microsoft and Apple have made significant strides in ensuring that their products can communicate with each other effectively.
Always remember to check your presentation thoroughly after transferring it to a different platform, as this will allow you to catch and fix any glitches that may have occurred during the process. Whether you’re a student, a professional, or just someone who needs to get their point across, mastering the art of cross-platform presentations will give you an edge in our increasingly digital world. So, go ahead and create your PowerPoint presentations with confidence, knowing that you can present your ideas on any platform, anytime, anywhere.

Matthew Burleigh has been writing tech tutorials since 2008. His writing has appeared on dozens of different websites and been read over 50 million times.
After receiving his Bachelor’s and Master’s degrees in Computer Science he spent several years working in IT management for small businesses. However, he now works full time writing content online and creating websites.
His main writing topics include iPhones, Microsoft Office, Google Apps, Android, and Photoshop, but he has also written about many other tech topics as well.
Read his full bio here.
Share this:
Join our free newsletter.
Featured guides and deals
You may opt out at any time. Read our Privacy Policy
Related posts:
- How to Save Powerpoint as PDF with Notes
- How to Use a Mac With PowerPoint: A Step-by-Step Guide
- Can I Convert My Powerpoint to Google Slides?
- How to Convert PowerPoint Presentations to HTML: A Step-by-Step Guide
- How to Email a PowerPoint Slideshow: A Step-by-Step Guide
- How to Make a Powerpoint Slide Vertical in Powerpoint 2013
- How to Drag Slides From One PowerPoint to Another: A Step-by-Step Guide
- How to Loop a Slideshow on Powerpoint 2013
- How to: Effortlessly Create PowerPoint Looping Presentations
- How to Copy a PowerPoint to a New PowerPoint: A Step-by-Step Guide
- What is a Mac Mini?
- Can You Save a Powerpoint as a Video in Powerpoint 2013?
- How to Change Hyperlink Color in Powerpoint 2010 (An Easy 5 Step Guide)
- How to Transfer From PowerPoint to Flash Drives: A Step-by-Step Guide
- How to Convert a PowerPoint to Word and Edit with Ease
- How to Convert HTML Pages Into Powerpoint: A Step-by-Step Guide
- How to Make All Columns the Same Width in Excel 2013
- What Are Benefits of PowerPoint? A Comprehensive Guide
- How Is Microsoft PowerPoint Used in Business: A Comprehensive Guide
- How to Combine PowerPoint Presentations With Different Orientations

How To Make An Impactful Presentation On Your Macbook: A Step-by-Step Guide
Do you want to make an impact when presenting your ideas or business pitches? Have you ever felt like the presentation tools available on a Macbook aren’t enough to create professional-looking slideshows? Well, look no further! Here’s a step-by-step guide that will show you how to use all of the features and resources available on your Macbook so that you can give presentations with confidence. With this guide, you’ll learn how to make powerful slides, captivate audiences and ensure that everyone remembers what they heard. So get ready: it’s time to start crafting amazing and impactful presentations!
Utilizing Mac’s Keynote for Engaging and Professional Presentations
When it comes to giving presentations, there is nothing quite as sleek and professional as utilizing Mac’s Keynote. This powerful presentation software brings a whole new level of engagement and visual appeal to your audience. With its user-friendly interface and vast array of features, you’ll be able to create captivating slideshows that will leave a lasting impact.
One of the standout features of Keynote is its ability to create stunning visuals. Whether you’re using pre-designed templates or starting from scratch, this software allows you to easily incorporate images, videos, charts, and graphs into your slides. You can even add elegant transitions between each slide for a seamless flow throughout your presentation.
Additionally, Keynote offers an extensive selection of stylish fonts and customizable text options. This means you can play around with different font sizes, colors, and styles to make sure your message stands out on every slide. Furthermore, the software allows you to animate text elements in creative ways – from fading in gradually to zooming in for emphasis – making it easier than ever before to keep your audience engaged.
Moreover (as fancy bullet list), Keynote provides ample opportunities for collaboration. Multiple users can work on the same slideshow simultaneously by sharing access through iCloud or other cloud-based platforms. This makes it ideal for team projects or when you need input from colleagues or clients who are located remotely.
In conclusion (stylistic line break), if you want your presentations to be engaging and professional-looking (bold tag), look no further than Mac’s Keynote software (bold tag). Its intuitive design tools coupled with its wide range of features make creating visually appealing slideshows a breeze (stylistic line break). So next time you have an important presentation coming up (bold tag), give Keynote a try – I guarantee that both you and your audience will be impressed!
Mastering The Art of Graphics and Images on Your MacOS For Presentation Impact
Graphics and images can be powerful tools to enhance your presentations and captivate your audience. If you’re a MacOS user, you’re in luck because the platform offers numerous features to help you master the art of graphics and images.
Firstly, let’s talk about using high-quality images. Whether you’re sourcing from stock photo libraries or taking your own pictures, make sure they are visually stunning and relevant to your topic. Bold tagsFor instance, if you’re presenting about wildlife conservation, include vibrant shots of endangered species that will instantly grab attention. Line breaksTo really make these images pop on your slides, take advantage of MacOS’ built-in editing tools such as Preview or Photos app. You can easily adjust brightness, contrast, and even apply filters to give them an artistic touch.
Next up is creating eye-catching charts and graphs using Numbers software on Mac. Bullet listsThis tool allows you to visually represent data in a clear and concise manner. Don’t just settle for plain bar charts – experiment with different chart types like pie charts or line graphs to present information dynamically.Bold tags Use contrasting colors for each element so they stand out distinctly when projected onto a screen.Line breaks And don’t forget to add titles or labels for clarity!
Lastly, let’s discuss the importance of typography in graphic design. Instead of relying on default system fonts like Arial or Times New Roman, explore MacOS’ extensive collection of pre-installed fonts.Line breaksChoose fonts that match the tone and message of your presentation – whether it’s professional and formal or playful bold tagsand creative.Line breaksDon’t go overboard with too many different font styles; stick to two complementary ones at most.Bullet listsRemember also to consider font size: choose larger sizes for headingsLine breaksand subheadings while keeping body text readable but not overpowering.Bold tagsYou want your audience focused on what’s being said rather than squinting their eyes trying to decipher tiny letters!Line breaksIn conclusion, by utilizing the various graphic and image-related features on MacOS, you can elevate your presentations to a whole new level.Bold tags Add stunning visuals, charts that are visually appealing yet informative, and typography that enhances the overall aesthetic. With these tips in mind, your audience will be left impressed and engaged throughout your entire presentation.
Leveraging Audio & Video Capabilities On Your Macbook To Enhance Your Presentation
When it comes to giving presentations, it’s always important to captivate your audience and leave a lasting impression. And what better way to do that than by leveraging the audio and video capabilities of your trusty Macbook? With its sleek design and powerful features, your Macbook can truly take your presentation game to the next level.
One great feature is the ability to add background music or sound effects to enhance your presentation. By incorporating some catchy tunes or subtle sounds, you can create a more engaging atmosphere for your audience. Just imagine their surprise when they hear a dramatic drum roll right before unveiling an important slide! To do this, simply find an audio file or track that complements your content, drag and drop it into Keynote (or any other presentation software you prefer), and adjust the settings accordingly.
Another way to leverage audio on your Macbook is through voiceovers. Instead of just reading out text-heavy slides in monotone fashion, why not record yourself narrating key points or providing additional insights? This not only adds a personal touch but also helps reinforce important information for your listeners. To do this with ease, open QuickTime Player on your Macbook (it’s pre-installed!) and select “New Audio Recording”. Hit record, speak clearly into the microphone built-in on most models, then save the recording as an mp3 file. Import it into Keynote or PowerPoint later – voila!
Now let’s talk about videos – one of the most impactful ways to grab attention during a presentation. Whether you want to showcase product demos, customer testimonials, or highlight key moments from events – adding videos will surely elevate the overall experience for everyone present in that room (or virtual space!). Simply insert video clips directly onto slides using Keynote’s “Media” button; make sure they are relevant and high-quality so as not to distract from the main message.
In conclusion: don’t be afraid to get creative with your presentations! Utilize the audio and video capabilities of your Macbook to add that wow factor, whether it’s through background music, voiceovers, or engaging videos. With these simple yet powerful tools at your disposal, you’ll be sure to leave a lasting impression on your audience.
Maximizing the Use of Interactive Features in a Macbook Powered Presentation
So you’ve got a shiny new MacBook and you want to impress your audience with a killer presentation. Well, lucky for you, MacBooks come packed with interactive features that can take your presentation to the next level. Let’s dive right into how you can make the most of these awesome tools!
First off, have you tried using Keynote? It’s Apple’s very own presentation software and it’s absolutely fantastic. With Keynote, you can create stunning slideshows that are not only visually appealing but also highly interactive. You can add animations, transitions, and even build in quizzes or polls to engage your audience. Plus, Keynote has this cool feature called Magic Move that allows objects on your slides to seamlessly transition from one location to another. Talk about smooth!
Another great way to maximize interactivity is by using AirPlay with your MacBook. By connecting wirelessly to an Apple TV or other AirPlay-enabled device, you can mirror your screen onto a bigger display for everyone to see. This is perfect for when you want to showcase videos or demonstrate how certain apps work in real-time.
Lastly, don’t forget about the power of gestures! Your MacBook trackpad supports all sorts of intuitive gestures that can enhance your presentation experience. Want to zoom in on something specific? Just pinch with two fingers and voila! Need a quick way to switch between slides? Swipe left or right with three fingers and there you go! These simple yet powerful gestures will not only save time but also give your presentation a more polished feel.
In conclusion, if you’re looking for ways to elevate your presentations on a MacBook, be sure to explore the many interactive features at your fingertips – like Keynote’s animations and Magic Move tool – as well as utilizing AirPlay for larger displays and incorporating trackpad gestures into your delivery style.

A late Apple convert, Dom has spent countless hours determining the best way to increase productivity using apps and shortcuts. When he's not on his Macbook, you can find him serving as Dungeon Master in local D&D meetups.
Read more from Dom
How To Eject a Disc From MacBook Pro: An Easy Step-by-Step Guide
How to record your macbook screen with internal audio: a step-by-step guide, leave a comment cancel reply.
Save my name, email, and website in this browser for the next time I comment.

Apps UK International House 12 Constance Street London, E16 2DQ
Privacy Policy
Export your PowerPoint for Mac presentation as a different file format
If you want to send your presentation to someone but they don't have PowerPoint for macOS or PowerPoint for Windows, you can export your presentation in a different format, such as a picture format or a PDF file, so the recipient can view the slides.
Export your presentation as a video
Note: Exporting your presentation as a video feature is only available to users using PowerPoint for Microsoft 365 for Mac, PowerPoint 2019 for Mac, or newer versions of PowerPoint for Mac. If you have a Microsoft 365 subscription, make sure you have the latest version of Office .
(Beginning with PowerPoint for Microsoft 365 for Mac version 16.19, audio narration is included in the video when you export your presentation.)
Click File > Export .
On the File Format menu, select the video format that you want (MP4 or MOV).
Select the video quality you want: Presentation Quality , Internet Quality , or Low Quality . The higher the video quality, the larger the file size.
If you have recorded timings and want to use them in the video you create from your presentation, make sure the box next to Use Recorded Timings and Narrations is checked. You can also choose to set the amount of time the video will spend on each slide if you don't have a set timing.
When you've made all your selections, choose Export .
Note: When you export your presentation as a video, any narrated audio that was recorded in Slide Show will play, but other embedded media files won't play.
After you've saved your presentation as a video, you can share it just as you would any other video, by using applications or devices that can open and play videos.
Export your slides as pictures
You can save one or more slides as pictures so that the recipient can view the slides in any application or device that works with pictures. Just make sure that you choose a picture format that the application or device can open.
Note: When your slides are converted to picture files, any transitions, animations, movies, or audio are removed from the presentation.
On the File Format menu, select the picture format that you want, such as JPEG or PNG.
Select either Save Every Slide or Save Current Slide Only . You may also enter a size for your slide images in the Width and Height boxes.
If you choose to save every slide, your presentation will be saved as individual image files, one for each slide.
After you save your slides as pictures, you can share them just as you would any other picture file, by using applications or devices that can open pictures.
Export your presentation to PDF format
On the File Format menu, click, PDF .
After you save your slides as a PDF file, you can share them just as you would any other PDF file, by using applications or devices that can open PDF files.
Export a PowerPoint for Mac presentation to PDF
Convert Keynote presentations to Microsoft PowerPoint

Need more help?
Want more options.
Explore subscription benefits, browse training courses, learn how to secure your device, and more.

Microsoft 365 subscription benefits

Microsoft 365 training

Microsoft security

Accessibility center
Communities help you ask and answer questions, give feedback, and hear from experts with rich knowledge.

Ask the Microsoft Community

Microsoft Tech Community

Windows Insiders
Microsoft 365 Insiders
Was this information helpful?
Thank you for your feedback.
- PRO Courses Guides New Tech Help Pro Expert Videos About wikiHow Pro Upgrade Sign In
- EDIT Edit this Article
- EXPLORE Tech Help Pro About Us Random Article Quizzes Request a New Article Community Dashboard This Or That Game Popular Categories Arts and Entertainment Artwork Books Movies Computers and Electronics Computers Phone Skills Technology Hacks Health Men's Health Mental Health Women's Health Relationships Dating Love Relationship Issues Hobbies and Crafts Crafts Drawing Games Education & Communication Communication Skills Personal Development Studying Personal Care and Style Fashion Hair Care Personal Hygiene Youth Personal Care School Stuff Dating All Categories Arts and Entertainment Finance and Business Home and Garden Relationship Quizzes Cars & Other Vehicles Food and Entertaining Personal Care and Style Sports and Fitness Computers and Electronics Health Pets and Animals Travel Education & Communication Hobbies and Crafts Philosophy and Religion Work World Family Life Holidays and Traditions Relationships Youth
- Browse Articles
- Learn Something New
- Quizzes Hot
- This Or That Game
- Train Your Brain
- Explore More
- Support wikiHow
- About wikiHow
- Log in / Sign up
- Computers and Electronics
- Presentation Software
- PowerPoint Presentations
How to Open a PPT File on PC or Mac
Last Updated: September 1, 2022 Tested
Using PowerPoint
Using google slides, using powerpoint online.
This article was co-authored by wikiHow Staff . Our trained team of editors and researchers validate articles for accuracy and comprehensiveness. wikiHow's Content Management Team carefully monitors the work from our editorial staff to ensure that each article is backed by trusted research and meets our high quality standards. The wikiHow Tech Team also followed the article's instructions and verified that they work. This article has been viewed 85,580 times. Learn more...
This wikiHow teaches you how to open and view the contents of a PPT (PowerPoint presentation) file in Windows and macOS. PPT is the native presentation format in Microsoft PowerPoint's earlier versions and is supported by all versions of the software. If you don't have PowerPoint, you can open the file in Google Slides or PowerPoint Online (a free version of PowerPoint accessible on the web).

- If you don't have PowerPoint installed on your computer, make sure to check out this article for detailed instructions on how to download it.
- Alternatively, you can download and use Apache OpenOffice ( https://www.openoffice.org/download ), or Apple Numbers ( https://itunes.apple.com/tr/app/numbers/id409203825 ).
- To open the PPT with a different program, just select the program you want to use on the "Open with" menu.

- If you're prompted, sign in with your Google account.

- Alternatively, you can drag and drop your PPT file here.

- If you're prompted, sign in with your Microsoft account.

Expert Q&A
You might also like.

About This Article

1. Right-click the PPT file. 2. Hover over Open with . 3. Select Microsoft PowerPoint . Did this summary help you? Yes No
- Send fan mail to authors
Is this article up to date?

Featured Articles

Trending Articles

Watch Articles

- Terms of Use
- Privacy Policy
- Do Not Sell or Share My Info
- Not Selling Info
wikiHow Tech Help Pro:
Level up your tech skills and stay ahead of the curve
Free All-in-One Office Suite with PDF Editor
Edit Word, Excel, and PPT for FREE.
Read, edit, and convert PDFs with the powerful PDF toolkit.
Microsoft-like interface, easy to use.
Windows • MacOS • Linux • iOS • Android

- Articles of PPT
How to Make A PowerPoint on Macbook [Totally Free]
Many users wonder how to make PowerPoint presentations on a MacBook without Microsoft Office. While some of PowerPoint’s features are only available on Windows, Mac users have great alternatives through Apple's Keynote app or the impressive WPS Office suite. This guide will walk through your options to easily create PowerPoints on a Mac.
Microsoft PowerPoint Version: Windows vs Mac
PowerPoint was originally created by Microsoft for Windows operating system. The Mac version was released later and had limited capability compared to the Windows version for a long time.
Over the years, Microsoft has considerably improved PowerPoint for Mac, bringing it closer to feature parity with Windows. But there are still some differences:
Presenter View Differences: Certain elements in Presenter View operate uniquely on Mac, providing a distinct user experience.
Additional Mac Features: Mac boasts exclusive features such as AppleScript and automator support, enhancing user capabilities.
Dynamic Reorder: a noteworthy addition on Mac, facilitates seamless adjustment of layered objects in presentations.
Missing Features on Mac : Notable omissions on Mac include the absence of Animation Painter, the inability to enter correctly formatted equations, the lack of support for video or animation triggers, and video trimming.
Zoom Functionality Discrepancy: Zoom, a valuable PowerPoint tool, is currently exclusive to PCs, posing a limitation for Mac users. Future availability on Mac is anticipated with Office updates.
Color Representation Variations: When opening the same Microsoft Office file on both platforms, subtle differences in color representation may be observed due to the distinct ways Macs and PCs interpret colors.
The distinctions between PowerPoint on Mac and Windows result in subtle variations in user experience.
Keynote – PowerPoint on Mac
Keynote is a presentation software developed by Apple, designed to create stunning and memorable presentations. Its powerful tools, dazzling effects, and intuitive interface stand out. Keynote enhances presentations by offering over 40 eye-catching themes, animations, and dynamic backgrounds. It allows real-time collaboration across Apple devices, including Mac, iPad, iPhone, and PC.
Keynote stands out with its user-friendly design, featuring Apple Pencil integration for illustrations and animations. It's compatible with PowerPoint – presentations can seamlessly switch between the two platforms, ensuring smooth collaboration for users of Microsoft PowerPoint.
How to Create a PowerPoint on Mac
Here are step-by-step instructions to make a PowerPoint presentation using Keynote on your Mac:
Step 1 : Open Keynote, located in the Applications folder on your Mac. You can choose a theme or start with a blank presentation when launched.
Step 2 : If using a theme, click to select one that fits your presentation style. Themed slides will automatically populate.
Step 3: Customize slides by adding text, changing layouts, inserting images, and more. Edit and arrange slides from the left sidebar.
Step 4: When finished, export your Keynote project to PowerPoint format. Go to File > Export To > PowerPoint.
Step 5: In the Export Your Presentation window, select a file format from the Advanced Options field and then click Next to save your presentation.
And that's it! You now have a PowerPoint presentation created completely on your Mac. The process is very intuitive for both new and experienced users.
Create a Presentation Using a Theme
Keynote offers many professionally designed themes to jumpstart your presentation building. Themed slides provide layouts, fonts, colors, and graphics matching your selected style.
Explore themes efficiently in the theme chooser by browsing categories. Double-click the one that aligns closely with your vision. Refine your options by selecting a category from the left sidebar.
Using a theme saves tons of time designing layouts and formatting – you can focus on the content! And themes are easy to make your own by tweaking fonts, colors, and images.
Free Alternatives to Make a PowerPoint – WPS Presentation
If you want a free Office suite that works seamlessly across Windows and Mac, WPS Office is an excellent choice. The WPS Presentation software has all the key features of PowerPoint for creating stunning slide decks.
Compared to older versions of Microsoft Office, WPS offers significant advantages:
Lightweight and Feature-Rich: WPS Office is a lightweight and feature-rich office suite.
High Compatibility: Recommended for low-configuration computers, ensuring widespread usability.
Comprehensive Suite: Includes Writer, Presentation, Spreadsheet, and PDF editing functionalities in one platform.
Effortless Creation and Collaboration: Users can effortlessly create, edit, and collaborate on Word, Spreadsheets, Presentations, and PDFs in a unified environment.
Airpage Cloud Documents: Real-time synchronization and seamless collaboration across platforms.
Extensive Template Library: Over 100,000 professional templates across categories for creative document designs.
User-Focused Segmentation: Tailored features for students, teachers, business users, and finance professionals.
How to Create a Presentation Using WPS on Mac
Follow these simple steps to make presentations using WPS Presentation on your Mac:
Step 1: Open WPS Office, and click on New.
Step 2: Choose Presentation.
Step 3 : Select a blank presentation or template.
Step 4: From now on, you can edit slides by adding text boxes, images, shapes, and charts using WPS Presentation.
Multiply Templates of WPS Presentation
WPS Presentation offers a wide selection of professional templates and themes for free. Some of the noticeable themes are:
Blue Business Strategy Planning

This template is likely for business presentations focusing on strategic planning. Expect a professional, blue-themed design with elements conducive to illustrating business strategies.
Green Business Activity Planning

This template seems suitable for business activity planning presentations. A green color scheme might convey a sense of growth and productivity, aligning well with business-oriented content.
Blue Technology Big Data Product Display

This template likely targets presentations related to technology and big data. Anticipate a blue-themed design, possibly with futuristic and data-centric visual elements to convey a tech-savvy vibe.
Business Style Investment Analysis

Enhance your investment pitches with our sophisticated business template designed for in-depth analysis. Boasting a significant download record, expect compelling financial charts and visuals for clear communication of intricate investment ideas.
Browse all the templates at: https://template.wps.com/
How to Download WPS Office
Step 1: Go to https://www.wps.com/download/
Step 2: Select your operating system – Windows, Mac, Linux, Android, iOS and click on the Free Download button.

Step 3: Click on the downloaded file to open WPS Office Installer.

Step 4: Click on Install Now and follow the prompts to complete the installation.

Use Word, Excel, and PPT for FREE, No Ads.
Edit PDF files with the powerful PDF toolkit.
Microsoft-like interface. Easy to learn. 100% Compatibility.
Boost your productivity with WPS's abundant free Word, Excel, PPT, and CV templates.
How do I open PowerPoint on my Mac keyboard?
To open PowerPoint on your Mac, press Command + Space to open Spotlight, type "PowerPoint," and hit return when it appears in the results.
As for useful shortcuts, here are some for Mac:
Open a new PowerPoint: Command + N
Open existing PowerPoint: Command + O
Open print preview: Command + Option + P
View and Zoom: Command + 1 (Normal), Command + 2 (Outline), Command + 3 (Slide Sorter), Command + Plus or Minus (Zoom In/Out)
Presenting: Shift + Command + Enter (Start Slideshow)
What are the disadvantages of using Keynote?
Keynote slides have limited compatibility with Microsoft systems, potentially causing issues when exporting to PPT format. Transitioning from PowerPoint to Keynote can be time-consuming and frustrating, especially for experienced PowerPoint users.
Can I collaborate on presentations with KeyNote or WPS Presentation?
Yes, both KeyNote and WPS Presentation offer collaboration features, making it easy for multiple users to work on a presentation simultaneously.
Mac users can create PowerPoint-style presentations, including Office for Mac, Keynote, or the free WPS Presentation. WPS provides a full-featured alternative with hundreds of free templates and easy compatibility for exporting PowerPoint files. Any Mac user can quickly make professional presentations by following the step-by-step instructions.
- 1. How to Make a Shape Transparent in PowerPoint
- 2. Professional Tips to Make Your PowerPoint Slides Appealing to the Audience
- 3. How to Make A Beautiful Slideshow in PowerPoint-- Make Your Presentations Better
- 4. How to Make a PowerPoint on Mac (Easy Tutorial)
- 5. How to make a timeline in PowerPoint
- 6. 5 Best Free Fonts That Make Your PowerPoint Presentations Visually Appealing

15 years of office industry experience, tech lover and copywriter. Follow me for product reviews, comparisons, and recommendations for new apps and software.
IMAGES
VIDEO
COMMENTS
Whether you need to show off your school project, business plan, or family vacation photos, PowerPoint is your go-to app for presentations. Kickstart your creativity. • Achieve more and enhance your documents with access to a growing catalog of premium templates for Word, Excel, and PowerPoint. • Advanced formatting and layout options ...
Absolutely! PowerPoint for Mac supports real-time collaboration, allowing multiple users to work on the same presentation simultaneously. Can I open a PowerPoint presentation made on a Mac on a Windows PC? Yes, presentations made in PowerPoint for Mac are compatible with PowerPoint for Windows, ensuring easy file sharing and collaboration.
Apply or change slide layouts. Customize a slide master. Change the page orientation of your PowerPoint presentation. Create and use your own presentation template. Create your own theme in PowerPoint. Learn about SmartArt graphics. Compress the picture size. Crop a picture. Add a transparent picture (watermark) to your slides.
PowerPoint 2021 for Mac lets you create compelling content with the addition of features including co-authoring, Ink Replay, better support for SVG, and more rich media content from the Office Premium Creative Content collection. If you're upgrading to PowerPoint 2021 for Mac from PowerPoint 2019 for Mac, you'll still have all the features you ...
To do this, click on the magnifying glass icon in the top-right corner of your screen. You can then type in "Keynote" in the search bar and hit the "Enter" key. The Keynote app should appear in the search results. You can then click on the Keynote icon to open the app. Once the Keynote app is open, you can begin creating your PowerPoint ...
Mac PowerPoint presentations having a beautiful style can result in having a colossal effect on your audience. A well-crafted PowerPoint presentation can be a deciding factor between a closed deal and a missed opportunity. Keep these seven enlightening and professional tips in your mind before structuring your next ideal presentation.
Learn how to get PowerPoint on a Mac, whether free or paid and options for presenting without PowerPoint, such as Mac's Keynote or Google Slides. ... It offers all of the core features of PowerPoint—creating slides and presentations, animations, templates, presenter mode, etc. It integrates tightly with Apple's other software and services ...
Anyone who's spent time on a consulting, finance, or strategy team knows just how powerful PowerPoint can be. With the right training, anyone can learn to bu...
Open the Mac App Store application on your computer. Type in "PowerPoint" in the search bar and click search. The result from your search should show you the application, but if that isn't the case, scroll through the results till you see Microsoft PowerPoint. Click "Get" and then begin installation by clicking "Install".
PowerPoint 2019 for Mac comes with the Morph transition, which can help you make smooth animations on your slides. LEARN MORE. Insert 3D models to see all angles. Use 3D models to increase visual and creative impact in your presentations. Easily insert a 3D model, and then rotate it through 360 degrees. Bring 3D models to life in presentations ...
How to Make a PowerPoint Presentation on a Mac. Part of the series: Using Apple Computers. Making a PowerPoint presentation on a Mac computer can be done usi...
Step 1: Open the App Store on your Mac. App Store Icon on Mac Launcher. Step 2: In the search bar at the top right, type in "PowerPoint" and press Return. App Store Search Bar. Step 3: The Microsoft PowerPoint app should appear as the first result. Click on the Get button and then Install.
Step 1: Open Your PowerPoint Presentation. Open the PowerPoint presentation you want to create handouts for. Once you have your PowerPoint open, ensure that all the slides are arranged and edited to your liking. This is your last chance to make any changes before you create the handouts. Step 2: Click on 'File' in the Menu Bar
One person. Sharing and real-time collaboration. PowerPoint for the web and PowerPoint desktop app for offline use. Premium templates, fonts, icons, and stickers with thousands of options to choose from. Dictation, voice commands, and transcription. Advanced spelling and grammar, in-app learning tips, use in 20+ languages, and more.
- 15″ Macbook Pro 2015 - 14″ Macbook Pro 2021 - 15″ MacBook Pro 2018. OS: Monterey. Powerpoint-version: 16. Using this method with APS. Auto Presentation Switcher, gives you more ways to open, display and switch presentations. When opening presentations on Mac with APS, the monitor where the presentation is shown is taken from the ...
How to share a PowerPoint Presentation on a Mac. 1. Open the PowerPoint presentation on your Mac desktop or laptop. 2. Click the "File" tab in the top left corner. 3. Select "Share" from the ...
Step 1: Save the PowerPoint Presentation Correctly. Make sure to save your PowerPoint presentation in a format that is compatible with Mac. The best option is to use the .pptx file format. Saving your presentation in the .pptx format ensures that most of the formatting and features you used on your PC will be preserved when you open the ...
To do this with ease, open QuickTime Player on your Macbook (it's pre-installed!) and select "New Audio Recording". Hit record, speak clearly into the microphone built-in on most models, then save the recording as an mp3 file. Import it into Keynote or PowerPoint later - voila!
Click File > Export. On the File Format menu, select the picture format that you want, such as JPEG or PNG. Select either Save Every Slide or Save Current Slide Only. You may also enter a size for your slide images in the Width and Height boxes. If you choose to save every slide, your presentation will be saved as individual image files, one ...
Download Article. 1. Find the PPT file you want to open on your computer. Open the folder that contains your presentation, and locate your PPT file. 2. Right-click on the PPT file. This will open your file options on a drop-down menu. 3. Hover over Open with on the menu.
Follow these simple steps to make presentations using WPS Presentation on your Mac: Step 1: Open WPS Office, and click on New. create new file in wps office. Step 2: Choose Presentation. open wps presentation. Step 3: Select a blank presentation or template. "wps presentation templates".