PowerPoint Tips Blog
Helping you with presenting, PowerPoint, and speaking

View your slide show in a smaller window so you can see another presentation or program
July 9, 2012 by Ellen Finkelstein 9 Comments
Sometimes you might want to display your presentation in Slide Show view in a way that doesn’t take up the entire screen. For example, let’s say that you are delivering a presentation and want to switch between applications. (You can press Alt + Tab, but that’s a little clunky and if you have many applications open, it can get confusing.)
- Click the Slide Show tab and choose Set Up Slide Show.
- In the Set Up Show dialog box, in the Show Type section, choose Browsed by an Individual (Window).
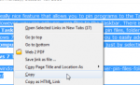
- Go into Slide Show view. Instead of taking up the entire screen, your presentation is in a resizable window. You can easily switch among other applications
To switch back to full screen, choose the Presented by a Speaker (Full Screen) option in the same dialog box.
Another method is to go into “Reading View.” Either click the Reading View icon at the bottom-right of the screen — just to the left of the Slide Show icon — or go to View, Reading View.
When you aren’t delivering a presentation but just want to check animation and navigation, you can view the presentation in a quarter-size slide show. This option displays a quarter-size slide show view. For more information, see my tip on that topic.
Related posts:
- Using a window instead of full screen for Slide Show view
- Display a quarter-size slide show view
- Add notes in PowerPoint in Slide Show view
- How to zoom into a slide and choose another slide in Slide Show view–PowerPoint 2013
9 Leave a Reply
This was a great and timely tip Ellen! I was just looking for information on how to do that. I knew it could be done, I had done it before but could not remember exactly how.
Thanks for your help!
Love your newsletter!

Thanks for the tip. I clicked the individual browse and was not able to resize. After that, I clicked on the view function on the toolbar and clicked on the icon showing a tiled format. That allowed me to work on the Powerpoint while seeing another program but as soon as I tried to work on the other image’s program, the Powerpoint disappeared and only again reappeared when I clicked on the Powerpoint icon at the bottom of my screen. Any way to keep both programs working?

Which version of Windows are you using? And which version of PowerPoint? I can’t think of any other variable that might affect this.

I have read so many articles or reviews regarding the blogger lovers however this article is genuinely a good paragraph, keep it up.

Hi, thanks for brining up the amazing Ubuntu release. This is one of the coolest releases and i have it setup on my computer at home. the only issue is outdated nvidia driver.

Thank you Ellen , It was very helpful .

Presenter view is a key slide show-based view that you can use while delivering your presentation. By using two monitors, you can run other programs and view speaker notes that your audience cannot see.

Did not work for me. Stayed on full screen?

This is great, but I need information about how to present in speaker mode (with captions) in a window. When you switch to “Browsed by an individual” the captions/subtitles no longer work. I need to keep it in speaker mode so I can use subtitles and the pen feature, but just in a window instead of full screen.
How to Play a PowerPoint Slideshow in a Small Window instead of Full Screen
Last updated on August 19th, 2023
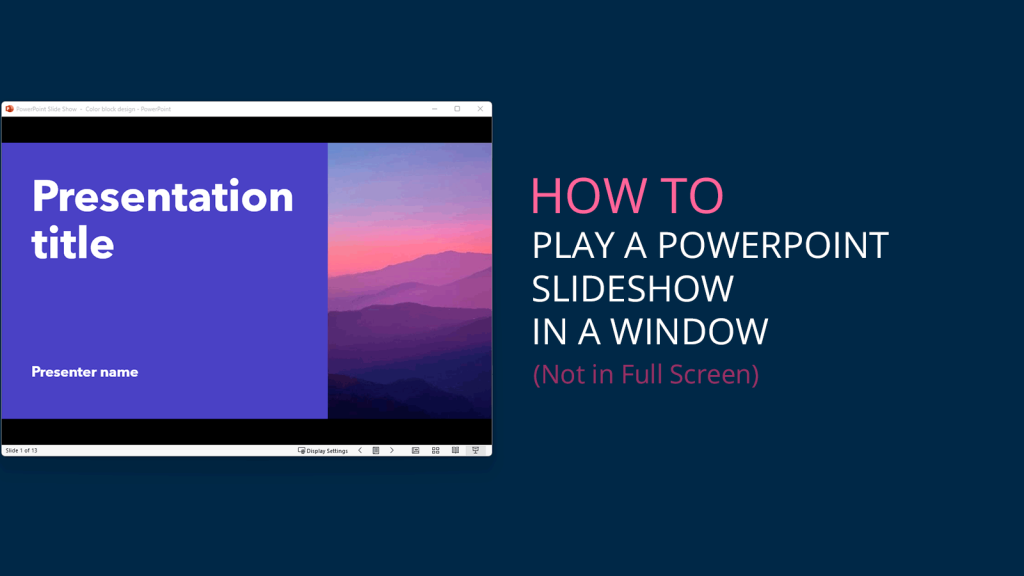
PowerPoint was originally intended for the purpose of presenting slideshows in a projector. However, over time, the software has evolved and is now being utilized for a range of other purposes. For example, PowerPoint is now commonly used for presenting online webinars or training employees remotely using software such as TeamViewer, GoView, or GoToMeeting. Additionally, PowerPoint can also be used to record screen or screencasts using free tools such as Screenr .
For presenters who prefer to play their slideshows in a small window that can be easily controlled in Windows, rather than in full screen mode, the following tip may prove beneficial. By configuring PowerPoint to play slideshows in a resizable window, presenters can have a greater control over their presentations, especially when dealing with online meetings, sharing screen with teammates or presenting online.
To configure PowerPoint to play a slideshow in a resizable window, rather than in full screen mode, follow these steps:
How to Configure PowerPoint Slideshow to play in a resizable window instead of full screen mode?
So, how can I view a PowerPoint show without using full screen? Go to SlideShow and then Setup Slide Show.

Now, in the Set Up Show dialog, make sure to select Browsed by an individual (window) . By default you will see that the Presented by a speaker (full screen) is selected.

Now, every time you start the slideshow for example using the keystroke F5 then you will see that the slideshow opens in a regular window instead of full screen.

This configuration can be useful for a range of purposes, including:
- Recording screencasts using PowerPoint and including animations and transitions in a resizable window.
- Conducting online webinars using tools such as TeamViewer for presentations and GoToMeeting without entering full screen mode.
- Sharing a window online with the presentation while working on other windows simultaneously.
- Playing the slideshow in multiple monitors.
In conclusion, while PowerPoint was originally designed for presenting slideshows in a projector, it has evolved to offer a range of other uses, including online webinars, remote employee training, and screen recording. By configuring PowerPoint to play slideshows in a resizable window, presenters can have greater control over their presentations and offer a more personalized experience for their audience. This feature can be particularly useful for those looking to record screencasts or conduct online webinars. Overall, PowerPoint’s versatility continues to make it a valuable tool for a variety of industries and purposes.
Leave a Comment Cancel reply
Your email address will not be published. Required fields are marked *
Save my name, email, and website in this browser for the next time I comment.
Sign up to our newsletter
We will send you our curated collections to your email weekly. No spam, promise!
Critical PowerPoint Shortcuts – Claim Your FREE Training Module and Get Your Time Back!
How to Change Your PowerPoint Slide Size (16:9 vs. 4:3)
- PowerPoint Tutorials
- March 10, 2019
In this tutorial, you’ll learn how to change your slide size in PowerPoint.
That way you can create slides for any situation including on-screen presentations, printed documents, posters, postcards, handouts, etc.
First off, the two most used PowerPoint slide sizes are:
- 16:9 ratio for onscreen presentations and new overhead projectors. This is the default setting for the latest versions of PowerPoint.
- 4:3 ratio for printing slides on standard 8.5 x 11 pieces of paper as handouts.
When starting with a blank PowerPoint presentation, changing your slide size is super easy and straightforward. If not, there are a few issues you’ll need to deal with, each covered below.
That’s why it’s worth figuring out what slide size you need BEFORE you build your presentation. If you later convert your presentation to a different size, it can be painful!
It’s just like the old carpenter saying, “measure twice and cut once.” In PowerPoint, you’ll want to “ask twice (to double confirm the required size) and build once.”
Changing your PowerPoint slide size does not make your PowerPoint presentation larger or smaller. To reduce your PowerPoint file size, you need to learn how to compress a PowerPoint presentation .
Table of Contents
How to change your powerpoint slide size.
By default, new PowerPoint presentations start in the 16:9 slide size format.
This is the NEW standard for most modern overhead projects and monitors and is recommended for most presentations. That said, you can easily change your slide size to something else.

To change your slide size in PowerPoint, simply:
- Navigate to the Design tab
- Open the Slide Size drop down menu
- Select 4:3 , 16:9 or Custom Slide Size (see options below)
When starting with a blank presentation, you are now good to go. You will not have to worry about any of the conversion issues discussed below.
Notice too, how much wider the 16:9 slide size is versus the 4:3 slide size in the picture below. The new size gives you more room for the content on your slides.

When you are converting an existing presentation to a new slide size, you will additionally be given the following prompt:
“You are scaling to a new slide size. Would you like to maximize the size of your content, or scale it down to ensure it will fit on the new slide?
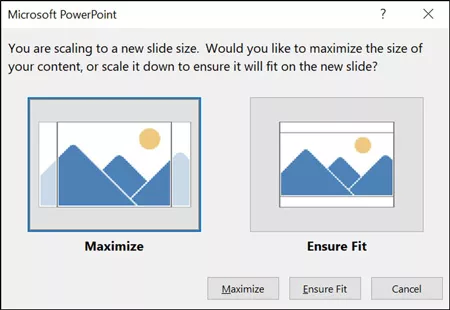
Maximize leaves all your content as is on your slide, even if it no longer fits on the new slide size that you selected.
Ensure Fit scales down your content in proportion to the new slide size you have selected. You will only see this option when moving from a larger slide size to a smaller one.
Custom PowerPoint slide sizes
Choosing Custom for your slide size gives you additional options to work with. Inside the dialog box you can choose your size on the left and your orientation on the right.
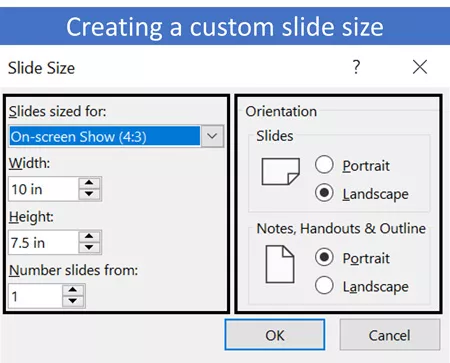
On top of that, you can also input your own custom slide size. However, I recommend using one of the preset PowerPoint dimension options.
- On-screen show (4:3)
- Letter Paper (8.5×11 in)
- A3 Paper (297×420 mm)
- B4 (ISO) Paper (250×353 mm)
- B5 (ISO) Paper (176×250 mm)
- 35mm Slides
- On-screen Show (16:9)
- On-screen show (16:10)
For your orientation options on the right-hand side of the dialog box, you can choose between Landscape and Portrait .
In most situations, you will want one of the default settings. Best practice is Landscape for your presentation slides and Portrait for your printed notes, handouts and outlines.

Issues when converting 4:3 to the 16:9 slide size in PowerPoint
When converting an existing 4:3 presentation with content into the 16:9 format, you are not given any conversion options. Instead, PowerPoint simply does the conversion for you, which can create several problems.
There are two issues you will face in the new 16:9 slide size.

The first issue is that all the images on your slide master (including company logos) will be stretched to fit the new, larger slide size.
To fix the stretched images, you will need to fix those images (or reinsert them) on your slide master, as if you were creating a PowerPoint template from scratch.
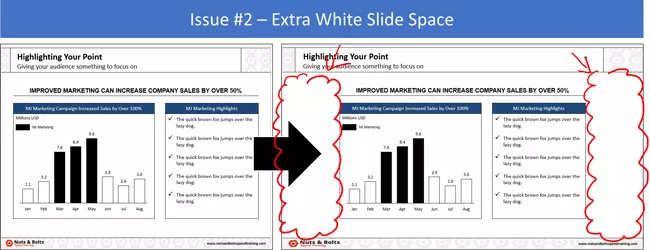
The second issue you will face in the larger 16:9 slide size is that you will have a lot of extra white space on your slides.
While you can leave the space blank, doing so will make your content look weird. Ideally you don’t want a lot of white empty space like that on your slides. Especially since all your font sizes will be so small.
That’s why if you have the time, I recommend resizing your content to fill in the white space. You can do this by either increasing the font size of your content, or adding additional visuals that support your message.
Issues when converting 16:9 to the 4:3 slide size in PowerPoint
When converting an existing 16:9 presentation to the 4:3 slide size, you are given the option to either Maximize or Ensure Fit (both covered below).
1. The Maximize option
This option means that the content on your slides will not be resized to fit the 4:3 slide size. The same is true if you move to any smaller slide size.

Maximize Issue #1: All the images on your slide master (including your company logo) will be distorted.
You might also have issues with other content placeholders, slide backgrounds or anything else that was built on your slide master. For these issues, you’ll first need to navigate to your Slide Master. Once you are there, you either adjust (or rebuild) your PowerPoint template so that everything fits properly.
Maximize Issue #2: Your content will not be scaled down to the smaller slide size. Instead, you’ll have overhanging content as pictured above.
For these kinds of spacing issues, you will need to work through your slides to adjust your content.
One recommendation as you move from the larger 16:9 slide size to 4:3, is to break up your slides. Take the contents from one larger slide and break it into two (or even three) separate slides.
Breaking up your content is preferable to just cramming more content on the smaller slide space. Doing so will make your content easier to read when presented on an overhead projector.
2. The Ensure Fit option
This option means that PowerPoint will scale down your content to fit the smaller slide size based on the size you selected.

Ensure Fit Issue #1: Distorted images, slide backgrounds and anything else that PowerPoint had to automatically resize on your slide master.
To fix these issues, you’ll need to navigate to your slide master and adjust (or rebuild) your template to make everything fit.
Ensure Fit Issue #2: Your content will be scaled down to fit your new slide size, leaving you with a lot of white space. In addition, all your font sizes will be smaller, making them hard to read.
For small content like this, you’ll need to work through your slides and resize your content accordingly. Keep in mind the people at the back of the room too when choosing a new font style and size.
Saving your custom slide size as a PowerPoint theme
If want to use your own custom slide size for all your future PowerPoint presentations, you can save and set it as a PowerPoint theme.
This is a two-step process as discussed below.
1. Save your custom slide size as a theme

To save your custom slide size (and settings) as your own custom PowerPoint theme, simply:
- Open the M ore options
- Click Save Current Theme
- Name your Theme (and don’t change the file location it saves to)
- Click Save
2. Set your custom theme as the default

To set a custom PowerPoint theme as the default for all your future presentations, simply:
- Open the More options
- Right-click your custom theme
- Select Set as Default Presentation
- Close out of PowerPoint (and do not save any presentations if it prompts you)
Once you’ve set your own custom theme as the Default Presentation, it will open every time you start PowerPoint. This saves you from always having to switch your slide sizes.
So that’s how you can change your PowerPoint slide size, either before or after you create your presentation.
And although you are given a lot of flexibility in the slide sizes you can choose from, I recommend using the default slide sizes as used by most people.
It’s also important to remember that switching slide sizes after you have built your presentation can be a total pain. So, to the extent possible, figure out your PowerPoint slide size first before you build out your presentation.
If you enjoyed the depth of this article, you’ll love our PowerPoint training courses and other free resources that you can learn more about here .
🔒 Unlock the PowerPoint Shortcuts Trusted by Industry Leaders KKR, American Express, HSBC, and More!
Join over 114,880 professionals from diverse fields including consulting, investment banking, advertising, marketing, sales, and business development who have supercharged their PowerPoint game with our proven methods.
✅ Customize compelling presentations effortlessly.
✅ Master time-saving techniques for faster deck creation.
✅ Boost your career prospects with top-notch PowerPoint skills.
Get FREE access to the Critical PowerPoint Shortcuts module of our premium training course by entering your name and email below.
DISCLAIMER: PC Users Only!
We respect your privacy and will keep your info safe and confidential.
Related Articles
About the author.

Popular Tutorials
- How to Strikethrough Text (l̶i̶k̶e̶ ̶t̶h̶i̶s̶) in Word, Excel & PowerPoint
- How to Make Animated Fireworks in PowerPoint (Step-by-Step)
- Strikethrough Shortcut (l̶i̶k̶e̶ ̶t̶h̶i̶s̶) for Word, Excel & PowerPoint
- How to Create a Flash Card Memory Game in PowerPoint (Like Jeopardy)
- Keyboard Shortcuts Not Working: Solved
PowerPoint Tutorial Categories
- Strategies & Opinions
- Shortcuts & Hacks
- Presentation Design
- Pictures, Icons, Videos, Etc.
- New Features
- Miscellaneous
- Charts & Data Viz
We help busy professionals save hours and gain peace of mind, with corporate workshops, self-paced courses and tutorials for PowerPoint and Word.
Work With Us
- Corporate Training
- Presentation & Template Design
- Courses & Downloads
- PowerPoint Articles
- Word Articles
- Productivity Resources
Find a Tutorial
- Free Training
- For Businesses
We help busy office workers save hours and gain peace of mind, with tips, training and tutorials for Microsoft PowerPoint and Word.
Master Critical PowerPoint Shortcuts – Secure Your FREE Training Module and Save Valuable Time!
⌛ Master time-saving expert techniques.
🔥 Create powerful presentations.
🚀 Propel your career to new heights.
We value your privacy – we keep your info safe.
Discover PowerPoint Hacks Loved by Industry Giants - KKR, AmEx, HSBC!
Over 114,880 professionals in finance, marketing and sales have revolutionized their PPT skills with our proven methods.
Gain FREE access to a full module of our premium PowerPoint training program – Get started today!
We hate spam too and promise to keep your information safe.
You are currently viewing a placeholder content from Facebook . To access the actual content, click the button below. Please note that doing so will share data with third-party providers.

How to Change Slide Size or Dimensions in PowerPoint

Change PowerPoint Slide Size (Widescreen, Standard or Custom)
by Avantix Learning Team | Updated September 7, 2023
Applies to: Microsoft ® PowerPoint ® 2016, 2019, 2021 and 365 (Windows)
You can change the slide size or aspect ratio of a PowerPoint presentation in all versions. The default slide size or dimensions in 2013, 2016, 2019, 2021 or 365 is widescreen (16:9 aspect ratio). You can also enter a custom slide size if you prefer (including entering slide size in pixels). The best time to set slide size is when you first set up your PowerPoint presentation before you add any content. If you change the size later in the process, you may have to deal with distorted pictures and you may also need to adjust the position and size of various objects on slides in Normal View and in the slide master(s) and layouts in Slide Master View.
The most common slide sizes or aspect ratios are typically used as follows:
- Widescreen or 16:9 aspect ratio is frequently used for onscreen presentations using a projector, monitor or a widescreen TV. Older projectors used the standard aspect ratio but most new projectors are designed for widescreen.
- Standard or 4:3 aspect ratio is often used if slides are intended to be printed on letter size paper.
Slide size changes affect the entire presentation. You cannot change slide size for single slides.
You should never change slide size just before running a presentation as you may not be satisfied with the results. If you already have a presentation with images and other content, it's also a good idea to change slide size on a copy of the presentation so you can keep the original deck and slide size.
Note: Some Ribbon tabs may appear with slightly different names if you are working with PowerPoint 365 and have a smaller screen or different display settings. Buttons on the Ribbon may appear as icons only and are also affected by screen size and display settings.
Recommended article: How to Reduce the Size of PowerPoint Presentations (10 Ways to Compress Your PowerPoint Decks)
Do you want to learn more about PowerPoint? Check out our virtual classroom or live classroom PowerPoint courses >
Regardless of the version of PowerPoint you use, you should go through your slides after you change slide size to be sure you are satisfied with the results. Be sure to check the slide master(s) and layouts in Slide Master View as well.
Change slide size to widescreen or standard
To change slide size to widescreen or standard size:
- In Normal View, click the Design tab in the Ribbon.
- Click Slide Size in the Customize group. A drop-down menu appears.
- Select Widescreen, Standard or another option from the drop-down menu. A dialog box appears with options to maximize content or scale to fit (this dialog appears only if you are moving from a larger to a smaller slide size).
- Select the desired option.
Slide Size appears on the Design tab in the Ribbon:

The following dialog box appears in PowerPoint to maximize content or scale to fit only when you change slide size to a smaller size (such as widescreen to standard):

If you select Maximize, the slide content will not be resized when you change to the smaller slide size.
If you select Ensure Fit, PowerPoint will scale your content to fit the smaller slide size.
Change slide size to a custom size
You can use custom slide sizes. Simply choose options from the Slides sized for drop-down menu in the dialog box (such as A4 paper size) or enter custom dimensions.
To change slide size to a custom size:
- Choose Custom Slide Size from the drop-down menu. A dialog box appears.
- Select an option from the Slides sized for drop-down menu or enter the desired slide size in the Height and Width boxes.
- A dialog box appears with options to maximize content or scale to fit (this dialog appears only if you are moving from a larger to a smaller slide size).
Note that the measurement system in PowerPoint dialog boxes is based on your system settings. If you would like to change the measurement system, check out our article on How to Change the Measurement System in PowerPoint.
The following dialog box appears when you select Slide Size and then Custom Slide Size:

You can create posters in PowerPoint by entering a custom slide size such as 36 inches wide by 56 inches high or 91.44 cm wide by 142.24 cm high. The maximum slide size in PowerPoint is 56 inches or 142.24 cm. As a best practice, set the slide size before adding content to the poster.
Many PowerPoint users are not aware that you can enter slide size in pixels (simply enter the measurement with px beside the number). This is useful in a number of situations such as using PowerPoint to create social media posts. If you enter slide size in pixels (such as 200px), when you tab to another box or close the dialog box, PowerPoint changes the pixels to the equivalent in the current measurement system.
Deal with issues when changing slide size
When changing slide size in existing presentations with content, 4 common issues occur:
- Pictures may be distorted as PowerPoint tries to adjust images to fit slide size. Images on slides in Normal View will be affected as well as images on the slide master(s) and layouts. If pictures are distorted, you will need to either manually resize each image or delete them and insert them again.
- Objects such as placeholders and shapes that have been created in PowerPoint are not in the position you'd like. You may need to move objects or reset one or more slides (on the Home tab in the Ribbon, click Reset in the Slides group).
- Extra space is created if you change to a larger slide size. You may need to move or resize objects and adjust the slide master(s) or layouts in Slide Master View.
- If you have changed to a smaller slide size, you may need to increase font size for placeholders and text boxes.
Dimension differences between different slide sizes
In PowerPoint 2013 and later versions, widescreen (16:9) format measurements are different and are set to 13.33 inches wide by 7.5 inches high or 33.867 cm wide by 19.05 cm high. This matches the height of the 4:3 format.
Avoid issues when changing slide size
To avoid issues in PowerPoint related to slide size, you should:
- Try to set slide size as a first step after you create a presentation and before you have entered any content. In 2013 and later versions, the default is widescreen (16:9 aspect ratio).
- If you have changed slide size in a presentation with content, review your slides to be sure you are satisfied with the results. You should also check the slide master(s) and layouts in Slide Master View.
- Never change slide size just before running a presentation as you may not be pleased with the results and you won't have time to fix your slide deck.
- If you have created a presentation with content, make a copy of the presentation first and change slide size on the copy.
Keep in mind that widescreen is normally used for on screen presentations and standard is often used for printed presentations.
This article was first published on October 6, 2019 and has been updated for clarity and content.
Subscribe to get more articles like this one
Did you find this article helpful? If you would like to receive new articles, JOIN our email list.
More resources
How to Blur Text on a PowerPoint Slide
How to Get Slide Design Ideas Using PowerPoint Designer
How to Change Picture Brightness or Contrast in PowerPoint
How to Insert Slide Numbers in PowerPoint Presentations (Step-by-Step)
Where to Find Free Images for Your PowerPoint Presentations (10 Great Stock Photo Sites)
Related courses
Microsoft PowerPoint: Intermediate / Advanced
Microsoft PowerPoint: Design for Non-Designers
Microsoft PowerPoint: Animations Bootcamp
Microsoft Excel: Intermediate / Advanced
VIEW MORE COURSES >
Our instructor-led courses are delivered in virtual classroom format or at our downtown Toronto location at 18 King Street East, Suite 1400, Toronto, Ontario, Canada (some in-person classroom courses may also be delivered at an alternate downtown Toronto location). Contact us at [email protected] if you'd like to arrange custom instructor-led virtual classroom or onsite training on a date that's convenient for you.
Copyright 2024 Avantix ® Learning
You may also like

10 Keyboard Shortcuts in PowerPoint's Outline View
The outline has been an integral part of Microsoft PowerPoint for many years. It is dynamically linked to slide placeholders and is organized in a hierarchical way.

How to Change the Thumbnail for a Video in PowerPoint (using the Poster Frame Tool)
If you have inserted a video on a PowerPoint slide, you can display a custom thumbnail (or Poster Frame) for the video during a slide show. The thumbnail will display when you run a PowerPoint slide show and disappears when you start the video. For most videos, the thumbnail that displays is the first frame of the video clip. You can use the Poster Frame command to display a different frame in the video clip or a picture from another source as a thumbnail. A picture thumbnail could be either an image or an icon.

How to Use the Built-in Laser Pointer in PowerPoint (with Shortcuts)
During a PowerPoint slide show, you can change your mouse into a laser pointer to focus attention on a specific area on your slide. You can show or hide the built-in laser pointer using keyboard shortcuts or by using the context menu.
Microsoft, the Microsoft logo, Microsoft Office and related Microsoft applications and logos are registered trademarks of Microsoft Corporation in Canada, US and other countries. All other trademarks are the property of the registered owners.
Avantix Learning |18 King Street East, Suite 1400, Toronto, Ontario, Canada M5C 1C4 | Contact us at [email protected]
Our Courses
Avantix Learning courses are offered online in virtual classroom format or as in-person classroom training. Our hands-on, instructor-led courses are available both as public scheduled courses or on demand as a custom training solution.
All Avantix Learning courses include a comprehensive course manual including tips, tricks and shortcuts as well as sample and exercise files.
VIEW COURSES >
Contact us at [email protected] for more information about any of our courses or to arrange custom training.
Privacy Overview
Pin it on pinterest.
- Print Friendly
How to Change the Slide Size in PowerPoint for Better Presentations
Makes them much easier to read
Powerpoint presentations are supposed to be engaging. But that’s another story if the audience can’t see what’s in front of them. So, in this article, we’ll discuss how to change the default slide size in Powerpoint.
This will come in handy so you can maximize your slides to the size of the projector or monitor you’ll be using and deliver a better presentation.

Choose One Slide Size First
PowerPoint allows you to change the slide size anytime you like, but it’s a good idea to pick the right size before you start creating your presentation.
If you decide to change the size later, PowerPoint will do its best to give you options on how to shift items around, but it will more than likely result in having to totally redesign your slides.
This is especially true if you move from a widescreen format slide to a smaller 4:3 standard sized slide.

If you choose to scale it down, PowerPoint will try to fit everything as best it can into the smaller slide. If you choose Don’t Scale , the items that are outside the standard size will simply be out of the window. You’ll then have to decide whether to delete those items or move them back into the slide.
Change Slide Size in PowerPoint
Once you know what size will be ideal for your output device, you can adjust the slide size in PowerPoint.
First, go ahead and open PowerPoint and select a slide.

This guide works will work for most modern versions of PowerPoint that have the ribbon interface, including the version in Office 365.
Next, go to the Design tab. It’s where you can find the options that let you tweak your presentation’s design.

There, head over to the far right end — to where you can find the Customize section. Next, choose Slide Size .

Clicking on this option will reveal a menu. It lets you pick the size of the slide that you want. Your choices are Standard , Widescreen , and Custom Slide Size .

Let’s walk through each of the choices. This way, you will have a better understanding of your options. This will also help you adjust your slide’s size as needed – a size that works best for your projector or TV.
If you go with the Standard size, you’ll be going with a 4:3 aspect ratio. This is a safe choice because it works for familiar devices such as older screens with low resolutions.
A Standard slide size is a suggested choice for old school presenters. This means those who will be working with old projectors and SlideShare or other old online presentation platforms .

If you choose Widescreen , you’ll be going with an aspect ratio of 16:9. This is the ideal choice for you if you’re dealing with newer devices and online presentation platforms.
Got a Microsoft Surface device or HD projector? Going with a Widescreen option is the better way to go. The same is true if you’ll be presenting on a HDTV or 4K TV/monitor.

If Standard and Widescreen slide sizes are not for you, you can also go with the Custom Slide Size…

If you select this option, a pop-up window will appear.
Here, you can select from plenty of choices regarding the slide size you want. If you’re about to deliver your Powerpoint presentation on an unfamiliar projector, it’s good to go with this option.
It’s flexible. It can also accommodate your preferred slide dimensions.
Plus this way, you can select the Orientation for your slides and notes. This lets you have control over the Width and Height of your slides, too.

You can also try expanding the Slides sized for menu option. Doing so reveals preset sizes that go beyond the Standard and Widescreen size options.
As you can see, this option allows you to adjust your slide to fit the size of a Letter Paper, 35mm slide, a banner, 16:10 aspect ratio and more.

Christopher Jan Benitez is a freelance writer for hire who provides actionable and useful web content to small businesses and startups. In his spare time, he religiously watches professional wrestling and finds solace in listening to '80s speed metal. Read Christopher's Full Bio
Read More Posts:
Leave a Reply
Your email address will not be published. Required fields are marked *
How to Adjust Slide Size in PowerPoint

PowerPoint presentations are an essential tool for many professionals, students, and educators. Whether you’re creating a lecture slideshow, a business pitch, or a graphic design portfolio, the size of your PowerPoint slides is a crucial factor that can greatly affect the quality and effectiveness of your presentation. In this article, we’ll take a deep dive into understanding and adjusting the slide size in PowerPoint, including its benefits, default settings, customization options, tips for choosing the right size for your needs, and common issues and how to fix them.
Table of Contents
Understanding Slide Size in PowerPoint
Slide size refers to the dimensions of your PowerPoint slides, such as width and height. By default, PowerPoint sets your slide size to 10 inches by 7.5 inches, which is a 4:3 aspect ratio. However, there are other aspect ratios and sizes you can select, depending on your needs and preferences.
Aspect ratio is the relationship between the width and height of your slide. A 4:3 aspect ratio means that the width is 4 units for every 3 units of height. This was the standard aspect ratio for television screens and computer monitors for many years. However, with the rise of widescreen displays, 16:9 aspect ratio has become the new default for PowerPoint, as it fits better with modern screens.
It is important to consider the purpose and audience of your presentation when selecting slide size. If you are presenting on a large screen, such as in a conference room or auditorium, you may want to choose a larger slide size to ensure that your content is visible to everyone in the room. On the other hand, if you are presenting on a smaller screen, such as a laptop or tablet, a smaller slide size may be more appropriate to avoid overwhelming your audience with too much information at once.
Another factor to consider when selecting slide size is the amount of content you plan to include on each slide. If you have a lot of text, images, or other media to include, a larger slide size may be necessary to avoid overcrowding and ensure that your content is legible. However, if you have less content or prefer a minimalist approach, a smaller slide size may be more suitable to create a clean and uncluttered presentation.
Benefits of Adjusting Slide Size in PowerPoint
Adjusting your slide size can bring several benefits to your PowerPoint presentations. Firstly, it can help you ensure that your content is visible and readable, regardless of the device or screen your audience uses. The right slide size can also make your presentation more visually appealing, engaging, and professional-looking. Additionally, some content, such as images or videos, may require specific slide sizes to be displayed correctly.
Another benefit of adjusting slide size in PowerPoint is that it can help you save time and effort. By choosing the right slide size from the beginning, you can avoid having to resize and reposition your content later on, which can be a time-consuming and frustrating process. Moreover, if you plan to share your presentation online or via email, adjusting the slide size can help you reduce the file size and make it easier to send and download.
Finally, adjusting slide size can also help you customize your presentation to your audience and purpose. For example, if you are presenting to a large group in a conference room, you may want to use a larger slide size to ensure that everyone can see your content clearly. On the other hand, if you are presenting to a small group on a laptop or tablet, you may want to use a smaller slide size to avoid overwhelming your audience with too much information at once.
Using the Default Slide Size in PowerPoint
If you’re new to PowerPoint or don’t need to customize your slide size, you can use the default settings. To use the default slide size in PowerPoint, open a new presentation and go to the “Design” tab. Click on the “Slide Size” button, then select “Standard (4:3)” or “Widescreen (16:9)” from the options. PowerPoint will apply the default size to all your slides.
It’s important to note that while the default slide size may work for most presentations, there may be instances where you need to customize the size to fit your content. For example, if you’re creating a presentation to be displayed on a large screen, you may want to use a larger slide size to ensure that your content is easily visible. Similarly, if you’re creating a presentation to be viewed on a mobile device, you may want to use a smaller slide size to ensure that your content fits on the screen. In these cases, you can use the “Custom Slide Size” option in PowerPoint to create a slide size that works best for your needs.
Changing Slide Size in PowerPoint: Step-by-Step Guide
If you want to customize your slide size in PowerPoint, follow these steps:
- Open your presentation in PowerPoint.
- Go to the “Design” tab.
- Click on the “Slide Size” button.
- Select “Custom Slide Size” at the bottom of the menu.
- In the “Slide Size” dialog box, enter the width and height of your desired slide size in inches or centimeters. You can also choose from several predefined options, such as “Banner,” “Ledger,” or “A4” size.
- Click “OK” to apply the new slide size to your presentation.
It’s important to note that changing the slide size may affect the layout of your presentation. If you have images or text boxes that are close to the edge of the slide, they may be cut off or resized. Be sure to preview your presentation after changing the slide size to ensure that everything looks the way you want it to.
Additionally, if you plan on sharing your presentation with others, keep in mind that the slide size may not be compatible with their devices or projectors. It’s a good idea to check with your audience beforehand to see if there are any specific requirements or recommendations for slide size.
How to Increase or Decrease Slide Size in PowerPoint
If you’ve already created a presentation and want to change the slide size, you can do so by following these steps:
- In the “Slide Size” dialog box, enter the new width and height of your desired slide size.
- A warning message may appear, informing you that the new slide size may cause some content to be cropped or distorted. Choose the “Maximize” option if you want PowerPoint to adjust the content proportionally to fit the new size, or “Ensure fit” if you want to keep the content as it is and add borders if necessary.
It’s important to note that changing the slide size may affect the overall layout and design of your presentation. If you have images or graphics that are sized specifically for the original slide size, they may appear stretched or distorted when the slide size is changed. It’s a good idea to preview your presentation after changing the slide size to ensure that all content appears as intended.
How to Change the Orientation of Your Slides in PowerPoint
You can also change the orientation of your slides from landscape to portrait or vice versa in PowerPoint:
- In the “Slide Size” dialog box, choose the orientation you want: “Portrait” or “Landscape.”
- Click “OK” to apply the new orientation to your presentation.
Changing the orientation of your slides can be useful when you want to create a presentation that is optimized for a specific screen or device. For example, if you are creating a presentation to be viewed on a mobile device, you may want to use the portrait orientation to make the slides easier to read.
It’s important to note that changing the orientation of your slides may affect the layout of your content. You may need to adjust the size and position of your images, text boxes, and other elements to ensure that they fit properly on the new slide size.
Customizing Slide Size for Different Devices and Screens
If you’re presenting your PowerPoint on different devices or screens, you may need to adjust your slide size accordingly to ensure the best possible viewing experience. For example, if you’re presenting on a large projector screen, you may need a bigger slide size to avoid pixelation or distortion. On the other hand, if you’re presenting on a mobile device, you may need a smaller slide size to fit the screen.
You can customize your slide size for different devices and screens by following these steps:
- Determine the size and aspect ratio of the device or screen you’ll be presenting on.
- Create a new presentation or open your existing one in PowerPoint.
- Enter the width and height that match the device or screen size and aspect ratio you’ve determined.
Tips for Choosing the Right Slide Size for Your Presentation
Choosing the right slide size for your presentation can greatly enhance its impact and effectiveness. Here are some tips to help you choose the best slide size for your needs:
- Consider your audience and how they’ll be viewing your presentation.
- Match your slide size to the device or screen you’ll be presenting on.
- Allow enough space for text, images, and other content, but avoid overcrowding your slides.
- Use a consistent aspect ratio throughout your presentation for a cohesive look.
- Test your presentation on different devices and screens to ensure compatibility and readability.
Common Issues with Slide Size and How to Fix Them in PowerPoint
Despite your best efforts, you may encounter some issues related to slide size when creating or presenting your PowerPoint. Here are some common problems and how to fix them:
- Content is too small or large: Adjust your slide size to ensure that your content is appropriately sized and readable.
- Content is cropped or distorted: Use the “Maximize” or “Ensure fit” option when changing your slide size to avoid cropping or distortion.
- Text or images are pixelated: Ensure that your images and text are high resolution and adjust your slide size accordingly.
- Slides don’t fit the screen: Use the “Scale to Fit” option in the “Slide Show” tab to adjust the size of your presentation to the screen.
By following these tips and guidelines, you can effectively adjust your slide size in PowerPoint to create engaging, professional, and impactful presentations.
By humans, for humans - Best rated articles:
Excel report templates: build better reports faster, top 9 power bi dashboard examples, excel waterfall charts: how to create one that doesn't suck, beyond ai - discover our handpicked bi resources.
Explore Zebra BI's expert-selected resources combining technology and insight for practical, in-depth BI strategies.

We’ve been experimenting with AI-generated content, and sometimes it gets carried away. Give us a feedback and help us learn and improve! 🤍
Note: This is an experimental AI-generated article. Your help is welcome. Share your feedback with us and help us improve.

How-To Geek
How to reduce the file size of a powerpoint presentation.
Need to chip off some KB from your presentation's file size? Try some of these handy tips.
Quick Links
Convert your presentation to the pptx format, insert your pictures—don’t copy and paste, do image edits in an image editor—not in powerpoint, compress all of the images in your presentation, don’t use embedded fonts, link to files instead of embedding them, don’t store a thumbnail for the presentation, remove personal and hidden information from your presentation, turn off autorecover, copy everything into a new presentation, a possibility: unzip the presentation and compress it.
Considering that Microsoft PowerPoint presentations are generally accompanied with tons of images, gifs , embedded videos , charts , graphs, and other content, it’s no surprise that you get some pretty big files. Here are a few steps you can take to reduce a presentation's file size.
Large files can be annoying. They take up loads of precious disk space, slow down playback performance, and can cause emails to bounce back due to exceeding the file size limit. You can prevent all of these things by reducing the file size of your presentation.
We’ve mentioned it before, but the first thing you’d think of when considering file size reduction is images—and for a good reason. Image files can be quite large. There are steps you can take to reduce the size, such as compressing the images in the presentation. If you suspect the reason your PowerPoint file is so large is due to images, then be sure to read the article we’ve written on how to reduce the size of Office documents that contain images .
Related: How to Reduce the Size of a Microsoft Word Document
We do have some additional tips to add if you followed these steps but still need to reduce your presentation’s file size.
Microsoft released the PPTX format in Office 2007. Still, it’s not uncommon to see PPT files floating around. So what’s the difference between a PPT and PPTX file? The PPTX version compresses all of the content within the presentation. If you have a PPT file and convert it into a PPTX file, you’ll notice a decrease in the file size.
Converting the file is as simple as pressing a button and choosing the file type. Go ahead and open your PPT file, head over to the “File” tab, and then click “Convert.”
Windows File Explorer will appear. You’ll notice the Save As type is set as "PowerPoint Presentation." This is the PPTX file type. Click “Save.”
Your PPT file will now be converted to a PPTX file. As you can see, the size of the file has been reduced.
HTG Presentation 2 is our PPT file, and HTG Presentation 3 is our PPTX file. Merely converting the file type reduced the size by 335 KB.
While this isn’t a breathtaking drop in file size, we managed to reduce a Word document file size from 6,001 KB to 721 KB. It all depends on what’s inside the file. With any luck, this will be the only step you need to take. If not, keep reading.
It’s tempting to copy and paste an image in PowerPoint instead of using the insert function. This won’t be an issue if you’re not concerned about file size, but if you are, then beware of copy and paste—it may reformat your image to BMP or PNG. Why is this an issue? Both of those file formats are larger than JPG.
You can see in the above screenshot that the PNG file is 153KB compared to the 120KB JPG file of the same image. Each time you copy and paste a JPG file to PowerPoint, and it gets converted to PNG, you’re adding a bit of unnecessary file size to the presentation. Using the insert function will ensure your images are inserted as intended.
When you insert an image in PowerPoint, it’s best to make sure that it doesn’t need any edits. If it does require edits, you’re better off doing it in an image editor. Why? When you use PowerPoint to edit your image, it stores all of those edits as part of the presentation. For example, when you change an image to black and white, PowerPoint retains the full-color image as well. That’s a lot of extra bites being stored.
If you don’t have an image editor ( you do ) or you simply must use PowerPoint, be sure to tell PowerPoint to discard all of that excess data saved from the edits . It won't save you as much space as working in a dedicated editor, but it will help.
You can compress images in PowerPoint one at a time or all at once. If you’re looking to do the latter, here’s how.
Open your presentation, head over to the “File” tab, and then select “Save As” in the left-hand pane.
Next, select “More Options,” which you'll find under the area where you would name your file and choose the file type.
The “Save As” window will appear—this time with a few extra options available to you. Next to the “Save” button, click “Tools.”
In the drop-down menu that appears, select “Compress Pictures.”
The “Compress Pictures” window will appear. Here, you can choose the resolution type of the images (based on PPI) in the presentation. You’ll also notice that you’re not able to select the “Apply only to this picture” option in the “Compression Options” group. That’s because, due to the way we accessed this tool, this option isn’t available.
Note: If you do want to compress a single picture, select it and then head to Picture Tools Format > Compress Pictures.
Once you’re happy with your selection, click “OK.”
Be sure to save your presentation afterward.
We get why you might want to embed fonts—you might be making a Star Wars themed presentation and, as a result, anyone you may be sharing the presentation with is not likely to have those special fonts available to them. Embedding the fonts in your presentation could prevent issues down the line, but it comes at the cost of increased file sizes.
In general, unless you are sure you need to display a particular font, we recommend turning off font embedding.
Head over to the “File” tab and select “Options” at the bottom of the left-hand pane.
On the “Save” tab, untick the “Embed fonts in the file” checkbox and then click “OK.”
We saved a copy of our presentation with all fonts embedded, without fonts embedded, and with only the fonts used in the presentation embedded. Look at the difference if file sizes:
Convinced yet?
Consider the difference in file size if you embed an entire YouTube video in your presentation instead of linking back to it. Embedding an entire video will significantly increase the size of your presentation. There are certainly some valuable benefits when embedding a file vs. linking to it (such as when the recipient might not have internet access to play the video), but if the file size is an issue, just don’t do it.
Way back when Office let you save thumbnail images of your presentation so that you could get a sneak preview of the file when searching for it in File Explorer. Windows has grown to be more sophisticated, so it no longer requires the help of Office applications to do this. But, the option is still available.
We ran a little test to see the difference in file size with and without this option enabled. Here are the results:
With the thumbnail option enabled, our file size was 2,660 KB. Without the option enabled, the file size was reduced to 2,662 KB, saving a total of 7 KB.
This is a pretty small save, but when we tested it with a Word document, the difference was significant, showing 721 KB without the option enabled, and 3,247 KB with the option enabled.
While this is a large gap between applications and it’s not exactly clear why the difference is so large, it’s still an option worth exploring. To disable the feature, open your presentation, head over to the “File” tab, and then select “Properties” found on the right-hand side, then “Advanced Properties.”
You’ll now be in the “Summary” tab of the “Properties” window. At the bottom of the window, uncheck the box next to “Save preview picture,” and then click “OK.”
Microsoft Office will store your personal information (such as author name) and hidden properties within your presentation. Getting rid of this information can save you a bit of space.
Open your presentation, head over to the “File” tab, select the “Check for Issues” option, then select “Inspect Document."
The “Document Inspector” window will appear. Make sure the “Document Properties and Personal Information” box is checked, and then click “Inspect."
In the next window, select “Remove All.” The information will now be removed, saving you a few KB of space.
We don’t necessarily recommend this, and it should only be used as a last resort effort. AutoRecover is an essential tool in Office, and if you’ve ever lost a document before saving, then you understand precisely what we mean.
Each time Office uses AutoRecover, it adds a little to the size of the file. To turn AutoRecover off, head over to the “File” tab and select “Options” found at the bottom of the left-hand pane.
In the “Save” tab of the “Options” window, uncheck the box next to “Save AutoRecover information ever xx minutes.”
If you save and exit out of the presentation immediately, you won’t notice a difference. Over time though, as you continue to progress through the presentation, the AutoRecover feature will add KB to your file.
While you’re creating your presentation, PowerPoint will save various things in the background to help you out. We’ve mentioned how to turn off a lot of these features, delete data PowerPoint saves, and so on, but there’s always a chance something slipped through the cracks, and PowerPoint stored some information you don’t need. Copying your content over to a new presentation may be a good solution to the problem.
This may be a bit of a hassle though as, with PowerPoint, you’ll need to copy and paste each slide (and master slides). Once you do though, the new presentation won’t have any of the previous background saves, AutoRecover information, or previous versions of the file. As a result, you should see a change in file size.
While we can’t tell you exactly how much this will reduce your file size since each presentation will be different, it’s worth a shot.
As we mentioned earlier, a PPTX file is a compressed file (which is why the size is much smaller than an old-school PPT file). This means you can open it with a tool such as 7-Zip or WinRar, extract all the files from your PPTX, add them to a compressed archive, and then rename the archive to a PPTX file extension.
We had some issues here, though.
In Rob’s testing with his Word document, it successfully reduced the size of the file from 721 KB to 72 KB. However, it corrupted the file in the process. In my testing with my 2,614 KB file, it didn’t corrupt it, but it only reduced it to 2,594KB—a total of only 20 KB. We’re unsure what’s at play here, so if you want to give this a go, be sure to have a backup copy of your file before doing so.
That’s all the tips we've got for reducing the size of your PowerPoint presentation. We’re always looking for new and interesting ways to reduce the size of our files, so if you have any tips, let us know in the comment section, and we’ll be happy to test them out!
- Ad Creative Eye-catching designs that perform
- Social Media Creative Engaging assets for all platforms
- Email Design Templates & designs to grab attention
- Web Design Growth-driving designs for web
- Presentation Design Custom slide decks that stand out
- Packaging & Merch Design Head-turning apparel & merch
- eBook & Digital Report Design Your digital content supercharged
- Print Design Beautiful designs for all things printed
- Illustration Design Visual storytelling for your brand
- Brand Identity Design Expertise & custom design services
- Concept Creation Ideas that will captivate your audience
- Video Production Effortless video production at scale
- AR/3D Design New creative dimensions that perform
- AI-Enhanced Creative Human expertise at AI scale

Create a presentation
Create a presentation in powerpoint for the web.

With PowerPoint for the web running in your web browser, you can:
Create presentations that include images, videos, transitions, and animations.
Get to your presentations from your computer, tablet, or phone.
Share and work with others, wherever they are.
If you're using the desktop version of PowerPoint on a Windows PC, see the PowerPoint Quick Start .
If you're using the desktop version of PowerPoint on a Mac, see Office for Mac Quick Start Guides and PowerPoint for Mac Help .
Create, open, and name a presentation
Go to powerpoint.office.com .

Select New blank presentation , open a Recent file, select one of the themes , or start with a presentation template .
To name the presentation, select the title at the top and type a name.
If you need to rename the presentation, select the title and retype the name.

Add a slide
Select the slide you want your new slide to follow.
Select Home > New Slide .
Select Layout and the you type want from the drop-down.

When working in PowerPoint for the web, your work is saved every few seconds. You can select File > Save a Copy to create a duplicate copy in another location.
Or choose File > Download As to save a copy to your device.

When you're online, AutoSave is always on and saves your changes as you work. If at any time you lose your Internet connection or turn it off, any pending changes will sync as soon as you’re back online.

Need more help?
Want more options.
Explore subscription benefits, browse training courses, learn how to secure your device, and more.

Microsoft 365 subscription benefits

Microsoft 365 training

Microsoft security

Accessibility center
Communities help you ask and answer questions, give feedback, and hear from experts with rich knowledge.

Ask the Microsoft Community

Microsoft Tech Community

Windows Insiders
Microsoft 365 Insiders
Was this information helpful?
Thank you for your feedback.

Contribute to the Microsoft 365 and Office forum! Click HERE to learn more 💡
March 14, 2024
Contribute to the Microsoft 365 and Office forum!
Click HERE to learn more 💡
Top Contributors in PowerPoint: Steve Rindsberg - Jim_ Gordon - John Korchok ✅
March 11, 2024
Top Contributors in PowerPoint:
Steve Rindsberg - Jim_ Gordon - John Korchok ✅
- Search the community and support articles
- Microsoft 365 and Office
- Search Community member
Ask a new question
PowerPoint 2013 Displays fine at home, too large for screen elsewhere
I am using Windows 8.1, PowerPoint 2013 on a desktop. First of all, when I run my presentation at home, what is on the slide is what is on the screen. When I run the presentation online the url etc lines are there taking up room. Is there a way to prevent this?
Second, it just seems that the slide is enlarged and won't fit on a smaller screen. Again, is there a way to adjust this at run time?
Report abuse
What´s up, Sarg...!
I´m pretty sure you are facing some small problems about the size of your slides. As you know, we have differents screen models nowadays, so you aften have to fit it to screen where you are showing it.
Check it out!
In earlier versions of PowerPoint, slides were squarer (4:3). The default slide size in PowerPoint 2013 is widescreen (16:9). However, you can resize your slides to 4:3—and even to a custom size.
- Click the Design tab, and then click Slide Size .
- Click Standard (4:3) .
Note When PowerPoint is unable to automatically scale your content, it will prompt you with two options:
- Maximize: Select this option to increase the size of your slide content when you are scaling to a larger slide size. Choosing this option could result in your content not fitting on the slide.
- Ensure Fit: Select this option to decrease the size of your content when scaling to a smaller slide size. This could make your content appear smaller, but you’ll be able to see all content on your slide.
- Click Widescreen (16:9) .
- On the Design tab, click Slide Size , and then click Custom Slide Size .
- Do one of the following in the Slide Size box:
- Set the height and width dimensions, and the orientation.
- Click the down arrow next to Slides sized for , and pick an option.
Tip In the Slide Size box, you’ll notice there are two options for 16:9 aspect ratios: Widescreen and On-screen Show (16:9) . There is a difference between these two:
- On-screen Show (16:9) sets the slide dimensions to 10 in x 5.625 in.
- Widescreen sets it to 13.333 in x 7.5 in.
Both of these options are the same aspect ratio so they will look the same in Normal View , since we automatically adjust the zoom. Widescreen (13.333 in x 7.5 in.) provides more slide surface area for the content, so that is the best choice for presentations. There are some other things to consider however, Widescreen (13.333 in x 7.5 in.) won’t fit on an 8.5 x 11 sheet of paper without you having to scale it.
I hope it might be helpful. If not, post again and let me know what is going on, ok?
Good Lucky!
3 people found this reply helpful
Was this reply helpful? Yes No
Sorry this didn't help.
Great! Thanks for your feedback.
How satisfied are you with this reply?
Thanks for your feedback, it helps us improve the site.
Thanks for your feedback.
Replies (1)
Question info.
- Norsk Bokmål
- Ελληνικά
- Русский
- עברית
- العربية
- ไทย
- 한국어
- 中文(简体)
- 中文(繁體)
- 日本語
IMAGES
VIDEO
COMMENTS
Press Command-Q to exit the Visual Basic Editor. From the Tools menu choose Macro > Macros. Select the Test macro and click Run. Your presentation should now be running in a window that you might be able to move to any screen. You can adjust the number of pixels by changing the Width and Height settings in the Macro.
Go into Slide Show view. Instead of taking up the entire screen, your presentation is in a resizable window. You can easily switch among other applications; To switch back to full screen, choose the Presented by a Speaker (Full Screen) option in the same dialog box. Another method is to go into "Reading View."
Go to SlideShow and then Setup Slide Show. Set up a PowerPoint Slideshow. Now, in the Set Up Show dialog, make sure to select Browsed by an individual (window). By default you will see that the Presented by a speaker (full screen) is selected. Now, every time you start the slideshow for example using the keystroke F5 then you will see that the ...
Discarding it means that you can't restore the changes you make, but it will reduce your file size. Lowering the default resolution for images also reduces your overall file size. Go to File > Options > Advanced. Under Image Size and Quality, do the following: Select Discard editing data . This option removes stored data that's used to restore ...
Open PowerPoint again. On the File tab of the toolbar ribbon, select New.. The custom theme that you just saved is listed at the top left corner, named Default Theme.The thumbnail image looks like a widescreen slide, but in reality, when you create a new presentation based on that theme, the presentation has the aspect ratio that you've defined for this default theme.
Slide Show view occupies the full computer screen, exactly the way your presentation will look on a big screen when your audience sees it. Presenter view. To get to Presenter view, in Slide Show view, in the lower left corner of the screen, click , and then click Show Presenter View (as shown below).
That said, you can easily change your slide size to something else. To change your slide size in PowerPoint, simply: Navigate to the Design tab. Open the Slide Size drop down menu. Select 4:3 , 16:9 or Custom Slide Size (see options below) When starting with a blank presentation, you are now good to go.
Simply choose options from the Slides sized for drop-down menu in the dialog box (such as A4 paper size) or enter custom dimensions. To change slide size to a custom size: In Normal View, click the Design tab in the Ribbon. Click Slide Size in the Customize group. A drop-down menu appears.
Click on the Design tab on PowerPoint's ribbon. The available options will change on the ribbon. Find the Customize section on the ribbon and click on the Slide Size icon. A drop-down menu opens with several options. Click on Custom Slide Size to open the Slide size menu and change your presentation's dimensions.
Next, go to the Design tab. It's where you can find the options that let you tweak your presentation's design. There, head over to the far right end — to where you can find the Customize section. Next, choose Slide Size. Clicking on this option will reveal a menu. It lets you pick the size of the slide that you want.
Changing the resolution. Open your PowerPoint presentation, go to the File tab and click Options. Then, select the Advanced tab. Under "Image Size and Quality", check "Discard editing data" and uncheck "Do not compress images in file". There's an option that allows you to set the default resolution (measured in ppi).
To change the PowerPoint slide dimensions, first access the Design tab on the app's ribbon. Then, you can find the Slide Size button in the Customize section on the right. Depending on your screen and the size of the PowerPoint window, the option might be hidden. If you can't see the button, press Customize to reveal it, and then click or ...
In the "Customize" section of the "Design" tab, select the "Slide Size" button. This will display the two common slide sizes in a drop-down menu. Click either the "Standard (4:3)" or "Widescreen (16:9)" option to switch all of your PowerPoint slides to that size. Unfortunately, it isn't possible to use multiple slide sizes in a PowerPoint ...
Open your presentation in PowerPoint. Go to the "Design" tab. Click on the "Slide Size" button. Select "Custom Slide Size" at the bottom of the menu. In the "Slide Size" dialog box, choose the orientation you want: "Portrait" or "Landscape.". Click "OK" to apply the new orientation to your presentation.
Converting the file is as simple as pressing a button and choosing the file type. Go ahead and open your PPT file, head over to the "File" tab, and then click "Convert.". Windows File Explorer will appear. You'll notice the Save As type is set as "PowerPoint Presentation." This is the PPTX file type. Click "Save.".
To change the presentation slide aspect ratio in PowerPoint, click Slide Size, which is in the Customize group on the Design tab, and choose the desired aspect ratio for your presentation. Select the Design tab of the toolbar ribbon. Select Slide Size near the far right end of the toolbar. Select Standard (4:3 aspect ratio) or Widescreen (16:9 ...
Try disabling the hardware acceleration under file > option > advanced > display and check if it resolves the issue. Report abuse. RI. RichardReiner. Replied on April 3, 2014. Powerpoint refuses to scale properly on my second monitor and borders menu items etc. stay too big to operate efficiently. Word is working as it should and the menu items ...
Open the PowerPoint presentation you want to compress. Under File, go to Save As. In the Save As box, click on Tools and select Compress Pictures. In the Compress Pictures box, select Print, Screen or Email. If you want to compress the file for email sharing, then the Email option is the right one for you. Click OK, and then Save.
Summary: For oral presentations, use a font size of 36-44 points for headings and 24-28 points for body text. For presentations meant to be read, use a font size of 18 points or larger for ...
Select New blank presentation, open a Recent file, select one of the themes, or start with a presentation template. To name the presentation, select the title at the top and type a name. If you need to rename the presentation, select the title and retype the name.
On the Design tab, click Slide Size, and then click Custom Slide Size. Set the height and width dimensions, and the orientation. Click the down arrow next to Slides sized for, and pick an option. Tip In the Slide Size box, you'll notice there are two options for 16:9 aspect ratios: Widescreen and On-screen Show (16:9).