NateChamberlain.com
Microsoft 365 training and content for modern digital workplaces

How to share your screen during a Microsoft Teams meeting
The process used when sharing your screen in Teams depends on whether you’re using the Teams desktop app or web app. I’ll cover both methods in this post, and provide a video demonstration for each.
Share your screen using the Microsoft Teams desktop app
Using the desktop app (installed on your machine), you can share your screen during a meeting in just a few clicks:
- Once inside the meeting, select the Share icon (rectangle with an arrow) in the upper right corner next to the Leave button.
- Screen (one of your monitors and everything you see on it, even if you change windows/apps)
- Window (one specific window or app – prevents accidentally sharing things like your email)
- If you’ll be sharing video audio or music, toggle the button to include computer sound
- When finished sharing, use the same Share button to stop sharing.
If you’ll be sharing a PowerPoint presentation, consider using PowerPoint Live as opposed to just screen sharing the full-screen presentation. This enables your attendees to benefit from individual features that won’t affect others including:
- Moving forwards and backwards through slides for a refresher or more time to consume the content
- Changing slides to high contrast for better visibility
- Translating slides to a language of choice
- Click on links directly on slides (such as social media, references, survey, or company hyperlinks)
Watch the desktop version video demonstration to see these steps performed, including PowerPoint Live:
Share your screen using the Microsoft Teams web app
The web app is entirely browser-based, meaning you don’t need to have anything installed on your device to use it. You can access it anytime from any device with web access by navigating to https://teams.microsoft.com in your browser of choice.
In the web app, you can share your screen during a meeting by following these steps:
- Once inside the meeting, select the Share icon (rectangle with an arrow) from the lower central area menu. If the menu has disappeared, simply move your cursor around the meeting space to make it reappear.
- Entire screen : A whole monitor/screen and everything that becomes visible on it.
- Window : A single app or window (prevents accidentally sharing things like your email)
- Microsoft Edge tab : A single browser tab (similar to the app/window option, this prevents accidentally switching to a sensitive app or tab)
- If you’ll be sharing video audio or music, check the box to Share system audio
- PowerPoint (PowerPoint Live): Select a recent presentation, or click Browse to find a presentation and utilize this feature.
- When finished sharing, use the same Share button to stop sharing or one of the Stop sharing dialogs you may see.
Watch the web version video demonstration to see these steps performed, including PowerPoint Live:
Spread the word:
Leave a reply cancel reply.
This site uses Akismet to reduce spam. Learn how your comment data is processed .
Discover more from NateChamberlain.com
Subscribe now to keep reading and get access to the full archive.
Type your email…
Continue reading
Code of Conduct - Terms and Conditions - Privacy Policy
Home Blog PowerPoint Tutorials How to Share a PowerPoint Presentation on Microsoft Teams
How to Share a PowerPoint Presentation on Microsoft Teams

In recent years many remote meeting tools like Microsoft Teams and Zoom have become the norm for regular remote meetings. If you’re new to Microsoft Teams, the chances are you are still finding your way around various options. One of the most common questions a Microsoft Teams newbie might ask is how to share PowerPoint on Teams.
What is Microsoft Teams?
Microsoft Teams is a messaging app by Microsoft for online collaboration and remote meetings that comes integrated with Microsoft 365. It provides a real-time workspace where end users can collaborate via chat, Teams Channels, Live calls, etc. Microsoft Teams also integrates with other Microsoft products like PowerPoint and OneDrive, enabling instant file sharing via the cloud.
Why use Microsoft Teams to Present Your PowerPoint Presentations?
Many organizations use Microsoft Teams for online collaboration and remote meetings. Organizations with integrated Microsoft products like its Windows operating system, Microsoft Office, and Azure Active Directory prefer Teams as the primary internal and external communication app. Organizations use Microsoft Teams to provide secure accounts to employees, with two-factor authentication and data encryption. These accounts are integrated into the Active Directory, providing scalability and control for IT administrators to offer people within an organization an online collaboration platform that can be securely used within the limits of the organization’s data protection policies.
While there are many alternatives to Microsoft teams, such as Zoom and Google Meet, the integration of teams with other Microsoft products, such as Azure, Microsoft Office apps, and OneDrive, makes it attractive within a secure enterprise environment.
How to Present PowerPoint in Teams?
How to present your PowerPoint slides on Microsoft Teams, let us tell you there are at least two methods for sharing presentations. This includes sharing a PowerPoint file directly and presenting your slide deck before one or more meeting participants, or perhaps PowerPoint templates or Google Slides templates to help a colleague design a slide deck.
How to Attach and Share Your PowerPoint Slides on Teams
To share a PowerPoint file on teams, go to an ongoing conversation or meeting window and click Attach files . This will provide you with the option to either fetch a file via OneDrive or from your device. This option can be used for sharing PowerPoint files and other types of files, such as documents, spreadsheets, videos, compressed files, etc.

When sharing a file, you can add a message optionally before hitting Send .

The recipient and the sender can download the file, open it in a browser, or copy the file link for further sharing.

How to Present Your PowerPoint Slides on Teams
Method #1: use the share button in powerpoint.
You can also directly present your slide deck via Microsoft Teams by sharing your screen to start a Live presentation during a remote meeting instantly. Suppose your organization uses Microsoft Teams regularly. In that case, the chances are you will be using it for presentations during remote meetings; therefore, it’s essential to know how to use the screen-sharing option to present online.

Method #2: Share Screen to Present a PowerPoint Presentation
Another way to present a PowerPoint presentation on Teams is by sharing the screen with your audience. If you share your screen, this will show the audience whatever is visible on the entire screen on your device.

Pros of sharing your screen with the audience to present a presentation:
- It is easier to activate
- You can easily switch to other windows besides the PowerPoint presentation and also share them with the audience
Cons of sharing your entire screen on Teams for presenting:
- If you have confidential data in other windows, you may want to avoid switching the windows and keep only the Slideshow window in front.
- You may accidentally switch to other windows, and your audience can lose focus of the presentation.
Method #3: Share PowerPoint Window to Present Your Slides
If you intend to hide parts of your screen, you can simply share the relevant PowerPoint window so that your audience can only view the presentation. During a Live call, click the Share button and select your screen or window to share.

5 Features to Make the Most from Your Microsoft PowerPoint Presentation Sharing in Teams
Microsoft Teams offers a wide array of features that make it a robust remote meeting and online collaboration app since it leverages the full force of Microsoft 365 and other Microsoft products.
1. Translate Slides into a Different Language
This is a private feature that individuals can use to translate slides in their language instantly. As a presenter, you can ask your audience to use this feature if they deem it convenient to help bridge a gap that might exist due to a language barrier.
Slides can be viewed in a different language via More actions > Translate Slides . From the drop-down list, you can pick a preferred language.

2. Use Live Captions
Microsoft Teams supports Live Captions / Closed Captions (CC) to help persons with disabilities, including those suffering from hearing impairment. Closed Captions can also be helpful for people to translate or view text in a preferred language.
Turn on Live Captions: To enable Live Captions on Teams, go to More options > Turn on live captions . Translate Spoken Language: To translate Live Captions, go to Captions settings > Change spoken language .

Turn Off Live Captions: You can turn off Live captions anytime via More actions > Turn off live captions .

3. View Slides in High Contrast
Viewing slides in high contrast on Teams can have several benefits. For example, it helps you focus on the content and is also helpful for people with visual impairment. To configure your slides to appear in high contrast, follow the steps below:
1. Launch your PowerPoint presentation.
2. Click on the Present tab at the top of the window.3. Go to More action > View slides in high contrast .

4. Annotate your Slides in Real Time
Like any standard remote meeting app, Microsoft Teams also provides a number of handy annotation options to help you make the most out of your PowerPoint presentations. You can click on Start annotation when sharing your full screen during presentations to start annotating slides.
Powered by Microsoft Whiteboard, this powerful feature enables one or more meeting participants or the presenter to annotate presentations. It can also be a helpful feature when you’re looking to collaborate online during a Live presentation.
5. Pop Out the Window
You can separate the presentation window from the Teams window to make it easier to work with the two. This feature can be handy when working with multiple monitors or separating the two windows from uncluttering your screen. You can use this option by clicking on the Pop-out option from the toolbar during a screen-sharing session.

How to Stop Presenting on Teams
When presenting your slide deck, you can also present your PowerPoint presentation using any view, be it as a SlideShow or in Normal view. Once you’re done presenting, click Stop Presenting to conclude your session. Furthermore, you can also choose to enable or disable your camera and computer sound when presenting your slides.

To turn off screen sharing during a remote meeting, you can click Stop Sharing .

Present in Teams Button in PowerPoint is Missing. How to Fix it?
Some users might have used the Present in Teams option to share a PowerPoint presentation during a meeting. Suppose you are wondering why the Present in Teams button in PowerPoint Presentations is missing. In that case, this option isn’t available for anyone using the free version of Teams, as only users with a paid subscription, such as a Business Standard or Business Premium Plan. Furthermore, you must share your PowerPoint presentation with OneDrive to use this option. To use the Present in Teams option, upload your PowerPoint presentation to OneDrive. You can do this via File > Save As > OneDrive .

Once done, the Present in Teams button will become available to instantly launch your presentation for sharing during a Teams call.

5 Tips to Make your Presentation a Success on Microsoft Teams
Presenting PowerPoint in Teams can require being mindful of a number of things. This includes accounting for brevity to ensure your presentation does not take more than its designated time, using slides that are suitable for remote meetings. Below is a list of 5 tips to make your presentation successful using Microsoft Teams.
1. Check Your Audio and Video Settings
One of the most annoying problems faced during remote meetings is technical failures such as no or low audio quality. This becomes even more annoying when the meeting organizer or a presenter during their session faces the issue, wasting precious time. This is why you must check your audio and video settings beforehand to ensure everything works correctly. If you need to play a video during your session, make a test call with a colleague and get feedback if the sound and video quality are up to the mark.
2. Make Sure Your Slides are Clear and Concise
Presentations delivered via Microsoft Teams will often take place during scheduled remote meetings. This means that you will have to account for the designated time given for your session, which is why you must ensure that your slides are clear and concise.
3. Use Animations and Transitions Sparingly
Since remote meetings will be attended by participants using different types of computers and mobile devices, some animations and transitions might not be suitable. This is because they can cause Teams to slow down, or the slides might not display appropriately via screen sharing. For example, 3D animations , GIF animations , and objects with elaborate PowerPoint animated sequences might cause issues when displayed via Teams.
4. Keep Your Slides on Topic
One of the banes of remote meetings is how a discussion can go off-topic very quickly. This is why it’s best to ensure that your slides remain focused on the topic and additional discussions are discouraged during the presentation session.
5. Use Team Members’ Names Sparingly to Call Out Specific Points
Calling out team members for their opinion or advice during a remote meeting can quickly lead to a very lengthy and off-topic discussion. This is why it’s best to call out team members’ sparingly. If you have been using Teams or other remote meeting apps long enough, you would have learned by now that for some topics, it’s best to ask participants to schedule a separate meeting so that the ongoing discussion remains on track.
Other Issues to Troubleshoot while presenting a PowerPoint presentation on Microsoft Teams
Someone has already set up Teams for your organization’s error
If you’re using a premium subscription for Microsoft Teams managed by your organization’s IT team, you might get an error when logging in to Teams. In such a case, you might get the following error:
“Someone has already set up Teams for your organization.”
If you see the error message mentioned above, this means that your account isn’t ready yet, and you need to contact your organization’s IT team to ask when your account might be ready for use.
We’re sorry–we’ve run into an issue error.
Another prevalent issue is when the following error message appears:
“We’re sorry–we’ve run into an issue.”
This is a generic message, and usually, it can be resolved by clicking the Restart button that appears below the error. In case the issue isn’t resolved after restarting the Teams app, ensure your Internet connection is working. More often than not, the issue is associated with the Internet connection. If the issue persists, you can clear your cache , reinstall Teams or contact your IT support team. The error can also occur if there is an outage affecting Microsoft products or if there is a configuration issue for Microsoft 365 accounts associated with your organization.
Final Words
Using Microsoft Teams to share a presentation file is easy enough. However, when presenting a PowerPoint presentation in Teams, you must decide how to present your slide deck. If you need to switch back and forth between your slides and another document, spreadsheet, or browser window, it might be best to share your entire screen. However, if you wish to focus only on the slide deck, sharing your Window can help you avoid sharing the rest of your screen with the audience.

Like this article? Please share
Meeting, Microsoft Teams, Share Filed under PowerPoint Tutorials
Related Articles

Filed under Business • July 28th, 2022
What is an All Hands Meeting?
The proper meeting format can boost your company’s transparency and help employees align with its core values. In this article, we will introduce the All Hands Meeting model and why it’s a resource you should consider from now on.

Filed under Business • February 17th, 2022
A guidebook to set Meeting Objectives by taking Effective Meeting Notes
Make an impact in your meetings by applying the science of note-taking. Capture all the valuable information you require by taking effective meeting notes.

Filed under Business • May 20th, 2021
Quick Guide to Project Kick Off Meetings
Every time a team must begin a project an essential set of meetings must happen to ensure the success of the project. In this blog post we discuss the Project Kick Off Meeting and why it´s so important at the beginning of any new project.
Leave a Reply

Try Process AI free
How to share a presentation on microsoft teams.
Do you want to share a presentation on Microsoft Teams ? We’ll take you through the steps of sharing your PowerPoint slides with ease!
- Log into Teams and locate the channel or chat .
- In the message box, click the “Attach” button .
- Select “File” from the drop-down menu and upload the presentation.
- Now everyone can access it.
There’s more! Did you know you can present your slides directly in a meeting?
- Navigate to the meeting or start a new one.
- Click the “Share” button and select “PowerPoint” .
- Present in a window or share a file. This helps participants follow along.
Make your presentations more engaging by using live captions . This is helpful for those with hearing difficulty and those in noisy environments.
Promote active participation from your audience. Use features like annotations and highlighting tools which emphasize key points and gather feedback. This encourages teamwork and productivity.
Overview of Microsoft Teams presentation sharing
Sharing presentations on Microsoft Teams ? It’s a breeze! Just select the file you want to share & who you want to share it with – and you’re good to go. Plus, real-time editing capabilities enable multiple users to work on the same presentation simultaneously. You can even present slides directly from Teams, making collaboration faster and easier. To optimize viewing quality, make sure to adjust resolution settings. There you have it – seamless information exchange and team productivity in no time!
Step 1: Accessing the Microsoft Teams platform
To share a presentation on Microsoft Teams, you must access the platform first. It is key for successful collaboration and communication between your team. Follow these simple steps to easily access Microsoft Teams and begin sharing presentations!
- Go to the Teams website in your web browser.
- Enter your email address and password.
- Click “Sign In”.
- On the dashboard, click “Join or create a team” on the left.
- Choose a team from the list or enter a code from your team leader.
- To create a new team, click “Create Team” and follow the prompts.
- After joining/creating a team, you have access to Teams’ features.
- Use different channels and tabs to interact with your team and locate files.
- To share a presentation, go to the “Files” tab in a channel and upload the PowerPoint.
Don’t miss this opportunity to engage with your team using Microsoft Teams. Communicate, exchange ideas and share presentations quickly and easily. Start sharing now!
Step 2: Starting a presentation sharing session
- Log into your account with the Teams app.
- Pick the channel you’ll share your presentation to.
- Look for the “Share” button at the bottom of the chat window.
- Select the presentation file you wish to share with “Browse teams and channels”.
- Once you’ve chosen the file, click “Share” to start the sesh.
- Navigate your slides with the provided controls.
Make sure everyone has access to the presentation. Plus, Teams offers collaboration features like annotating and questioning through chat.
Pro Tip: Check your internet connection’s stable before you start the presentation sharing session. No interruptions!
Step 3: Choosing the sharing options
When it comes to sharing presentations on Microsoft Teams, choosing the right option is key. Here’s how to do it:
- Click the “Share” button at the bottom of the meeting screen.
- A pop-up window will appear with several options – select “PowerPoint” to share a presentation.
- Next, decide whether you want to share your entire desktop or just a single window. This lets you control what the participants see.
- Finally, click “Share” to start sharing your presentation.
Remember to double-check that your presentation looks good before you continue with the meeting.
Furthermore, Microsoft Teams offers extra features such as annotation tools and letting people edit documents simultaneously – this boosts collaboration and involvement during presentations.
Did you know that Microsoft Teams is now one of the most popular collaboration tools for businesses? Its easy-to-use interface and many features make it great for remote working.
Step 4: Sharing the presentation
Sharing a presentation on Microsoft Teams is crucial for efficient collaboration with your team. Follow these steps to easily share and engage your audience:
- Get Ready: Make sure your presentation has all the content and visuals you need. This helps others understand your message.
- Open Teams: Launch the Teams app on your computer or use the web version. Sign in with your details to access the workspace.
- Join/Start Meeting: Join an existing meeting or start a new one. Sharing presentations is usually done in meetings with discussion and collaboration.
- To share the entire PowerPoint, select “PowerPoint”.
- To share slides or other documents, choose “Browse”.
- Teams has extra options like Slide Show mode or sharing single application windows.
- Engage Participants: Choose the sharing method, file, or slides. Click “Share” to start presenting. Participants view your presentation in real-time. They can ask questions or give feedback via chat or audio.
Follow these steps for successful collaboration on Microsoft Teams. Be prepared, use appropriate sharing methods, and engage your audience.
Step 5: Navigating and presenting the slides
Want to know how to smoothly move through slides on Microsoft Teams? Here’s the step-by-step guide:
- Press the “Share” button at the bottom of your screen to start presenting.
- Use the arrows on your keyboard or click the navigation buttons to go back and forth between slides.
- If you need to jump to a specific slide, select the “Go to slide” option and enter the number.
- To end presentation mode, click the “Stop presenting” button at the top of your screen.
Plus, use shortcuts like “B” to black out your screen and “W” to display a whiteboard. This helps keep the presentation on track.
A funny thing happened to a colleague presenting slides on Teams. Instead of advancing to the next slide, they clicked an emoji reaction. This caused a lot of laughter. It’s a great reminder to double-check actions when navigating virtual slides.
Step 6: Ending the presentation sharing session
To finish the Microsoft Teams presentation-sharing session, do these steps:
- Click on the presentation screen to go to the meeting controls.
- Find the ‘Stop Presenting’ button at the top of the screen. Then click it.
- A pop-up will appear. It’ll ask if you want to stop presenting. Click ‘Stop Presenting’ again to confirm.
- The presentation sharing session will end. You’ll go back to your regular view of the meeting.
- You can stay in the meeting or leave.
Remember, ending the presentation-sharing session doesn’t mean you have to leave the meeting. You can still talk with others and contribute to discussions before you finish.
Pro Tip: Before you finish the presentation-sharing session, make sure all the points are covered and all questions or concerns are answered. This will help everyone finish the session on a good note.
Share presentations on Microsoft Teams for simple, efficient results! Just follow the steps outlined in this article. Showcase your work, collaborate, and ensure everyone’s on the same page.
- First, upload the file to the platform. Select “Share” and choose the presentation from your files. You can share your entire screen or just a specific window. This lets you control what participants see.
- Navigate through slides smoothly. Make sure participants see each slide clearly. Use presenter view and annotations. Use laser pointer tools for clearer communication.
- Microsoft Teams also offers a recording feature. If you want to share with those who weren’t able to attend or review later, you can record the meeting. Everyone will have access to the presentation.
Start sharing today and experience seamless communication!
Additional tips and troubleshooting guidelines
- Double check the sharing settings. Ensure you enabled the right permissions on Microsoft Teams before the presentation. It will let everyone view and interact with it without issues.
- Optimize your internet connection. Stable and reliable internet is needed for successful presentation sharing. Use a wired network or strong Wi-Fi to avoid interruptions.
- Be mindful when sharing your screen. Close any unnecessary applications or tabs. This will reduce distractions and maintain a professional atmosphere.
- Remember, attention to detail is key when presenting on Microsoft Teams. Consider the tips and troubleshooting guidelines. This will help you deliver a seamless and engaging presentation.
- Technical issues may occur despite preparation. Remain calm and try restarting the app or checking compatibility. If nothing works, contact the support team for assistance.
Let me tell you a story. A colleague had a crucial sales pitch through Teams. His PowerPoint slides didn’t display properly. He had taken our tips into account and switched to screen sharing mode. He was able to deliver his pitch using alternative tools within seconds. This shows the value of flexibility and quick thinking in overcoming challenges while presenting on Microsoft Teams.

No credit card required
Your projects are processes, Take control of them today.
How-To Geek
How to share your screen in microsoft teams.
Teams lets you share not just your PC screen but also your mobile screen!
Quick Links
Table of contents, how to screen share in microsoft teams on desktop, how to screen share in microsoft teams on mobile.
Microsoft Teams makes it easy to share your desktop or mobile device's screen in your online meetings. You can even choose between sharing your device's entire screen or just a specific app window. Here's how.
Related: What Is Microsoft Teams, and Is It Right for My Business?
- Share Your Screen in Microsoft Teams on Desktop
- Share Your Screen in Microsoft Teams on Mobile
On a Windows, Mac, Linux, or Chromebook computer, you can use Teams web version or the app to share your screen in a meeting.
To start, first, launch Microsoft Teams on your computer and join a meeting.
In the meeting, at the top of the Teams interface, click the "Share Content" option (an up-arrow icon).
You will see a "Share Content" section to the right of the Teams interface. To share your computer's entire screen, then in this section, click "Screen." To share a specific app's window, click the "Window" option instead.
If you select the "Screen" option, Teams will start presenting your desktop's screen in the meeting. You will see a red border around your screen indicating the screen is being shared.
On Linux, you will not see the red border around your screen when it's shared. You also can't share a specific app's window on Linux.
If you choose the "Window" option, select the app window that you'd like to share.
When you've finished your meeting and you want to stop screen sharing, then at the top of the Teams interface, click "Stop Presenting."
And that's all there is to screen-sharing in Teams on desktop. Very useful!
Like Teams, you can also share your screen in Zoom and Google Meet meetings .
Related: How to Share Your Screen in a Zoom Meeting
On an iPhone, iPad, or Android phone, you can use the official Teams app to share your phone's screen in your online meetings, similar to sharing mobile screens in Skype .
To do so, first, launch the Microsoft Teams app on your phone. In the app, join the meeting where you'd like to present your phone's screen.
In the meeting, from the bottom bar of the Teams app, select the three dots.
From the three-dots menu, select "Share."
Choose the "Share Screen" option. To include the audio in your screen share, toggle on the "Audio" option.
If you're on Android, you will see a "Display Over Other Apps" page. Here, find "Teams" and tap it. Then enable the "Allow Display Over Other Apps" option.
If you're on an iPhone or iPad, tap the "Start Broadcast" option.
Tap the back button to get back to the Teams screen. There, in the prompt that opens, select "Start Now."
A red border will appear around your phone's screen, which indicates your screen is currently being shared. To stop sharing your screen, tap "Stop Presenting."
And that's how you make explaining various concepts and ideas easier by sharing your screen with Microsoft Teams!
Did you know you can use a whiteboard in a Teams meeting ?
Related: How to Use a Whiteboard in a Microsoft Teams Meeting
- Our Community
- Our philosophy
- Awards & Certification
- Join our team
- Security Training
- There are no suggestions because the search field is empty.
- Cyber Security
- IT Projects
- Communications
- Not for Profit
- Engineering
- Case Studies
- What it Costs
- Our Partners
- What Our Clients Say

How to share your screen and PowerPoint in Microsoft Teams
Categories: Microsoft 365
Sharing your screen, presentations and whiteboards in Microsoft Teams is a great way to make your Teams meetings more effective. And fun… After all, who doesn’t like a cheeky post-meeting game of hangman to secure the office bragging rights for the day? 🏆
Microsoft Teams brought many teams together and has been the tool that brings projects from start to finish. But sometimes, clients will require our IT support services to show them the ropes - especially with sharing screens and PowerPoint presentations in Microsoft Teams.
In this article I’ll show you precisely how you can do these things on Microsoft Teams:
- Share your entire desktop,
- Share a specific window,
- Share a PowerPoint presentation, or
- Share a whiteboard that your team can “collaborate” on 🙂
Sharing Screen Content in Microsoft Teams
You've got a handful of options at your disposal when you want to share content in a meeting, let’s get clear on what the options look like and the best scenario for each. 👇

Select the share your desktop option if you want to share your entire desktop screen in Microsoft Teams.
Note: This is the equivalent of having someone look over your shoulder and will include visibility of all your notifications, reminders, and other desktop activity.
Tip : Choose this option when you need to share multiple windows simultaneously. It’s a good idea to disable your notifications or set your computer to do-not-disturb mode first.
Select the share your screen option if you want to present one of your open windows in the Microsoft Teams app. An example might be a spreadsheet, webpage or word doc.
Note : This option will exclude notifications, reminders or desktop activity outside the shared window.
Tip : Choose this option if you only need to share one thing and want to keep the rest of your screen private.
Microsoft Teams have built in the capability of sharing your PowerPoint presentations. This interactive method of sharing allows your team to interact with your presentation by skipping forward and backwards through your slides, without disrupting your flow as the presenter.
Tip : Choose this option whenever you share a PowerPoint in Microsoft Teams and want your audience to be able to move through the presentation at their own pace.
Note : As the presenter, you can disable the ability for others to browse through the slides if you wish.
Each Teams meeting has a whiteboard where meeting participants have space to ink together. Select the share your whiteboard option if you want to open the virtual whiteboard that everyone can collaborate on in Microsoft Teams.
Tip: Choose this option if you want to brainstorm with your team and have your ideas attached to your meeting. Also great for a quick game of hangman, tic tac toe or dots and crosses. 🙂
How to share your screen in Microsoft Teams
- While in a meeting, chat or group chat click the share icon
- Choose if you’d like to share your entire desktop or just one specific window
- When you’re done sharing click the stop sharing Icon
How to share your PowerPoint presentation in Microsoft Teams
- Choose from one of your recently opened PowerPoint slide presentations. Alternatively, click Browse to navigate to your PowerPoint file
- Your team members will be able to navigate through your presentation by default. (Optional turn off this feature by clicking the eye icon to turn off participant navigation). And that's how to share PowerPoint on Teams
- And when you’re done sharing, click the stop sharing icon
How to share your whiteboard in Microsoft Teams
- Select the whiteboard option from the menu
- Everyone will be able to grab a pen and interact with the whiteboard
If you need further help with PowerPoint or any of the Microsoft 365 productivity tools, your friendly neighbourhood IT support guys are willing to help.
Microsoft Teams Training Resources
- Microsoft Teams Quick Start Guide for New Users
- Microsoft Teams for Beginners: 101
You may also be interested in

Microsoft Teams Quick Start Guides
Drop your details below and tell us where to send your quick start guide - we'll also include a copy of our Microsoft Teams for Beginners 101 guide too.
Turn that IT frown upside down
IT isn’t supposed to distract you from the important stuff. It’s supposed to enable you to do more of it, more efficiently. And that’s our sole purpose at Office Solutions IT – delivering IT support services that take care of the complex business of managing IT, so you can focus on your business. Get in touch and find out more.
Call us on 1300 349 195 Email us [email protected] Schedule a call
Recent Blog Posts

Teams Top Forum Contributors: EmilyS_726 👍✅
April 17, 2024
Teams Top Forum Contributors:
EmilyS_726 👍✅
Contribute to the Teams forum! Click here to learn more 💡
April 9, 2024
Contribute to the Teams forum!
Click here to learn more 💡
- Search the community and support articles
- Microsoft Teams
- Teams for education
- Search Community member
Ask a new question
For Teams Meetings, why is the default for sharing a presentation that the audio is muted?
I work events for the Community College of Baltimore County. There are many times when a client shares a presentation that has audio during a meeting. The audio setting for presentations is set, by default, to mute any audio. Therefore, we have to actively remember to unmute audio before a presentation is shared in a meeting. If there were multiple presentations with audio, we would have to click that button for each one. Why is the default for audio to be muted? Why would anyone share a presentation that contains audio, without wanting that audio to play? The default should be that the audio plays and if, for some reason, the audio wasn't desirable, then they could do the extra step of muting it.
I hope you are aware of this problem and working on fixing it in the new roll out of Teams.
- Subscribe to RSS feed
Report abuse
Reported content has been submitted
Replies (2)
- Microsoft Agent |
Hello Brad,
Good day! Thank you for reaching out.
I understand that you have a concern with the default setting while sharing a presentation with audio.
The default setting for muting audio during presentations in Teams meetings is designed to prevent unintended disruptions which can occur when multiple audio sources are active. It’s a precautionary measure to ensure a smooth and clear meeting experience for all participants.
However, I do understand that this can be inconvenient when sharing presentations with intentional audio. It’s a valid point that the default could be set to play audio, with the option to mute the computer audio if necessary. Your feedback is important, and I will surely raise your concerns with our product team and hopefully this can be included in future updates. I'd also recommend submitting an entry through the Teams feedback channel via Microsoft Teams · Community as this channel is constantly monitored by the product team. Many features of our current products are designed and upgraded based on customers’ feedback.
I will update here just in case I get any update on this.
Thank you for your precious time and have a great day.
Best Regards,
Was this reply helpful? Yes No
Sorry this didn't help.
Great! Thanks for your feedback.
How satisfied are you with this reply?
Thanks for your feedback, it helps us improve the site.
Thanks for your feedback.
Perhaps a pop-up with the audio options would be best. Just as we are able to select our camera and microphone before a meeting starts, Teams could ask if you want to allow audio to pass through your computer or not.
Question Info
- Meetings and calls
- Audio and video
- Norsk Bokmål
- Ελληνικά
- Русский
- עברית
- العربية
- ไทย
- 한국어
- 中文(简体)
- 中文(繁體)
- 日本語
Think Outside The Slide
How to see the participants in a Teams meeting when you are sharing your screen or content
One of the top requests of Teams meeting presenters is the ability to see the participant’s videos when they are sharing their screen. Seeing the videos allows you to get visual feedback on your presentation, which is helpful to a presenter.
***2023 Update: Teams has recently changed the way you can see participants after sharing your slides or other content. I’ve posted a video showing the old way and the new way .***
Did you find this article using a Google search? Get more answers to your virtual presentation questions here and get updates of new articles and videos here .
If you have two screens
If you have two screens, the typical setup is that you have one screen with your webcam in or on it. This is the screen you will be looking at during the presentation and the one you want the meeting participant videos to be displayed on. This is usually referred to as the primary screen. The second screen is to one side and you won’t usually be focused on looking at it while presenting.
Open the Teams app on the primary screen. Open the content you want to share, whether that is PowerPoint slides, a browser window, an Excel spreadsheet, or any other content, on the second screen. If you are using PowerPoint, you can learn more about using Presenter View with two screens in my complete guide .
In the Teams app, share the second screen in the meeting. When you share content in Teams, it minimizes the controls to the lower right corner of the primary screen.

Click in the center of the minimized window, on the video or initials shown and the Teams app will be displayed full size again. Now you can see everyone who has their video turned on. You can also open the chat pane to keep up with the meeting chat.
To stop sharing the second screen, use the stop sharing button in the Teams control bar (the rounded rectangle with the “X” in it).
If you have one screen
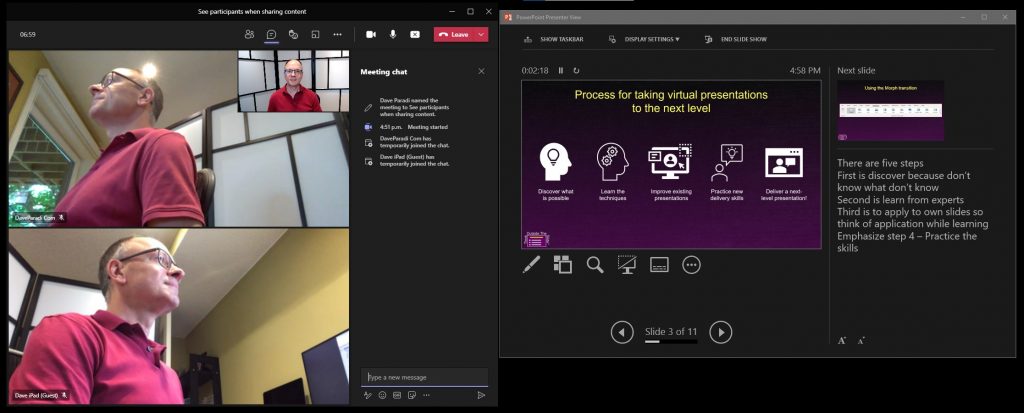
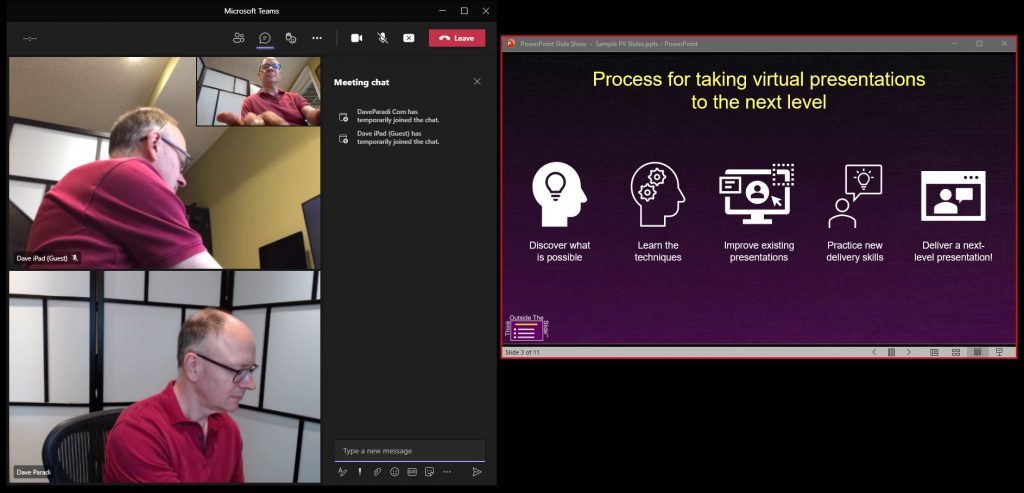
Your single screen needs to be used for sharing content and seeing the participant videos. The best approach is to share a window of content instead of the full screen. This allows you to still see the Teams app with the participant videos.
If you are sharing PowerPoint slides, use Reading View to show the Slide show in the PowerPoint window instead of the full screen ( this article explains how to see your notes and show the slides in Reading View ).
If you are sharing other apps, make the window less than full screen so you have space for the Teams app on the screen.
In the Teams app, share the window of content in the meeting. When you share content in Teams, it minimizes the controls to the lower right corner of the screen. As shown above for two screens, click in the center of the minimized window, on the video or initials shown and the Teams app will be displayed full size again. Now you can see everyone who has their video turned on and you can see the chat if desired. Here is an example of PowerPoint slides in Reading View beside the Teams app on a single screen when shared in a Teams meeting.
To stop sharing the window, use the stop sharing button in the Teams control bar.
Teams allows you to see participant videos while sharing content
When you are sharing content in a Teams meeting, open the full Teams app on your screen using the instructions above to see the participant videos and get feedback during your presentation.
1 or 2 screens? Teams, Zoom, or Webex? Windows or Mac?
Sign up to download my best tips for your virtual presentation situation and stay updated as the technology changes..
Where to go next –> More articles on virtual presenting –> Training for your team on presenting virtually –> More articles on virtual & hybrid sales presentations –> Training for your sales team

Dave Paradi has over twenty-two years of experience delivering customized training workshops to help business professionals improve their presentations. He has written ten books and over 600 articles on the topic of effective presentations and his ideas have appeared in publications around the world . His focus is on helping corporate professionals visually communicate the messages in their data so they don’t overwhelm and confuse executives. Dave is one of fewer than ten people in North America recognized by Microsoft with the Most Valuable Professional Award for his contributions to the Excel, PowerPoint, and Teams communities. His articles and videos on virtual presenting have been viewed over 4.8 million times and liked over 17,000 times on YouTube.
By Dave Paradi
Dave Paradi has over twenty-two years of experience delivering customized training workshops to help business professionals improve their presentations. He has written ten books and over 600 articles on the topic of effective presentations and his ideas have appeared in publications around the world . His focus is on helping corporate professionals visually communicate the messages in their data so they don't overwhelm and confuse executives. Dave is one of fewer than ten people in North America recognized by Microsoft with the Most Valuable Professional Award for his contributions to the Excel, PowerPoint, and Teams communities. His articles and videos on virtual presenting have been viewed over 4.8 million times and liked over 17,000 times on YouTube.
How To Give Control in Teams to Switch Presenter
Microsoft Teams continues to add new features and ways to engage meeting attendees. Sometimes when you’re a presenter in a Teams meeting, you’ll want to allow someone else to present or give control to someone else in the meeting. We’ll run through the different ways to present and how to give control in Teams to someone else.
The information below applies to all Microsoft Teams meetings, including breakout sessions and webinars. Some features, like PowerPoint Live, are only available while using the desktop version of Teams and cannot be accessed if you’re running Teams in a web browser.
Sharing Content in a Teams Meeting
When you’re in a Teams meeting and select the Share button, you can choose to share content in different ways:
- Share your screen : This option will allow meeting attendees to see anything that’s on the monitor you select.
- Share a specific window : This option will only allow attendees to see the specific window you choose to share.
- Create a Whiteboard : This option will launch the Whiteboard app so meeting attendees can collaborate.
- Share a PowerPoint : Select a specific PowerPoint file to present to meeting attendees.

When you choose to share a PowerPoint presentation (rather than sharing the specific window the PowerPoint is in), meeting attendees will get a few extra features, and so will you.
When you share a presentation using PowerPoint Live, attendees will be able to move through the slides in your presentation at their own speed. Don’t worry—meeting attendees won’t control what other attendees see. You’ll still be in control of your presentation . However, if an attendee wants to skip a few slides ahead to see what’s coming, they can. When they’re ready, there’s a sync button which will sync them up with the presenter.

If you don’t want attendees to move through the presentation on their own, you can toggle that feature off by selecting the eye icon on the control panel that appears on the presentation.
When you share a presentation via PowerPoint live, you’ll be able to see your notes, slides, and the audience while you present. This is a feature that Teams users have been clamoring for, and we’re thrilled to see that Microsoft listened.

You’ll also get access to multi-colored laser pointers, pens, and highlighters to aid in your presentation.
Roles in Teams Meetings
First, let’s get clear about the various roles available in Teams meetings. The person who creates the link to join the meeting is the organizer. That person has ultimate control and can do things that no other attendee can do like manage breakout rooms .
The organizer can designate other meeting attendees as presenters. Only the organizer and presenters can share content during the meeting. Besides the organizer and presenters, everyone else in the meeting is called an Attendee.

The organizer can set presenters in advance of the meeting or on the fly during the meeting. To set presenters in advance of the meeting, the meeting organizer should select the Meeting Options link in the calendar invitation for the meeting.
A web page will open where you can choose who will be able to present during the meeting.

If you choose Specific people , next type in the names of the people who you want to be Presenters.

How To Promote an Attendee to Presenter in Teams
If you’re the meeting organizer, it’s easy to promote a meeting attendee to presenter during the meeting itself.
- Find the attendee in the participant list.
- Select the More options (three dots) link next to the attendee’s name.

- Select Make a presenter .

Now that person will be able to share content during the meeting.
Presenting vs. Taking Control
It’s important to understand the distinction between presenting in a Teams meeting and taking control of shared content.
Apps like GoToMeeting and Zoom have ways for meeting attendees to take control of another attendee’s computer. This usually happens in remote support sessions. So far, Microsoft Teams has not provided that functionality. However, Teams does allow presenters to give limited control to another attendee, and attendees can request control from presenters.
Obviously, you should only give control in Teams to someone you trust.
How To Give Control in Teams
In Microsoft Teams, if you want someone else in your meeting to edit a file you’re sharing or take over your presentation, you can give control to that person. It’s like adding a second, simultaneous presenter. You’ll both be able to control what’s being shared. You can take back control any time you want.
You can only give control to someone else in your Teams meeting when you’re presenting. Mouse over the content you’re sharing to activate the sharing toolbar and select Give control .

From there, select the person you want to give control to. The person you want to give control to will receive a notification letting them know that you want to share control of the presentation with them. When you share control with someone else, they’ll be able to make edits and other changes to the shared screen.

If you want to take control back from them, simply select the Cancel Control button.
How To Request Control in Teams
Requesting control while someone’s presenting in Teams works similarly. Simply select the Request control button. The presenter can then choose to Allow or Deny your control request.

When you no longer want control, you can select the Release control button.
Get Comfortable with Microsoft Teams
Love it or hate it, it doesn’t look like Microsoft Teams is going away any time soon. If your employer uses Teams, it’s worth learning a few Teams tips and tricks to get more comfortable with all its features.
You can read about several ways to run polls in Teams meetings or learn how to hide your mess by changing your background in Teams.

Maggie Marystone is a freelance technology writer, human rights worker, and storyteller based in Chicago. Read Maggie's Full Bio
Read More Posts:

- Start a chat with others
- Send and read
- Send a file, picture, or link
- Send a loop component
- Send an emoji, GIF, or sticker
- Send Praise to people
- Read receipts
- Use suggested replies
- Like or react to messages
- Chat in a Teams meeting
- Share your screen in a chat
- Reply to a specific message
- Share a link to a specific message
- Forward a message
- Use file suggestions
- Record a video clip
- Use editor text predictions
- Send Viva Topics
- Schedule chat messages
- Format a message
- Edit or delete a message
- Delete a chat thread
- Copy and paste
- Mark a message as saved
- Mark as important or urgent
- Pin a chat message
- Hide, unhide, mute, pin, or mark a chat as unread
- Open a chat in a new window
- Resume an old conversation
- Add or invite people outside your org to a chat
- Search for messages
- Translate a message
- Change the spacing
- Leave or remove someone from a group chat
- Personalize your group chat avatar
- Chat with someone on Teams for personal use
- Chat with members from distribution list or M365 group
- Manage chats with the Teams mobile app
- Send code snippets in a message
- Use Markdown formatting
- Use Immersive Reader
- Share to Outlook from Teams
- Send messages to skype for Business users
- Create, edit, or delete a contact group
- Do your one-on-ones with Teams chat
- Use Teams with skype
- Accept people outside your org
- Block or unblock people outside your org
Chat with others in Microsoft Teams
Note: Some features detailed below are available as part of the public preview program and might undergo further changes before being released publicly. To get access to this and other upcoming features, switch to Teams public preview .

Start a chat with another person

You can also start a one-on-one chat from someone's profile card. Open it by choosing their picture in a channel or finding their name using the Search box .
Start a chat with yourself
When you first use Teams, you'll see your name pinned to the top of your chat list. Use this space for drafts, to send messages and files to yourself, or to get to know chat features a little better.

Start and name a group chat
A group chat includes multiple people in a conversation. Create a group chat the same way you start a one-on-one chat.

Select the down arrow to the far right of the To field and then type a name for the chat in the Group name field.
Type in the names of the people you’d like to add in the To field.

This starts a new conversation. Everyone who has access to the group chat can send messages .
You can include up to 250 people in a group chat.
Add people to the conversation

Type the names of the people you'd like to chat with. If it is already a group chat, you can also choose how much of the chat history to include.

Select Add to add them to the conversation.
Note: You can only include chat history when adding someone to an existing group chat, not a one-on-one.
Teams saves the entire chat history, all the way back to the first message. If someone leaves the group, their chat responses will remain in your chat history.
See who's in a group chat

Chat with Microsoft support
Contact - Microsoft Support
Want to learn more? See First things to know about chats and First things to know about group chats .

Start a chat with another person

You’ll see your name pinned to the top of your chat list by default.

Start and name a group chat
Create a group chat the same way you start a one-on-one chat.
Compose and send your message.
Tap the names of the participants at the top of your screen.

Tap Group chat name .

Type a group name and then tap Save .

Everyone who has access to the group chat can send messages.
Add people to the conversation
To loop more people into the conversation:

Type the names of the people you'd like to chat with, choose how much of the chat history to include, then tap Done .

Note: You can only include chat history when adding someone to a group chat (not a one-on-one).
Teams saves the entire chat history, all the way back to the first message. If someone leaves the group their chat responses remain in your chat history.
See who's in a group chat
To see who’s in a group chat, tap the names of the participants at the top of your screen for a list of everyone’s names.

Need more help?
Want more options.
Explore subscription benefits, browse training courses, learn how to secure your device, and more.

Microsoft 365 subscription benefits

Microsoft 365 training

Microsoft security

Accessibility center
Communities help you ask and answer questions, give feedback, and hear from experts with rich knowledge.

Ask the Microsoft Community

Microsoft Tech Community

Windows Insiders
Microsoft 365 Insiders
Find solutions to common problems or get help from a support agent.

Online support
Was this information helpful?
Thank you for your feedback.
IMAGES
VIDEO
COMMENTS
Present your slides. If you're already in a Teams meeting, select Share and then under the PowerPoint Live section, choose the PowerPoint file you're wanting to present. If you don't see the file in the list, select Browse OneDrive or Browse my computer. If your presentation is already open in PowerPoint for Windows or Mac, go to the file ...
If you're leading a presentation and need to share your PowerPoint slides during a Microsoft Teams meeting, here's how: • Once your meeting is active, select...
In this article I am using the Teams app in Windows 10. The seven options are: Share your entire screen/desktop. Share the Slide Show window. Share the editing window with a clean look. Run the Slide Show in a window and share that window. Use the PowerPoint sharing option in Teams. Use Presenter View to show the audience your slides while you ...
If you need to present in an online meeting, you can show your PowerPoint slides right from a Microsoft Teams meeting.If you're a presenter:1. Select Share c...
Microsoft Teams has a robust screen-sharing and presentation tool. You can share your entire desktop screen or a specific application in video calls or conference meetings. We'll show you how to share your screen on Teams for Windows and macOS. Microsoft Teams Presenter Modes Explained Microsoft Teams has three presenter modes: Standout, Side-by-side, and Reporter.
In this step-by-step tutorial, learn how to best present Microsoft PowerPoint slides in Microsoft Teams.⌚ Timestamps0:00 Introduction1:58 Example of the prob...
Learn how to share PowerPoint Slides in Microsoft Teams the correct way. There are different ways to present your PowerPoint slides in a Teams meeting. In th...
Share your screen using the Microsoft Teams desktop app. Using the desktop app (installed on your machine), you can share your screen during a meeting in just a few clicks: Once inside the meeting, select the Share icon (rectangle with an arrow) in the upper right corner next to the Leave button. When finished sharing, use the same Share button ...
Method #3: Share PowerPoint Window to Present Your Slides. If you intend to hide parts of your screen, you can simply share the relevant PowerPoint window so that your audience can only view the presentation. During a Live call, click the Share button and select your screen or window to share.
Make your presentations more impactful by sharing them directly in Microsoft Teams meetings. This guide covers everything from preparing your slides to prese...
Step 6: Ending the presentation sharing session. To finish the Microsoft Teams presentation-sharing session, do these steps: Click on the presentation screen to go to the meeting controls. Find the 'Stop Presenting' button at the top of the screen. Then click it. A pop-up will appear. It'll ask if you want to stop presenting.
To start, first, launch Microsoft Teams on your computer and join a meeting. In the meeting, at the top of the Teams interface, click the "Share Content" option (an up-arrow icon). You will see a "Share Content" section to the right of the Teams interface. To share your computer's entire screen, then in this section, click "Screen."
Learn how you can easily pass control back and forth when you choose to share directly present a PowerPoint file in your Teams Meeting. By selecting a file ...
How to share screen in Microsoft Teams. Watch on. While in a meeting, chat or group chat click the share icon. Choose if you'd like to share your entire desktop or just one specific window. When you're done sharing click the stop sharing Icon. How to share your PowerPoint presentation in Microsoft Teams.
However, I do understand that this can be inconvenient when sharing presentations with intentional audio. It's a valid point that the default could be set to play audio, with the option to mute the computer audio if necessary. ... I'd also recommend submitting an entry through the Teams feedback channel via Microsoft Teams · Community as ...
To stop sharing the window, use the stop sharing button in the Teams control bar. Teams allows you to see participant videos while sharing content. When you are sharing content in a Teams meeting, open the full Teams app on your screen using the instructions above to see the participant videos and get feedback during your presentation.
Microsoft Teams continues to add new features and ways to engage meeting attendees. Sometimes when you're a presenter in a Teams meeting, you'll want to allow someone else to present or give control to someone else in the meeting. ... When you choose to share a PowerPoint presentation (rather than sharing the specific window the PowerPoint ...
4K-quality local HDMI content sharing for Teams Rooms on Android 4K local HDMI content sharing lets you project HDMI content in 4K quality to front-of-room displays for Teams Rooms on Android devices that have 4K HDMI input capability, enhancing presentations and collaboration.
Use Microsoft Teams to chat online with the people you interact with. Start all chats the same way: by selecting New chat at the top of your chat list. Start a chat with another person. Once you've selected New chat and entered a person's name, compose your message in the box at the bottom of the chat.
As with any form you create via Microsoft Forms, you have a range of options on the types of questions you can include. You can ask for a text response or ask respondents to select from multiple choices. You can also require a file upload, so that each recipient team must share a photo of the completed work, if you so choose.
What's New in Microsoft Teams | September 2023 by Steve_Stein on September 29, 2023 38229 Views
With Microsoft Copilot in Teams, you can get to decisions quicker during and after your meetings - no matter where everyone is connecting from. In this "Prompt Like a Pro," you'll learn how to leverage prompts that will help visualize and evaluate each team member's ideas as well as make decisions based on those ideas.