The Complete Guide to Editing Images in PowerPoint
Want to make your PowerPoint presentations more visually appealing? Learn how to edit images in PowerPoint with this complete guide.
Images, graphs, or charts can make your PowerPoint presentations more engaging. However, if you want to add plenty of images that require minor edits, using third-party tools can be time-consuming.
Fortunately, PowerPoint lets you make basic edits to the image. In this guide, we explain how you can rotate, flip, mirror, and blur images in PowerPoint.

How to Crop an Image in PowerPoint
Trying to fit large pictures on a PowerPoint slide preserves the original image’s resolution, but the object you want to highlight in the picture might appear small. Consider cropping the image using PowerPoint so it focuses on the area you want to highlight.
Below are a few methods to crop an image in PowerPoint.
Crop an Image to a Custom Size
You can crop the image to a custom size like so:
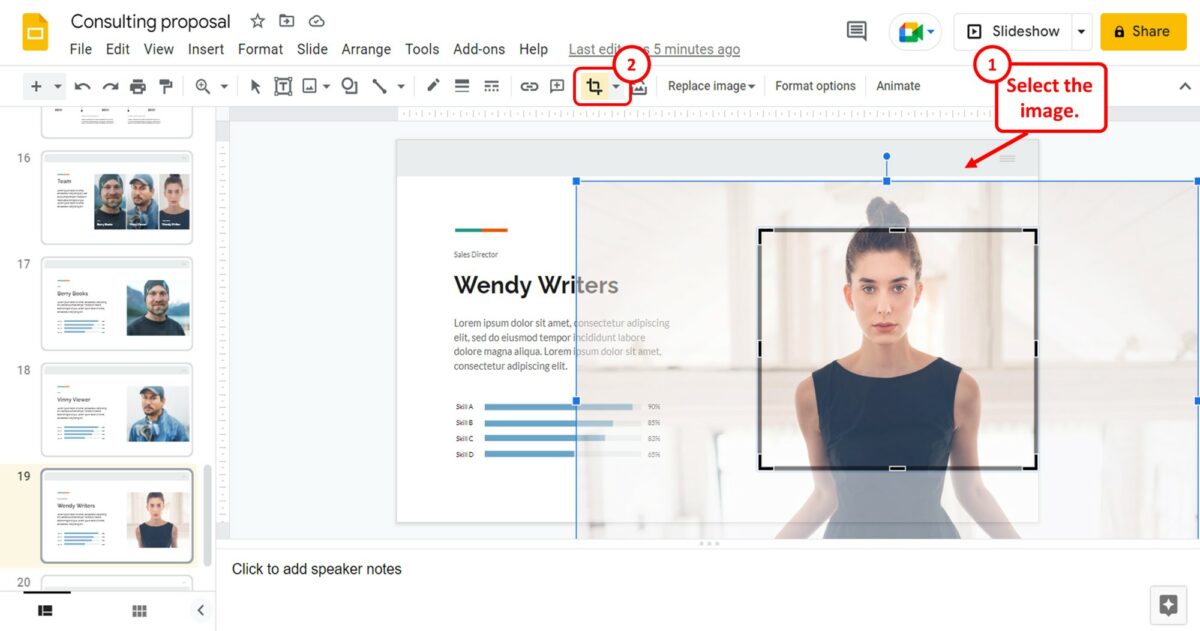
- Go to the slide that has the image you want to crop and click on the image.
Once you’re done trimming the image, click anywhere outside the image or click on the Crop button again under the Picture Format tab.
Crop an Image to a Shape
Here’s how you can crop an image to a specific shape, such as a rectangle or square:
- Click on the image and go to the Picture Format tab.
- Select from the wide range of shapes on the menu.
Crop an Image to an Aspect Ratio
Maybe you want the image to cover the slide from edge to edge, or you want to retain the original image’s aspect ratio. Here’s how you can crop an image to a specific aspect ratio:
- Select the image and go to the Picture Format tab.
- Once you select the aspect ratio, move the image around within the frame.
Click anywhere outside the image or click Crop from the Picture Format tab in the ribbon once you are done cropping the image.
How to Rotate an Image in PowerPoint
There are two ways to rotate an image in PowerPoint. You can manually rotate the image or rotate it 90° to the right or left with a single click. PowerPoint also allows you to manually set the image tilt to a certain angle.
Follow these quick steps to rotate an image in your presentation:
Built-In Rotation Options
PowerPoint has built-in options for rotating images. Here’s how you can use them:
- Select the image you want to rotate and go to the Picture Format tab.
Rotate an Image Manually
You can also manually hold and rotate images to a specific angle like so:
- Release the icon once you have a perfect angle for the image.
How to Flip an Image in PowerPoint
There are two ways to flip an image in PowerPoint:
Built-In Flip Options
PowerPoint has built-in options to flip images:
- Click on the image you want to flip and go to the Picture Format tab.
Flip an Image Manually
- Click on the image you want to flip. You’ll see tiny white squares on the edges and corners of the image.
- Similarly, to flip the image vertically upside down, click on the square at the center of the top edge and drag the image toward the bottom. Release the square once the image is flipped.
If you want to flip an image without changing its position, press-hold Ctrl and then click on the squares to drag and flip your image.
How to Mirror an Image in PowerPoint
The image-flipping feature in PowerPoint can help mirror images. Here’s how:
- Right-click on the image and click Copy . Right-click anywhere on the slide and click Paste .
You can use the same method to create a mirror image vertically.
How to Use the Reflection Effect in PowerPoint
Here’s how you can add reflection to your images in PowerPoint:
- Select the image you want to create a reflection for and go to the Picture Format tab.
How to Blur an Image in PowerPoint
Blurring an image can help bring objects into focus. Here’s how to blur images in PowerPoint:
- Alternatively, you can manually enter the radius figure in the box.
How to Make an Image Transparent in PowerPoint
Another artistic effect will be to fade the image. This effect also helps shift focus away from the image on a particular slide.
Best Practices for Using Images in Your Microsoft PowerPoint
Creating engaging PowerPoint presentations isn’t as time-consuming when you’re fully aware of the tools at your disposal. We hope this article helped you save some time editing images in your presentation. Of course, there are more ways to create engaging PowerPoint presentations than adding graphics.
- PRO Courses Guides New Tech Help Pro Expert Videos About wikiHow Pro Upgrade Sign In
- EDIT Edit this Article
- EXPLORE Tech Help Pro About Us Random Article Quizzes Request a New Article Community Dashboard This Or That Game Popular Categories Arts and Entertainment Artwork Books Movies Computers and Electronics Computers Phone Skills Technology Hacks Health Men's Health Mental Health Women's Health Relationships Dating Love Relationship Issues Hobbies and Crafts Crafts Drawing Games Education & Communication Communication Skills Personal Development Studying Personal Care and Style Fashion Hair Care Personal Hygiene Youth Personal Care School Stuff Dating All Categories Arts and Entertainment Finance and Business Home and Garden Relationship Quizzes Cars & Other Vehicles Food and Entertaining Personal Care and Style Sports and Fitness Computers and Electronics Health Pets and Animals Travel Education & Communication Hobbies and Crafts Philosophy and Religion Work World Family Life Holidays and Traditions Relationships Youth
- Browse Articles
- Learn Something New
- Quizzes Hot
- This Or That Game New
- Train Your Brain
- Explore More
- Support wikiHow
- About wikiHow
- Log in / Sign up
- Computers and Electronics
- Presentation Software
- PowerPoint Presentations
Using PowerPoint to Edit Images: The Complete Guide
Last Updated: June 26, 2023
wikiHow is a “wiki,” similar to Wikipedia, which means that many of our articles are co-written by multiple authors. To create this article, volunteer authors worked to edit and improve it over time. This article has been viewed 84,407 times. Learn more...
If you thought that Microsoft PowerPoint was just for creating presentations, think again. You might be surprised to learn that it's also an amazing image editor. This article will show you how to use PowerPoint for the purpose of editing your pictures.
Things You Should Know
- To insert an image, click Insert , select Pictures , then select your picture.
- You'll find your picture editing tools on the Picture Format menu at the top of PowerPoint.
- To crop an image, select it, click Crop , and drag the boundaries to the desired size.

Community Q&A
You Might Also Like

About This Article
- Send fan mail to authors
Is this article up to date?

Featured Articles

Trending Articles

Watch Articles

- Terms of Use
- Privacy Policy
- Do Not Sell or Share My Info
- Not Selling Info
wikiHow Tech Help Pro:
Level up your tech skills and stay ahead of the curve

Cloud Storage

Custom Business Email

Video and voice conferencing

Shared Calendars

Word Processing

Spreadsheets
Presentation Builder

Survey builder

Google Workspace
An integrated suit of secure, cloud-native collaboration and productivity apps powered by Google AI.
Tell impactful stories, with Google Slides
Create, present, and collaborate on online presentations in real-time and from any device.
- For my personal use
- For work or my business

Jeffery Clark
T h i s c h a r t h e l p s b r i d g i n g t h e s t o r y !

E s t i m a t e d b u d g e t

Make beautiful presentations, together
Stay in sync in your slides, with easy sharing and real-time editing. Use comments and assign action items to build your ideas together.

Present slideshows with confidence
With easy-to-use presenter view, speaker notes, and live captions, Slides makes presenting your ideas a breeze. You can even present to Google Meet video calls directly from Slides.

Seamlessly connect to your other Google apps
Slides is thoughtfully connected to other Google apps you love, saving you time. Embed charts from Google Sheets or reply to comments directly from Gmail. You can even search the web and Google Drive for relevant content and images directly from Slides.

Extend collaboration and intelligence to PowerPoint files
Easily edit Microsoft PowerPoint presentations online without converting them, and layer on Slides’ enhanced collaborative and assistive features like comments, action items, and Smart Compose.

Work on fresh content
With Slides, everyone’s working on the latest version of a presentation. And with edits automatically saved in version history, it’s easy to track or undo changes.

Make slides faster, with built-in intelligence
Assistive features like Smart Compose and autocorrect help you build slides faster with fewer errors.

Stay productive, even offline
You can access, create, and edit Slides even without an internet connection, helping you stay productive from anywhere.
Security, compliance, and privacy

Secure by default
We use industry-leading security measures to keep your data safe, including advanced malware protections. Slides is also cloud-native, eliminating the need for local files and minimizing risk to your devices.
Encryption in transit and at rest
All files uploaded to Google Drive or created in Slides are encrypted in transit and at rest.
Compliance to support regulatory requirements
Our products, including Slides, regularly undergo independent verification of their security, privacy, and compliance controls .
Private by design
Slides adheres to the same robust privacy commitments and data protections as the rest of Google Cloud’s enterprise services .

You control your data.
We never use your slides content for ad purposes., we never sell your personal information to third parties., find the plan that’s right for you, google slides is a part of google workspace.
Every plan includes

Collaborate from anywhere, on any device
Access, create, and edit your presentations wherever you are — from any mobile device, tablet, or computer — even when offline.

Get a head start with templates
Choose from a variety of presentations, reports, and other professionally-designed templates to kick things off quickly..

Photo Album

Book Report

Visit the Slides Template Gallery for more.
Ready to get started?
No Photoshop? Edit Pictures in PowerPoint
June 30, 2014 / Blog, PowerPoint Tutorial photo editing in powerpoint, presentation design
There are so many ways to create unique PowerPoint presentations. The software has many tools and functions that allow you to be as creative as possible. The many possibilities include customizing templates , creating exciting shapes to enhance presentation design, and adding animations to your slides. Another thing you can do is edit pictures in PowerPoint.
PowerPoint is an excellent alternative if you don’t have Photoshop (or are overwhelmed by its complexity). You can do a lot of basic photo editing to enhance the images you’ve added to your presentation.
Need a Presentation Designed? Click Here To View Our Amazing Portfolio!
Edit pictures in powerpoint: the basics.
To get started, familiarize yourself with the Pictures Tool Format tab.

This only appears if you have a picture selected, so go ahead and Insert the image you want to edit into a Blank Slide .

The tools you’ll probably use the most to edit pictures in PowerPoint are the following:
- Corrections – This will allow you to edit your picture’s brightness and contrast and choose to either sharpen or soften it.
- Color – With this option, you can change the saturation and tone of your image. You can also choose to overlay several color filters.
- Crop – Aside from letting you do the obvious, PowerPoint’s crop tool allows you to crop your image into many different shapes.
- The options under Picture Styles – This group allows you to customize and design your picture with a few clicks effortlessly. You can add effects or borders. Choosing Picture Layout automatically will enable you to convert your image into a SmartArt graphic.
Using these tools to edit my chosen picture, I was able to come up with this:

Adding Text to Images
Another thing you’ll probably want to do is to add text to your pictures. You can’t do this in the Format tab. You have to go back to the Insert tab and select Text Box .

Just create a TextBox anywhere you want on the picture, and then start typing like you would if you were editing slides.

To add a background color to the TextBox, just go to the Home tab and select Shape Fill . A drop-down box will appear where you can choose whatever color you want.
Saving Pictures
You can save your edited pictures separately from your slides, and you don’t need to go through the tedious process of using Print Screen, either. All you have to do is Right- Click the image and then choose Save Picture As .
To save several objects as one picture (which is what you’ll have to do if you added a text box ): Select all elements you want to include, right-clic-, and then choose Group . After that, you can right-click again and save as usual.
If you’re editing the photos for your PowerPoint slides, don’t forget to keep all manipulated images manageable. Select your edited picture, go back to the Format tab, then select Compress Pictures .
Bonus: Creating Polaroids with PowerPoint
Now that you’re familiar with the Pictures Tool, here’s a quick tutorial: edit pictures in PowerPoint and turn them into “Polaroids.”

- Crop your image into a 1:1 ratio . Set it aside for a while.
- Draw a rectangle using the Shape tool. Make sure it’s big enough for your image to fit inside. It’ll be in the default color. Don’t change it to white yet!
- Select the rectangle and go to the Drawing Tools Format tab. Under Shape Effects , select Shadow (Outer) . When the rectangle has the drop-shadow effect, change its color to White .
- Drag the image on top of the rectangle. If it disappears under the shape, just select the shape, hover over Send to Back, and choose Send Backward .
- Adjust the image to create the overall look of a Polaroid picture.
- Group the image and the rectangle and Save .
There you have it!
We hope that learning how to edit pictures in PowerPoint can help you come up with great presentation design ideas. Don’t be afraid to explore and utilize all the tools that PowerPoint has to offer.
Popular posts, save your deck: methods to recover an unsaved powerpoint file.

Twitter: Lessons from Social Media

Oscar Speech Sounds A Lot Like…..

Olympians Can Teach Presenters a Thing or Two

Overcoming a Public Speaking Disaster: A Lesson from Michael Bay

The Similarities Between Presentations and Advertisments : Super Bowl Edition
How to Edit Images in Google Slides? [The EASY Way!]
By: Author Shrot Katewa
![How to Edit Images in Google Slides? [The EASY Way!]](https://artofpresentations.com/wp-content/uploads/2022/11/Featured-Image-3.jpg "image editing presentations")
Images add aesthetics to your presentation but sometimes you think of skipping the idea of adding images to your slides. It is because you find them inappropriate and mismatched with your presentation. Some of the problems you face include relocation, cropping, rotating, resizing or even less brightness and dull color.
Fortunately, you can carry out a number of built-in image editing functions in Google Slides which allows you to adjust your desired images according to your preference and add more value to your presentation.
To edit images in Google Slides, first you have to select the image and then choose relevant options from the toolbar to crop, resize, and add borders to the image as well as from “Format Options” to lock image position, make adjustments such as recolor, transparency, contrast and add drop shadows.
If you’re struggling with editing images in your slides and actively looking for some easy ways to do that, you have reach out to the right post. In this article, we have explained EVERYTHING you need to know about how to edit images in Google Slides. Here’s how:
1. How to Insert an Image in Google Slides?
In Google Slides, you can insert an image using the “Insert” menu. You can read more about inserting images in Google Slides in my article titled “ how to Insert Images in Google Slides? “.
Meanwhile, here’s a summary of what you need to do to insert an image in Google Slides –
Step-1: Click on the “Insert” menu
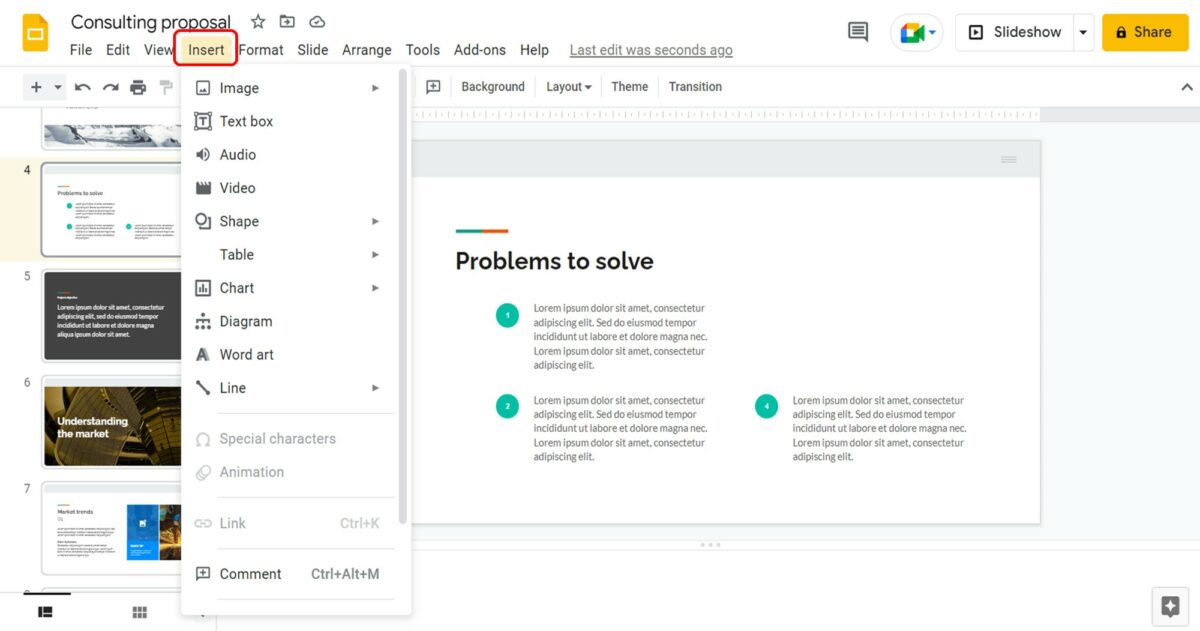
In the menu bar at the top of the screen, click on the “Insert” menu. It is the fourth tab in the menu bar.
Step-2: Select the picture source
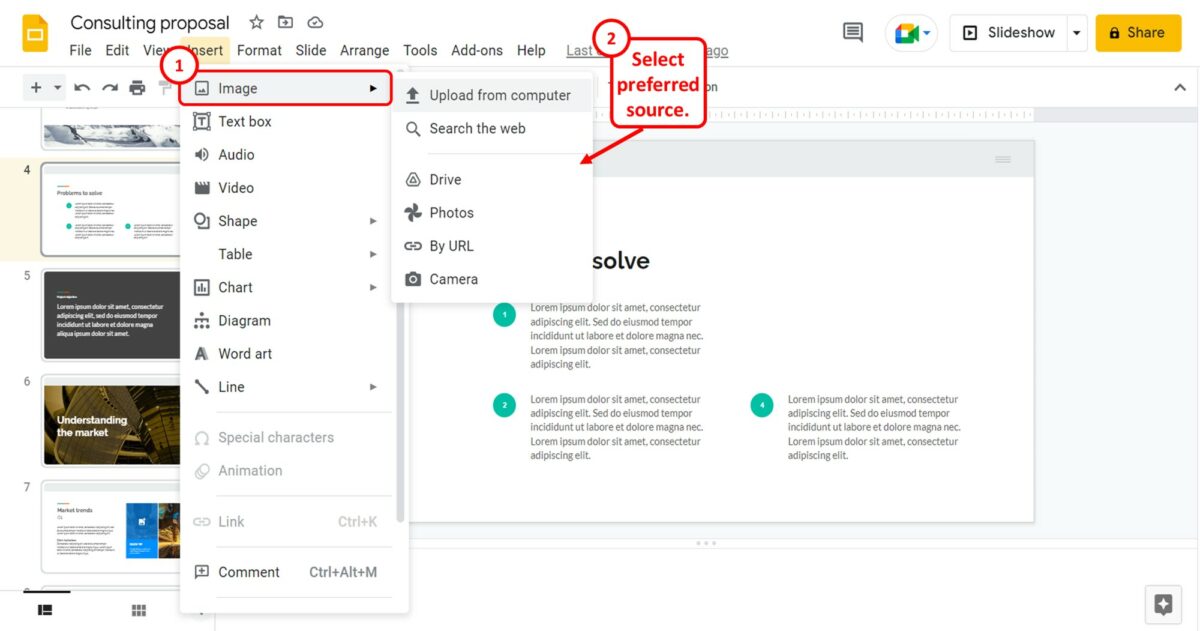
The next step is to click on the “Image” option from the “Insert” menu. In the secondary menu by the “Image” option, click on the source of the picture you want to insert into the presentation slide.
2. How to Move an Image in Google Slides?
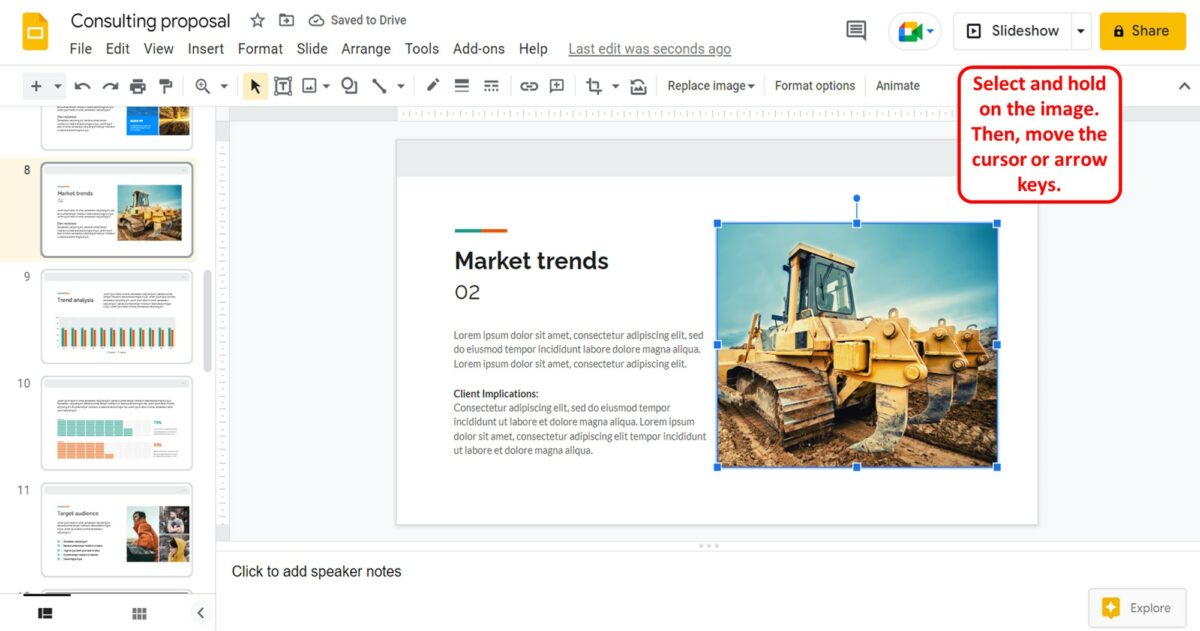
To move an image in Google Slides, all you have to do is click and hold on to the image. Then you can move your cursor to move the image with it.
Alternatively, you can click on the image to select it. Then use the arrow keys on your keyboard to move the image.
2.1 How to Lock the Position of an Image in Google Slides?
In Google Slides, there is no option available to lock an image in place. However, you can use some tricks to lock the position of an image in a slide. All you have to do is follow the 6 simple steps.
Step-1: Click on the “Zoom out” option
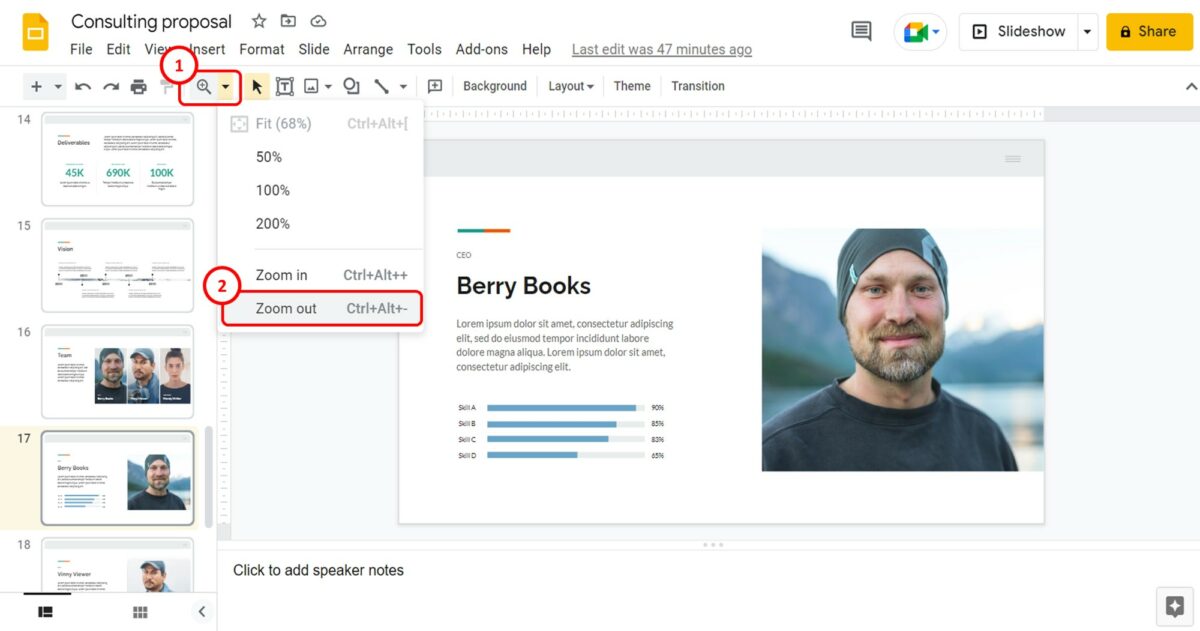
The first step is to zoom out the slide. Click on the down arrow by the “Zoom” option in the toolbar. Then click on the “Zoom out” option from the dropdown menu.
Step-2: Click on the “Shapes” option
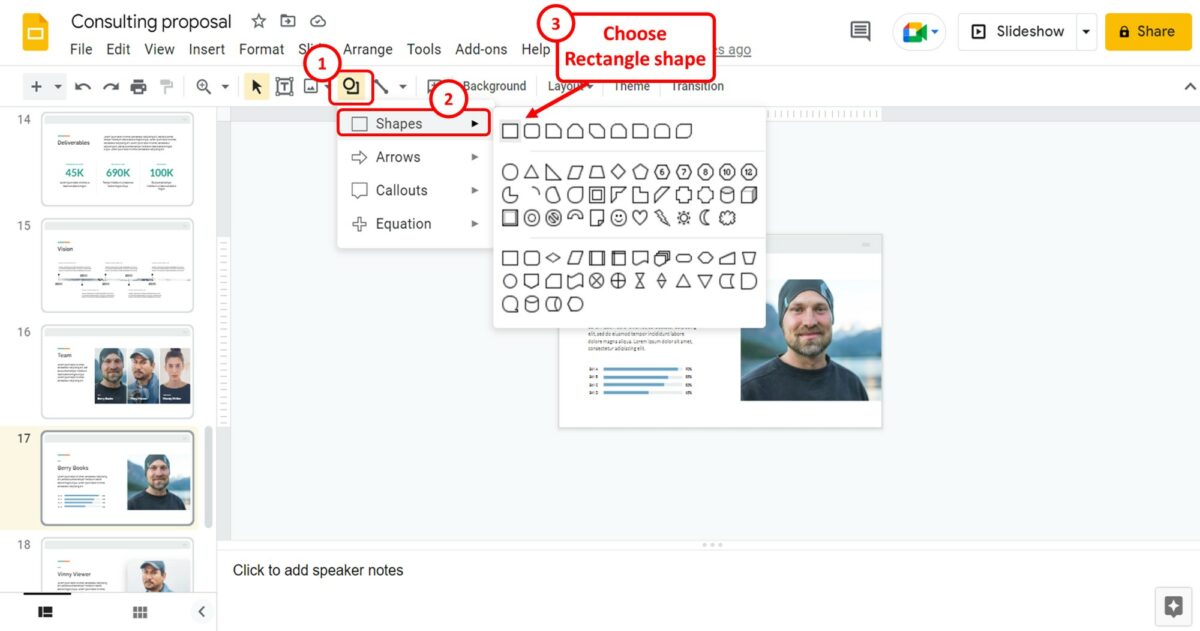
Now you can click on the “Shape” icon in the toolbar. In the dropdown menu, click on the “Shapes” option and select the rectangle shape from the list.
Step-3: Draw the shape

The next step is to draw the shape. You have to draw a shape large enough to cover not only the slide but also the entire visible area.
Step-4: Click on the “Fill color” option
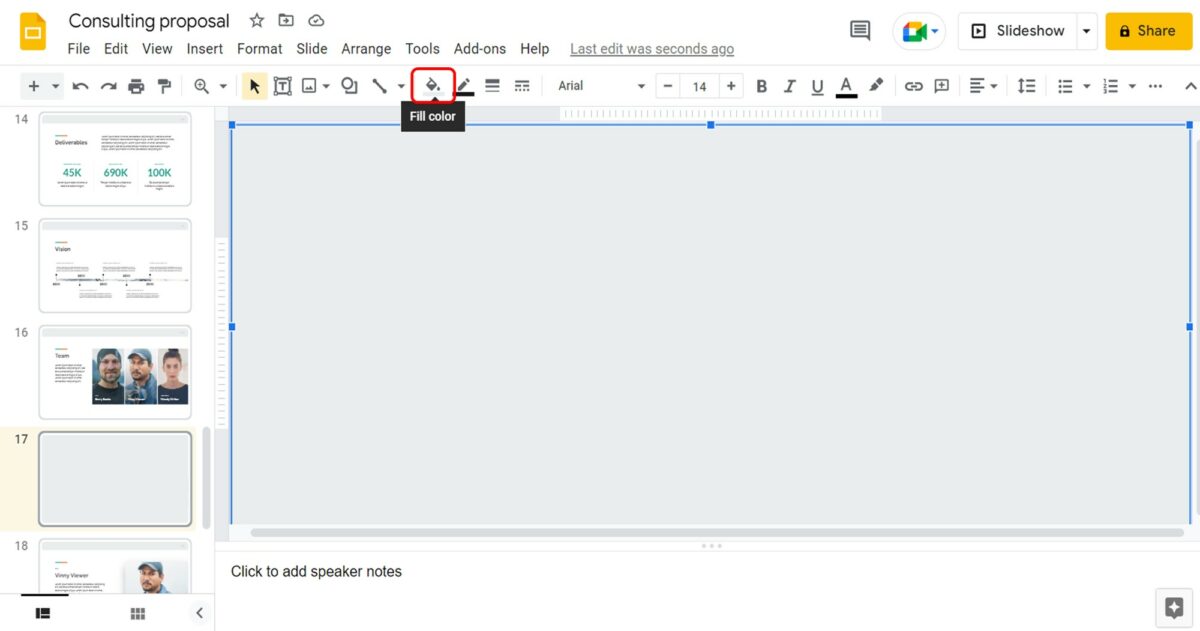
Click on the “Fill color” icon which looks like a paint bucket in the toolbar. This will open the dropdown menu with color options.
Step-5: Click on the “Transparent” option
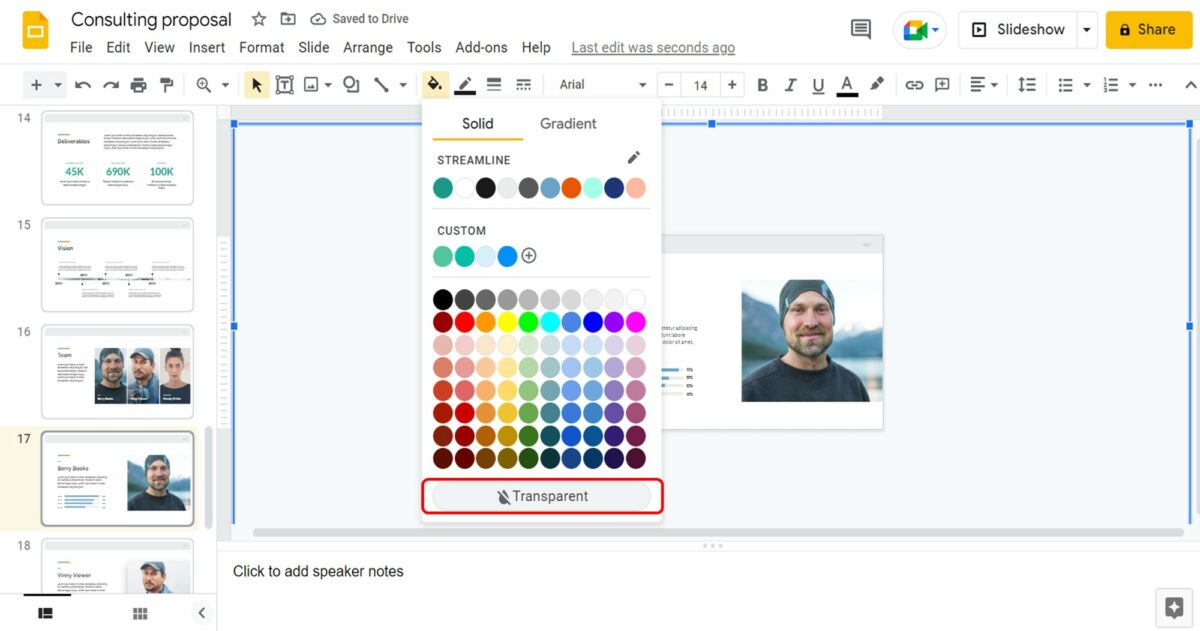
In the dropdown menu under the “Fill color” option, click on the “Transparent” option at the bottom. This will make the shape transparent and the slide under it visible.
Step-6: Click on the “Zoom in” option
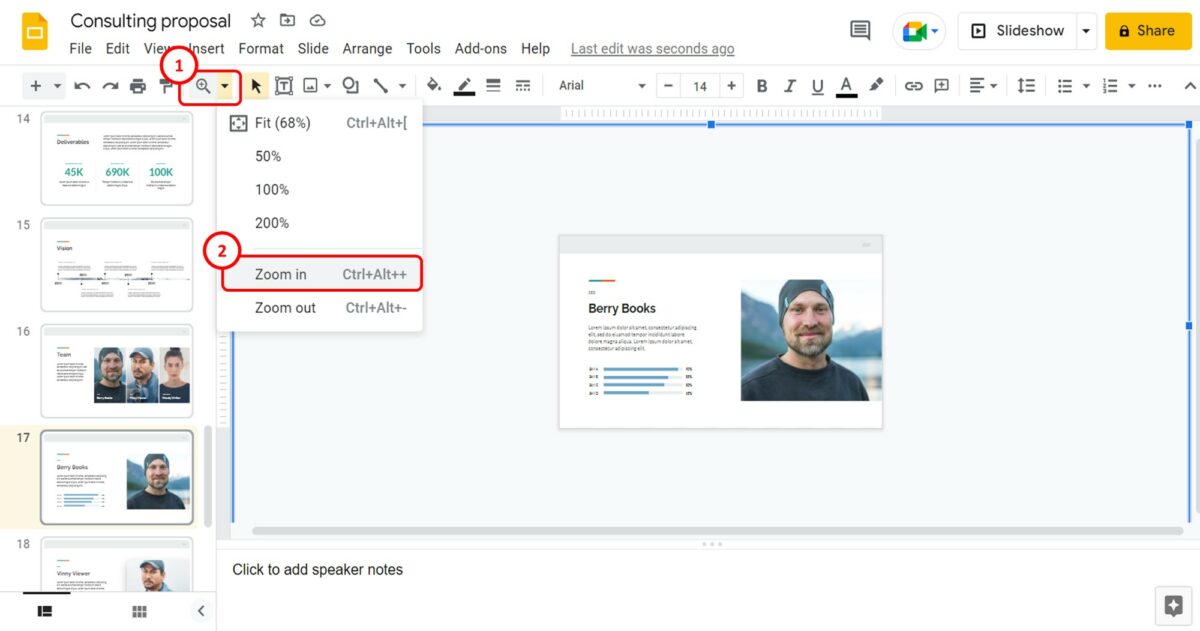
Now you have to click on the “Zoom” option in the toolbar. Then click on the “Zoom in” option from the dropdown menu to return the zoom to normal. The objects in the slide including the images will be locked in place and you will be unable to select them.
3. How to Resize an Image in Google Slides?
Google Slides allows you to easily resize an image after you insert it into a slide. There are multiple ways to resize an image on a slide.
3.1 Method 1 – Using the Corner of an Image
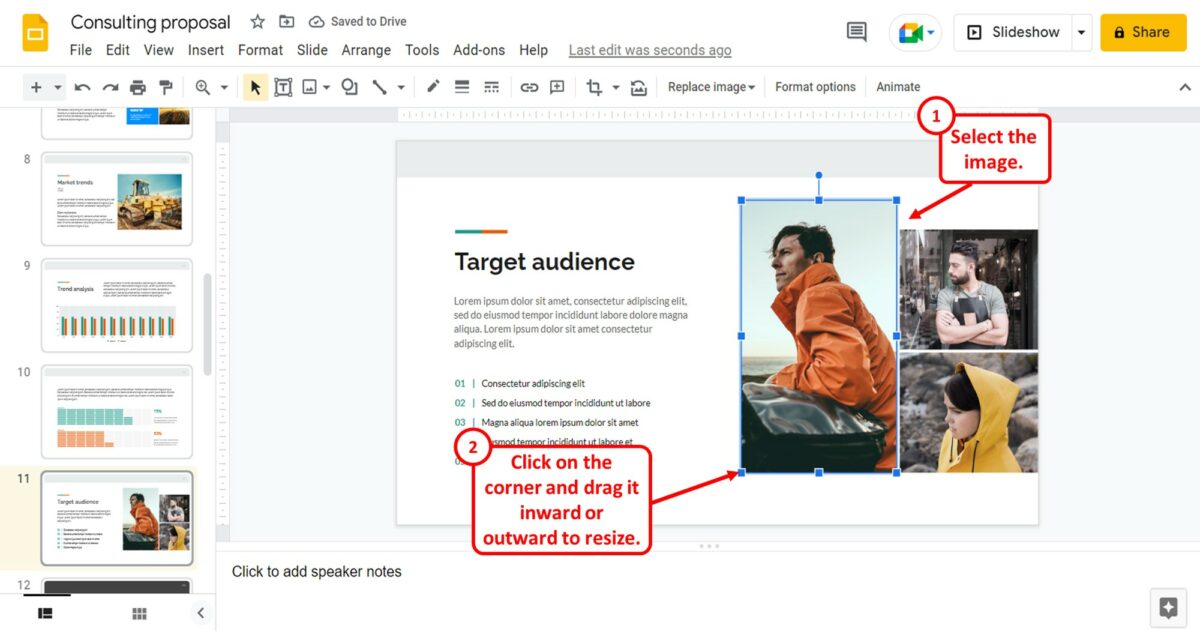
To resize an image using the corners, you have to first click on the image to select it. You will see tiny blue squares appear on all corners of the image. All you have to do is click on the corner and drag it inward or outward to make the image smaller or larger in size.
3.2 Method 2 – Using the Format Options
The “Format options” feature in Google Slides allows you to customize the dimensions of an image on a slide. You can use this feature to create a custom size for an image. To resize an image using “Format options” , follow the 4 simple steps.
Step-1: Click on “Format options”
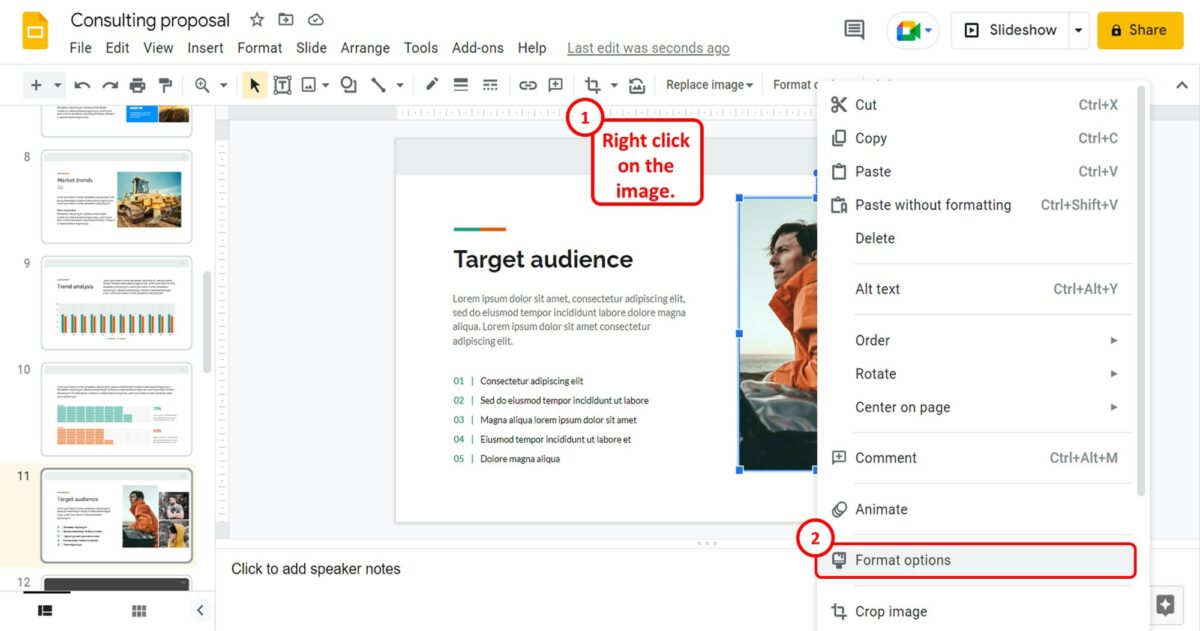
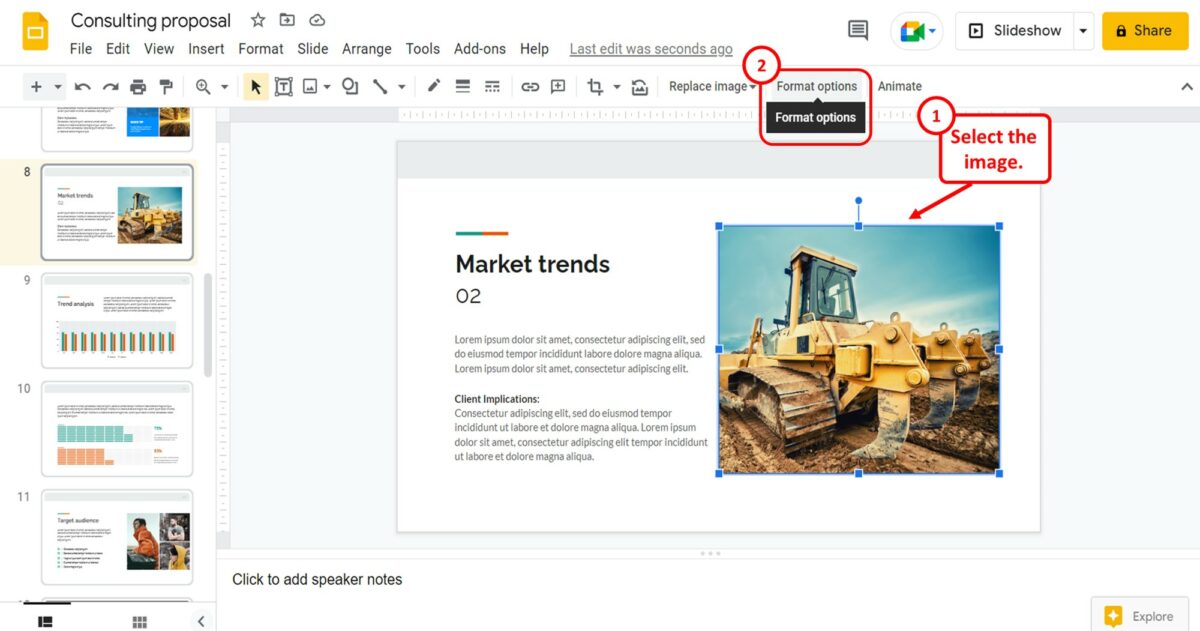
The first step is to “Right Click” on the image that you want to resize. Then click on “Format options” from the right-click menu.
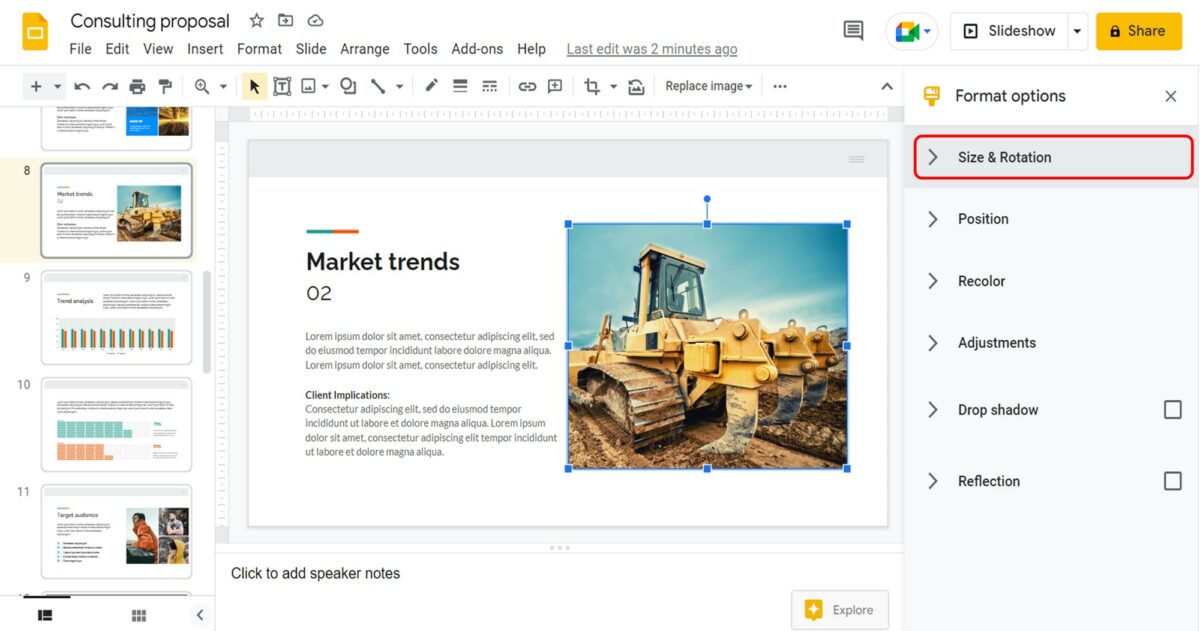
Step-2: Click on the “Size and Rotation” option
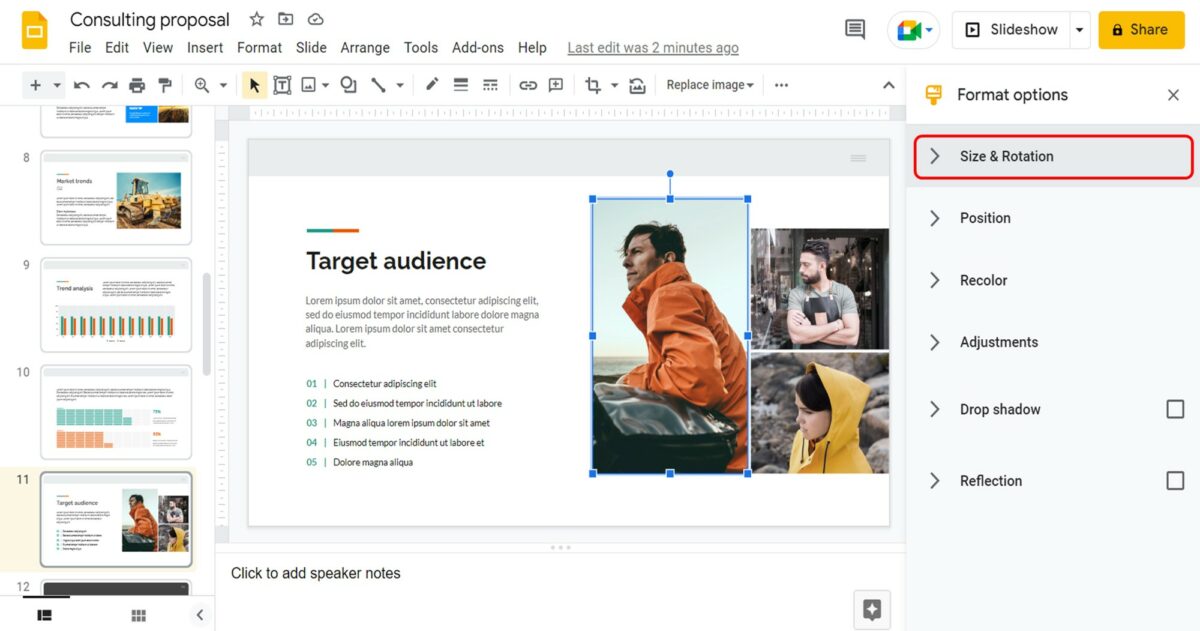
In the “Format options” sidebar on the right side of the screen, click on the “Size and Rotation” option.
Step-3: Click on the “Width” box
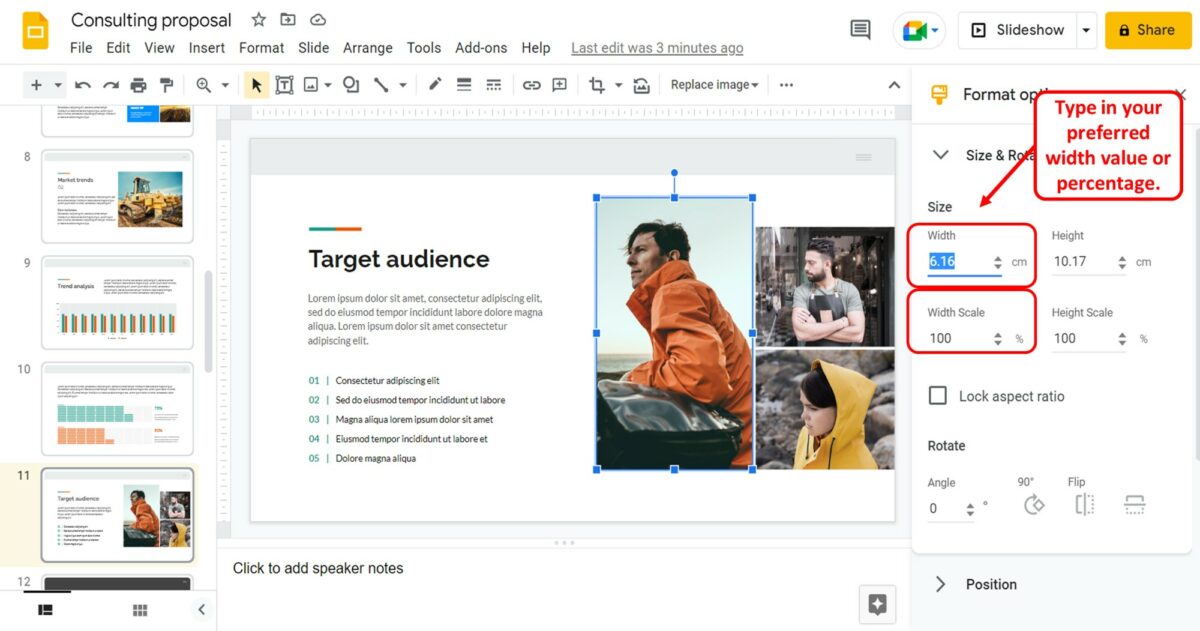
Under the “Size and Rotation” section, you have to now click on the “Width” box. Then type in the preferred width for the image in centimetres. You can also click on the “Width scale” box to customize the width scale.
Step-4: Click on the “Height” box
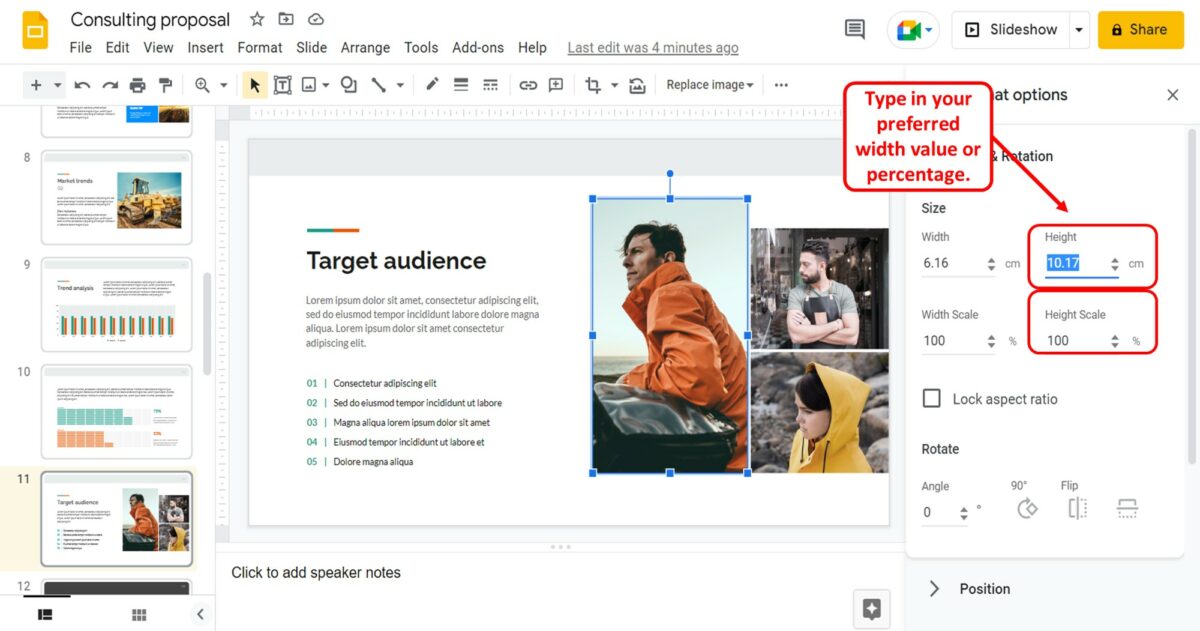
Similarly, you can click on the “Height” box and type in the preferred height of the image in centimetres. You can also click on the “Height scale” box to customize the height scale.
3.3 How to Lock Aspect Ratio of Image in Google Slides?
Locking the aspect ratio of a picture allows you to resize the image without changing the height-to-width ratio of the image. To lock the aspect ratio of an image in Google Slides, follow the 3 easy steps.
The first step is to click on the image that you want to lock the aspect ratio. Then click on the “Format options” option in the toolbar.
Step-3: Click on the “Lock aspect ratio” option
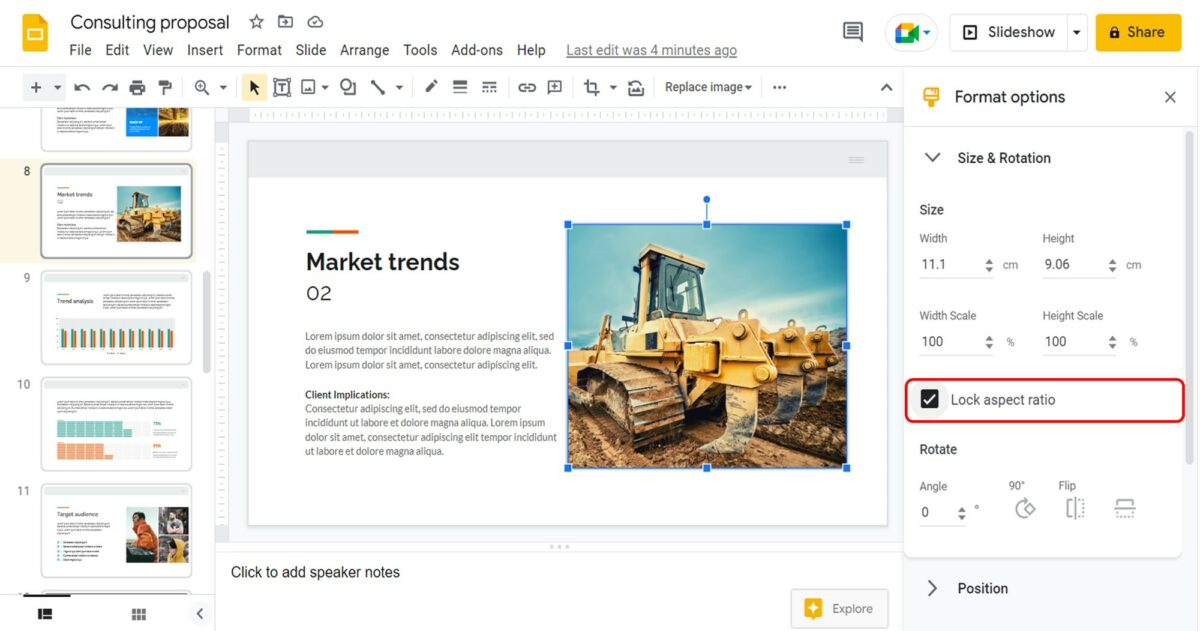
Under the “Size and Rotation” option in the “Format options” sidebar, all you have to do is click on the “Lock aspect ratio” option. A checkmark will appear by the option showing that the aspect ratio is now locked.
4. How to Crop an Image in Google Slides?
In Google Slides, you can easily crop an image inserted in a slide. All you have to do is select the image and then click on the “Crop” option in the toolbar.
Alternatively, you can “Double-click” on the image. Then drag the corners of the cropped part to increase or decrease the clear part of the picture. The shadowed part of the picture will be cropped out. You can read my other article here to learn about the different methods you can use to crop an image in Google Slides .
4.1 How to Make Image Fit to Slide in Google Slides?
In Google Slides, there is no option available to make an image fit to the slide. To make an image fit to the slide, you can insert the image as a background image. All you have to do is follow the 4 quick steps.
Step-1: Click on the “Background” option
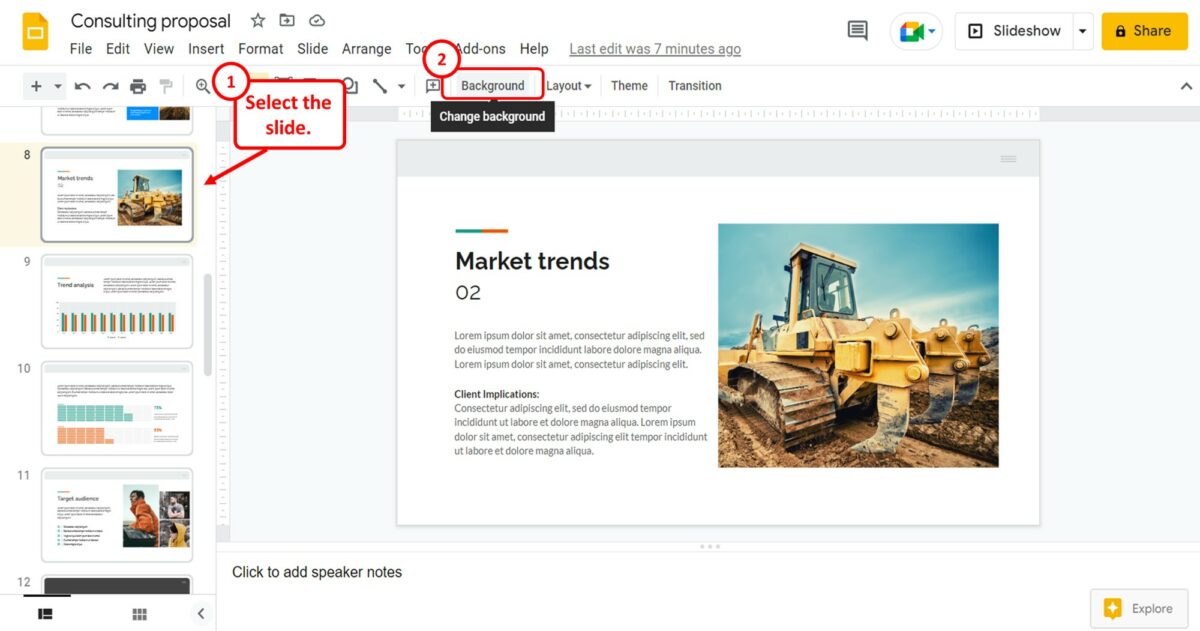
The first step is to open the slide where you want to insert the image. Then click on the “Background” option from the toolbar at the top of the screen.
Step-2: Click on the “Choose image” option
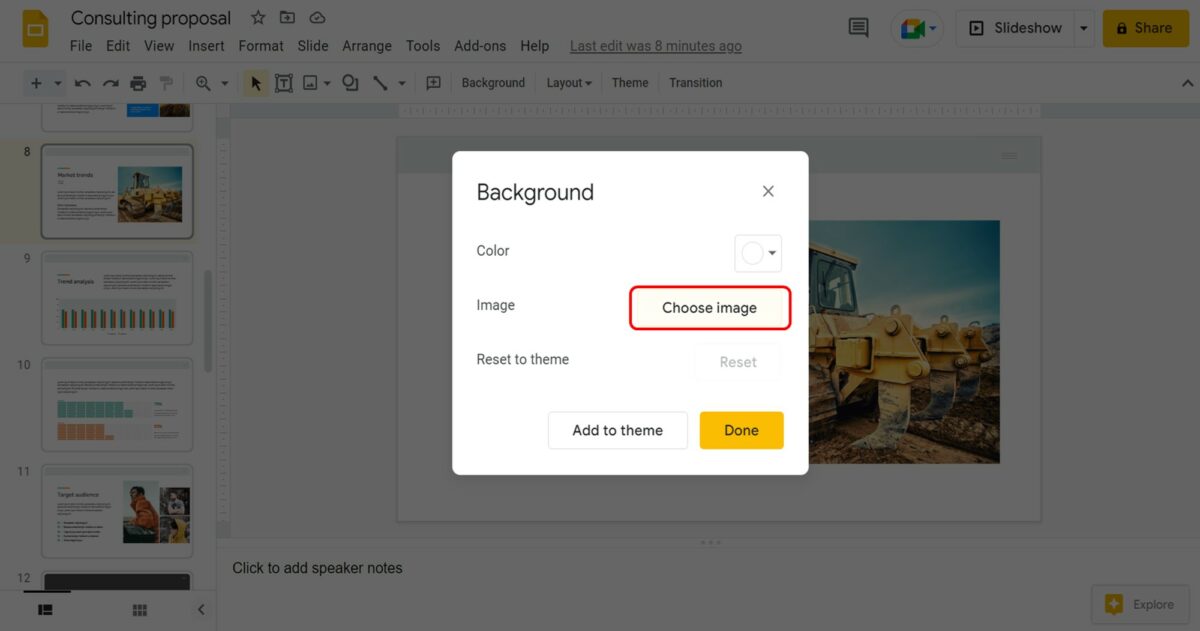
In the “Background” dialog box, click on the “Choose image” box. This will open another dialog box.
Step-3: Select the image source

In the “Insert background image” dialog box, click on the image source. The selected source will open in a new window where you can select the image to insert it into the slide.
Step-4: Click on the “Done” button
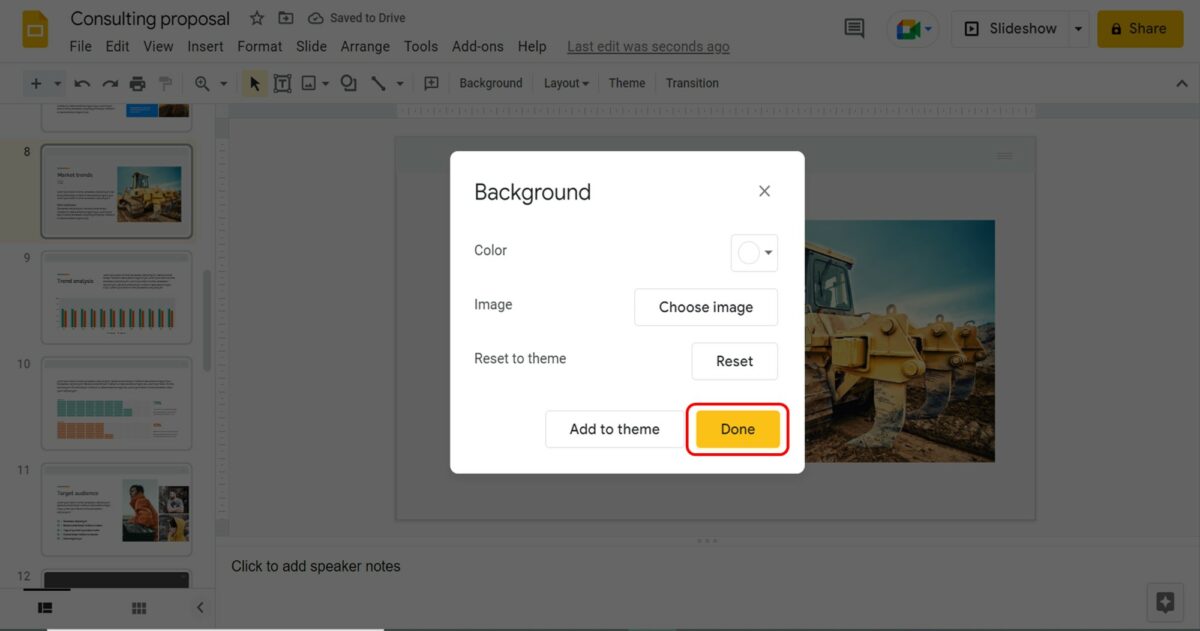
Finally, all you have to do is click on the “Done” button to insert the image fitted to the open slide.
5. How to Add Border to an Image in Google Slides?
Using the toolbar located at the top of the screen under the menu bar, you can easily add borders to a picture inserted in Google Slides. All you have to do is follow the 3 quick steps.
Step-1: Click on the “Border dash” option
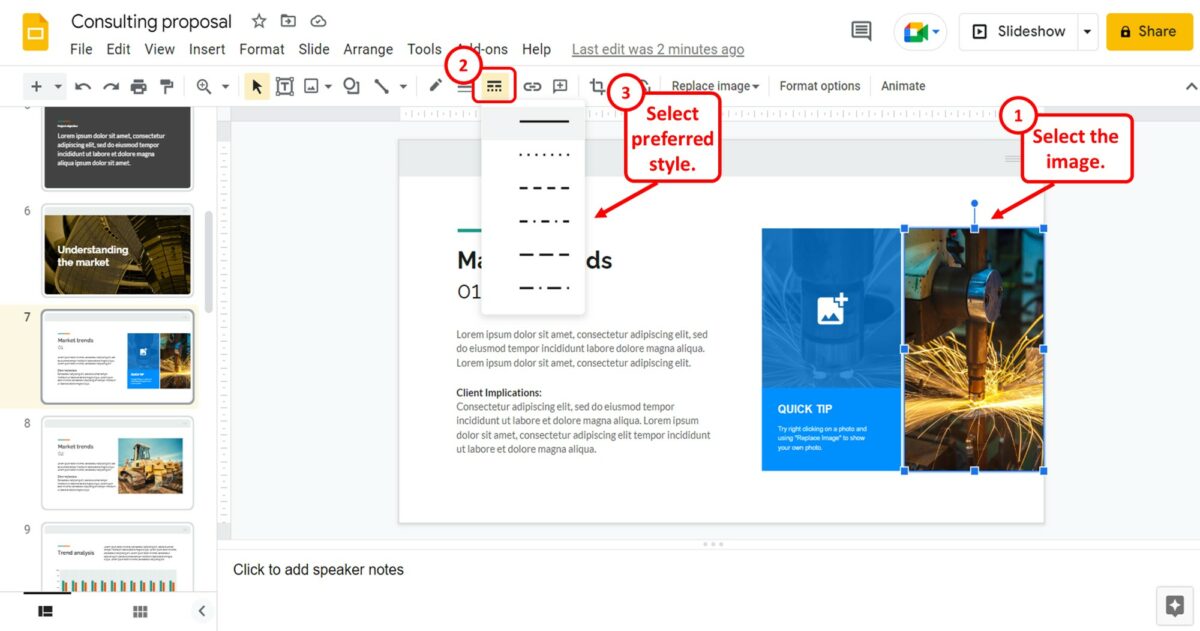
The first step is to select the image where you want to add the border. Then click on the “Border dash” option in the toolbar. The “Border dash” icon looks like three horizontal dashed lines. You can then select your preferred border style from the dropdown list.
Step-2: Click on the “Border weight” option
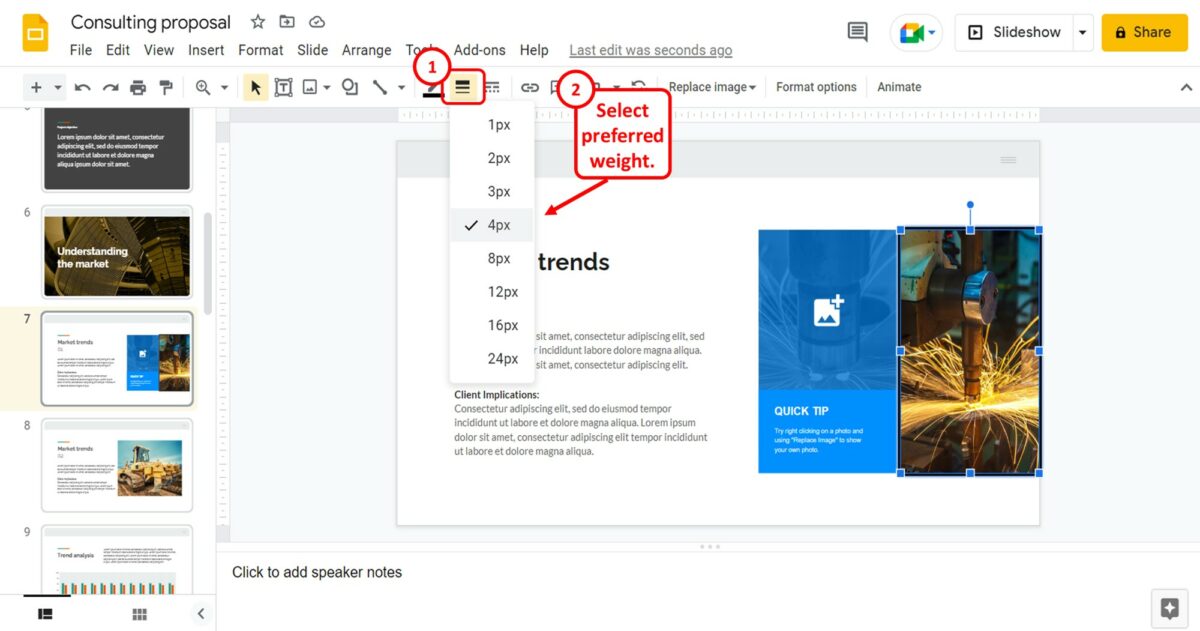
The next step is to click on the “Border weight” option in the toolbar. The “Border weight” icon looks like three horizontal thick lines and is located on the left of the “Border dash” icon. You can then select the preferred border thickness from the dropdown list.
Step-3: Click on the “Border color” option

The final step is to click on the “Border color” option located to the left of the “Border weight” option in the toolbar. In the dropdown menu under the “Border color” option, you can now select a preferred color for the image border.
6. How to Format an Image in Google Slides?
To format an image in Google Slides, you can use the “Format options” sidebar. All you have to do is follow the 2 easy steps.
Step-1: Click on the “Format options” option
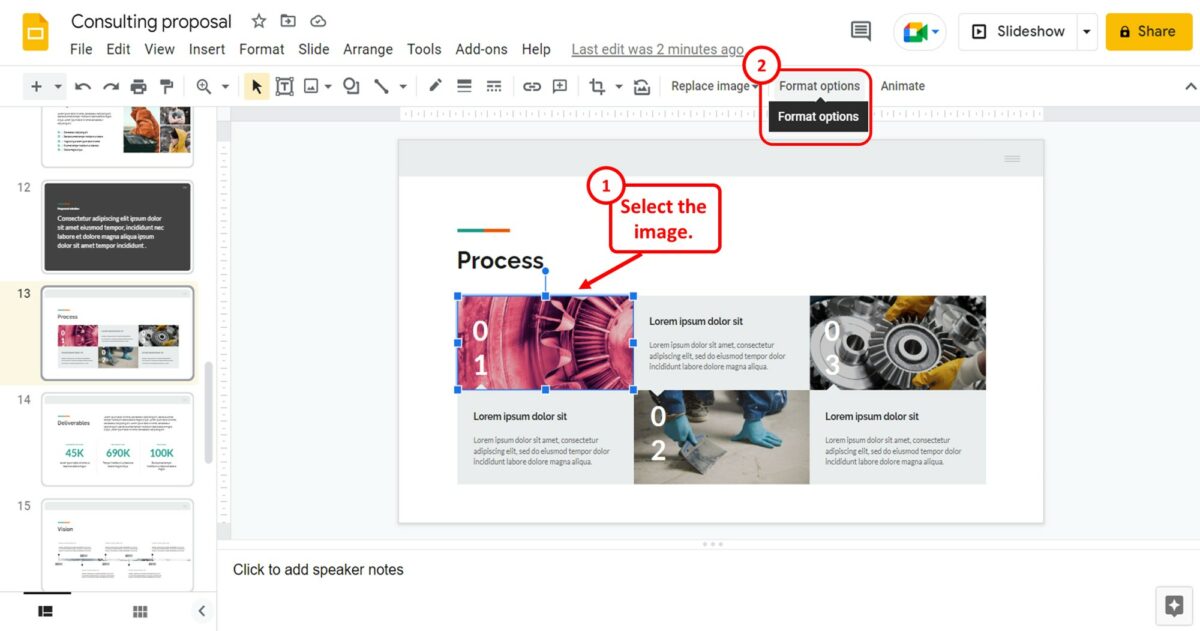
The first step is to select the image that you want to format. Then click on “Format options” from the toolbar at the top of the screen.
Step-2: Click on the “Adjustments” option
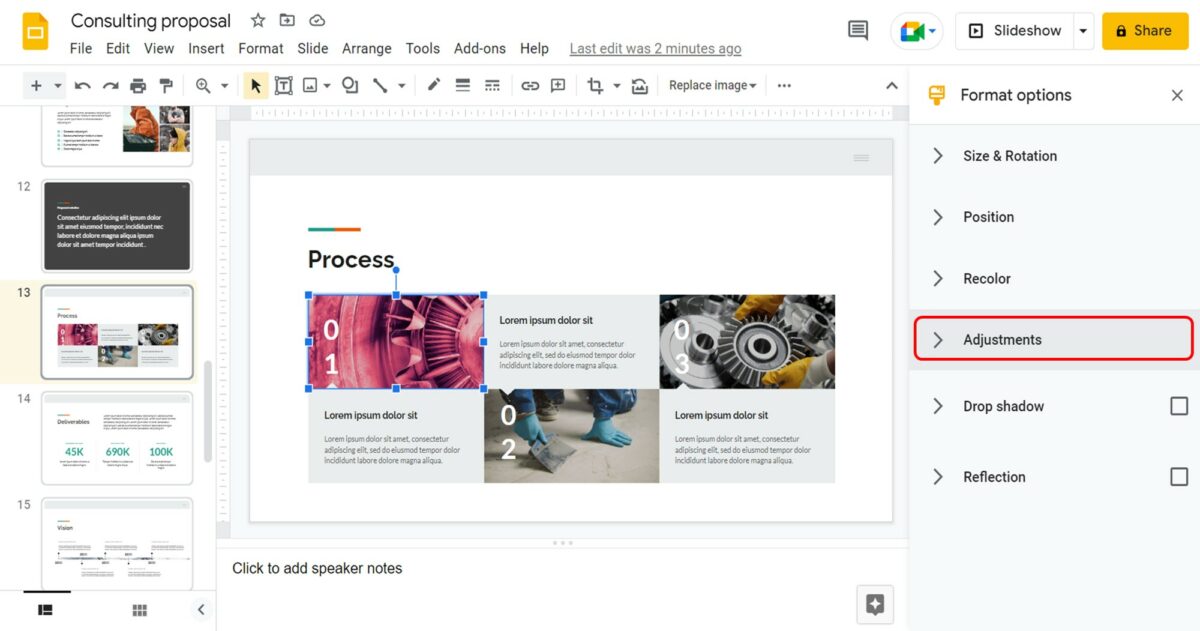
In the “Format options” sidebar, click on the “Adjustments” option. You can use the features available under the “Adjustments” section to format the selected image.
6.1 Add Transparency to a Picture
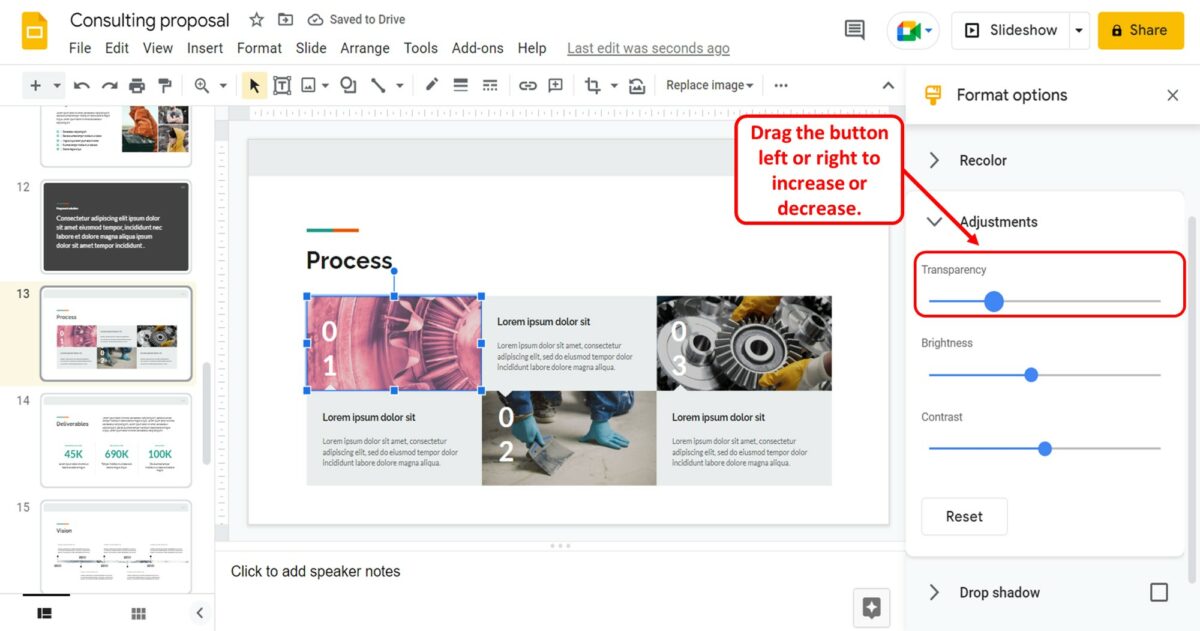
To add transparency to the selected picture, all you have to do is drag the “Transparency” slider under the “Adjustments” section in the “Format options” sidebar. You can drag it to the right to increase transparency and to the left to decrease transparency.
6.2 Change Brightness of an Image
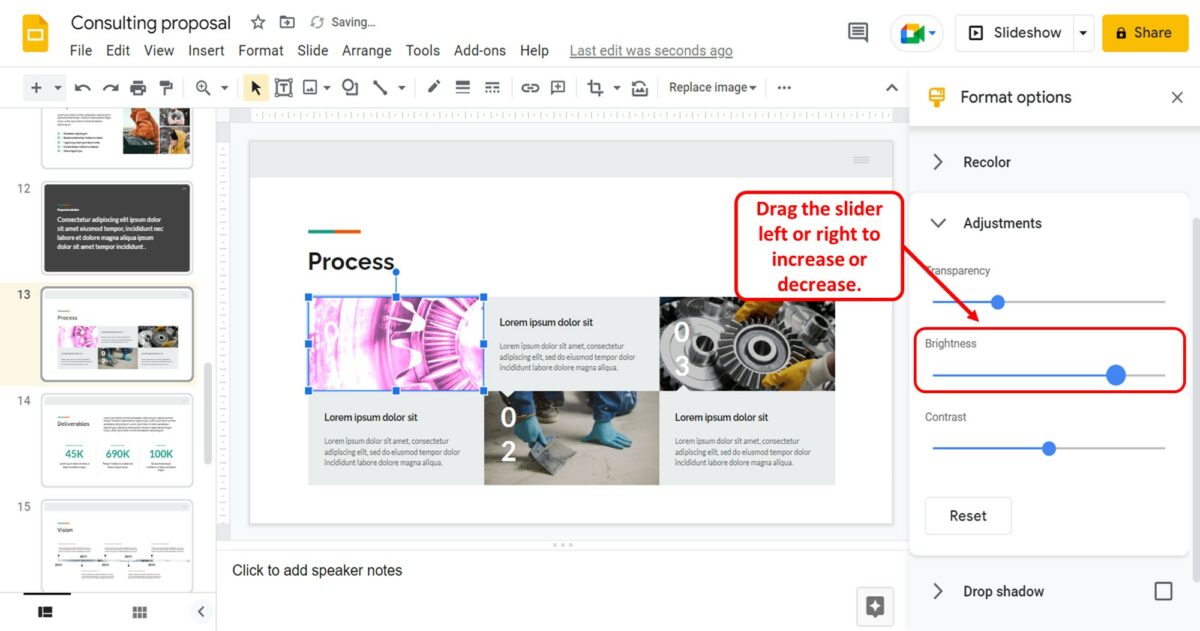
In the “Adjustments” section of the “Format options” sidebar, drag the “Brightness” slider left or right to decrease or increase the brightness of the image.
6.3 Adjust Contrast of an Image
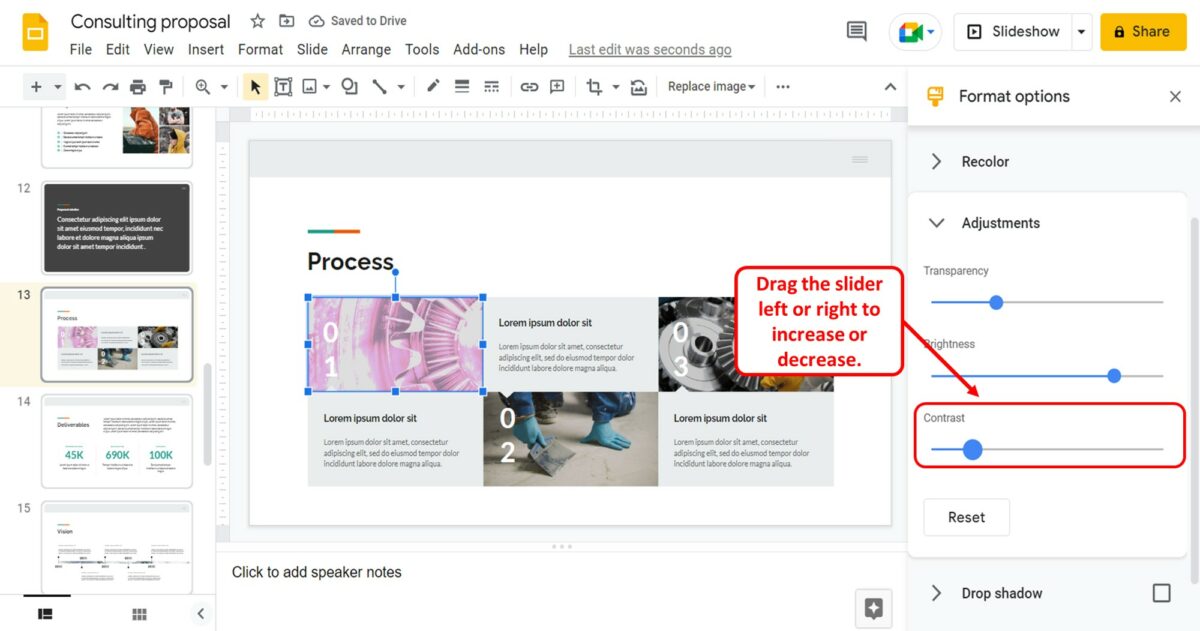
Adjusting the image contrast allows you to customize the color difference between each object in an image. To adjust the contrast, all you have to do is drag the “Contrast” slider.
7. How to Recolor Images in Google Slides
In Google Slides, there are a few preset color options that you can use to recolor an image on a slide. To recolor an image, follow the 3 quick steps.
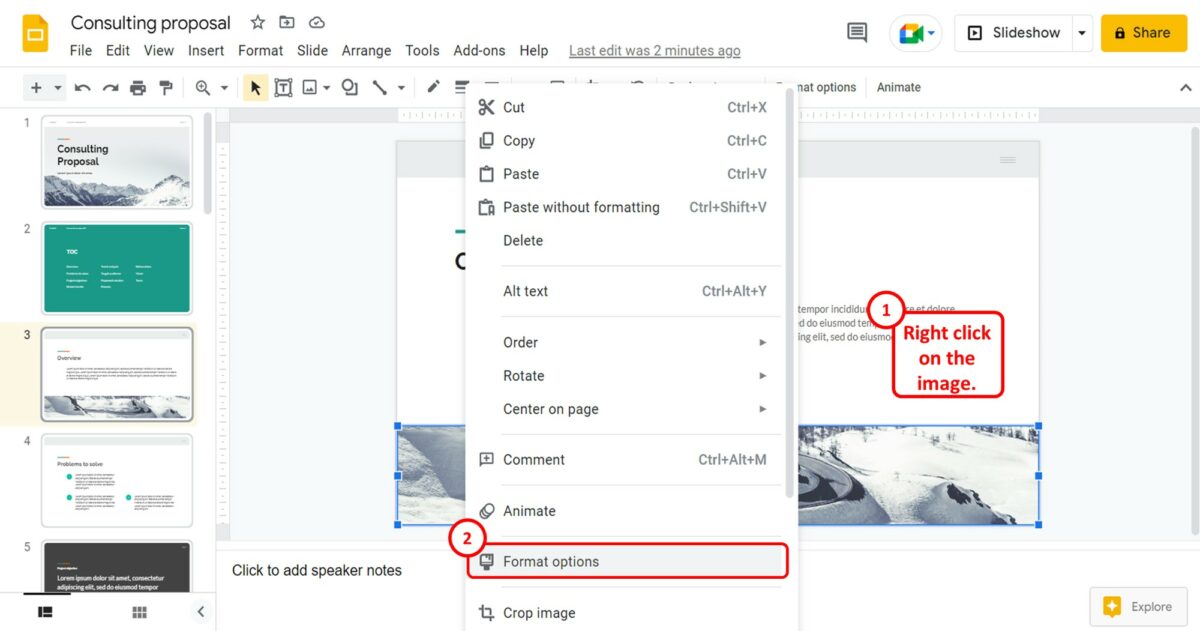
The first step is to “Right Click” on the image that you want to recolor. In the right-click menu, click on the “Format options” option.
Step-2: Click on the “Recolor” option
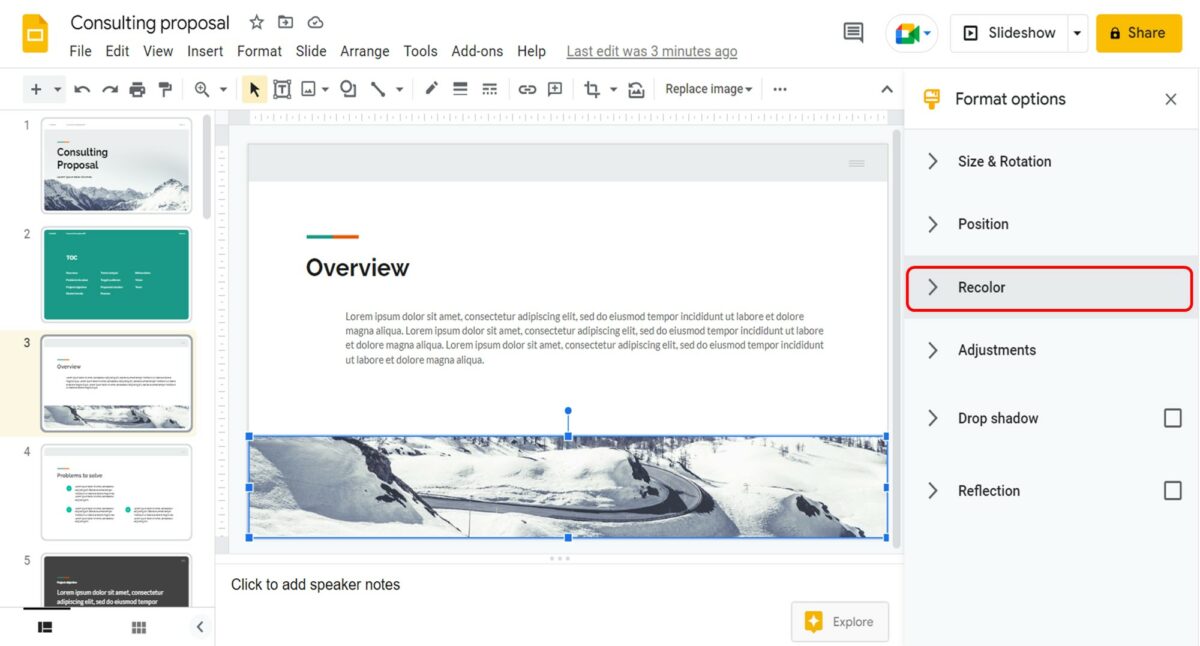
In the “Format options” sidebar on the right side of the screen, click on the “Recolor” option.
Step-3: Click on the “No Recolor” box
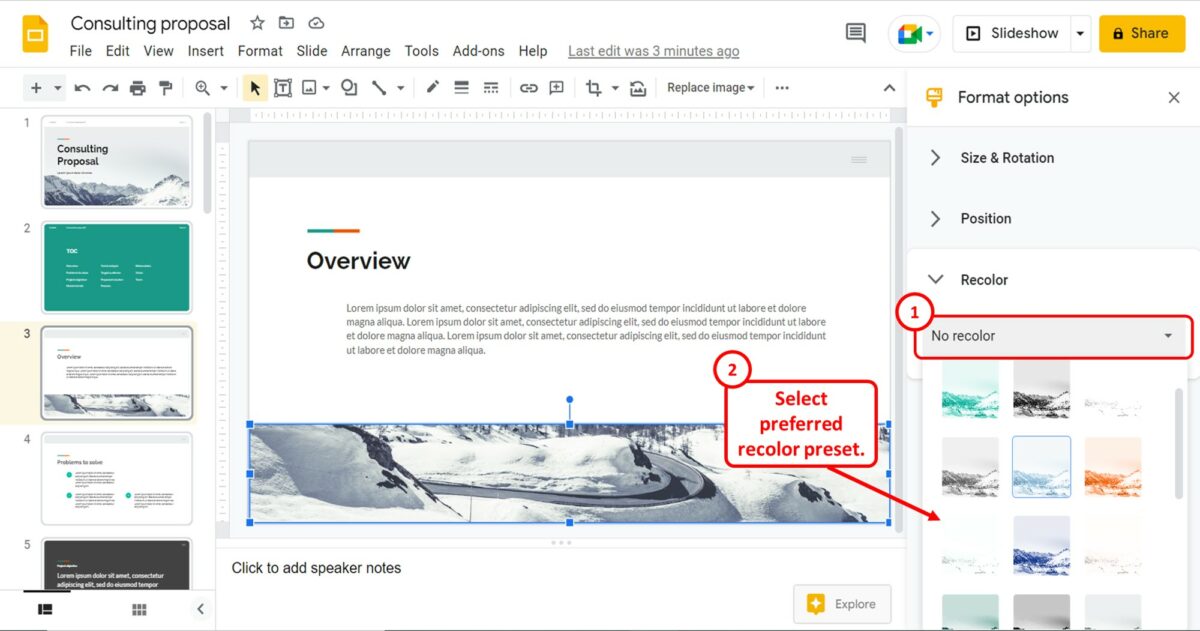
In the “Recolor” section of the “Format options” sidebar, click on the “No recolor” box. Now all you have to do is click on the preferred recolor preset from the dropdown list to recolor the selected image.
8. How to Rotate or Flip an Image in Google Slides?
To quickly rotate or flip an image in Google Slides, you can use the “Format options” sidebar. All you have to do is follow the 4 simple steps.

In the open slide, click on the image that you want to flip or rotate. Then click on the “Format options” option in the toolbar.
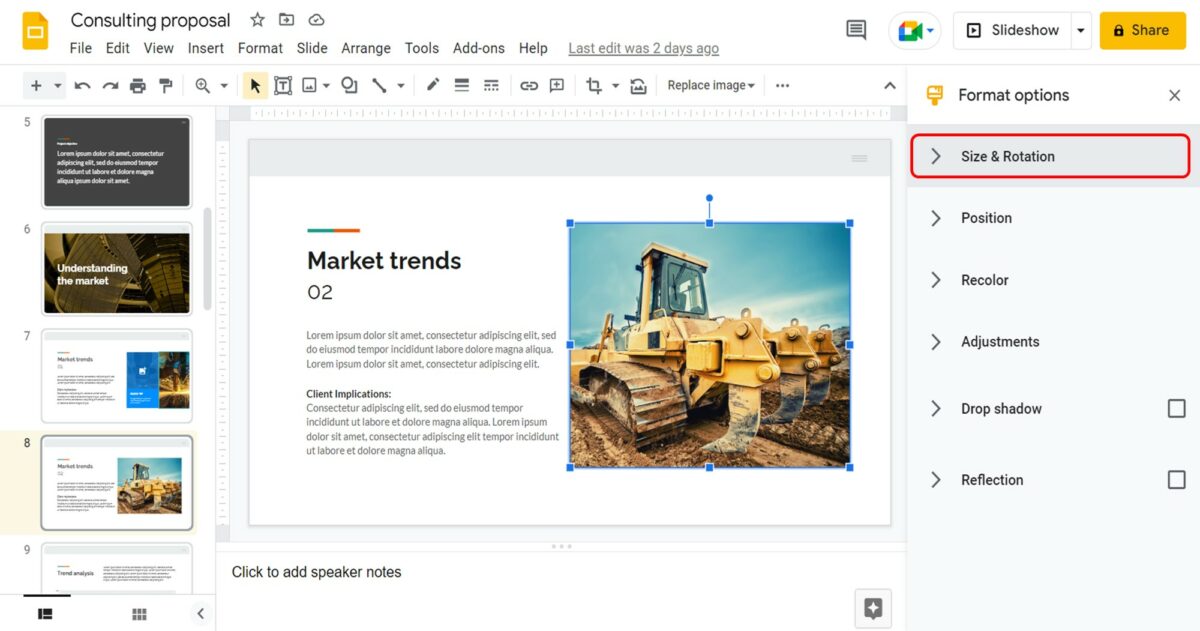
The next step is to click on the “Size and Rotation” option in the “Format options” sidebar on the right side of the screen.
Step-3: Click on the “Angle” box
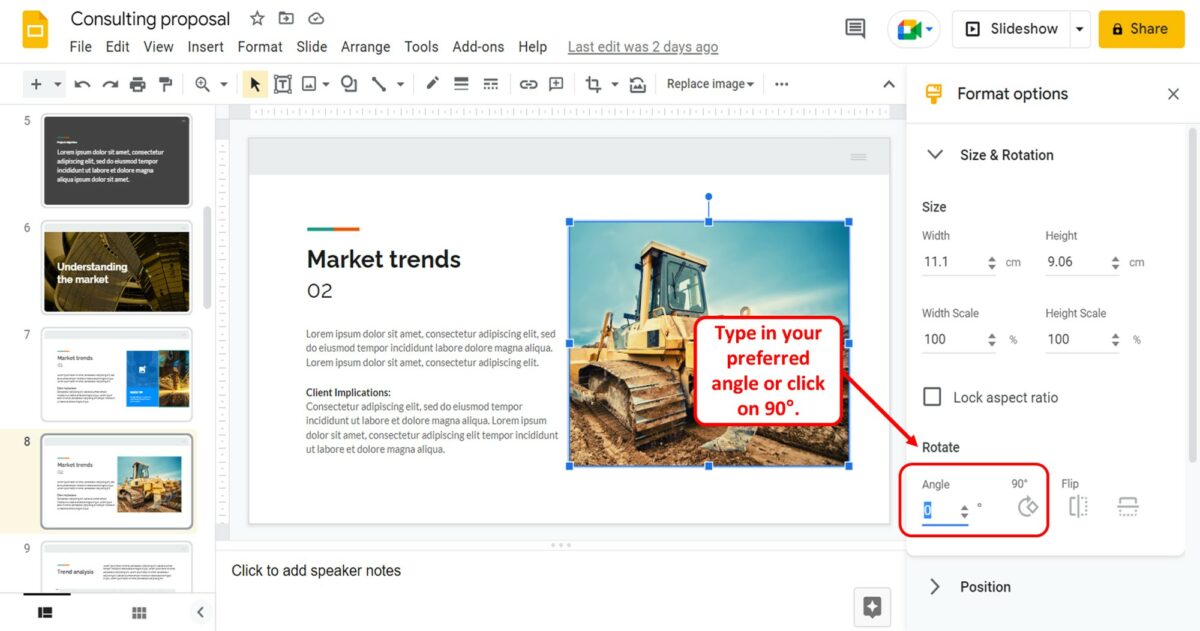
To rotate the image, click on the “Angle” box under the “Rotate” section of the “Size and Rotation” option in the “Format options” sidebar. All you have to do is type in the preferred angle of rotation in the “Angle” box. You can also click on the “90°” option to rotate the image by 90°.
Step-4: Click on the “Flip” option
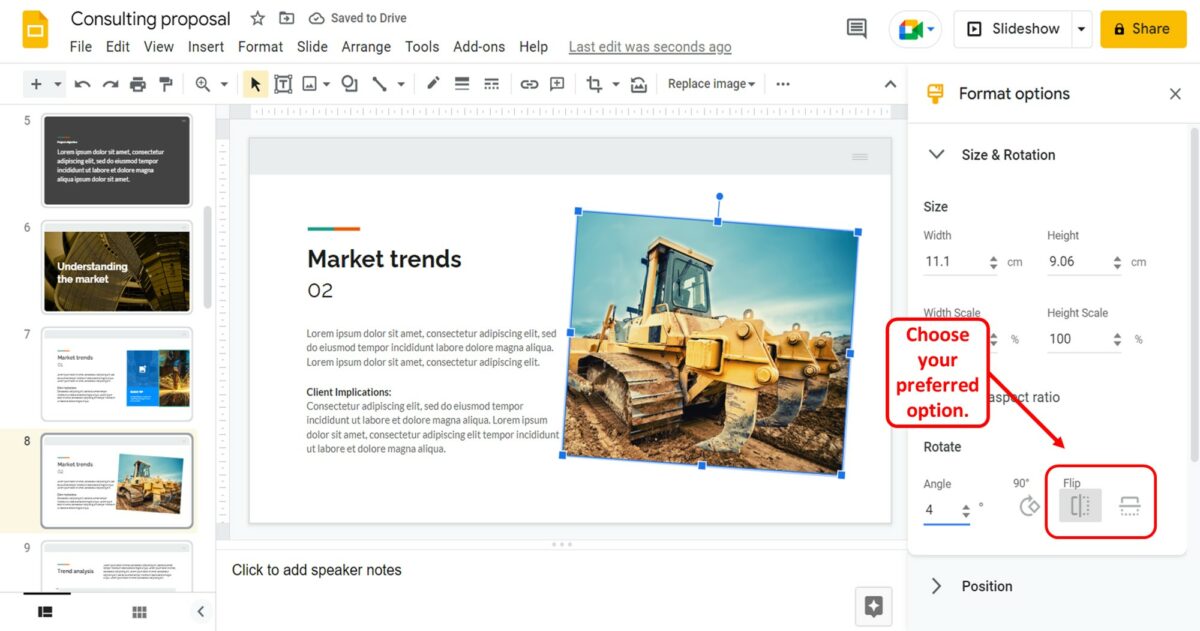
To flip the image, click on the “Flip horizontally” or the “Flip vertically” options available under the “Flip” option in the “Format options” sidebar.
9. How to Add Drop Shadow to an Image in Google Slides?
The “Drop shadow” feature in Google Slides adds a shadow under the selected image in a slide to give it a 3D effect. To add a drop shadow to an image, follow the 2 easy steps.
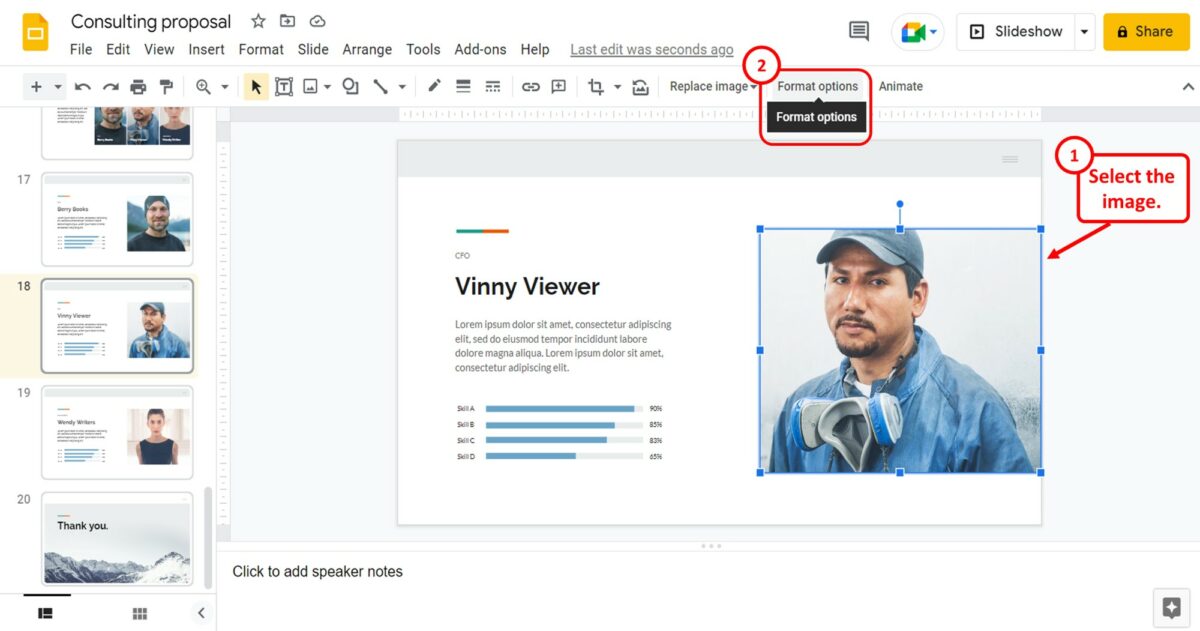
The first step is to click on the image to select it. Then click on the “Format options” option in the toolbar. This will open a sidebar.
Step-2: Click on the “Drop shadow” option
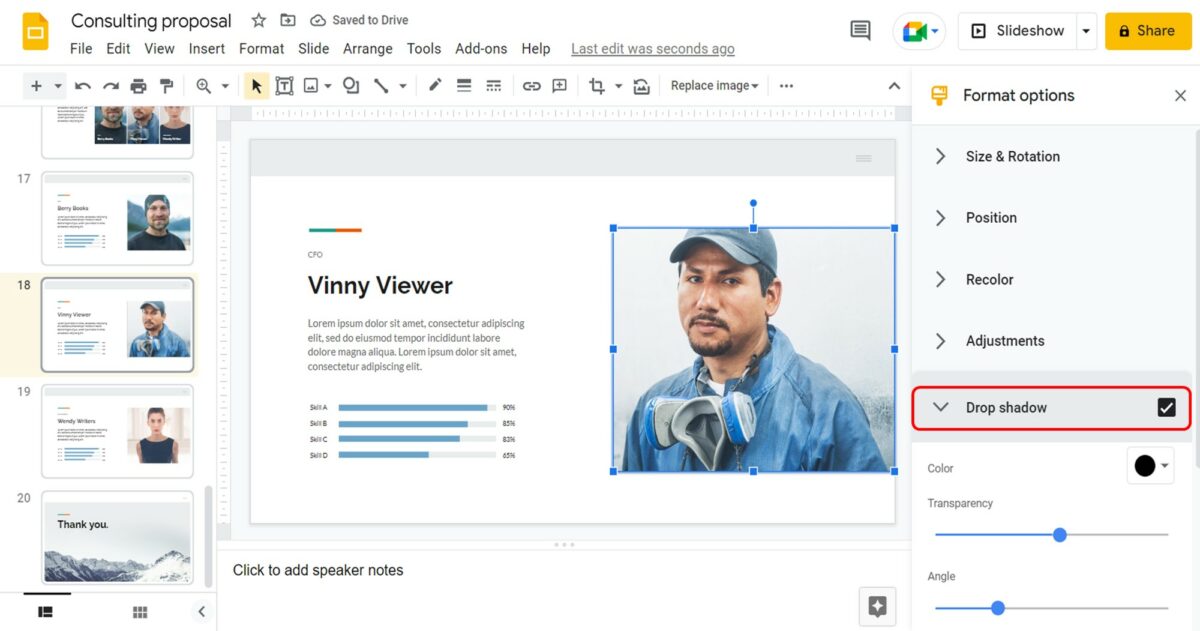
In the “Format options” sidebar, click on the “Drop shadow” option. This will add a drop shadow to the selected image. You can also customize the drop shadow using the options available under the “Drop shadow” section in the “Format options” sidebar.
9.1 Adding Transparency to the Drop Shadow
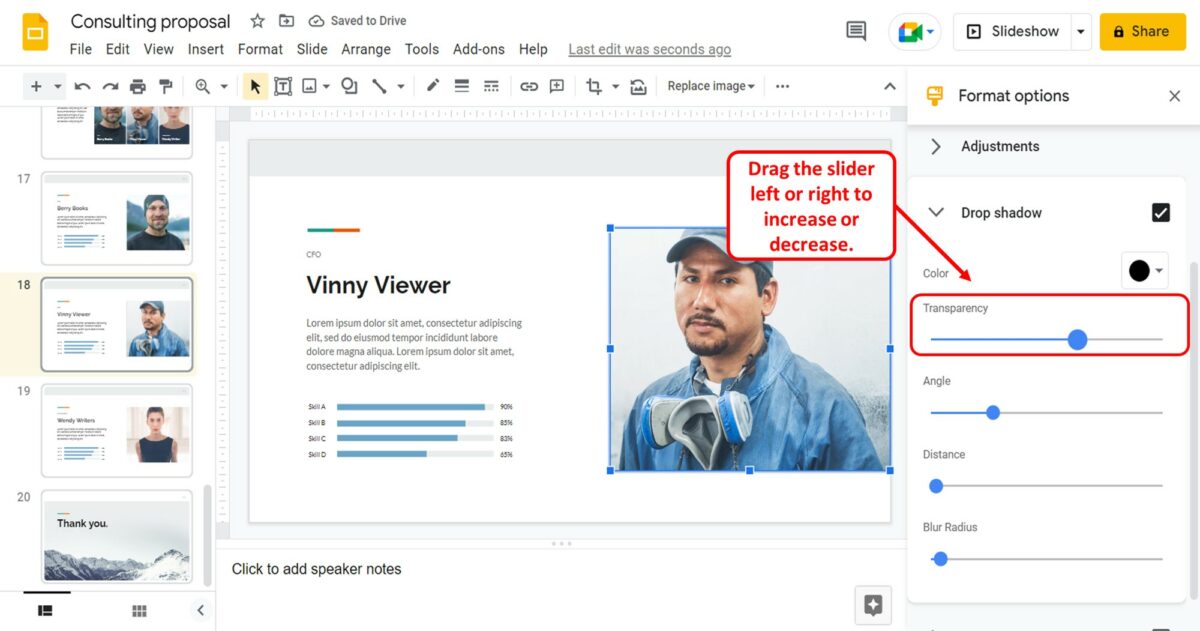
To add transparency to the drop shadow, all you have to do is drag the “Transparency” slider under the “Drop shadow” section in the “Format options” sidebar. You can drag it to the right to increase transparency and to the left to decrease transparency.
9.2 Changing Drop Shadow Angle of an Image
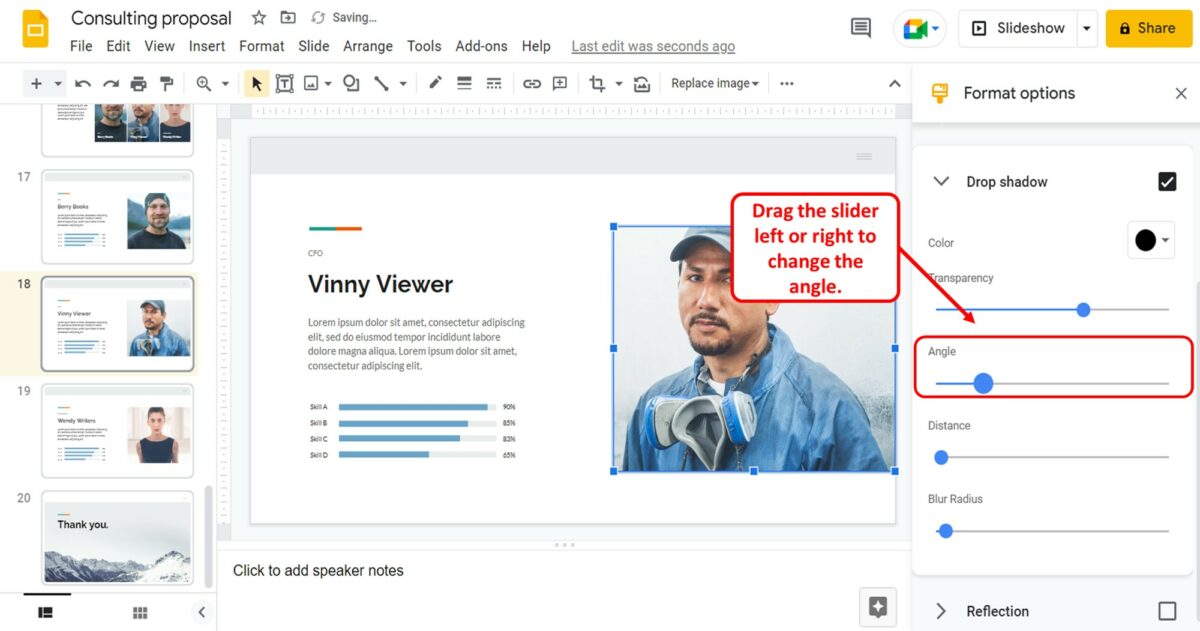
In the “Drop shadow” section of the “Format options” sidebar, you can drag the “Angle” slider to change the angle of the drop shadow in different directions.
9.3 Drop Shadow Distance
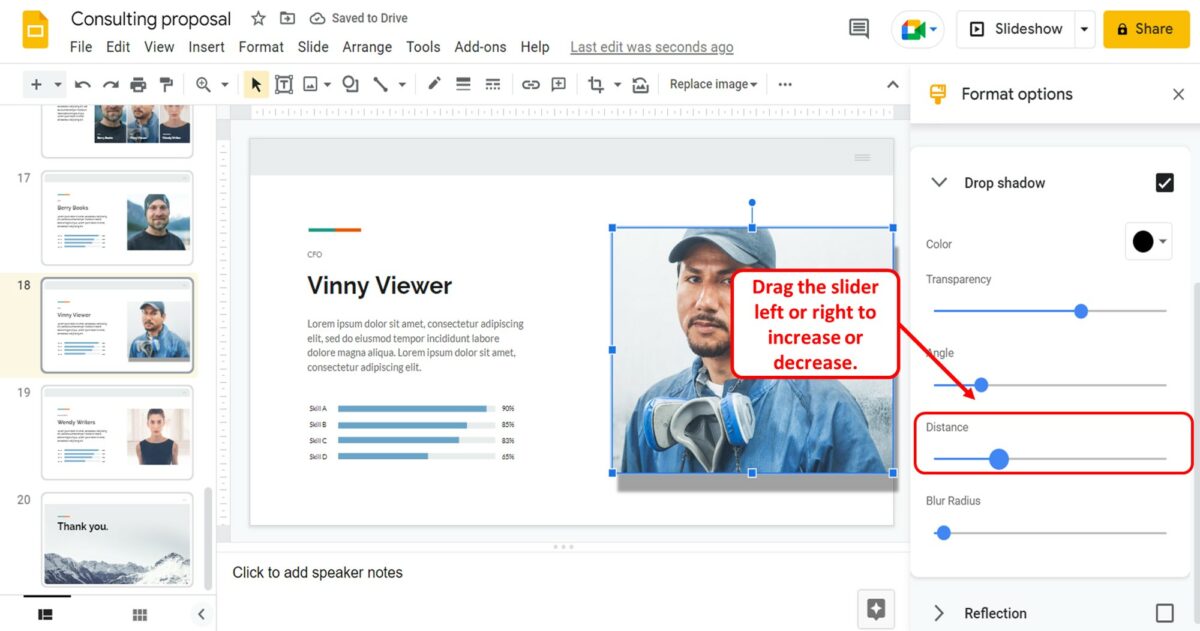
The “Distance” option in the “Drop shadow” section allows you to customize the distance between the image and its drop shadow. You can drag the “Distance” slider left or right to decrease or increase the drop shadow distance.
9.4 Blur Radius of the Drop Shadow
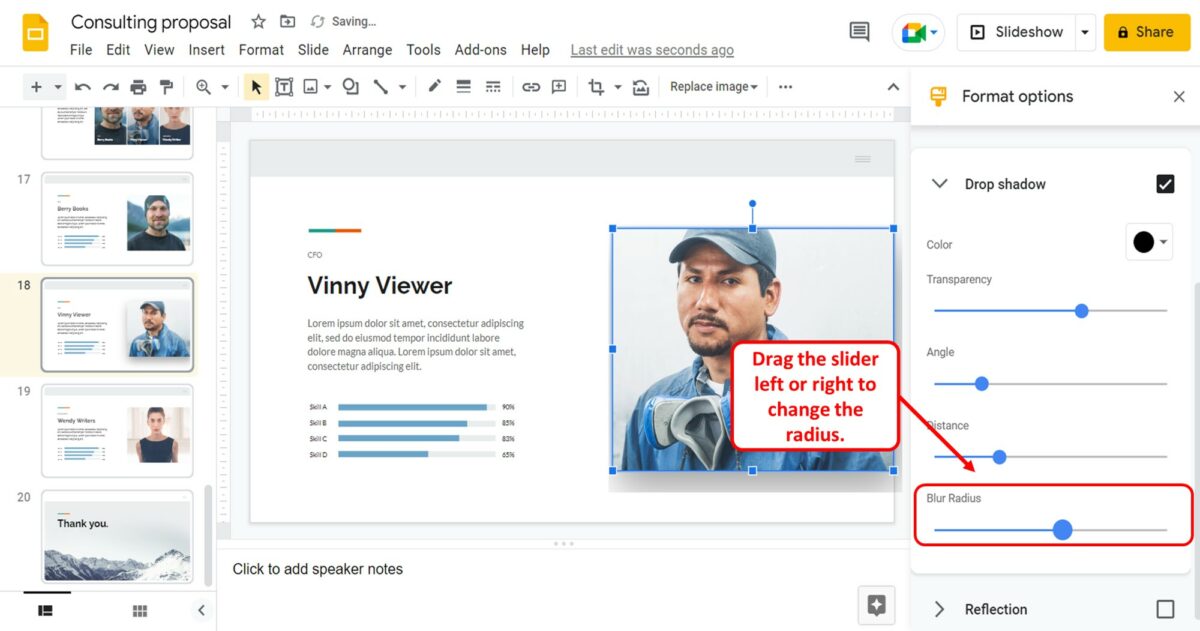
To change the blur radius of the drop shadow added to an image, all you have to do is drag the “Blur Radius” slider in the “Drop shadow” section of the “Format options” menu.
10. How to Reset Image Edits in Google Slides?
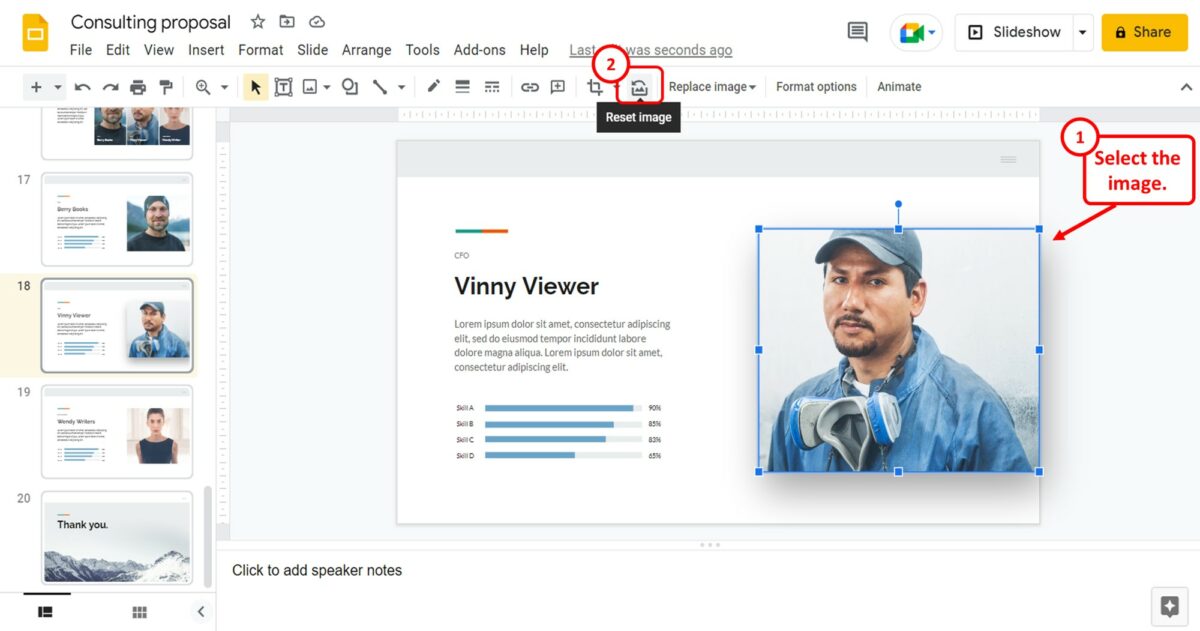
To reset all the edits applied to an image in Google Slides, you have to first click on the image to select it. Then all you have to do is click on the “Reset image” icon in the toolbar located under the menu bar at the top of the screen.
Best photo slideshow software and apps 2022
The best photo slideshow software turns your images and music into a seamless presentation

The best photo slideshow software can turn your long list of photos into a lively and engaging experience. From family holidays and trips with friends to your kids' sports and arts progress – this software is ideal for sharing your beloved images with others.
The best photo slideshow software does more than simply pairing images and music. Some will help you remove any out of focus or unclear shots so you get the best end result. Then you can add more such as annotations, maps and beyond.
These programs work across a host of devices and some even offer more advanced video editing tools for you to work with while remaining easy to use. Or, for more basic versions that work right there on your smartphone, there are the likes of PixGram for Android and PicPlayHost for iOS which are free and easy to use but lack more complex features.
Image editing is possible on a basic level with filters included on many of the programs, allowing you to make certain snaps pop out as needed. But to go deeper on this you'll want to look at the best photo editing software . Should you want to keep all your photos organized, to make the whole process far easier, then look into getting one of the best photo organizing apps too.
1. Movavi Slideshow Maker 7: Best photo slideshow software overall
Why you can trust Top Ten Reviews Our expert reviewers spend hours testing and comparing products and services so you can choose the best for you. Find out more about how we test .

Movavi Slideshow Maker 7
Our expert review:
Specifications
Reasons to buy, reasons to avoid.
Movavi Slideshow Maker 7 is a versatile photo slideshow software package that will get you good results in minutes, and excellent results the more you learn its tools and features. There's a handy montage wizard to get you started, and that may be all you need for most of the slideshows you end up creating - this is very simple to use, even though it has all the hallmarks of an actual video editor.
Movavi includes a whole variety of effects, transitions, and filters to make your slideshows stand-out, and you can use it for everything from fun social media fodder through to serious photo presentations. The more technical video effects like camera pans and zooms will give you more editorial control over your slideshow, while the effects, stickers, and animations will help you keep things entertaining. There are over 160 filters, and more than 100 animation effects, so you can really craft a variety of slideshows. It's ideal for weddings, graduation parties, birthdays and more, as well as more serious stuff like business presentations and showreels.
You can overlay music too, which draws from the library on your computer, and you can mix in videos with your photos if you want to create mixed media. Movavi exports to all the most common photo and video file types, so you don't need to worry about compatibility, and there's an option to save direct to a YouTube channel or - if you want to share on other social media - to Google Drive. The negatives? Well, some may never use many of the features, and could just use a free app, but anyone serious about making a quality slideshow will love what Movavi has to offer.
2. PhotoStage Slideshow 8: Best budget slideshow software

PhotoStage Slideshow 8
PhotoStage Slideshow 8 is one of the cheapest options for creating slideshows, and is very simple to use too. It lacks a handful of features you may find elsewhere, but has more than enough for most people to create excellent slideshows. We recommend it for anyone who isn't going to use all of the flashy graphics and transitions offered by other programs. There are no backgrounds, filters or themes, but there are plenty of transition effects to choose from. This includes more elaborate transitions like fading into the next image in the expanding shape of a heart or simply scrolling from one side of the screen to the other. You can make simple edits such as cropping and rotating your photos, and adjusting contrast, hue and brightness. We found the slideshow playback to be crisp and of good color quality in our tests. This software handles the most common audio and video formats, so you can spice up your slideshows with mixed media. The area where this slideshow software really falls short is in the help and support, but honestly, this program is so easy to use that you likely won't need to contact anyone at NCH for help.
In terms of export, you can save your slideshow as a variety of popular file types, or upload directly to YouTube, Vimeo, or Flickr. Or, if you want, you can save directly to your smartphone or tablet. Simple.
3. CyberLink PhotoDirector 12: Best editor with slideshow options

CyberLink PhotoDirector 12
CyberLink PhotoDirector 12 has the right balance of features for anyone looking to create professional-looking slideshows. It's primarily a photo editor, with all the tools you'd expect from a full-featured photo enhancement program, but with the option to create slideshows via the 'Create' tab. The reason we recommend PhotoDirector above other photo editing apps is because it's simple to use and it helps you create incredible results with very little effort, even if it does lack some of the more advanced tools that professional editors need.
There are a whole host of tools for enhancing your photos, including things like dispersion effects, which give you the power to animate particles in your images with ease. This can add a serious wow-factor to your slideshows. There are also editing options for cropping, layers, background changes, and all kinds of creative effects to give your photos some zing.
As a slideshow creator it's simple to use, with various headers, overlays, transitions, and everything you need to craft a compelling presentation. Some who want basic options may find it overwhelming, despite its simplicity, so this really is for anyone looking to create pro-looking slideshows. And it's a little more expensive than some other options in our guide. However, there's no denying you get excellent results.
4. PixGram: Best slideshow app for Android devices

PixGram is one of the best slideshow apps if you want to simply create slideshows and montages on your smartphone. There's a free version and it covers you for almost all the features you need, although you're restricted to three-minute videos/slideshows until you purchase the premium version.
This one is primarily designed to help you set slideshows to music, and to share them direct to social media. You can import images and videos direct from your phone's gallery into the app, and combine it with any music you have purchased and saved to your device. There are plenty of filters to apply to your images, and a decent range of video editing options, but it does lack transitions. What matters most is that this is easy to use, and you can quickly share results to most of the popular social media platforms in a variety of aspect-ratios that each one supports. For example, the 16:9 format suits Facebook, while the 1:1 is perfect for Instagram.
There are definitely limitations here, and if you're using the free version you'll get in-app ads (much like you do in most free apps). Those looking for fancy transitions should consider other options, but anyone who wants to simply create slideshows and montages on their phone, without using a laptop or computer, should seriously consider PixGram.
5. PicPlayPost: Best slideshow app for Apple devices

PicPlayPost
PicPlayPost is a surprisingly powerful slideshow (and video) tool for iOS devices. It has a vast number of features, and can craft montages and slideshows in 1080p and 4K, if you have a compatible iPhone or iPad. You can download it for free, but this version is very limited, and you're definitely going to need to subscribe if you're looking to use the majority of the tools. This is expensive, at $6.99 per month (or an even higher one-time payment), so consider if you're really going to use it that much.
There are so many transitions, sticker, effects, and filters - you can get seriously creative with your slideshows and montages. It's simple to use, but there are loads of deep editing options for those who want to create professional-looking presentations and video montages. You can create gifs, slideshows, movies, and collage images, making this perfect for crafting memes too. The slideshows can last up to 30 minutes, and it'll access music from your device.
If you're constantly adding custom videos and slideshows to social media, this is probably worth the price of subscription, especially as you can create videos and images specifically formatted for social channels. If you're looking for something a little more simple, then this is probably a bit much (ironically, though, the free version doesn't offer enough for even basic use).
6. PhotoStory Deluxe: Best for beginners

PhotoStory Deluxe
If you're new to the whole photo slideshow thing, and you want a no-nonsense piece of software for your home computer, then PhotoStory Deluxe is just the thing. There's a slideshow wizard to help get you started, and introduce you to most of the main features, and after that the interface is nice and simple. There's a built-in editor too, which lets you enhance and make basic edits to the images you've added, and while options here are relatively limited compared to other editing programs, there's enough here to make your slideshows look rather professional.
You can export your slideshows to most common formats, and there are options for VR slideshows and 360 videos, which is a nice touch. We love the travel map feature too, which allows you to create slideshows that show off all your vacation-snaps. The grandkids will love to see all of those!
There are options to upload your slideshows and videos direct to places like YouTube, although you retain the ability to burn them to a DVD too, in case you want to mail your substantial slideshows to friends, family, or clients. You can simply save them onto your home computer device too. While the editing tools lack features, and we do think this is mid-priced among slideshow creators, it's still worth considering if you're a newcomer seeking to create slideshows to thoroughly entertain your friends and family with.
What features should you look for in slideshow software?
Slideshow software does offer some photo editing options but these are basic and won't replace a fully fledged photo editor. So if you simply want to crop, rotate or remove the redeye from a picture, then this slideshow software may be enough. But for anything more complex you'll be left wanting.
A useful feature to look out for is the ability to arrange your photos by themes. This can help in making it easier to insert appropriate backgrounds and transitions for the slideshow.
The photo organizing software mentioned above can help as it allows you to cut down the images to the best ones only. Being concise is important for a slideshow where too many pictures - especially many similar ones - can really put people off.
Voiceover recording is a really helpful feature which can add another layer of context to what is being seen. Even more valuable if you're sending this to someone and you won't actually be there to explain what's being shown.
Talking of sharing, this is important so be sure your software can export in a file format that's easily accessible. MP4 is a common video file format that most devices will be able to open and more slideshow software should output to. Plus it condenses well meaning it can be sent without taking up too much space or time.
While most of these options are very intuitive, it can pay to have decent help and support, should you wish to try the more complex features on offer. So keep an eye out for this as a useful feature too.
Tips for creating a compelling slideshow
- According to Memories Renewed , when it comes to slideshows ten to 12 images are typically displayed within a minute. This means that a 100-image slideshow will likely last ten to 12 minutes. Take this into account when creating your slideshows.
- For an elegant slideshow, don’t use distracting transitions. Stick with a simple fade between images.
- Choose music and images that are appropriate for the event. You don’t want to play raucous music or have disrespectful photos at a funeral, for example.
- Know how the slideshow will be used. If it’s going to play in the background it can go on forever. However, if you’re going to draw everyone’s attention to it as a special presentation, keep it short and simple – three to five minutes. People typically don’t have long attention spans.
- Add statements from loved ones, when appropriate, to make it extra special.
- Make sure you run through the slideshow beforehand to make sure everything works properly. Fix any problems. This includes the transitions, graphics and music.
Get the Top Ten Reviews Newsletter
Sign up to receive the latest news, reviews, buying guides and deals direct to your inbox
Ian has been a journalist for 20 years. He's written for magazines and websites on subjects such as video games, technology, PC hardware, popular (and unpopular) science, gardening and astronomy. In his spare time he has a pet tortoise and grows his own vegetables. He also has a passion for cameras and photography, and has written for TTR on these subjects.
Ooni Volt 12 review: Ooni's first electric pizza oven is a huge success
Sign up to our newsletters
Get ready for those warm summer evenings with 33% off this outdoor fire pit at Wayfair—hurry, if you snooze, you'll lose
Most Popular
Free online slideshow maker.
Combine photos and video clips with music to create a captivating slideshow in minutes. No experience required.

Template IDs
(To pull in manually curated templates if needed)
Orientation
(Horizontal/Vertical)
( Full, Std, sixcols )
(number of templates to load each pagination. Min. 5)
Most Viewed
Rare & Original
Newest to Oldest
Oldest to Newest
(still/multiple-pages/video/animated)
(true, false, all) true or false will limit to premium only or free only.
Make a photo slideshow in minutes with Adobe Express.
Share your story as a captivating slideshow for your audience with Adobe Express. Quickly and easily create a unique wedding slideshow, promote your product and business, or make a recap video of your favorite travels in minutes. Start with free slideshow templates at your fingertips, drag and drop icons and text, then choose a royalty-free Adobe Stock soundtrack that best fits the theme of your video. In no time, you’ll be able to turn your vision to life with a video slideshow made in Adobe Express. No experience required.
Discover even more.
Facebook Video
Instagram Video
TikTok Video
YouTube Clip
Marketing Video
Animation Video
Outro Video
Intro Video
Promo Video
How to make a photo slideshow.

Personalize your slideshow with one-click video editing tools.
Cut, crop, & trim..
Select videos and photos to crop, cut, split, or trim in just a few taps.
Easy resize options.
Make content of any size in the same project. Use the Resize tool to adjust video dimensions anytime.
Stand out with animation.
Select any element in your project to add movement or dynamic transition effects.
Adjust video speed.
Speed videos up or slow them down in one click.
Send an edit link.
Invite other people to edit your video project directly, leave comments, or view it in real-time, from anywhere.
Share on social.
Connect your social channels to the Adobe Express Content Scheduler & share your video to your favorite platforms.
Add text to photos and videos.
Apply text to any photo or video with tons of unique font combinations to choose from.
Enhance with filters.
Try out filter effects or tweak the look and feel of your media using the Adjustments menu.
Make any kind of content from your browser.
All-in-one online content creation app..
Create slideshow videos, explainer videos, montages, and more and share to any digital destination.
Thousands of free Adobe Stock videos, images & music.
Tons of royalty-free stock music, videos, images, & design assets right in Adobe Express to add to your own content.
Free video templates for any occasion.
Find the perfect free template to start customizing with your own media.
Tons of free templates to make a video slideshow.
Whether you’re making a video slideshow to showcase your favorite memories, a how-to video, or a recap video, there are tons of stunning, free slideshow templates fit for any occasion right in Adobe Express. It’s free, easy to use, and all skill levels can make a video slideshow in minutes.

Turn any video or photo into a dynamic viewing experience.
Add a blend of photos and video clips to a single slideshow. Drag the corners of each clip to shorten scenes or split videos in one click. To add a whole new layer of dimension, you can even apply animated transition effects to any text, icon, or graphic in your project to capture – and keep your audience’s attention.
Frequently asked questions.

- SUGGESTED TOPICS
- The Magazine
- Newsletters
- Managing Yourself
- Managing Teams
- Work-life Balance
- The Big Idea
- Data & Visuals
- Reading Lists
- Case Selections
- HBR Learning
- Topic Feeds
- Account Settings
- Email Preferences
How to Make a “Good” Presentation “Great”
- Guy Kawasaki

Remember: Less is more.
A strong presentation is so much more than information pasted onto a series of slides with fancy backgrounds. Whether you’re pitching an idea, reporting market research, or sharing something else, a great presentation can give you a competitive advantage, and be a powerful tool when aiming to persuade, educate, or inspire others. Here are some unique elements that make a presentation stand out.
- Fonts: Sans Serif fonts such as Helvetica or Arial are preferred for their clean lines, which make them easy to digest at various sizes and distances. Limit the number of font styles to two: one for headings and another for body text, to avoid visual confusion or distractions.
- Colors: Colors can evoke emotions and highlight critical points, but their overuse can lead to a cluttered and confusing presentation. A limited palette of two to three main colors, complemented by a simple background, can help you draw attention to key elements without overwhelming the audience.
- Pictures: Pictures can communicate complex ideas quickly and memorably but choosing the right images is key. Images or pictures should be big (perhaps 20-25% of the page), bold, and have a clear purpose that complements the slide’s text.
- Layout: Don’t overcrowd your slides with too much information. When in doubt, adhere to the principle of simplicity, and aim for a clean and uncluttered layout with plenty of white space around text and images. Think phrases and bullets, not sentences.
As an intern or early career professional, chances are that you’ll be tasked with making or giving a presentation in the near future. Whether you’re pitching an idea, reporting market research, or sharing something else, a great presentation can give you a competitive advantage, and be a powerful tool when aiming to persuade, educate, or inspire others.
- Guy Kawasaki is the chief evangelist at Canva and was the former chief evangelist at Apple. Guy is the author of 16 books including Think Remarkable : 9 Paths to Transform Your Life and Make a Difference.
Online PowerPoint Editor
Edit powerpoint presentation. edit pptx, ppt, or odp., powered by aspose.com and aspose.cloud ., * by uploading your files or using our service you agree with our terms of service and privacy policy ..
Send the download link to
Press Ctrl + D to save this page as a bookmark.
We've already processed ??? files with a total size of ??? Mbytes.

How to edit presentation online
- Click Drop or upload your file .
- Select the PowerPoint file you want to open and edit on your computer. Your PowerPoint will be uploaded and then presented in an online Editor menu.
- Edit your PowerPoint: Edit text; Change the size of fonts; Use formatting options; Move shapes and objects; And perform other tasks.
- Once you finish editing your presentation, click the Download icon.
Aspose.Slides Editor App is used to create and edit PowerPoint presentations (PPT or PPTX), templates and layouts. Load your presentation and observe the slides. Choose the element on a slide and modify its properties, color, size, layout, etc. Move, resize and delete elements. Zoom the slides, change z-order, etc. Download the resulting presentation in different formats as PDF, TIFF, etc. Other Aspose Apps you may want to try: Merger web app for merging presentations; Watermark web app for adding watermarks to presentations. Read an article on creating invitations in PowerPoint: 3 Easy Steps for Creating Invitations in PowerPoint

Aspose.Slides Editor
- Online PPTX or PPT Editor.
- Open PPTX or PPT online.
- Edit PowerPoint online. Save edited presentation.
- Edit or create PowerPoint presentation online.
- Edit any PowerPoint file: PPT , PPTX or ODP.
- Edit presentation slideshow: PPS , PPSX .
- How do I edit a PowerPoint presentation online? To edit your PowerPoint online, upload the PowerPoint file. Then you get to access editing options.
- Can I edit PowerPoint without Office? Yes. You do not have to install Office or Microsoft PowerPoint. To use Aspose Editor, all you have to do is upload your file. No payment, software installation, or plugin is required.
- How do I edit a text box in PowerPoint? Upload your PowerPoint file. Click the text box. You can now edit or make changes to the text.
- How do I edit PowerPoint on my mobile phone? Aspose PowerPoint Editor works everywhere: mobile phones (iPhones and Android devices) or computers (Windows, macOS). Use it.
- Can I format a text in PowerPoint online? Yes, you can format a text. Click the text and then apply your preferred formatting options to it.
- Are there limits on uploaded files? For a single presentation, the maximum file size is 35 MB and the maximum number of slides is 50. If you must edit a presentation that exceeds 35 MB or contains more than 50 slides, we recommend you use Aspose PowerPoint Splitter to divide the slides into multiple presentations. You can then modify the presentations you obtained individually.
Simple Editing
Edit from Anywhere
Trusted operations
Other supported editors.
We provide editors used to work with other PowerPoint documents. Please, see the list below.
- Edit PDF (Edit PDF document)
- Edit PDF text (Edit text in PDF)
- Change PowerPoint Background (PowerPoint Presentation)
- Create Presentation (PowerPoint Presentation)
- Create Slides (PowerPoint Presentation)
- Edit PowerPoint Template (PowerPoint Presentation)
- Edit PPS (PowerPoint Presentation)
- Edit Slideshow (PowerPoint Presentation)
- PowerPoint Creator (PowerPoint Presentation)
- Web PowerPoint (PowerPoint Presentation)
Oops! An error has occurred.
Error has been reported successfully..
You have successfully reported the error, You will get the notification email when error is fixed. Click this link to visit the forums.
� Aspose Pty Ltd 2001-2022. All Rights Reserved.
How-To Geek
6 ways to create more interactive powerpoint presentations.
Engage your audience with cool, actionable features.
Quick Links
- Add a QR code
- Embed Microsoft Forms (Education or Business Only)
- Embed a Live Web Page
- Add Links and Menus
- Add Clickable Images to Give More Info
- Add a Countdown Timer
We've all been to a presentation where the speaker bores you to death with a mundane PowerPoint presentation. Actually, the speaker could have kept you much more engaged by adding some interactive features to their slideshow. Let's look into some of these options.
1. Add a QR code
Adding a QR code can be particularly useful if you want to direct your audience to an online form, website, or video.
Some websites have in-built ways to create a QR code. For example, on Microsoft Forms , when you click "Collect Responses," you'll see the QR code option via the icon highlighted in the screenshot below. You can either right-click the QR code to copy and paste it into your presentation, or click "Download" to add it to your device gallery to insert the QR code as a picture.
In fact, you can easily add a QR code to take your viewer to any website. On Microsoft Edge, right-click anywhere on a web page where there isn't already a link, and left-click "Create QR Code For This Page."
You can also create QR codes in other browsers, such as Chrome.
You can then copy or download the QR code to use wherever you like in your presentation.
2. Embed Microsoft Forms (Education or Business Only)
If you plan to send your PPT presentation to others—for example, if you're a trainer sending step-by-step instruction presentation, a teacher sending an independent learning task to your students, or a campaigner for your local councilor sending a persuasive PPT to constituents—you might want to embed a quiz, questionnaire, pole, or feedback survey in your presentation.
In PowerPoint, open the "Insert" tab on the ribbon, and in the Forms group, click "Forms". If you cannot see this option, you can add new buttons to the ribbon .
As at April 2024, this feature is only available for those using their work or school account. We're using a Microsoft 365 Personal account in the screenshot below, which is why the Forms icon is grayed out.
Then, a sidebar will appear on the right-hand side of your screen, where you can either choose a form you have already created or opt to craft a new form.
Now, you can share your PPT presentation with others , who can click the fields and submit their responses when they view the presentation.
3. Embed a Live Web Page
You could always screenshot a web page and paste that into your PPT, but that's not a very interactive addition to your presentation. Instead, you can embed a live web page into your PPT so that people with access to your presentation can interact actively with its contents.
To do this, we will need to add an add-in to our PPT account .
Add-ins are not always reliable or secure. Before installing an add-in to your Microsoft account, check that the author is a reputable company, and type the add-in's name into a search engine to read reviews and other users' experiences.
To embed a web page, add the Web Viewer add-in ( this is an add-in created by Microsoft ).
Go to the relevant slide and open the Web Viewer add-in. Then, copy and paste the secure URL into the field box, and remove https:// from the start of the address. In our example, we will add a selector wheel to our slide. Click "Preview" to see a sample of the web page's appearance in your presentation.
This is how ours will look.
When you or someone with access to your presentation views the slideshow, this web page will be live and interactive.
4. Add Links and Menus
As well as moving from one slide to the next through a keyboard action or mouse click, you can create links within your presentation to direct the audience to specific locations.
To create a link, right-click the outline of the clickable object, and click "Link."
In the Insert Hyperlink dialog box, click "Place In This Document," choose the landing destination, and click "OK."
What's more, to make it clear that an object is clickable, you can use action buttons. Open the "Insert" tab on the ribbon, click "Shape," and then choose an appropriate action button. Usefully, PPT will automatically prompt you to add a link to these shapes.
You might also want a menu that displays on every slide. Once you have created the menu, add the links using the method outlined above. Then, select all the items, press Ctrl+C (copy), and then use Ctrl+V to paste them in your other slides.
5. Add Clickable Images to Give More Info
Through PowerPoint's animations, you can give your viewer the power to choose what they see and when they see it. This works nicely whether you're planning to send your presentation to others to run through independently or whether you're presenting in front of a group and want your audience to decide which action they want to take.
Start by creating the objects that will be clickable (trigger) and the items that will appear (pop-up).
Then, select all the pop-ups together. When you click "Animations" on the ribbon and choose an appropriate animation for the effect you want to achieve, this will be applied to all objects you have selected.
The next step is to rename the triggers in your presentation. To do this, open the "Home" tab, and in the Editing group, click "Select", and then "Selection Pane."
With the Selection Pane open, select each trigger on your slide individually, and rename them in the Selection Pane, so that they can be easily linked to in the next step.
Finally, go back to the first pop-up. Open the "Animations" tab, and in the Advanced Animation group, click the "Trigger" drop-down arrow. Then, you can set the item to appear when a trigger is clicked in your presentation.
If you want your item to disappear when the trigger is clicked again, select the pop-up, click "Add Animation" in the Advanced Animation group, choose an Exit animation, and follow the same step to link that animation to the trigger button.
6. Add a Countdown Timer
A great way to get your audience to engage with your PPT presentation is to keep them on edge by adding a countdown timer. Whether you're leading a presentation and want to let your audience stop to discuss a topic, or running an online quiz with time-limit questions, having a countdown timer means your audience will keep their eye on your slide throughout.
To do this, you need to animate text boxes or shapes containing your countdown numbers. Choose and format a shape and type the highest number that your countdown clock will need. In our case, we're creating a 10-second timer.
Now, with your shape selected, open the "Animations" tab on the ribbon and click the animation drop-down arrow. Then, in the Exit menu, click "Disappear."
Open the Animation Pane, and click the drop-down arrow next to the animation you've just added. From there, choose "Timing."
Make sure "On Click" is selected in the Start menu, and change the Delay option to "1 second," before clicking "OK."
Then, with this shape still selected, press Ctrl+C (copy), and then Ctrl+V (paste). In the second box, type 9 . With the Animation Pane still open and this second shape selected, click the drop-down arrow and choose "Timing" again. Change the Start option to "After Previous," and make sure the Delay option is 1 second. Then, click "OK."
We can now use this second shape as our template, as when we copy and paste it again, the animations will also duplicate. With this second shape selected, press Ctrl+C and Ctrl+V, type 8 into the box, and continue to do the same until you get to 0 .
Next, remove the animations from the "0" box, as you don't want this to disappear. To do this, click the shape, and in the Animation Pane drop-down, click "Remove."
You now need to layer them in order. Right-click the box containing number 1, and click "Bring To Front." You will now see that box on the top. Do the same with the other numbers in ascending order.
Finally, you need to align the objects together. Click anywhere on your slide and press Ctrl+A. Then, in the Home tab on the ribbon, click "Arrange." First click "Align Center," and then bring the menu up again, so that you can click "Align Middle."
Press Ctrl+A again to select your timer, and you can then move your timer or copy and paste it elsewhere.
Press F5 to see the presentation in action, and when you get to the slide containing the timer, click anywhere on the slide to see your countdown timer in action!
Now that your PPT presentation is more interactive, make sure you've avoided these eight common presentational mistakes before you present your slides.

6 Tips & Tricks To Edit iPhone Photos Like A Pro In 2024
T hanks to the functionality and performance of cameras in modern-day smartphones, you can take photos that rival those taken on even the best cameras for beginners and amateurs in terms of quality. But that's only the first step. After you take your shot, you get to put your creativity to work by transforming the photo from simply good to great. In the past, you would have had to download a whole bunch of third-party iPhone photo editing apps on your smartphone to edit and adjust the photos on your camera roll to your liking.
But thanks to the built-in editing tools available on most smartphones, especially the new-generation iPhones, you get to take your photos to the next level without leaving the Photos app on your iPhone. From the basics like cropping your photos to more advanced editing techniques like tweaking the color balance and using the right filters, your iPhone pretty much has all the required photo editing tools. While you may, of course, have to use a few other tools and platforms if you're looking to publish your photographs professionally, most people will find that an iPhone's built-in editing suite will serve their photo editing needs just fine.
Read more: The 10 Worst Smartphones Of All Time
Crop And Flip The Image
Cropping your image is one of the easiest ways to edit your photo and remove unnecessary elements, bringing the focus to the subject of the photo. This is especially useful if you shoot a photo that isn't perfectly framed or if you notice a lot of background noise in it. Alternatively, you could also resize an image. Given that cropping is such a basic photo manipulation tool, you've likely used it at least a few times in the past. However, there's a way to crop your photo effectively. If you know the best points of interest to highlight, you can do it manually on your iPhone. To do so, launch a photo from your Photos app and tap Edit, which is in the top-right corner of the phone. Then, select Crop and drag the corners of the rectangle to the area you want to focus on.
You can also choose to crop to a preset ratio. To do this, select Crop and tap on one of the options: Original, Square, Freeform, Wallpaper, 9:16, 4:5, or 5:7, to name a few. You can test out a few different cropping dimensions until you find one that best suits what you have in mind. Another way to highlight an image is by flipping it, and this is fairly easy to do using your iPhone as well. Flipping it can be a good way to add a sense of symmetry and create a natural flow. To flip your image, all you need to do is open the image, tap Edit, select Crop, and tap the Flip icon in the top-left corner.
Adjust The Light And Color
The lighting of a photo can dramatically alter its visual appeal, even if you took the photo on a brand-new iPhone 15 Pro Max . If you didn't take the photo in the most flattering lighting conditions, changing the light and color settings of the image can help you enhance it.
To edit the light and color of a photo, select Edit and swipe left to view the various settings. These should include Exposure, Brilliance, Highlights, Shadows, Contrast, Brightness, Blackpoint, Saturation, and Vibrance to name a few. Each of these settings has a slider under it that you can drag left or right to change the color and light. You'll know how much of an adjustment you've made by the number indicated above the slider. Because there are really no right light and color settings, the ideal settings will vary based on the effect you're aiming for and the existing color scheme of your current photo. Given this, experimentation is key, so be sure to tweak the various settings until you find a balance that works for you.
Use Live Images
One of the best parts of taking pictures on your iPhone is that you can shoot Live Photos and change the key photo to one that you find most appealing. If you find it difficult to capture the perfect moment or if you don't have too long to capture a variety of shots to pick the perfect one, Live Photos can be a game changer. This feature essentially records whatever happens 1.5 seconds before and after taking a photo, so you have plenty of frames to pick from.
Live Photos is usually turned on by default, provided you've set your camera to photo mode, so any photo you take using this mode will have the shots preceding and following the exact second you took your shot. After you've taken the photo, open it and select Edit. Then, tap Live from the list of editing options you see toward the bottom and drag the slider to change the key photo to a different frame. Release your finger, select Make Key Photo, and then tap Done. Another thing you can do with Live Photos is add effects such as Loop, Bounce, and Long Exposure. These effects are great ways to add a creative touch to your photos.
Tweak The Perspective
When snapping pictures with your phone, you might not always be able to align it just right. The good news is that you can adjust the perspective and straighten the angle of your photos to give them a more visually appealing look. To do this, launch the photo, select Edit, and tap the Crop icon. Swiping left will let you view the various options: Straighten, Vertical, and Horizontal. Selecting the Straighten option and dragging the slider will change the angle of the photo. This can be especially helpful if you have horizontal lines in the photo that give it the appearance of being tilted. Similarly, tapping Horizontal or Vertical and dragging the slider can correct distortions and help you adjust the perspective.
The degree to which you adjust a photo is displayed above the slider. This way, you can tweak each setting and view the adjustment level so you know if more or less correction is needed. While straightening and adjusting your photos may not be something you do frequently, it can be an invaluable photo editing hack when your photo includes straight lines.
Use The Right Filters
If you're looking to create a more cinematic appearance, the iPhone's built-in filters can help. Depending on the type of filter you choose, you could end up with a warmer or cooler color temperature, creating a more balanced visual aesthetic. To apply filters to your existing photos, launch the photo and select the Edit option.
Now, select Filters from the bottom and swipe left to view the various filters: Vivid (increases the contrast of the photo), Vivid Warm (applies the Vivid filter but makes the photo warmer), Vivid Cool (applies the Vivid filter and makes the color temperature cooler), Dramatic (reduces highlights in the photo and increases necessary shadows), Dramatic Warm (applies the previously-mentioned Dramatic filter, but creates a warm look), Dramatic Cool (applies the Dramatic filter, but creates a cool look), Mono (turns the image black and white), Silvertone (turns the picture black and white but also casts shadows), and Noir (turns the picture black and white and boosts the contrast).
When you select a particular filter, you can drag the slider to increase or decrease the intensity of the color palette or effect associated with that particular filter. If you like what you see, select Done to save your work. Alternatively, select Cancel and Discard Changes to revert to the original picture.
Write Or Draw On The Photo
You can write or draw on a photo for fun, to highlight something, or to add a message to the photograph. You can do this right through the Photos app by tapping a photo and selecting the Edit button. Then, tap the marker/Edit icon in the top-right corner of the screen. When you do this, you'll be able to see a variety of drawing and coloring tools, including a pen, highlighter, pencil, and even an eraser. Select any tool of your choice, and choose the size of the stroke and the intensity of the color to adjust the writing to your preferences.
You can change the color of the text or select the plus icon to add a description, text, signature, or shape, apart from just drawing something. If you're happy with your edit, select Done to save the image. If you don't like it, select Cancel to revert to the original image.
Read the original article on SlashGear .

The sisterhood of the Express pants
Express has filed for bankruptcy. don’t pretend you never shopped there..

In the mid-aughts, there arose a generation of women whose 20-something lives were consumed by two equally important and not-incompatible concerns. The first concern was how to acquire a job interview after graduating from college. The second concern was how to avoid getting roofied at a frat party. For some reason, both of these goals involved going to Express.
Express was a store in the mall. It sold, among other apparel, pants. It sold the kind of pants that were paired either with rayon blouses for office wear, or with Steve Madden platform slides for a party ensemble that could be found in all kinds of weather on all kinds of campuses. I went to a tiny liberal arts college, and we had black Express pants with Steve Madden slides. I took a bus to Penn State and my friend’s friends there had black Express pants with Steve Madden slides. It was winter. Arms and toes were bare. Pants were polyester and spandex. The girl next to you would watch your drink while you went to the bathroom.
Earlier this week, Express filed for bankruptcy. The company announced it would be closing 95 stores nationwide, representing about a fifth of the total retail locations. Stores would disappear in Toledo, Kansas City, Miami and Fresno. “Closing sales” would begin the following week, the company said, but then again who knows what a closing sale really means for a chain whose stores advertise “50% off already reduced clearance” in perpetuity.
Why am I writing about this? I do not write about fashion. I don’t care about fashion. I don’t know anything about fashion. But by God do I know something about pants from Express and the aspirations of 20-year-old girls.
The most famous line is called the Editor Pant, which was not one style of pant but many, a loose consortium of work pants that existed under an umbrella term. The Editor Pant could be low-waisted, high-waisted, tapered, cropped, black, plaid. The Express website now sells 33 varieties of Editor Pant for around $80 apiece, which becomes more like $50 on already-reduced clearance. Somewhere in the back of my closet, button missing and cuffs frayed, is a pair of Editor Pants from 2007, which I wore to the first day of my Washington Post internship and never had the heart to get rid of.
Express was not selling you pants alone. Express was selling you pants that imagined a whole life. Who wore these pants? Editors did. Maybe editors wore these pants while drinking coffee, taking the subway, editing things. Who else could wear these pants? You could. You could purchase these pants and segue into a life that was about to unfold like an episode of “Sex and the City.”
When your Editor Pants were at the drycleaner, you might find yourself reaching for the black polyester going-out pants, and trying to turn them into office attire by adding a blazer and replacing the Steve Madden slides with a sensible loafer. Did it look good? It did not. Did we do it anyway? We didn’t know any better. What we knew is that there were casual clothes, like the sweatshirts we’d worn to school for sixteen years, and there were fancy clothes, like what would be worn to a prom — and then there was a whole murky middle, a class of clothes that young adult women were expected to know how to navigate, and those clothes could be purchased at Express.
The aesthetic of the Express pants was not high fashion but high assimilation. It was shopping-as-handholding, an assurance that you and millions of other young women were in it together, even if you were still figuring it out.
The store in my nearest mall isn’t one of the ones that will be closing, but I went there a few days ago anyway, to soak up the vibe and commune with the pants. Formerly a loyal customer, I hadn’t been inside an Express in years — which might indicate why the company is going bankrupt or might just indicate that the store isn’t for me anymore.
But standing among the pants, I had the strongest memory of a night I’d completely forgotten. My college friends and I getting ready for a networking fair. We barely knew what networking was. We moved from dorm room to dorm room seeking each other’s advice on shoes and resume formats. Somehow I had acquired an attaché case, which seemed like a very professional thing to carry, even if it was empty inside. Ahmara told me it was, anyway, and she would go on to get a joint M.D. and PhD, and Jo would go on to work in television, and Lara would move to London, and Anne would become a teacher in Maine and then return to our 15-year reunion with the most perfect redheaded son.
That was all years away, though. In that moment, what we had was each other, and our whole lives ahead of us, and our shoddy wardrobes that would now make us cringe with embarrassment.
And sometimes when you think about that time in your life — how you had to bravely keep walking forward with no idea what the future held — sometimes it fills you with such tenderness for your dumb past self, for everything you walked through and the pants you wore while doing it.
- The debate about Sonia Sotomayor is not about sexism. It’s more dire. April 24, 2024 The debate about Sonia Sotomayor is not about sexism. It’s more dire. April 24, 2024
- Opinion | What the ‘tradwife’ trend says about modern life April 18, 2024 Opinion | What the ‘tradwife’ trend says about modern life April 18, 2024
- Nicole Brown Simpson’s cries for help are still hard to hear April 13, 2024 Nicole Brown Simpson’s cries for help are still hard to hear April 13, 2024

Top searches
Trending searches

18 templates

26 templates

16 templates

17 templates

pediatrician
27 templates

41 templates
Create your presentation
Writing tone, number of slides.

AI presentation maker
When lack of inspiration or time constraints are something you’re worried about, it’s a good idea to seek help. Slidesgo comes to the rescue with its latest functionality—the AI presentation maker! With a few clicks, you’ll have wonderful slideshows that suit your own needs . And it’s totally free!

Generate presentations in minutes
We humans make the world move, but we need to sleep, rest and so on. What if there were someone available 24/7 for you? It’s time to get out of your comfort zone and ask the AI presentation maker to give you a hand. The possibilities are endless : you choose the topic, the tone and the style, and the AI will do the rest. Now we’re talking!
Customize your AI-generated presentation online
Alright, your robotic pal has generated a presentation for you. But, for the time being, AIs can’t read minds, so it’s likely that you’ll want to modify the slides. Please do! We didn’t forget about those time constraints you’re facing, so thanks to the editing tools provided by one of our sister projects —shoutouts to Wepik — you can make changes on the fly without resorting to other programs or software. Add text, choose your own colors, rearrange elements, it’s up to you! Oh, and since we are a big family, you’ll be able to access many resources from big names, that is, Freepik and Flaticon . That means having a lot of images and icons at your disposal!

How does it work?
Think of your topic.
First things first, you’ll be talking about something in particular, right? A business meeting, a new medical breakthrough, the weather, your favorite songs, a basketball game, a pink elephant you saw last Sunday—you name it. Just type it out and let the AI know what the topic is.
Choose your preferred style and tone
They say that variety is the spice of life. That’s why we let you choose between different design styles, including doodle, simple, abstract, geometric, and elegant . What about the tone? Several of them: fun, creative, casual, professional, and formal. Each one will give you something unique, so which way of impressing your audience will it be this time? Mix and match!
Make any desired changes
You’ve got freshly generated slides. Oh, you wish they were in a different color? That text box would look better if it were placed on the right side? Run the online editor and use the tools to have the slides exactly your way.
Download the final result for free
Yes, just as envisioned those slides deserve to be on your storage device at once! You can export the presentation in .pdf format and download it for free . Can’t wait to show it to your best friend because you think they will love it? Generate a shareable link!
What is an AI-generated presentation?
It’s exactly “what it says on the cover”. AIs, or artificial intelligences, are in constant evolution, and they are now able to generate presentations in a short time, based on inputs from the user. This technology allows you to get a satisfactory presentation much faster by doing a big chunk of the work.
Can I customize the presentation generated by the AI?
Of course! That’s the point! Slidesgo is all for customization since day one, so you’ll be able to make any changes to presentations generated by the AI. We humans are irreplaceable, after all! Thanks to the online editor, you can do whatever modifications you may need, without having to install any software. Colors, text, images, icons, placement, the final decision concerning all of the elements is up to you.
Can I add my own images?
Absolutely. That’s a basic function, and we made sure to have it available. Would it make sense to have a portfolio template generated by an AI without a single picture of your own work? In any case, we also offer the possibility of asking the AI to generate images for you via prompts. Additionally, you can also check out the integrated gallery of images from Freepik and use them. If making an impression is your goal, you’ll have an easy time!
Is this new functionality free? As in “free of charge”? Do you mean it?
Yes, it is, and we mean it. We even asked our buddies at Wepik, who are the ones hosting this AI presentation maker, and they told us “yup, it’s on the house”.
Are there more presentation designs available?
From time to time, we’ll be adding more designs. The cool thing is that you’ll have at your disposal a lot of content from Freepik and Flaticon when using the AI presentation maker. Oh, and just as a reminder, if you feel like you want to do things yourself and don’t want to rely on an AI, you’re on Slidesgo, the leading website when it comes to presentation templates. We have thousands of them, and counting!.
How can I download my presentation?
The easiest way is to click on “Download” to get your presentation in .pdf format. But there are other options! You can click on “Present” to enter the presenter view and start presenting right away! There’s also the “Share” option, which gives you a shareable link. This way, any friend, relative, colleague—anyone, really—will be able to access your presentation in a moment.
Discover more content
This is just the beginning! Slidesgo has thousands of customizable templates for Google Slides and PowerPoint. Our designers have created them with much care and love, and the variety of topics, themes and styles is, how to put it, immense! We also have a blog, in which we post articles for those who want to find inspiration or need to learn a bit more about Google Slides or PowerPoint. Do you have kids? We’ve got a section dedicated to printable coloring pages! Have a look around and make the most of our site!
- Create an email message
- Suggested recipients
- Use @mentions
- Create a signature
- Add attachments
- Check spelling
- Add a reaction
- Out of office replies
- Delay or schedule
- Recall a message
- Automatic forwarding
- Read receipt
- Save a file or draft
- Change display name
- Create a folder
- Use inbox rules
- Conditional formatting
- Use Favorites
- Custom views
- Message font size
- Message list view
- Focused Inbox
- View as conversations
- Filter and sort messages
- Number of messages
- Chat with recipients
- Share an email
- Status in Outlook
- Phishing and suspicious behavior
- Blocked senders
- Protected messages
- Open a protected message
- More to explore

Create and add an email signature in Outlook
In Outlook, you can create one or more personalized signatures for your email messages. Your signature can include text, links, pictures, and images (such as your handwritten signature or a logo).
Note: If the steps under this New Outlook tab don't work, you may not be using new Outlook for Windows yet. Select Classic Outlook and follow those steps instead.
Create and add an email signature
On the View tab, select View Settings .
Select Accounts > Signatures .
Select New signature , then give it a distinct name.
In the editing box below the new name, type your signature, then format it with the font, color, and styles to get the appearance you want.
Select Save when you're done.
With your new signature selected from the list above the editing box, go to Select default signatures and choose whether to apply the signature to new messages and to replies and forwards.
Select Save again.
Note: If you have a Microsoft account, and you use Outlook and Outlook on the web or Outlook on the web for business, you need to create a signature in both products.
Create your signature and choose when Outlook adds a signature to your messages
If you want to watch how it's done, you can go directly to the video below .
Open a new email message.

Under Select signature to edit , choose New , and in the New Signature dialog box, type a name for the signature.
Under Edit signature , compose your signature. You can change fonts, font colors, and sizes, as well as text alignment. If you want to create a more robust signature with bullets, tables, or borders, use Word to create and format your signature text, then copy and paste it into the Edit signature box. You can also use a pre-designed template to create your signature. Download the templates in Word, customize with your personal information, and then copy and paste into the Edit signature box.

You can add links and images to your email signature, change fonts and colors, and justify the text using the mini formatting bar under Edit signature .
You can also add social media icons and links in your signature or customize one of our pre-designed temlates. For more information, see Create a signature from a template .
To add images to your signature, see Add a logo or image to your signature .
Under Choose default signature , set the following options.
In the E-mail account drop-down box, choose an email account to associate with the signature. You can have different signatures for each email account.
You can have a signature automatically added to all new messages. Go to in the New messages drop-down box and select one of your signatures. If you don't want to automatically add a signature to new messages, choose (none). This option does not add a signature to any messages you reply to or forward.
You can select to have your signature automatically appear in reply and forward messages. In the Replies/forwards drop-down, select one of your signatures. Otherwise, accept the default option of (none).
Choose OK to save your new signature and return to your message. Outlook doesn't add your new signature to the message you opened in Step 1, even if you chose to apply the signature to all new messages. You'll have to add the signature manually to this one message. All future messages will have the signature added automatically. To add the signature manually, select Signature from the Message menu and then pick the signature you just created.
Add a logo or image to your signature
If you have a company logo or an image to add to your signature, use the following steps.
Open a new message and then select Signature > Signatures .
In the Select signature to edit box, choose the signature you want to add a logo or image to.

To resize your image, right-click the image, then choose Picture . Select the Size tab and use the options to resize your image. To keep the image proportions, make sure to keep the Lock aspect ratio checkbox checked.
When you're done, select OK , then select OK again to save the changes to your signature.
Insert a signature manually
If you don't choose to insert a signature for all new messages or replies and forwards, you can still insert a signature manually.
In your email message, on the Message tab, select Signature .
Choose your signature from the fly-out menu that appears. If you have more than one signature, you can select any of the signatures you've created.
See how it's done

Top of page
Note: Outlook on the web is the web version of Outlook for business users with a work or school account.
Automatically add a signature to a message
You can create an email signature that you can add automatically to all outgoing messages or add manually to specific ones.
Select Settings at the top of the page.
Select Mail > Compose and reply .
Under Email signature , type your signature and use the available formatting options to change its appearance.
Select the default signature for new messages and replies.
Manually add your signature to a new message
If you've created a signature but didn't choose to automatically add it to all outgoing messages, you can add it later when you write an email message.
In a new message or reply, type your message.

If you created multiple signatures, choose the signature you want to use for your new message or reply.
When your email message is ready, choose Send .
Note: Outlook.com is the web version of Outlook for users signing in with a personal Microsoft account such as an Outlook.com or Hotmail.com account.
Related articles
Create and add an email signature in Outlook for Mac
Create an email signature from a template

Need more help?
Want more options.
Explore subscription benefits, browse training courses, learn how to secure your device, and more.

Microsoft 365 subscription benefits

Microsoft 365 training

Microsoft security

Accessibility center
Communities help you ask and answer questions, give feedback, and hear from experts with rich knowledge.

Ask the Microsoft Community

Microsoft Tech Community

Windows Insiders
Microsoft 365 Insiders
Find solutions to common problems or get help from a support agent.

Online support
Was this information helpful?
Thank you for your feedback.
IMAGES
VIDEO
COMMENTS
Select the image you want to modify in your PowerPoint presentation. On the Picture Format tab, in the Size group, click Crop. Click and drag the handles to modify the cropping. When you're done, click anywhere outside the image and the mask. You can use the options found in Crop to Shape if you want to crop the image to a specified shape.
Whether it's a photo, illustration, or graphic, PowerPoint has editing tools to import and edit your image files. Images often need cropping, resizing, and more tweaks to fit in a presentation. Apps like Photoshop have image editing tools, but they're difficult to learn. The good news is that PowerPoint has image editing essentials inside the app.
Select the image and go to the Picture Format tab. Click on the drop-down menu next to the Crop button and go to Aspect Ratio. Select from the given preset aspect ratios. It could be square, portrait, or landscape. Once you select the aspect ratio, move the image around within the frame.
1. Select the picture. 2. Select Picture Format and select Compress Pictures. 3. Select the options you want, then select OK. For more info, see Reduce the file size of a picture. You can apply artistic effects to a picture or a picture fill to make the picture look more like a sketch, drawing, or painting. You can also apply color effects and ...
Once you add a photo, graphic, or picture to your PowerPoint presentation, you have many ways to enhance the picture, such as backgrounds, shadows, and effec...
Download Article. 1. Insert the image you would like to edit. Click Insert and select Pictures. When a window prompts you to select an image, choose the image location, then open it. 2. Click the Picture Format menu. You'll see it at the top of PowerPoint. This is where you'll find all of your image editing tools.
Run Google Slides, open the presentation and select the image to modify. Click the drop-down arrow next to Crop and select the desired shape for the mask. Open your presentation and select the image you want to modify. Click Line color (the icon resembles a pencil) and choose a color for the border.
To make a good slideshow presentation, follow these tips: Use our photo video maker to create uniform color schemes, background images, font styles, and font sizes. Keep your slide design simple to let your audience focus on your slide's content. One slide, one point. Limit the number of words per slide to a minimum.
You can even search the web and Google Drive for relevant content and images directly from Slides. ... Easily edit Microsoft PowerPoint presentations online without converting them, and layer on ...
Original image by Dave L.. The tools you'll probably use the most to edit pictures in PowerPoint are the following: Corrections - This will allow you to edit your picture's brightness and contrast and choose to either sharpen or soften it.; Color - With this option, you can change the saturation and tone of your image.You can also choose to overlay several color filters.
Choose a design from our presentation templates or create your own from scratch. Customize your presentation with colors, fonts, and key information. Add animations, videos, images, illustrations. Use assets and other media content from your Brand Kit (Pro) to stay consistent with your business or school brand.
Click the upload button next to Create to import your PPTX file. Select your Powerpoint file (PPTX) from your computer and import it into Visme. Your presentation will now appear in your dashboard for you to jump in and make changes right inside Visme. Add photos, vector icons, new text blocks, animations and more until your PowerPoint is complete.
Step-1: Click on the "Background" option. The first step is to open the slide where you want to insert the image. Then click on the "Background" option from the toolbar at the top of the screen. Step-2: Click on the "Choose image" option. In the "Background" dialog box, click on the "Choose image" box.
In terms of export, you can save your slideshow as a variety of popular file types, or upload directly to YouTube, Vimeo, or Flickr. Or, if you want, you can save directly to your smartphone or tablet. Simple. 3. CyberLink PhotoDirector 12: Best editor with slideshow options. (Image credit: CyberLink)
How to make a photo slideshow. Open Adobe Express. Launch Adobe Express in your browser, then upload your own photos and videos to get started or select the kind of video you want to create. Pick a template. Search "slideshow" to find tons of free slideshow templates. Narrow down your search even further when you search by industry ...
Free online presentation maker. Try our new tool to edit this selection of templates for people that want to let their creativity run free. Create interactive resources easily, quickly and without the need for any software. A really useful tool for teachers and students. Move the content, add images, change colors and fonts or, if you prefer ...
Here are 10 free image editing websites to try. SlashGear. 10 Free Canva Alternatives For Eye-Catching Designs And Presentations ... There's also the option to quickly turn images into PowerPoint ...
Our drag-and-drop editing tools make it easy for you to customize your template however you want to. You can add vectors, illustrations, images, and even music and videos from our media library. Upload your own photos and apply page and text animations, too. It's simply your powerful PowerPoint alternative to supercharge your presentation to ...
Floral Introduction to Photo Editing Lesson. Get ready to spruce up your photo editing skills with a dash of floral flair! This PowerPoint and Google Slides template is the perfect pick for educators and enthusiasts eager to bloom into photo editing pros. Packed with engaging, flower-themed slides, it's crafted to make your teaching or ...
Images or pictures should be big (perhaps 20-25% of the page), bold, and have a clear purpose that complements the slide's text. Layout: Don't overcrowd your slides with too much information.
How to edit presentation online. Click Drop or upload your file. Select the PowerPoint file you want to open and edit on your computer. Your PowerPoint will be uploaded and then presented in an online Editor menu. Edit your PowerPoint: Edit text; Change the size of fonts; Use formatting options; Move shapes and objects; And perform other tasks.
Change the color theme of your presentation, text, fonts, add images, videos and graphics from Visme royalty-free library of assets or generate new ones with AI image generator, AI image touchup tools, or add your own. ... Edit your images, photos, and AI image-generated graphics with our integrated editing tools. On top of the regular editing ...
Engage your audience with cool, actionable features. 2. Embed Microsoft Forms (Education or Business Only) If you plan to send your PPT presentation to others—for example, if you're a trainer sending step-by-step instruction presentation, a teacher sending an independent learning task to your students, or a campaigner for your local councilor sending a persuasive PPT to constituents—you ...
Say goodbye to clip art and having to scour Google images! Canva's alternative presentation maker has an intuitive graphs and charts tool to help you turn your numbers into awesome pieces of data visualization. ... Simply use any software or tool that lets you create, edit and arrange slides. One advantage of these tools is the capability to ...
Zoner Photo Studio X's spring update promises to bring "the world's best HDR photo editing" to the Windows-based photography app, alongside other new features and improvements.
To edit the light and color of a photo, select Edit and swipe left to view the various settings. These should include Exposure, Brilliance, Highlights, Shadows, Contrast, Brightness, Blackpoint ...
The Editor Pant could be low-waisted, high-waisted, tapered, cropped, black, plaid. The Express website now sells 33 varieties of Editor Pant for around $80 apiece, which becomes more like $50 on ...
AI presentation maker. When lack of inspiration or time constraints are something you're worried about, it's a good idea to seek help. Slidesgo comes to the rescue with its latest functionality—the AI presentation maker! With a few clicks, you'll have wonderful slideshows that suit your own needs. And it's totally free!
Under Edit signature, compose your signature.You can change fonts, font colors, and sizes, as well as text alignment. If you want to create a more robust signature with bullets, tables, or borders, use Word to create and format your signature text, then copy and paste it into the Edit signature box.You can also use a pre-designed template to create your signature.
Go to the Design tab on the editor. Simply type a descriptive prompt in the search bar, and the AI presentation maker will generate beautiful drafts of slides for you. You can then edit the content and use other awesome AI tools to perfect your presentation. These AI features are super helpful for people new to design, as well as pros and teams ...