How-To Geek
How to trim a video in a microsoft powerpoint slideshow.
Avoid wasting your audience's time by trimming that video down.

Quick Links
Trim a video in powerpoint, reset or edit the trimmed video, save a trimmed video.
You may want to enhance your Microsoft PowerPoint presentation by including a video but only need a certain portion of the clip. Luckily, you can trim a video directly in Microsoft PowerPoint. We'll show you how.
Instead of using a separate tool or specific video editing software , PowerPoint has a trim feature built right in. This lets you keep only the part of the video you need and present the clip with your slideshow exactly as you want.
You can only trim videos you insert from your computer, not videos from the web . So if you're trying to trim a video from YouTube, that can't be done here.
You can add the video to your PowerPoint slideshow on whichever slide you need and in whatever place you want. You can even resize the video and adjust the volume and other playback options before you trim it.
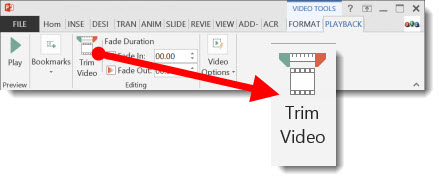
When you're ready, select the video to display the Playback tab. In the Editing section of the ribbon, click "Trim Video."
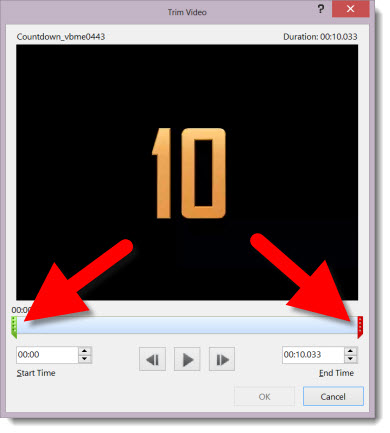
This opens a small editing window for you to trim the clip. You can enter the start and end times for the portion of the video you want to keep, use the markers to select the start and endpoints, or a bit of both.
If you know the exact start and end times, you can enter those into the corresponding boxes. You can also use the arrows on the sides of the boxes to adjust the times in smaller increments.
In addition, you can use the start and end time markers directly below the video to choose the portion you want to keep. Slide the green marker to set the start time and the red marker to set the end time.
You may also use a combination of these tools to pinpoint the exact spots to start and stop the video. Press the Play button and then press Pause when you see the time you want. You can then enter that time into the Start Time or End Time box depending on which part you want to keep or move one of the markers to that spot.
If you can only play a specific duration of the video due to time constraints, you can verify that by viewing the duration on the top right after you trim it.
When you have the section of the video you want all set, click "OK."
You'll see the video on your slide update to only play that portion you kept during the trim process.
Related: How to Reduce the File Size of a PowerPoint Presentation
If you change your mind about how you've trimmed a video, you can reset it back to its original state or edit where you trimmed it.
Select the video, go to the Playback tab, and click "Trim Video" as you did initially.
You'll notice that the Trim Video settings are exactly as they were when you trimmed the video. This allows you to adjust as needed.
To reset the video to its original length, simply slide the green start marker all the way to the left and the red end marker all the way to the right. Click "OK" to play the full-length video in your presentation.
Maybe you've trimmed a video in PowerPoint that you want to save for use outside of that application. You can save the file after you compress it and then use that trimmed video as you please.
After you compress the video using the steps below, only the trimmed portion will appear on your slide.
Select File > Info from the PowerPoint menu. Next to Compress Media, you'll see all media in the current slideshow including the trimmed video. If you have other video or audio files , the compression process applies to all files.
Click "Compress Media" and choose the level of compression.
You'll see a small dialog box appear as the process takes place. Click "Close" when it finishes.
Return to the slide containing the trimmed and now compressed video. Right-click it and choose "Save Media As."
Pick a location to save the video, give it a different name if you like, and click "Save."
If you want to undo the compression process for your media files, return to File > Info > Compress Media and choose "Undo."
Trimming a long video to play only the portion you need in your PowerPoint presentation is an easy process. Plus, you can keep your original video intact and save time from using a separate tool.
For more on PowerPoint, take a look at how to record your screen or how to turn your presentation into a video .
Convert video to any format
Record screen, webcam and sounds
Burn videos to DVD and Blu-ray
Blu-ray/DVD/4K video player
Edit videos with various options
Enhance video quality easily
Repair damaged video files
Walkthrough How to Cut Video in PowerPoint for Windows and Mac
PowerPoint is indeed an outstanding tool to make presentations. It has a plethora of visual aid tools to deliver an interactive, participative, and improvisational presentation. This program also supports adding multimedia content that will arouse the spectator's attention and improve their focus. You can attach content like videos, audio, and images for an impactful visual aid.
With this in mind, you would like to include a video in your presentation to catch the audience's attention. However, it so happened that the video you want to upload is lengthy due to the irrelevant parts of the video. The good thing is that PowerPoint comes with an inbuilt trimmer you can use to cut videos into smaller chunks. Here, we'll show you how to trim a video in PowerPoint and recommend a feasible program to help you get this done in no time.

Part 1. Best Way to Trim Video for PowerPoint
- Part 2. How to Trim Videos in PowerPoint on Macintosh/Windows
Part 3. FAQs on Trimming Video for PowerPoint
Before we go straight to the process of how to cut videos in PowerPoint, allow us to introduce a great alternative to do it. Vidmore Video Converter is a multi-feature desktop tool that helps you cut videos in multiple practical ways. It can trim lengthy introductions, cut out unwanted parts of the video using the split feature, and effortlessly trim the start/end of a video.
What's more, the tool is infused with video editing tools. It enables you to crop videos, rotate, add watermarks and subtitles, adjust primary effects, and apply filters. Undoubtedly, it is a valuable program that could generate elegant and eye-catching videos. See the guide below to trim video for PowerPoint using this excellent program.
Step 1. Launch Vidmore Video Converter
First and foremost, get the app by clicking the Free Download button designed for your computer OS. Once you get the installer for your computer, install and run it to see the working interface of the tool.
Free Download
Step 2. Import a video file
This time, import a video to the software. To do this, hit the Plus symbol in the main interface. It will open a folder to find and load the video you want to cut. You can also click the Spacebar to launch your folder and upload a media file or drag and drop the video track.

Step 3. Trim the selected video
After loading the video clip, click the Cut button attributed with the video's thumbnail. It shall bring you to the editing interface for cutting. You can select a range using the slider on the progress bar to trim the start/end of the video. To trim in the middle of the video, click the Fast Split button to cut the video into pieces. Then select and delete the unwanted video parts. Preview the video and hit Save at the bottom right corner once satisfied with the results.

Step 4. Save the trimmed video
This time, go back to the Converter tab and choose a file format for the video. Simply unfold the Profile menu, then pick a video format and quality. Then, hit the Convert All button to finish the process. Once done, you will receive the playback from the folder that will pop up.

Part 2. How to Trim Videos in PowerPoint on Mac/Windows
As we know, Microsoft PowerPoint is available on Mac and Windows PC. In line with this, the PowerPoint features, functions, and interface are almost the same. Therefore, regardless of your OS, you can trim videos in PowerPoint on Mac or Windows. The steps to trim videos in PowerPoint on Mac and Windows are as follow:
Trim Video in PowerPoint on Mac:
Step 1. First, ensure that you have PowerPoint installed on your Macintosh computer. Now, open a new presentation and insert the video you wish to cut.
Step 2. After uploading the video, the Video Format and Playback will display on the ribbon. Next, navigate to the Playback tab and select the Trim Video option. A dialog box will pop up showing the video editor.
Step 3. Hit the Play button to check the video playback and decide which part you wish to trim from the video. After that, drag the Nudge Forward and Nudge Backward buttons to select a range to cut.
Step 4. Lastly, click the Trim button to confirm the cutting and save the project or presentation.

Trim Video in PowerPoint on Windows:
Step 1. Similarly, make sure that the PowerPoint application is already installed on your Windows PC. Then, launch it and start with a PowerPoint slideshow.
Step 2. Load the video into the slideshow and click the Playback tab on the ribbon. From here, click on the Trim Video option, and it will display a dialog box for you to cut the video.
Step 3. Now, decide which part you want to cut by playing the video. Hit the Pause button and drag the green handles to select the start point. On the other hand, move the red handle to set the ending point.
Step 4. Once done, play the video again and see if you like the results. If you do, hit OK to confirm the cutting and save the trimmed video.

Further Reading:
3 Simple Ways to Trim a Video in Windows 10/8/7/XP/Vista
Useful Skill How to Record a PowerPoint Presentation
How to save a trimmed video in PowerPoint?
If you wish to insert or save a video in your PowerPoint presentation, you can do it like how you would typically embed multimedia files. Go to the Insert tab on the ribbon. Click the Video option and browse through your folder. Locate the trimmed video you want to save in PowerPoint and select it to upload.
How to trim the middle of a video in PowerPoint?
Apparently, the cutting tool for PowerPoint is fundamental. You can only delete the start and end points. You can learn to cut or trim in the middle of the video using the Vidmore Video Converter. Simply split the video into desired segments and delete the middle segments of the video. Save the video, and you are done.
Can I crop a video in PowerPoint?
Yes. Cropping video is almost the same as cropping a picture in PowerPoint. Once you have inserted a video, double-click on the clip and go to the Video format on the ribbon. Now, hit the Crop button, and the aspect ratio will appear. Select the part of the frame you wish to show, then hit the Crop button again to apply the changes.
This guidepost showed you how to trim a video in PowerPoint and use a great alternative that offers more valuable functions for video trimming. Either method is guaranteed to help you cut videos in a simple manner. However, the thing with PowerPoint is that there is only one cutting method. Unlike Vidmore, you can utilize different cutting ways to help you achieve your desired video output. Still, it boils down to your personal preferences. If you wish to cut directly in PowerPoint, then go with it. Meanwhile, suppose you want to cut using a tool with various cutting options. In that case, Vidmore Video Converter is the recommended solution.
Related Articles

Try Vidmore Video Converter for Free
All-in-one toolkit for converting and editing video & audio files in Windows 11/10/8/7, Mac OS X 10.12 and higher
based on 176 user reviews
Other Languages
Select Your Language
- Video Converter
- Screen Recorder
- Vidmore Player
- DVD Creator
- Video Enhancer
- Video Editor
- Free Solutions
- Free Screen Recorder Online
- Free Video Converter Online
- Free Watermark Remover Online
- Free Background Remover Online
- Free Image Compressor Online
- Free Image Upscaler Online
- Support Center
The PowerPoint Blog
Cut off part of a video in powerpoint using trim.
PowerPoint has made the trips over to video editing software less and less with the new tools. One of the tedious items was changing the in/out point of videos. That is where the video starts and ends. This can now be easily set in PowerPoint.
1. Here is my sample video. For an easy visual, it is a countdown from 10 to 0. But I need a video that counts down from 5 to 0.

2. Select the video, and in the Video Tools/Playback tab, click TRIM VIDEO.
3. The Trim Video dialog box opens, showing the selected video AND the start and stop points.
4. Sliding the green start point marker to the right adjusts where the video will begin playing from. I just slide until I see the number 5 on the video.
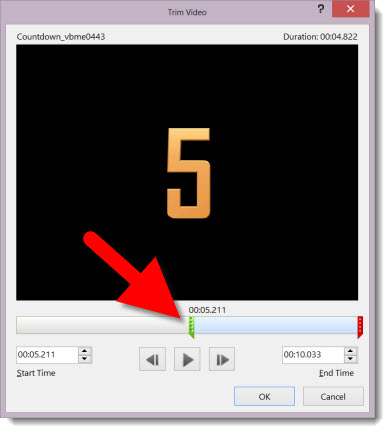
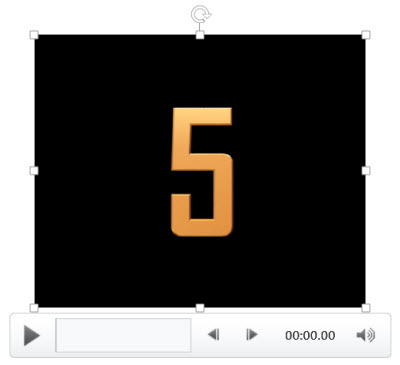
5. Now the slide shows the start of the video at the needed location and the presentation is set to go (all without opening a video editing application!).
– Troy @ TLC
How to Trim a Video in PowerPoint and Save to Your Computer?
Microsoft PowerPoint is a well-known presentation program. It provides an intelligible way to create and design impressive presentations. Meanwhile, PowerPoint allows users to trim or cut video length and save as a separate media file. This tutorial expands on how to trim a video in PowerPoint . Just keep reading if you're interested.
Part 1. How to Trim Video in PowerPoint
Part 2: How to Save the Trimmed Clip
Part 3: extra method to trim online and local videos.
Specifically, when we insert a video into a PowerPoint presentation file, we may only want to display a section of the video to our audience. Then, the built-in video trimming feature can be greatly helpful for this purpose and won’t take you much effort.
Here we demonstrate how to trim a video on PowerPoint 2016 for Windows. The method can also apply to other newer versions including PowerPoint 365, PowerPoint 2019, PowerPoint 2013, and PowerPoint 2010 on both Windows and Mac.
Related Tutorials : Fix Codec Unavailable PowerPoint Errors l How to Play Embedded Video in PowerPoint l Convert PowerPoint to Video
Versatile Video Trimmer
WonderFox Free HD Video Converter Factory can trim videos from a computer and websites while keeping high quality images. It supports virtually all common format types and over 500 websites including YouTube, Vimeo, Facebook, Dailymotion….
Compatible with Windows 11/10/8.1/8/7/...
100% Clean & Safe
Part 1: How to Trim Video in PowerPoint?

Step 1. Open a PowerPoint presentation file, on the ribbon, head to Insert, then select Video > Video on My PC .
Step 2. Select the target video and click Insert .

Step 3. When the video is inserted into the presentation file, there will be a Video Tools tab. Select Playback beneath it.
Step 4. Click Trim Video option. The Trim Video dialog appears.
Step 5. To decide the start point and the end point of the section you want to trim, you can follow the procedure: Click the Play button, when it reaches the point that you want to start the trimming, click Pause and drag the green marker to the exact point. Then continue to play the video and when it arrives at the point you want to end the trimming, pause and drag the red marker on the right to that point. Moreover, you can make use of the Previous Frame and Next Frame buttons to determine the start and end points more accurately. There are also the Start Time and End Time boxes in which you’re able to fill in the times manually. The total length of the cutted video will be displayed at the same time.
Step 6. Click on OK to save the setting.
- Optional: Trim a Video from YouTube
Microsoft PowerPoint includes an online video insertion function that allows you to add videos from YouTube. Besides, you’re able to adjust the video’s attributes for trimming. But this feature is for PowerPoint 365 or PowerPoint 2019 and it requires Internet Explorer 11 on your computer. What's more, if a YouTuber disable the video embedding feature, you can't insert the YouTube video either.

Step 1. Visit YouTube, open the video you want to insert into PowerPoint.
Step 2. Hit the Share button below the video player, select Embed and there will generate a string of codes.

Step 3. Copy and paste the embed code into a Notepad file, then modify the code to trim it. For example, if you want the video above to be played starting from 1:00 and ending at 2:30, you can add ?start=60&end=150&rel=0 before the video URL as follows:
Step 4. In the PowerPoint presentation file, click Insert , then select Video > Online video .
Step 5. Paste the modified embed code into the embed code box.
Step 6. Click the Insert button.
Now you can display the presentation with the trimmed video to your viewers. If you want to save the clip to your computer, then you need to further make some settings, as the following shows.
Microsoft PowerPoint doesn’t support exporting online videos. This part is for videos from local hard drive only.

Step 1. Click File on the top ribbon.
Step 2. Select Compress Media option, then select a quality. It will take a while for finishing the compression.
Step 3. Open the slide embedded with the video, right click on the video, and select Save media as .
Step 4. Specify the file name and destination. Hit Save .
Using PowerPoint to trim videos is practical when you only need to use the file within the presentation files. However, if you export the trimmed video, the quality will be apparently downgraded, which may be far below your expectation. So we also introduce a special Windows video trimmer – WonderFox Free HD Video Converter Factory . It can trim both online videos and videos on your computer hard drive. The program is designed for simple video processing tasks so you can easily handle it.
Compatible with Windows
Before start, please Free Download Free Download and install the software on your PC.

Step 1. Download an Online Video
If you want to trim a video from YouTube , Vimeo, or other video-hosting websites, download the video firstly:
Copy the video web address (URL). Enter Downloader , click + New Download . On the New Download window, select Paste and Analyze . The analysis process starts. When it finalizes the analysis, choose a video format and resolution under Download Video , then click OK and Download All .

Step 2. Import the Video into Video Converter
Back to the main interface and select Converter . Click on Add Files , select the downloaded video or any other video on the local folder, which you want to trim, click Open .
Step 3. Trim the Video
On the menu bar below the imported video, select scissors icon. Drag the two blue markers to determine the start pointing and end pointing. You can also fill in the accurate times. After you have selected the section, click Trim , then OK .
WonderFox Free HD Video Converter Factory can also split a video into multiple parts.

Step 4. Select an Output Format
Hit the format icon on the right side, then select a video format if you have the demand.
Step 5. Finalize the Process
Hit the triangle button at the bottom and specify the output path. Finally, click on Run .
Also Read: Crop Video | Rotate Video | Merge Video | Put Watermark on Video | Add Background Music to Video
Letting PowerPoint trim video is useful for better presentation. But people primarily delete undesired parts from a video or reduce video file size through video trimming. PowerPoint is still not as qualified as a video editor. So if you’re looking forward to bells and whistles, a dedicated video editing software should address your demands more.

WonderFox HD Video Converter Factory Pro
A mighty program gathers multiple tools in one body. It’s more than a video editor, but also a video converter, downloader, screen capture, GIF maker, and toolkit of more other gadgets. Tackle multiple video processing missions based on only one installation.
How to Convert PPT to Video in Office 2007 with 3 Effective Ways
How to Fix PowerPoint QuickTime Not Available Issue
Fix “PowerPoint Cannot Insert a Video from the Selected File” Issue
How to Trim an MP3 File in Windows Media Player
How to Trim/Cut/Crop Videos with HandBrake
Top 13 Best Free Video Cutter Software to Cut Video Files for Free
DVD Ripper Pro
Free DVD Ripper
HD Video Converter Pro
Free HD Video Converter
DVD Video Converter
Convert Video & Audio
Rip, Burn, Copy DVD & CD
Download Video, Music
Play Media Files
Share Media Files
Record Screen
Edit Video & Audio
Multiple Software Solutions
Order Support
Product Support
Retrieve Registration Code
Submit a Ticket
Subscribe WonderFox
Refund Policy
Privacy Policy | Copyright © 2009-2024 WonderFox Soft, Inc.All Rights Reserved


How to Quickly Remove All Animations from PowerPoint Presentations

Remove Animations on One Slide or Turn Off Animations for an Entire PowerPoint Presentation
by Avantix Learning Team | Updated September 12, 2023
Applies to: Microsoft ® PowerPoint ® 2010, 2013, 2016, 2019, 2021 and 365 (Windows)
You can quickly remove or delete PowerPoint animations on an individual slide or turn off all animations for an entire presentation. This can be particularly helpful for specific audiences. In this article, we'll use two methods to remove animations. The first method permanently removes animations on a slide and the second simply disables animations during a presentation. Animations can be enabled again later.
Recommended article: How to Add Animation in PowerPoint (Animate Images, Text and Other Objects)
Do you want to learn more about PowerPoint? Check out our virtual classroom or in-person PowerPoint courses >
Remove animations on one or more slides
Since you can't restore animation if you use the following method, you may want to work on a copy of the presentation (or slide) and retain the original with animations.
To remove animations on a single slide:
- In Normal View, display the slide with the animations you want to remove. You can also display a layout or master in Slide Master View.
- Click an object on the slide. If you are selecting a placeholder, click its edge.
- Press Ctrl + A to select all objects on the slide.
- Click the Animations tab in the Ribbon.
- If necessary, click the More down arrow in the Animations gallery in the Animation group.
- Click None. Repeat for other slides.

Note: If the animation has been created in Slide Master View, you'll need to remove it from the Slide Master or layout (submaster) in Slide Master View.
Turn off animations for an entire presentation
If you want to disable all animations in a presentation for a specific audience or because a presentation is "overanimated", you can use the following technique.
To turn off all animations in a PowerPoint presentation:
- In Normal View, click the Slide Show tab in the Ribbon.
- Click Set up Show.
- Check the Show without animation check box.
- Click OK. When you run a slide show, no animations should appear.

Be sure to run a slide show to check the results. If some objects are on top of others, you may need to make further changes in the presentation.
Turn on animations for an entire presentation
If you used the above method to disable animations, you can enable animations again at any time.
To enable animations in a PowerPoint presentation:
- Uncheck the Show without animation check box.
- Click OK. When you run the slide show, the animations should appear.
Subscribe to get more articles like this one
Did you find this article helpful? If you would like to receive new articles, JOIN our email list.
More resources
How to Blur an Image in PowerPoint
How to Convert PowerPoint to Google Slides (5 Ways)
How to Change Picture Brightness or Contrast in PowerPoint
How to Use Morph in PowerPoint to Design Engaging Presentations
10 Ways to Compress PowerPoint Presentations to Reduce File Size
Related courses
Microsoft PowerPoint: Intermediate / Advanced
Microsoft PowerPoint: Design Techniques for Non-Designer s
Microsoft PowerPoint: Animations Bootcamp
VIEW MORE COURSES >
Our instructor-led courses are delivered in virtual classroom format or at our downtown Toronto location at 18 King Street East, Suite 1400, Toronto, Ontario, Canada (some in-person classroom courses may also be delivered at an alternate downtown Toronto location). Contact us at [email protected] if you'd like to arrange custom instructor-led virtual classroom or onsite training on a date that's convenient for you.
Copyright 2024 Avantix ® Learning
You may also like

10 Keyboard Shortcuts in PowerPoint's Outline View
The outline has been an integral part of Microsoft PowerPoint for many years. It is dynamically linked to slide placeholders and is organized in a hierarchical way.

How to Change the Thumbnail for a Video in PowerPoint (using the Poster Frame Tool)
If you have inserted a video on a PowerPoint slide, you can display a custom thumbnail (or Poster Frame) for the video during a slide show. The thumbnail will display when you run a PowerPoint slide show and disappears when you start the video. For most videos, the thumbnail that displays is the first frame of the video clip. You can use the Poster Frame command to display a different frame in the video clip or a picture from another source as a thumbnail. A picture thumbnail could be either an image or an icon.

How to Use the Built-in Laser Pointer in PowerPoint (with Shortcuts)
During a PowerPoint slide show, you can change your mouse into a laser pointer to focus attention on a specific area on your slide. You can show or hide the built-in laser pointer using keyboard shortcuts or by using the context menu.
Microsoft, the Microsoft logo, Microsoft Office and related Microsoft applications and logos are registered trademarks of Microsoft Corporation in Canada, US and other countries. All other trademarks are the property of the registered owners.
Avantix Learning |18 King Street East, Suite 1400, Toronto, Ontario, Canada M5C 1C4 | Contact us at [email protected]
Our Courses
Avantix Learning courses are offered online in virtual classroom format or as in-person classroom training. Our hands-on, instructor-led courses are available both as public scheduled courses or on demand as a custom training solution.
All Avantix Learning courses include a comprehensive course manual including tips, tricks and shortcuts as well as sample and exercise files.
VIEW COURSES >
Contact us at [email protected] for more information about any of our courses or to arrange custom training.
Privacy Overview
Pin it on pinterest.
- Print Friendly
Search for: Search Button
- PowerPoint trim video reaches the web
The long-standing Trim Video feature in PowerPoint desktop has now reached the browser based version as well as in the desktop Windows and Mac versions.
If you’ve ever used Trim Video in either PowerPoint for Windows or Mac, this ‘new’ feature will be familiar in PowerPoint on the web .

Any video saved with the presentation (uploaded or Stock Video) has a Trim Video option on the Video tab.
Change the start or end points of the video by either dragging the end handles or entering start or end times.
It’s a fast way to shorten a video to something snappier for the presentation without the hassle of separately editing a video before adding to PowerPoint.
Linked videos from YouTube etc don’t have the trimmed video feature. You can trim the start of a YouTube video using the &t= URL parameter e.g. &t=16 will start a YouTube video 16 seconds in.
PowerPoint video audio compression tricks and traps Make captions for PowerPoint video and audio Tricks to using YouTube videos into PowerPoint
About this author

Office-Watch.com
Office 2021 - all you need to know . Facts & prices for the new Microsoft Office. Do you need it? Office LTSC is the enterprise licence version of Office 2021.
Office 2024 what's known so far plus educated guesses. Microsoft Office upcoming support end date checklist.
Latest from Office Watch
- Paste Text Only gets a Word shortcut and confusion
- Try a faster Microsoft 365 secure login
- Use free Copilot to summarize Word documents
- Ear 👂 symbol in Word, Excel, PowerPoint and Outlook
- Great image Resize options now in Windows
- Making pictures smaller - some more options.
- Use the Force with your PowerPoint & online backgrounds
- Star Wars look in Word and PowerPoint
- Happy Star Wars Day - with Microsoft Office
- How to save an Outlook attachment without knowing it
- Two ways to pay for Copilot with Microsoft Office
- PowerPoint video audio compression tricks and traps
- What is ‘grounding’ in Copilot?
- Import EML MSG and OFT files with Outlook (new)
- The Outlook setting everyone should check
- Microsoft Teams is changing its name to … Teams
- In person vs virtual event option in Outlook
- Tag your In-person events in Outlook
- Generative ‘Smart’ Erase returns to Designer
- DynamicPowerPoint.com
- SignageTube.com
- SplitFlapTV.com

How to Hide Video Media Controls on Slideshows
Nov 24, 2020 | Articles
When you want to show a video in full screen on a PowerPoint slideshow, then you can insert that video to slide. When you are using this slideshow for your information screens at the company, then you want it to start automatically. To start a video automatically, without clicking to start it, follow these instructions.
How to Start a Video Automatically?
Select the video and click Playback on the menu. The Start option by default is set to In Click Sequence . Change this setting to Automatically .

If you choose kiosk – you loose presenter notes, so this is not a viable option to remove controls for presenters with notes.
Submit a Comment
Your email address will not be published. Required fields are marked *
Pin It on Pinterest
- StumbleUpon
- Print Friendly

Contribute to the Microsoft 365 and Office forum! Click here to learn more 💡
April 9, 2024
Contribute to the Microsoft 365 and Office forum!
Click here to learn more 💡
PowerPoint Forum Top Contributors: Steve Rindsberg - John Korchok - Bob Jones AKA: CyberTaz ✅
May 10, 2024
PowerPoint Forum Top Contributors:
Steve Rindsberg - John Korchok - Bob Jones AKA: CyberTaz ✅
- Search the community and support articles
- Microsoft 365 and Office
- Search Community member
Ask a new question
Get bottom "Play/Pause Bar" to hide
Report abuse.
Reported content has been submitted
Just ran across this post.
To turn off the media control bar that automatically shows on videos, go to Slide Show | Set up Show and uncheck "show media controls."
48 people found this reply helpful
Was this reply helpful? Yes No
Sorry this didn't help.
Great! Thanks for your feedback.
How satisfied are you with this reply?
Thanks for your feedback, it helps us improve the site.
Thanks for your feedback.
If you try to insert a video file as control, the media player controls will show up at the bottom. Try inserting the video as movie file from insert-> go to media clips box-> select movie and choose the video file which you want to insert.
4 people found this reply helpful
Replies (21)
Question info.
- Norsk Bokmål
- Ελληνικά
- Русский
- עברית
- العربية
- ไทย
- 한국어
- 中文(简体)
- 中文(繁體)
- 日本語
Featured Products
Video Converter
All in one media converter tool.
Screen Recorder
Your all-featured screen recorder.
A comprehensive DVD ripper.
Blu-ray Player
Your incredible multimedia player.
MP4 Converter
A solid file converter to MP4.
MKV Converter
Best tool to convert MKV files.
PowerPoint Watermark Remover: Master 2 Ways for Pro Presentations
PowerPoint, a versatile and widely used presentation software, empowers users to create engaging slideshows. While it offers many features to enhance your presentations, you may encounter watermarks when working with specific files. Fortunately, PowerPoint watermark removal features can help you remove those.
This write-up will provide a step-by-step process you can follow to achieve that. Moreover, it will present various methods of removing watermarks from pictures and videos before uploading them into your PowerPoint. Let us explore these methods!
Part 1. How to Remove a Watermark in PPT
Part 2. how to remove watermark before uploading to ppt, part 3. faqs about removing watermark in powerpoint.
This section will explore a hassle-free method to remove watermarks from slides using PowerPoint’s features. These features offer a comprehensive solution for a polished and professional presentation. Let us dive into how to remove the watermark in PowerPoint:
1. Design Tab
Step 1 Start by opening your PowerPoint file containing the watermark.
Step 2 Choose the slide with the watermark or any slide if the watermark appears on many slides.
Head to the Design tab. It is where you control the look of your slides. In the Design tab, find Format Background in the Customize section and click on it.
Step 3 Go to the Fill tab once the Format Background sidebar appears. Then, select Solid Fill in the Fill tab. It ensures you are working with a simple, single-color background.
Use the color palette to choose a background color, replacing the area where the watermark is. Optionally, you can change the transparency if you desire to.
Step 4 Hit Apply to All if you want the new background without the watermark on all slides.
Step 5 Return to your slides to confirm the watermark has been removed from the selected slide or all slides.

2. Slide Master
Step 1 Open the PowerPoint file where the watermark is located.
Step 2 Head to the View tab. Look for the Slide Master in the Master Views group.
Step 3 In Slide Master view, you will notice a panel with thumbnail images. Locate the specific slide layout containing the watermark you wish to remove and click on it.
Note: If there are many layouts, hold down the Ctrl key and click on each.
Step 4 Find the watermark image or text on the chosen slide layout. Once found, click on it and press the Delete key on your keyboard.
Step 5 To make these changes effective throughout your presentation, return to the View tab and select Normal in the Presentation Views group. Confirm that the watermark has disappeared from your slides.

1. Remove Photo Watermark
Have you ever had an excellent picture for your PowerPoint but got bothered by a watermark? AVAide Watermark Remover is a helpful friend in such situations. It is a platform that erases watermarks, keeping your picture background clean. It offers various options to remove the watermark: brush, lasso, and polygonal. Impressive, right?
This online platform uses AI to understand and fill colors around the watermark. It does not remove the mark; it fixes details and makes your picture look perfect. Are you worried about safety? This platform ensures it is safe with a strong 256-bit SSL certificate, so there are no viruses, ads, or risks. Enjoy a hassle-free way to remove watermarks and make your PowerPoint look great!
Step 1 Head to the official AVAide Watermark Remover website.
Step 2 Press the Choose a Photo button. Then, import the image containing the watermark you want to remove.

Step 3 A new window will appear on your screen, where you can see your imported image. You have three options to remove the watermark on your image: Brush , Lasso , and Polygonal .
Use the Brush for marking and removing the watermark. Use the Lasso to draw around the watermark for removal. Use Polygonal for precise selections with straight lines. If there are unwanted highlights, you can use the Eraser to remove them.

Step 4 Once the watermark is covered, click the Remove button. AVAide Watermark Remover will kickstart the process, leaving you with a watermark-free picture.

Step 5 Press the Download button to save the watermark-free image to your local folder.

2. Remove Video Watermark
If you have videos with watermarks, making you hesitate to upload them on PowerPoint, AVAide Video Converter can be your solution.
It has a built-in Video Watermark Remover. It can help you achieve a professional and clean presentation. It simplifies the process of removing watermarks manually using a selection box. Therefore, you can remove the watermark without unwanted elements or residues. Moreover, it enables you to remove many watermarks in a single video. It makes your task efficient and hassle-free. Upgrade your presentation game with AVAide Video Converter!
Here is a guide on how to remove watermarks from your video using AVAide Video Converter:
Step 1 Visit the AVAide Video Converter official website to download and install the program.
TRY IT FREE For Windows 7 or later
TRY IT FREE For Mac OS X 10.12 or later
Step 2 Open the program and navigate to the Toolbox tab. Select the Video Watermark Remover from the provided tools.

Step 3 Import the video with the watermark by clicking the (+) button.

Step 4 A new window will appear for watermark removal. Click the + Add watermark removing area button to activate the selection box on the preview screen.
Move the selection box to the watermark in the video frame. Then, resize it using the circles on each side to cover the watermark.

Step 5 Once satisfied, click the Export button to start the watermark removal process. After completion, find your watermark-free video in your local folder.

- Full Guide to Resize Pictures with PowerPoint Easily
- Remove Watermark from PDF: Reasons & Effective Approaches
Can I remove watermarks from PowerPoint slides on my mobile device?
It might be more challenging on mobile devices due to limited editing features. A computer with a dedicated editing program, like AVAide Video Converter, is often more effective.
What are the benefits of removing a watermark from my PowerPoint slides?
Removing watermarks can give your presentation a more polished and professional appearance. It ensures that your audience focuses on your content without distractions. It makes the information more accessible and appealing.
Will removing a watermark change the file size of my presentation?
It does not change the file size of your presentation. Using high-resolution images to replace the watermarked ones could increase the file size.
Is there a way to recover the original file without a watermark if it's accidentally deleted?
If you delete or replace a file, returning the original without the watermark is hard. To avoid this, save a copy of your files in another place.
Does removing a watermark impact the formatting of my slides?
Removing a watermark itself should not affect the formatting of your slides. You might need to change the formatting to ensure a seamless fit if you replace watermarked images with new ones.
You have learned two straightforward methods to remove watermarks in PowerPoint . In addition, you have gained insights into eliminating watermarks from images and videos using AVAide's user-friendly tools. Simplify your workflow, enhance your presentations, and make your content truly yours with AVAide. Do you have something to say? Feel free to share it in the comment section!
By Jane Pineda on May 10, 2024
AVAide Watermark Remover
Easily get rid of annoying watermarks and unwanted objects from your photos without quality loss.
Related Articles

How to Make A Picture Background Transparent in PowerPoint

A Quick Guide to Editing Background Graphics in PowerPoint

How to Remove Object from Background (Online & Photoshop)
Select Your Language
Copyright © 2024 AVAide. All rights reserved.

Google Slides: How to delete a text box
G oogle Slides is Google's version of Microsoft Office. It gives you tools to create effective presentations and collaborate with others in minutes. Google Slides works across a variety of devices, including contemporary Android tablets , and it's free. Sometimes, the creative process can go awry, and a redundant text box could ruin your thought process. This guide explains how to remove a text box in Google Slides.
Delete a Google Slides text box
Deleting a text box in Google Slides is straightforward. However, the process differs slightly depending on the device you use. Below are the steps for deleting a text box on the web and the Android app.
Delete a Google Slides text box on the web
On your web browser, go to Google.com and follow the steps below.
- Click Go to Slides .
- Go to the upper-left corner and choose Blank presentation .
- Choose a slide with a text box in it.
- Right-click the text box you want to delete.
- Choose Delete from the menu that appears. The slide is now gone.
- Left-click the Undo button at the top of the screen to revert your changes.
Alternatively, when you open Google Slides:
- Right-click the slide that you want to delete.
- Choose Edit from the menu in the upper-left corner.
- Select Delete from the menu that appears.
Delete a Google Slides text box using the mobile app for Android or iOS
We've used an Android for this part of the tutorial, but iPhone users should be able to follow along easily.
Google Slides is also available on the App Store and Google Play Store, so you can create or edit your presentation from your phone or tablet Deleting a text box in Google Slides in the mobile app is a bit different, though just as simple.
- Open the Google Slides app and open your presentation. Close
- Tap the slide and tap Edit slide . Close
- Tap the desired text box. A menu appears at the top.
- Tap Delete to remove the text box from your slide.
Alternatively:
- Tap and hold the text box. Close
- Tap the trash bin in the upper-right corner of the screen.
Regardless of the option you use, the text box disappears.
The best Google Slides templates for work, school, and home
Everyone loves a presentation with less text and more pictures.
Adding text to your Google Slides is a great way to make your presentation more informative. Adding too much can distract from its purpose. Removing a text box takes no more than a click. You can also improve your presentation with Google Slides templates and themes .

- Add, change, or remove transitions between slides Article
- Animate text or objects Article
- Use the Morph transition in PowerPoint Article
- Insert a video from YouTube or another site Article
- Add or delete audio in your PowerPoint presentation Article
- Record your screen in PowerPoint Article
Insert a video from YouTube or another site

In PowerPoint for Microsoft 365, PowerPoint 2021, or PowerPoint 2019, you can insert an online video from YouTube or Vimeo on a slide.
In PowerPoint for Microsoft 365, version 1907 or later, you can also insert an online video from Microsoft Stream, a video service for enterprises—people in an organization can upload, view, and share videos with one another.
The video plays directly from the website, and it has the site's controls for playing, pausing, volume, and so on. The PowerPoint playback features (Fade, Bookmark, Trim, and so on) don't apply to online videos .
Because the video is stored on a web site, rather than in your presentation, you must be connected to the internet in order for the video to play successfully.
Insert a web video
In your web browser, locate the video you want.
Copy the URL of the web page from the Address bar of your browser.
Switch back to PowerPoint and select the slide where you want to place the video.
On the Insert tab of the ribbon, select Video > Online Video .
In the Online Video dialog box, paste the URL you copied in step 2.
Select Insert .
Play the video
If a video is inserted successfully, you can play it either in Normal view or Slide Show.
A Play button appears on the video in Normal view.
In Slide Show, you can interact with videos just as you would in a web browser.
By default, videos from YouTube and Vimeo play in "click sequence." You can play the video without having to click the Play button. Just tap the spacebar to advance to the next step in your click sequence.
Troubleshooting
Not all online videos from these sites are allowed to be embedded. You should check on the video site to find out if a certain video can be embedded.
Internet Explorer 11 is required on your computer
Note: Microsoft 365 apps and services will not support Internet Explorer 11 starting August 17, 2021. Learn more . Please note that Internet Explorer 11 will remain a supported browser. Internet Explorer 11 is a component of the Windows operating system and follows the Lifecycle Policy for the product on which it is installed.
For the purpose of playing videos in PowerPoint, Internet Explorer 11 is required to be on your computer. You don't have to use it to browse the web; you simply have to have it installed, because under the covers, PowerPoint needs its technology to play videos on Windows.
If your operating system is Windows 10, then you already have Internet Explorer 11 installed. If you have an older version of Windows, you can go to this Internet Explorer Downloads page for instructions.
Want to insert a video from your computer instead?
See Insert and play a video file from your computer for all the details.
Terms of Use and Privacy policies
Terms of Use
Privacy Policy
Microsoft Stream:
SlideShare.net:
In PowerPoint 2016, you can insert an online video with an embed code or search for a video by name. Then you can play it during your presentation.
The video plays directly from the website, and it has the site's controls for playing, pausing, volume, and so on. The PowerPoint playback features (Fade, Bookmark, Trim, and so on) don't apply to online videos.
Insert the online video with an "embed" code
On YouTube or Vimeo, find the video that you want to insert.
Below the video frame, click Share , and then click Embed . (If you neglect to click Embed , you'll end up copying the wrong code.)

Right-click the iFrame embed code, and click Copy .

If the highlighted text that you copy begins with "http", STOP. It's the wrong code to copy. Return to step 2 and click Embed :

In PowerPoint, click the slide that you want to add a video to.
On the Insert tab, click Video > Online Video .
In the From a Video Embed Code box, paste the embed code, and then click the arrow.

A video rectangle is placed on your slide, which you can move and resize as you like. To preview your video on your slide, right-click the video rectangle, select Preview , and then click the Play button on the video.
Note: If your video doesn’t embed correctly, double-check that you have installed the required Office updates.
Search for the YouTube video by name
Click the slide that you want to add a video to.

In the Search YouTube box, type the name of the video that you want to insert, and press Enter.
Select the video from the search results, and click Insert .
Note: If your video doesn’t insert correctly, double-check that you have installed the required Office updates.
Preview the video
Once the video rectangle is on your slide, select it, right-click it and choose Preview .
A Play button appears on the video.
Click the video's Play button.
Because the video is on a web site, rather than actually in your presentation, you must be connected to the internet in order for the video to play successfully.
Embed content from Slideshare.net
On a slide in PowerPoint, you can embed content from Slideshare.net , a sharing web site for presentations, infographics, and documents.
On Slideshare.net, any content that can be embedded elsewhere has a Share button on it. That button opens a window where you can copy an embed code like an embed for a video.
On Slideshare.net , find the content you want to embed.
Select the Share button beneath the content frame.
Sharing codes appear in the video frame.
Select the box named Embed .
All the text in the box becomes selected when you do this.
Right-click the selected text and choose Copy .
The text you've copied contains more information than you need, so it needs to be trimmed and re-copied.
Paste the copied text into a text editor such as Word or Notepad.
Select the portion of the text that begins with <iframe src ... and ends with </iframe> . Copy that text.
That's the embed code you need for inserting the content into PowerPoint.
In PowerPoint, go to the slide where you want to insert the content.
On the toolbar ribbon, select the Insert tab, select Video , and then select Online Video .
The Insert Video dialog box opens.
Paste the embed code in the box named From a Video Embed Code , and then press Enter.
It takes a moment for PowerPoint to absorb the content. When it has done so, a black box appears on your slide.

Requirements
Your use of online videos is subject to each provider web site's Terms of Use and Privacy Policy.
SlideShare.net
In PowerPoint for the web, you can insert an online video from YouTube or Vimeo on a slide. (If you have a Microsoft 365 business or education subscription, you can also insert an online video from Microsoft Stream.)
Insert an online video
On a separate tab in your web browser, locate the video you want.
Copy the address of the web page from the Address bar of your browser.
Switch to PowerPoint for the web and select the slide where you want to place the video.
On the Insert tab of the ribbon, in the Media group, select Online Video .
In the Online Video dialog box, paste the address you copied in step 2.
The video is inserted on your slide. You can move the video by dragging with the mouse, and you can resize the video frame by selecting a corner and dragging.
To play the video, you must run Slide Show. On the ribbon, switch to the View tab, and in the Start Slide Show group, select From Current Slide .
(If you've turned off the Simplified Ribbon, you don't have a Slide Show tab; instead use the View tab to start the slide show.)
Slide Show opens, and then you can click the play button to begin.
For related information, see Play a video in PowerPoint for the web .
Trimming a video
PowerPoint for the web can't trim videos, and online videos can't be trimmed. If you have a video that you want to trim, you must save it to your computer, then insert it on your slide in a desktop version of PowerPoint.
Newer Mac versions
In PowerPoint for Microsoft 365 for Mac, PowerPoint 2021 for Mac, or PowerPoint 2019 for Mac, you can insert an online video from YouTube or Vimeo on a slide. Earlier versions of PowerPoint for macOS don't support inserting an online video.
In PowerPoint for Microsoft 365 for Mac, you can also insert an online video from Microsoft Stream, a video service for enterprises—people in an organization can upload, view, and share videos with one another. This feature requires PowerPoint for Microsoft 365 for Mac version 16.27 or later.
Switch to PowerPoint and select the slide where you want to place the video.
On the Insert tab of the ribbon, in the Media group at the right end, select Video . Then select Online Movie .
In the dialog box, paste the URL you copied in step 2.
Click Insert .
The video is added to the slide.
To preview the video, click the Play button that appears on top of video.
Inserting and playing an online video requires a recent version of macOS and PowerPoint for macOS:
PowerPoint version 16.15.18070902 or later
macOS 10.13.4 (High Sierra) or later
A Mac manufactured in 2012 or later
Why can’t I embed a video in PowerPoint?
Add audio to your presentation
Add text to a video
Video and audio file formats supported in PowerPoint
How to Make an Eye-catching YouTube Thumbnail
Create a video for YouTube with a template

Need more help?
Want more options.
Explore subscription benefits, browse training courses, learn how to secure your device, and more.

Microsoft 365 subscription benefits

Microsoft 365 training

Microsoft security

Accessibility center
Communities help you ask and answer questions, give feedback, and hear from experts with rich knowledge.

Ask the Microsoft Community

Microsoft Tech Community

Windows Insiders
Microsoft 365 Insiders
Was this information helpful?
Thank you for your feedback.
IMAGES
VIDEO
COMMENTS
Turn off the narration. On the Slide Show tab, in the Set Up group, clear the Play Narrations check box. Alternatively, you can click Set Up Slide Show, and under Show Options select the Show without narration check box. This action has the same effect as step 1. Tip: To turn the narration back on, ensure that the Show without narration check ...
A short tutorial showing how to delete recorded narrations from PowerPoint slides. Become a Patreon of my work: https://www.patreon.com/doryvideoAll footage ...
Trim a music clip or sound clip. Select the audio clip on the slide. Under Audio Tools, on the Playback tab, click Trim Audio. To determine where you want to trim your audio clip, in the Trim Audio box, click the Play button. When you reach the point where you want to make the cut, click the Pause button. You can use the Next Frame and Previous ...
Select File > Info from the PowerPoint menu. Next to Compress Media, you'll see all media in the current slideshow including the trimmed video. If you have other video or audio files, the compression process applies to all files. Click "Compress Media" and choose the level of compression.
Open your PowerPoint presentation. Click the video that you want to trim. In the menu bar, click Playback. Click the Trim Video button in the ribbon. To find a specific point to trim to, play the ...
Then, launch it and start with a PowerPoint slideshow. Step 2. Load the video into the slideshow and click the Playback tab on the ribbon. From here, click on the Trim Video option, and it will display a dialog box for you to cut the video. Step 3. Now, decide which part you want to cut by playing the video.
2. Select the video, and in the Video Tools/Playback tab, click TRIM VIDEO. 3. The Trim Video dialog box opens, showing the selected video AND the start and stop points. 4. Sliding the green start point marker to the right adjusts where the video will begin playing from. I just slide until I see the number 5 on the video.
Step 1. Open a PowerPoint presentation file, on the ribbon, head to Insert, then select Video > Video on My PC. Step 2. Select the target video and click Insert. Step 3. When the video is inserted into the presentation file, there will be a Video Tools tab. Select Playback beneath it. Step 4. Click Trim Video option.
To turn off all animations in a PowerPoint presentation: In Normal View, click the Slide Show tab in the Ribbon. Click Set up Show. Check the Show without animation check box. Click OK. When you run a slide show, no animations should appear. Be sure to run a slide show to check the results.
PowerPoint can compress video for you. That's probably the easiest option. Save an extra copy as you play around with the couple compression settings it has. It's under File--> Info--> Compress Media. If you want to get the video out of the file - you should be able to right click on it and select Save Media As.
You inserted a video to your PowerPoint slide, but when you run the slideshow, you see the video media controls at the bottom of the slide. But you are runni...
Microsoft PowerPoint Step by Step On How To Replace A Video Background With Another Background... (In the next video I'll demonstrate how to replace a video ...
It's a fast way to shorten a video to something snappier for the presentation without the hassle of separately editing a video before adding to PowerPoint. Linked videos from YouTube etc don't have the trimmed video feature. You can trim the start of a YouTube video using the &t= URL parameter e.g. &t=16 will start a YouTube video 16 ...
To remove those video media controls, click the Slide Show menu option. Uncheck the option there: Show Media Controls, and then run the slide show again. No media controls will be shown on top of the video. To prevent other controls to appear on the slide, it is best to set the slide show type to kiosk. To get there, click the Set Up Slide Show ...
Just ran across this post. To turn off the media control bar that automatically shows on videos, go to Slide Show | Set up Show and uncheck "show media controls." If a post answers your question or solves your issue, please mark it as answered. If you try to insert a video file as control, the media player controls will show up at the bottom.
In this VideoTutorials we will learn how to add or delete audio files in the presentation.Steps to add an Audio File1. Select Insert -Audio.2.Select Audio on...
Now right click on the water picture and open the Animation tab. From Add animation dropdown (it is actually called a gallery), choose Transparency effect from Emphasis area. Run the presentation and click once to see what happens. This is how transparency works.
Let us dive into how to remove the watermark in PowerPoint: 1. Design Tab. Step 1 Start by opening your PowerPoint file containing the watermark. Step 2 Choose the slide with the watermark or any slide if the watermark appears on many slides. Head to the Design tab. It is where you control the look of your slides.
Delete a Google Slides text box on the web. On your web browser, go to Google.com and follow the steps below. Click Go to Slides. Go to the upper-left corner and choose Blank presentation. Choose ...
Copy the address of the web page from the Address bar of your browser. Switch to PowerPoint for the web and select the slide where you want to place the video. On the Insert tab of the ribbon, in the Media group, select Online Video. In the Online Video dialog box, paste the address you copied in step 2. Select Insert.