Welcome to my blog
I have been working with Salesforce for quite a while, so don’t hesitate to contact me if you have any questions or want some advice.
Email Address*

What are Compact Layouts in Salesforce And How to Create Them?
Datatype in salesforce.
What is a compact layout? How do they benefit our users? Are they all bad? In this Salesforce Compact Layouts tutorial, I go over all things related to creating and using compact layouts in your org.
You will learn what is Compact Layouts in Salesforce and How to Create blog posts. I will show you how to create layouts in a compact setup, what are the benefits of compact layout configuration and why a compact setup could be a good idea for you. Salesforce Compact Layouts create a better user experience and make navigating the application easier and faster.
Related Posts
Salesforce Dev Tools Chrome Extension for Salesforce Developer

Streamline Your Salesforce Development with Top Dev Tools

How to Use Salesforce Advanced Code Searcher Extension?
Post a comment cancel reply.
Save my name, email, and website in this browser for the next time I comment.

- App Building
- Be Release Ready – Spring ’24
- Integration
- Salesforce Well-Architected ↗
- See all products ↗
- Career Resources
- Essential Habits
- Salesforce Admin Skills Kit
- Salesforce Admin Enablement Kit
Home » Article » Pro Tip: How to Configure Lightning Pages that Work for Your Users
- Pro Tip: How to Configure Lightning Pages that Work for Your Users
Tune into the Lightning Experience Pro Tips blog series to learn about setting up Lightning Experience and how to avoid common gotchas along the way.
We know change management can be a full-time job for #AwesomeAdmin Trailblazers, and driving user adoption in Lightning Experience is no exception!
We’ve been listening to you and your end users and we’ve created some powerful tools for app building and customization in Lightning Experience. Through recent user experience research, we’ve gained excellent insights from users about where our product needs to go (See: Display Density Settings ). We’ve also learned about how challenging it can be for Admins to identify which customizations might best drive end-user adoption and engagement.
Between our product vision and #AwesomeAdmin innovation and feedback, we’ve identified some simple ways to configure Lightning Pages for a great user experience. To close out the Pro Tips series, let’s look at how you can use these options to help your users work more efficiently in Lightning Experience. What Admin wouldn’t love that?
Since many ‘End-User’ personas spend much of their day using Record Detail data, we’ve focused this post on five customizations that make accessing this data as efficient as possible, without extra scrolling or clicks:

Help your users find information they need faster by configuring Related List Quick Links and/or Related List – Singles
The card-based Related List components that display on out-of-the-box record pages in Lightning sometimes take up a lot of space and require users to scroll to reach the Related List they need.
Enter the Related List Quick Links (RLQL) component, which will drastically reduce your users’ time to task! It is the new and improved version of the Classic Related List Links, and similarly displays all your related lists as hoverable links in a single component.
Users are able to hover and view up to 10 records and all related list columns, perform mass actions, and sort without ever leaving the page. Users are also able to customize the order and even remove related lists to fit their needs (user settings are specific to a user, and will not affect other users). The component is also responsive so if your browser size is large, you will see more columns of links.
TIP: Use ‘Esc’ to quickly close a related list hover.
To configure Related List Quick Links (RLQL) :
- Go to the Lightning App Builder. From a record detail page, click the gear icon in the top right and then click ‘Edit Page’.
- Remove the Related Lists component that is on the page by default by selecting it and pressing the delete icon in the top right.
- Search for Related List in the search find box to quickly find all the available Related List components.
- Drag a Related List Quick Links component onto your page. The most popular locations are in the narrow side region or full width right under the highlights panel.
- Press ‘Save’ and go through the activation process if this is your first time editing a Lightning Page, and go back to the record you were looking at to see the fruits of your labor.
- Note: currently, a Related List still must be on a user’s assigned page layout for it to appear for that user. We are working on moving visible related lists in Lightning Experience away from page layouts to be tied to Lightning Pages. Stay tuned for more updates in the future.
We understand there are times when you want certain related information to be visible directly on the page. For these situations, the Related List – Single component is the way to go. Go back to the Lightning App Builder and drag one or more Related List – Single components onto your page and select the appropriate related list.
TIP: You can also show related data from related objects by changing the Parent Record attribute to the desired lookup field.
Congratulations! You have successfully configured RLQL. These components will provide a huge boost to productivity for your users and also clean up a lot of vertical real estate on your pages.
Reduce clicks by increasing the number of visible action buttons in the Highlights Panel

By default, the Highlights Panel will show the Follow / Following button, along with the first 3 action buttons from a user’s assigned page layout. Any additional action buttons will be accessible via a dropdown.
To customize the number of Action Buttons that are visible:
- Go to the Lightning App Builder
- Select the Highlights Panel component
- Update the Visible Action Buttons attribute value. The number of visible action buttons can be set to a value from 0 (everything is in a dropdown) to 10. The Follow / Following button is separate and does not count towards this limit. If you always want to see as many actions as possible, set this property to 10. Don’t worry, if there is not enough space to fit 10 actions for whatever reason (long labels, small browser size, etc.) the component is intelligent and will automatically overflow actions into the dropdown.
It is worth keeping in mind that we do prioritize respecting your metadata, so the component will show as many actions as possible, which means potentially showing less of the record name when there are many visible actions configured. Make sure to test out your changes to ensure the record name and actions appear as you expect.
After increasing the value, more buttons will be visible, saving the extra click to open the dropdown. Talk about productivity!
Set the Record Home tab default based on your users’ needs
Consider making Record Details the default (either as a tab or standalone).
In our research we observed many users getting tripped up on record home pages that defaulted to Related instead of Details, as well as by inconsistency of these defaults across objects. Please note: this highly depends on your users’ workflow! We recommend observing your users “in the wild.” If the first thing they do on a Record Page is click over to Details, you can save them a click by changing this default.
For most of our standard objects, out-of-the-box record details is behind a secondary DETAILS tab for most of our standard objects.This means it is one click away for users. For Custom Objects, DETAILS is the default tab out of the box. We are revisiting our out-of-the-box configurations along with other research topics to improve the default experience, however, for the time being this is a customization that you will need to make.
To do this there are two options:

Keep the tabs and make the appropriate tab default. This can be done by clicking the on the Tabs in the Lightning App Builder and updating the ‘Default Tab’ attribute in the right-hand pane. You can make any tab the default via the Default Tab attribute, no matter it’s position.
If you want to further customize, you can also move components outside of the tabs and move tabs to different regions, similar to what is shown at the start of the article where Details is outside of a tab and Activity and Chatter are now in tabs in the narrow region.
Set up Path for your Custom Object, and use it to represent linear processes
>Out of the box, Opportunities and Leads have a Path component that helps visualize the current status of a specific record and enables users to quickly update data and status. You can update the path settings with additional information or create your own Path for supported Standard Objects and all Custom Objects. Please note that we have observed some users becoming confused by Path when it has been used to represent non-linear processes. In those cases, proceed with caution and test your Path with users to ensure they aren’t tripped up.

To update Path settings or create your own path check out this help doc or follow these steps:
- Go to Path Settings in Setup and select ‘New Path’.
- Follow the steps to create your new path, making sure to select the appropriate picklist for the path, as well as adding the right fields and guidance for each picklist value.
- Once your Path is set up and activated, ensure it is on the page in the Lightning App Builder.
- Configure the attributes for the path in the right-hand panel as appropriate for your process.
- Save, activate, and assign as appropriate, then visit a record to see your new Path.
Your users can now easily visualize the status of your Custom Object Records and quickly update information right from your custom path!
Note: By default the Path stages display as collapsed, even if you have added fields and guidance to a stage. You can update this in Path Settings in Setup to remember your users’ preferences.
Place the most important fields in the Highlights Panel based on your users’ needs
For example, many Sales Personas often need phone numbers to jump out at them. The highlights panel at the top of Record pages is a great place to put key information. It is based on the fields in the Compact Layout. Compact Layout has some key fields for standard objects out of the box, but for custom objects it will only have the name field.
In order to make the Highlights Panel display the right info for your users, take these steps:
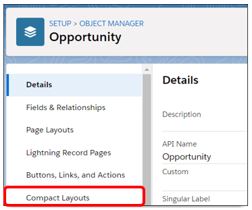
- Go into the appropriate Object in Object Manager, and click the Compact Layouts navigation item.
- From this page, press the ‘New’ button in the top right to go to the new compact layout screen, add the desired fields, and press Save.
- After this, press the Compact Layout Assignment button to edit the assignment to your new customized compact layout to ensure your users see it.
And that’s it! You have now customized the fields that are shown in the Highlights Panel!

Hopefully this set of customizations and User Experience tips has been helpful and you’re feeling encouraged you to dive deeper into the world of customization in Lightning Experience. What was your favorite customization from above? Are there any customizations you have personally implemented that made a difference to your users you would love to share? Let us know below!
Bonus: Accessibility Tip! For screenreader users, consider assigning custom page layouts that avoid placing components inside of Tabs or Accordions. For example, instead of placing Feed and Record Details components inside of Tabs, place them directly on the page, one on top of the other. This will make navigating Lightning much easier and more efficient for screen reader users. Stay tuned for more in-depth guidance on best practices for making Lightning Pages accessible!
Coming to Dreamforce? Join us for a live demonstration of these tips and others. We’ll also share insights on Lightning Pages from our user research, and guidance on how to do your own user research! Add to your Agenda Builder now .
Additional Resources:
Path Overview and Help:
Optimize Sales Processes Using Path
Know your Users:
User Research Basics Trail
Check out the other posts in the Lightning Experience Pro Tips blog series for more help with your Lightning Experience rollout.
About the Authors:

Lightning App Builder
Emily Witt is a former Not-for-Profit Admin turned User Experience Researcher at Salesforce who is passionate about making the tools that Salesforce provides as easy to use as they are powerful.
Related Posts
Use Custom Report Types to Analyze Lightning Usage
By Venkat Narayan | November 28, 2018
The Lightning Usage App is an efficient way for #AwesomeAdmins like you to track the adoption and usage of Lightning Experience in your org, so you can monitor progress and make informed decisions. Having tools like this at your fingertips will allow you to lead the way in your company through championing productivity, and continuing to deliver the […]
Transition to Lightning Experience at Your Own Pace
By Leah Scampoli | July 30, 2018
It’s the “Did You Know?” Lightning Experience edition! Use these tips to enhance your Lightning Experience transition to increase adoption. Did you know you can start rolling out Lightning Experience to a subset of your users? If you’ve never run before, you may not want to sign up for a race right away. Instead, you […]
Move to Lightning in 60 Days Webinar Recap
By Rachel Mincarelli | April 9, 2018
Our recent Admin webinar: Move to Lightning Experience in 60 days was all about showing #AwesomeAdmin Trailblazers tried and true steps that would allow them to successfully move their orgs to Lightning Experience. Nana Gregg and Marshall King of JLL involved their users in the design and configuration of Lightning while encouraging initial and ongoing […]

Guidance on how to retrieve and deploy Compact Layout assignment using Custom object and Record type metadata types
What metadata type to select in the filter?
Compact layout assignments are stored in the Custom object metadata within the RecordType sub-component.
So in order to deploy Compact Layout assignment, you'll need to include Custom object + RecordType in your metadata filter. Alternatively, you can use Gearset's default Basic comparison metadata filter, which already includes Custom object metadata.

When to include only 'Custom object' metadata type without any of its sub-components?
Below is an example of a Compact Layout assignment stored directly within the 'Account' Custom object metadata type.
In this Salesforce org you'd find it in Account > Compact Layouts . If you've reassigned System Default Compact Layout on a specific standard object, then you'd only need to include Custom object in your metadata filter (without any of its sub-components). This is when the Compact Layout assignment is being stored within Custom object metadata.

Preview in the Compare 2.0
Note: The user interface of the comparison results may differ slightly if you're using Compare 2.0 to retrieve the same Compact Layout assignment, in which case the interface would look as below.

When to include both 'Custom object' and 'Record type' metadata types?
You would need both Custom object and RecordType metadata types included in the filter when Compact Layout assignment is set up for a specific RecordType on a Custom object .
Below is an example of a Compact Layout assignment found in the comparison within the Record type .
In this Salesforce org its location is: Case (object) > Record Types > 'CSE Support' Record Type.

Preview in the Compare 2.0:

When to include 'Custom object' and 'Compact Layout' metadata types?
You'd normally include both Custom object and its sub-component Compact Layout when you're aiming to retrieve the Compact Layout as a top level component.

This means that you'd have the Custom Layout separated from the Custom object in your comparison results, as per below image.

About 15 mins
Add a Lightning Component
Create a custom candidate compact layout.
- Challenge +100 points
Create a Custom Candidate Record Page
When you generate a custom record page for the Candidate object, you can easily add, remove, or reorder Lightning components. That’s the next step in improving the Recruiting app for Ling Wu’s team.
Start by adding the Recent Items component to the Candidate record page.

- Click the Candidates tab.
- Click New to create a Candidate record, enter a first and last name, then click Save .

- Drag the Recent Items Lightning component from the list of standard components to the top of the Page Canvas, above the component featuring the Related and Details tabs.
- You'll have the option to set a custom label for the component, but for now, click the drop down menu for Label and select the standard Recent Items option.

- Click Save , Activate , Assign as Org Default.
- Select Desktop and phone on the Assign Form Factor page.
- Click Next.
- Click Save.

The compact layout controls which fields appear in the Highlights Panel component on the record page. Create a custom compact layout that includes more than just the candidate’s name.

- Click the Object Manager tab, and select Candidate .
- Click Compact Layouts , then click New and fill in the details:
- Click Save .
- Click Compact Layout Assignment , then Edit Assignment .
- Set the new compact layout you just created as the primary compact layout.
Using their new customized Candidate record page, the recruiting team can view all the information they need on a candidate in one easily accessible place. Now let’s create record types on the Position object to further streamline the recruitment process.
- Get personalized recommendations for your career goals
- Practice your skills with hands-on challenges and quizzes
- Track and share your progress with employers
- Connect to mentorship and career opportunities
Using the Compact Layout in Sales Cloud
In this blog we are jumping back in time a little to a platform feature that is so valuable, but in our experience under used. The Compact Layout.
Let’s start with what it is. The Compact Layout defines the key fields displayed in the Salesforce mobile app and Lightning Experience at the top of the record in the highlights area. Additionally, the Compact Layout also defines the fields you see when you mouse over a record link in Lightning, and which fields appear in your Outlook or Gmail plug-ins. Keep this in mind when you set up your Compact Layouts – your changes affect a few different areas of Salesforce.
To be transparent, there is a default set of fields determined for your Compact Layout, however, we at Stimulus are all about ensuring the optimal user experience to drive adoption. Of course, this means we recommend you look at creating your own compact layouts so YOUR key fields that your users need the most are displayed.
Let’s show you an example. In Sales Cloud, we want to ensure we see the key fields for your Opportunity as soon as you open it up. No searching through a record with tens or hundreds of fields for the critical information. Simply define your Compact Layout and customise the user experience.
Here’s how:
If you are using Lightning Pages, make sure the Highlights Panel Component is added to your page, or your users will not see it. Next, navigate to the Object Manager, select the Object and then Compact Layouts and New.
Once you’ve named your Compact Layout, add the fields you want to view.
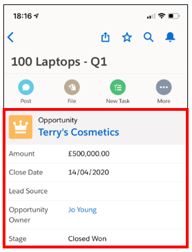
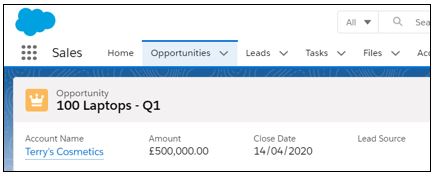
The order of your fields is really important as they are displayed in this order. You can add up to 10 fields to display in the new mobile app, whereas in Lightning Experience, users view the first six fields in the record highlights. The first field is shown above the others, and if you have chosen a lookup field, it also acts as a link to your other record e.g. Account Name takes you through to the related Account. Really think about this first field in the list. You may not wish to choose Opportunity Name as you already know which record you are viewing. Think about what else would be useful to know such as a record type, or Opportunity Type value.
After you’ve saved your Compact Layout, you need to assign it as the Primary Compact Layout for the object so you can see the changes. Click Compact Layout Assignment and choose your new layout.

Jump back into your org and now you can see your new Compact Layout:
Finally, if you have multiple record types, guess what? Yes, you can assign different Compact Layouts to different record types.
Take a look at our blog to find out more advice, tips and updates on all things Salesforce.
FIND THE RIGHT COURSE FOR YOU...
© Copyright Stimulus Consulting 2015
Terms and Conditions - Cookie Policy - Privacy Policy
- Marketing Cloud
Experiences
Access Trailhead, your Trailblazer profile, community, learning, original series, events, support, and more.
Search Tips:
- Please consider misspellings
- Try different search keywords
Try It Out: Create a Compact Layout
If you don’t create custom compact layouts, records display using a read-only, predefined system default compact layout. Once you create custom compact layouts, you can set one as the primary compact layout for the object.
We’ll create a custom compact layout, and then set it as the primary compact layout for the Merchandise object. Our new compact layout is used to render important merchandise record fields first in Salesforce1 for the Acme Wireless mobile technicians.
- From the Force.com app menu, select Warehouse.
- Click the Merchandise tab.
- Click New .
- For Merchandise Name , enter iPhone 4 .
- For Price , enter 299 .
- Click the Warehouse lookup, and select Oaklandia .
- For Quantity , enter 1 .
- Select Refurbished from the Condition drop-down list.
- Click Save .
Currently, the Merchandise object uses its system default compact layout, which only has the Merchandise Name field assigned. Here’s what our iPhone 4 record looks like in Salesforce1 :

Let’s add more fields alongside that “iPhone4” so our mobile users can see more pertinent information right at the top of the Merchandise record pages.
Merchandise is a custom object. If we were creating a custom compact layout for a standard object, the path in Setup would be Customize | Object | Compact Layouts .
- Click the Merchandise object name.
- Scroll down to the Compact Layouts related list and click New .
- In the Label field, enter Customized Compact Layout .
- Merchandise Name
- Using the Up or Down buttons, adjust the list so that the fields are in this order: Merchandise Name , Quantity , Condition , Price .
- Click Save . Now we need to set our compact layout as the primary.
- Click Compact Layout Assignment . You can see that the primary compact layout is set to the System Default here. We need to change that.
- Click Edit Assignment .
- Select the compact layout we just created to use as the primary compact layout.
We’ve customized a compact layout for the Merchandise object. Now let’s see what its related information page looks like in Salesforce1 .
How to Create Compact Layout in Salesforce
In the Salesforce tutorial, I will explain how to create a compact layout in Salesforce lightning and Salesforce Classic.
A compact layout is used to show a record’s key fields at a glance like an email, Date of birth and marital status, etc in the salesforce. It can also use to manage which of the fields appear in the header.
To create a compact layout in salesforce, I found a solution that helped us. So in this tutorial, we will understand how to create a compact layout in Salesforce.
- What is a compact layout in Salesforce?
- What is the use of a compact layout in Salesforce?
- How to create a compact layout in Salesforce
- How to create a compact layout in Salesforce lightning
- How to create a compact layout in Salesforce Classic
Table of Contents
In Salesforce, the compact layout is a technique to arrange the fields and information on the record detail page. It permits the administrator to select the fields of the subset to display relatively displaying all the fields available on the records.
This can help us in boosting the utility of the page, especially when the user is working in the areas where the limited screen is available or we can say that on the smaller screen, it boosts the utility.
It can be allotted to different profiles and is highly personalizable and it has also the ability to customize the record detail page which helps in reaching the needs of different users.
So, with this, we have learned about What is compact layout in Salesforce. Further, we will discuss what is the use of a compact layout in Salesforce.
Read: How to use schema builder in salesforce
Here we will learn what is the use of a compact layout in Salesforce. The compact layout is used for appearing the field in the header we can allocate up to ten fields which include the name field, and the email address which is relatively displaying all the fields available on the records.
Anyway, we are suggested using a compact layout for putting the information fields into the record header that can help the mobile user for getting the information they want to get quickly.
In this way, we have learned about what is the use of a compact layout in Salesforce.
Read: Create community in Salesforce Lightning
Here we will discuss the tips for creating or building compact layout in Salesforce.
- The compact layout is designed in that way only the most critical information is displayed and it is very easy to navigate.
- It is better for speed and efficiency and focuses on the most important fields and information.
- It is designed with the end-users and takes into account that fulfills the user’s requirements and particular needs.
- The compact layout is used for putting the information fields into the record header which can help the mobile user for getting the information they want to get quickly.
- The compact layout is better for use on mobile devices and the user can easily approach the important information in one go.
- It decreases the clutter and gives clean aspects that help the users to focus on the most important information.
- It also keeps a compatible structure throughout the page that makes it easy for users for finding the information.
- Its goal is to be reachable to the user with different needs and has an intuitive navigation structure.
This is how we understand the tips on how to create compact layouts in salesforce.
Read: How to Export a Report in Salesforce
Here we are creating a compact layout in Salesforce lightning. If you want to learn how to define a compact layout in salesforce lightning follow these steps:
Step-1: First, login into the salesforce lightning account. Go to the gear icon under the gear icon there are two options setup and service setup . Click on the setup after that click on the object manager.

Step-2: After clicking on the object manager, the object manager page is open under the object manager lots of objects are present. Enter the USA Student object in the Quick Find Box the object is shown on the top click on it.

Step-3: After selecting the USA student object page is open. Click on the compact layout that presents under the details option in the left sidebar.

Step-4: After clicking on the compact layouts , the compact layouts page is open click on the new option that is present at the top of the right corner beside the compact layout assignment.

Step-5: After clicking on New, the new compact layout page is open. Fill in all the information that is present on the page.
Firstly fill in the label as USA Student First Compact Layout and then fill in the name after that select the compact layout fields that show the record’s key fields at a glance then click on the save button.

Step-6: After clicking on the save option you can see that the USA Student First compact layout is created.

Step-7: After creating the USA Student First Compact layout . Click on the compact layout assignment then select the primary compact layout for assigning. Here we are selecting the USA Student first Compact layout and then clicking on the save option.

This is how we have learned how to create a compact layout in Salesforce lightning.
Read: How to Enable Knowledge Users in Salesforce
Here we are creating a compact layout in Salesforce classic . If you want to learn how to c ustomiz e a compact layout in salesforce classic follow these steps:
Step-1: Login into the salesforce classic account, and click on the setup option that is present at the top of the page.

Step-2: After clicking on the setup scroll down to the bottom of the page there are build add under the build there is a create option click on the drop-down option. Under the create option there is an objects option click on it.

Step-3: After clicking on the objects option click on the expense object and scroll to the bottom of the expense object page there is compact layouts option. Click on the new option.

Step-4: After clicking on New, the new compact layout page is open. Fill all the information that is present on the page.
Firstly fill in the label as Expense Compact Layout and then fill in the name after that select the compact layout fields that show the record’s key fields at a glance then click on the save button.

Step-5: After clicking on the save option you can see that the Expense compact layout is created. After creating the compact layout we can edit, clone, delete, and compact layout assignment.

So, with this, we understand how to create a compact layout in the salesforce classic.
You may also like to read the following Salesforce tutorials.
- How to Get Security Token in Salesforce
- How to Set Field-Level Security in Salesforce
- How to Create Lookup Filter in Salesforce
- How to Add Actions to Global Publisher Layouts in Salesforce
In this tutorial, we have learned about a compact layout in salesforce. We have also discussed the use of a compact layout in salesforce. In addition, we have covered how to create a compact layout for salesforce lightning as well as salesforce classic.

I am Bijay Kumar, the founder of SalesforceFAQs.com. Having over 10 years of experience working in salesforce technologies for clients across the world (Canada, Australia, United States, United Kingdom, New Zealand, etc.). I am a certified salesforce administrator and expert with experience in developing salesforce applications and projects. My goal is to make it easy for people to learn and use salesforce technologies by providing simple and easy-to-understand solutions. Check out the complete profile on About us .
Phone and email fields are grouped when added to a custom compact layout
Create the formula field, add it on the compact layout, assign it as default compact layout.
Cookie Consent Manager
General information, required cookies, functional cookies, advertising cookies.
We use three kinds of cookies on our websites: required, functional, and advertising. You can choose whether functional and advertising cookies apply. Click on the different cookie categories to find out more about each category and to change the default settings. Privacy Statement
Required cookies are necessary for basic website functionality. Some examples include: session cookies needed to transmit the website, authentication cookies, and security cookies.
Functional cookies enhance functions, performance, and services on the website. Some examples include: cookies used to analyze site traffic, cookies used for market research, and cookies used to display advertising that is not directed to a particular individual.
Advertising cookies track activity across websites in order to understand a viewer’s interests, and direct them specific marketing. Some examples include: cookies used for remarketing, or interest-based advertising.
Cookie List
IMAGES
VIDEO
COMMENTS
Manage Your Translations. Set Up Your Data Your Way. Build Your Own Salesforce App. Lightning App Builder. Manage Your Notifications with Notification Builder. Custom Domains. Extend the Reach of Your Organization. A compact layout displays a record's key fields at a glance in the Salesforce mobile app, Lightning Experience, and in the ...
Details. You're asking two things. Compact Layout Assignments. This is stored in the custom object metadata under compactLayoutAssignment within the RecordType property so you need to include whatever object you're changing the record type/compact layout assignment. It'll look like something like this within the metadata you pull
From Setup, click Object Manager. Click Energy Audit to open the object and then click Compact Layouts. You can see that the System Default compact layout is assigned as the primary compact layout right now. We're going to change that. Click New. Give the compact layout a label: Energy Audit Compact Layout.
Learn how to "customize record highlights with compact layouts" in "Salesforce Lightning Experience" in this comprehensive tutorial. Compact layouts are a gr...
- Learn how compact layouts help your users.- Learn to create a custom compact layout.Lightning Experience Customization Module 4 of 7 from Salesforce Trailh...
Click Compact Layout Assignment, then click Edit Assignment. From Primary Compact Layout, select Ursa Major Highlights Panel. Click Save. To test it, go back to the Ursa Major Solar Service Console app and check out your Highlights Panel. Good job! You just customized Ursa Major Solar's console to meet Ada and her team's needs for case ...
Learn why it's important to customize compact layouts.Learn to create a new compact layout.Assign a compact layout to users.Salesforce Mobile App Customizati...
You will learn what is Compact Layouts in Salesforce and How to Create blog posts. I will show you how to create layouts in a compact setup, what are the benefits of compact layout configuration and why a compact setup could be a good idea for you. Salesforce Compact Layouts create a better user experience and make navigating the application ...
Customize the Case Compact Layout The compact layout controls which fields appear in the highlights panel at the top of the record page. If desired, add or remove fields from the Case compact layout. Confirm the Contact and Case Layout Assignments Whichever page layouts you're using for Contact and Case records, make sure they're assigned to ...
Go into the appropriate Object in Object Manager, and click the Compact Layouts navigation item. From this page, press the 'New' button in the top right to go to the new compact layout screen, add the desired fields, and press Save. After this, press the Compact Layout Assignment button to edit the assignment to your new customized compact ...
In order to deploy Compact Layout assignment, you'll need to include Custom object + RecordType in your metadata filter. Note that RecordType is a sub-component of Custom object in the metadata filter. Below is an example of a Compact Layout assignment stored directly within the 'Account' Custom object metadata type (In a Salesforce org you'll ...
Create a Custom Candidate Compact Layout. The compact layout controls which fields appear in the Highlights Panel component on the record page. Create a custom compact layout that includes more than just the candidate's name. Click and select Setup. Click the Object Manager tab, and select Candidate. Click Compact Layouts, then click New and ...
Click Compact Layout Assignment and choose your new layout. Jump back into your org and now you can see your new Compact Layout: Finally, if you have multiple record types, guess what? Yes, you can assign different Compact Layouts to different record types. Take a look at our blog to find out more advice, tips and updates on all things Salesforce.
Here are a few more more tidbits about how compact layouts work. Compact layouts support all field types except: text area. long text area. rich text area. multi-select picklist. If a user doesn't have access to one of the fields that you assign to a compact layout, the next field on the layout is used. Removing a field from a page layout ...
Click Compact Layout Assignment. You can see that the primary compact layout is set to the System Default here. We need to change that. Click Edit Assignment. Select the compact layout we just created to use as the primary compact layout. Click Save. We've customized a compact layout for the Merchandise object.
3 Answers. Compact layouts are defined as part of the custom object, standard object, or external object definition. You need to have it defined in the Object's metadata xml definition as below: <fullName>testCompactLayout</fullName>. <compactLayoutItems>textfield__c</compactLayoutItems>. <label>testCompactLayoutLabel</label>.
Step-1: First, login into the salesforce lightning account. Go to the gear icon under the gear icon there are two options setup and service setup. Click on the setup after that click on the object manager. How to create a compact layout in salesforce. Step-2: After clicking on the object manager, the object manager page is open under the object ...
When adding multiple Phone and Email fields on Compact Layout, you'll notice that instead of appearing in a separately, the fields will be grouped. A drop down arrow will be available to switch fields. This is working as designed. If you wanted to display fields in separately, you need to create a formula field, reference those fields and then ...