
How to Use Canva Presentations
Make visually appealing presentations that'll stand out among others using Canva.

Canva, a graphic design platform, is gaining a lot of traction as a design tool. Its basic premise – it’s just as easy to use for non-designers. You don’t need to be an expert in graphic designing to use Canva, and that is one of the main reasons behind its popularity.
With design becoming one of the hottest commodities for just about every field, Canva makes it accessible to everyone. Whether you’re an entrepreneur, a marketer, influencer, or a blogger, you can use Canva to make fetching content for social media, posters, graphics, design your own business cards even. If you’ve got even a little eye for design, Canva can help you cut down on the costs of hiring professional designers.
But did you know you can also use it to make just as engaging and stimulating presentations? Whether you want to make presentations for a professional environment or personal use (like a birthday surprise), Canva Presentations have got you covered. Let’s dive right into it!
Getting Started
Canva offers a web app you can immediately start using on your desktop without having to download anything. Unfortunately, the web app is your only option as there is no desktop app. So you need an internet connection to work with Canva as it stores all your work on its servers.
Canva also has a mobile app for iPhone and Android, which you can use on the go. But when getting started, using the web app is the best course of action.
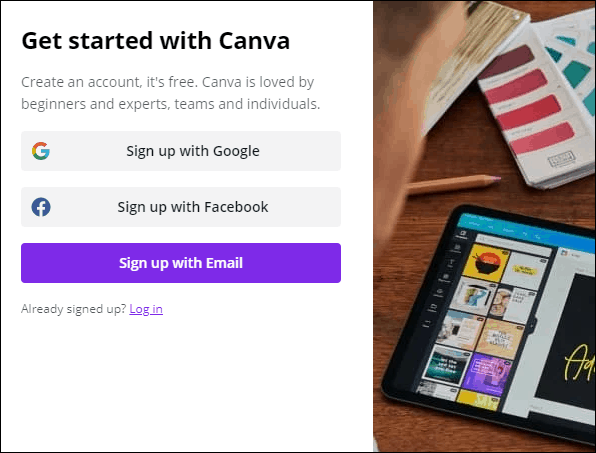
Go to canva.com and create a free account. Click the ‘Sign Up’ button to create a new account.

You can sign up with your Google account, Facebook account, or your email address.
Canva has a freemium structure, so you can use it for free with limited features or get a Pro or Enterprise subscription for complete access. It also offers a 30-day free trial to its Pro features, so you can try it out before deciding whether you want to convert to a paid user.
Now, from the Canva home page, click the ‘Presentations’ button under the Design anything banner. If you can’t find the option, you can also search for ‘Presentation’ from the search bar.

There are plenty of size options to choose from when creating a presentation. Let’s stick with the standard size ‘1920 x 1080 px’ here.

One of the things that makes Canva so easy to use for everyone is the sheer number of templates. The assortment of templates in existence ensures that you’ll find something to match your needs. But if not, you can also start with a blank slate and create your presentation from scratch.
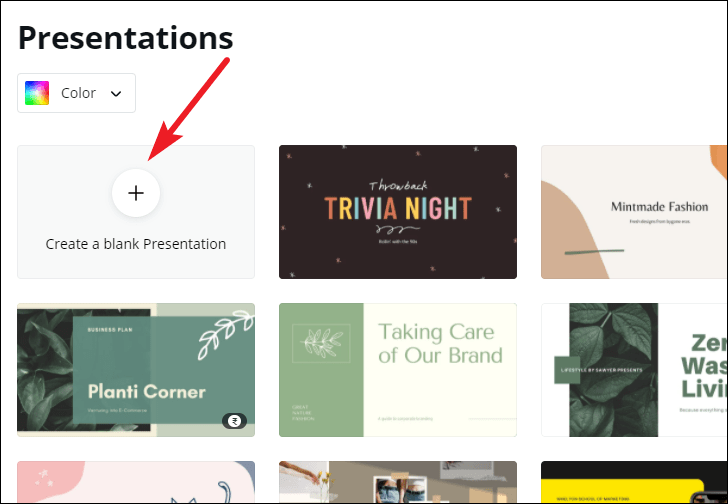
For this guide, we are selecting a template for the presentation. Before selecting a template, you can see what it has to offer by clicking the three-dot menu and selecting ‘Preview this template’.

Click ‘Use this template’ to select the template if you like it or go back and select another.

Editing the Presentation
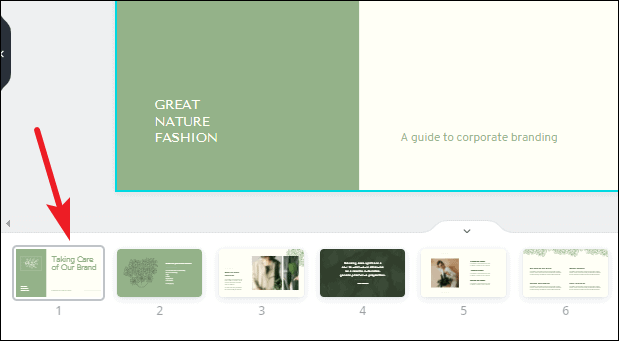
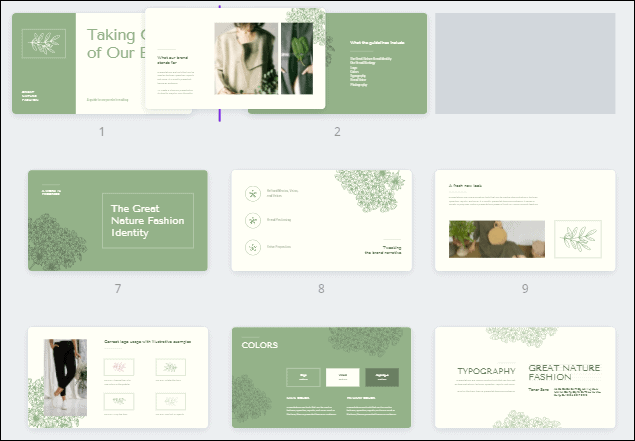
The template will load into the editing interface. Canva has an eerily easy editing interface. Let’s navigate the interface first. Below the slide is the thumbnail view where you can see all the slides in thumbnails side by side.
To turn off the thumbnail view, click the on/ off toggle (arrow).

Click the grid view button to switch views.
The grid view is helpful when there are a lot of slides in your presentation. Using grid view, you can get an overview of them all. You can also rearrange the slides by dragging and dropping slides into a new position. Click the ‘Grid View’ button again to switch back.
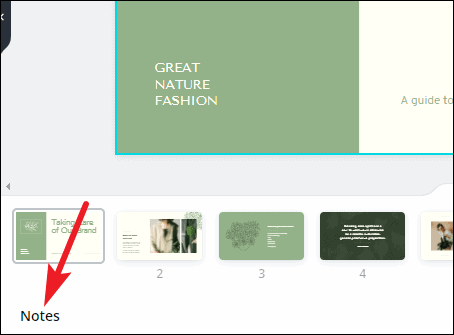
Click the ‘Notes’ option to add notes to the presentation that you can use for reference while presenting.
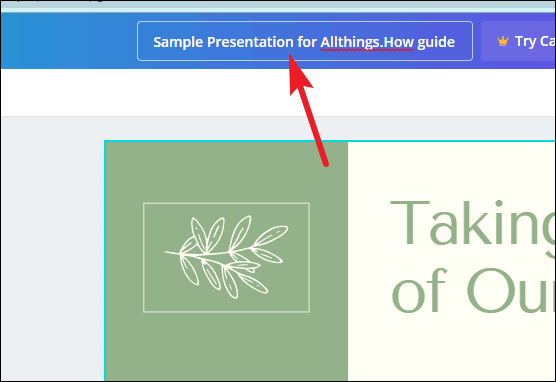
The name of the presentation can be edited from the top-most toolbar.
Now, on the left is the toolbar that houses all the tools for editing the design elements in the presentation.
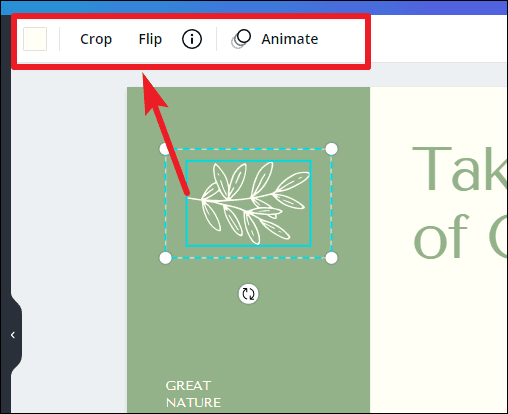
When you’re using a template, almost all of the elements can be selected and edited. You can delete an element, change color, font (for text). To select an element, hover over it. The part of that element will be highlighted in blue. Click it to select it.
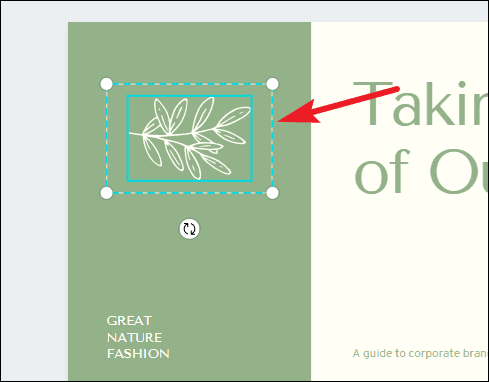
Another toolbar will appear above the slide with editing options specific to the element you have selected. Depending on the element, you can change it’s color, font, font size.
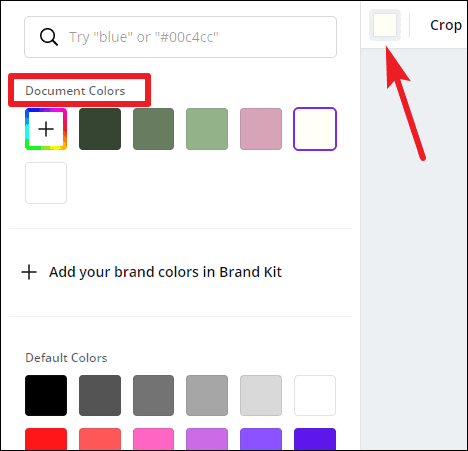
When you click the color option, a palette for document colors will appear above, followed by available default colors. For free users, only limited color options are available. If you have a Brand Kit (available only for Canva Pro users), that palette will also appear here.
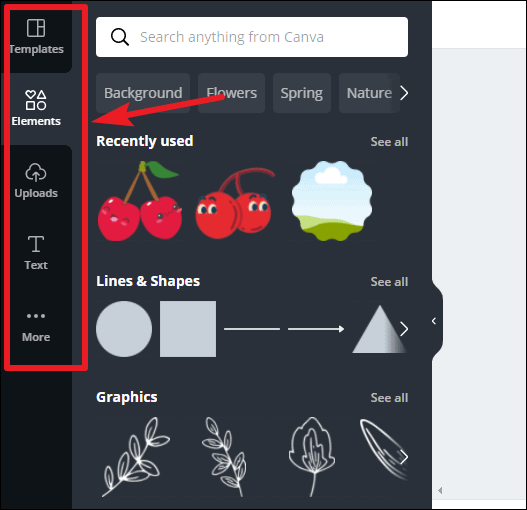
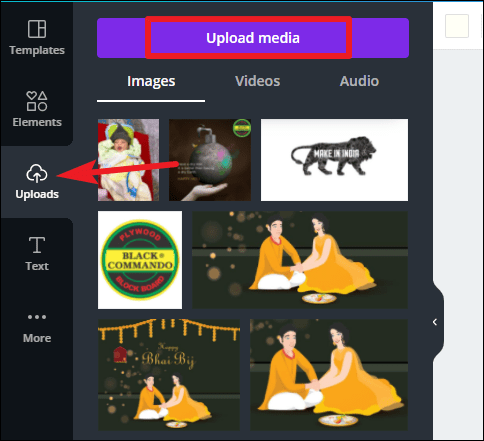
Click on the ‘Elements’ option on the left toolbar to add elements like photos, videos, graphics, audio, charts, etc. to your presentation.
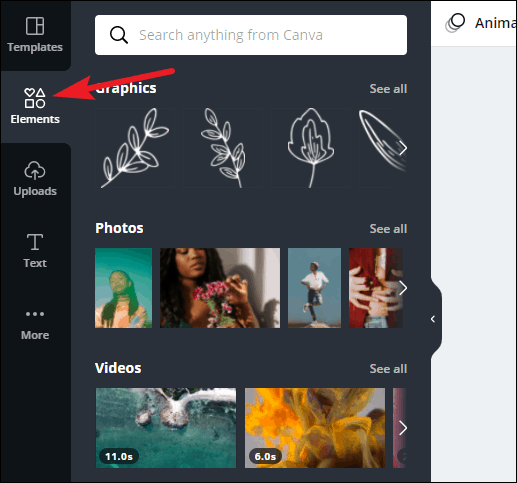
To add photos, videos, or audio from your computer, click the ‘Uploads’ button. Then, click the ‘Upload media’ button to select content. Any media you previously uploaded will also be available here.
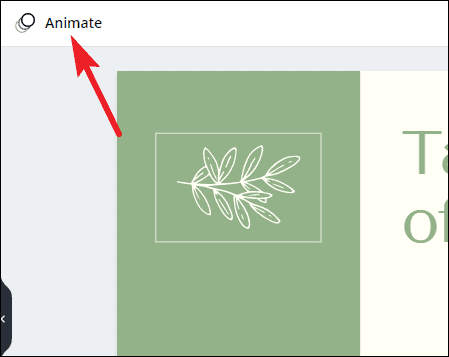
You can also add animations to individual elements or the entire page. Select an element and click the ‘Animate’ button.
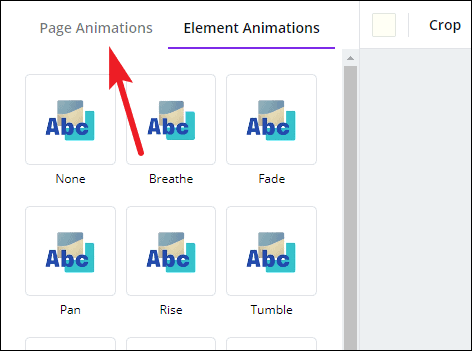
‘Element animations’ will open. To switch to page animations, click the ‘Page Animations’ tab.
Presenting your Presentation
Once your presentation is complete comes the main part – presenting it. Canva offers a lot of options for your finished presentation. You can present it right from Canva or publish or download it for various platforms.
To publish it elsewhere or download it, click the ‘three-dot’ menu on the top-right corner.
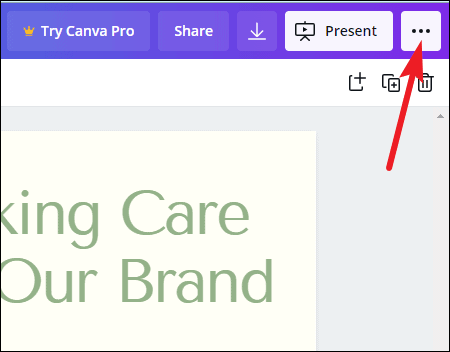
A list of options will appear. You can download it onto your computer, or as a PowerPoint presentation, share a link to the presentation, publish it as a website, embed it on your website, and much more. You can also record it while presenting with a voiceover.
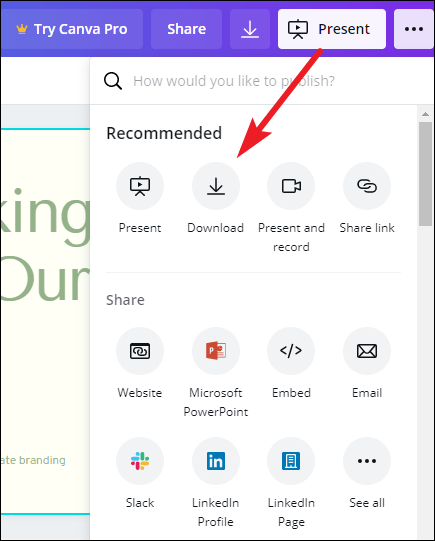
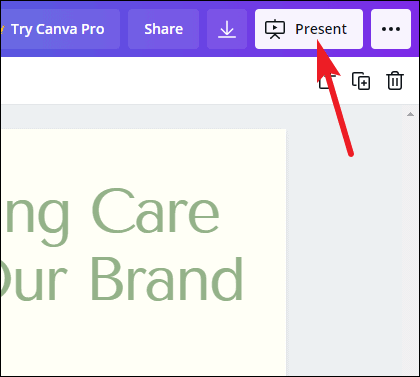
To present straight from Canva, click the ‘Present’ button.
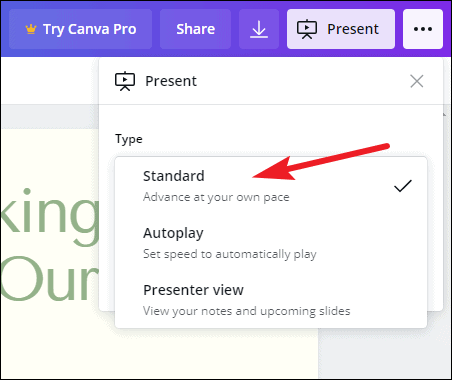
Click the drop-down menu below ‘Type’ and select how you want to present it.

There are three options to choose from: ‘Standard’ – where you present at your own pace, ‘Autoplay’ – where the presentation advances automatically, and ‘Presenter View’ – where you can view your notes and upcoming slides, but the rest of the people cannot. Presenter View is best used when you’re presenting on a projector.
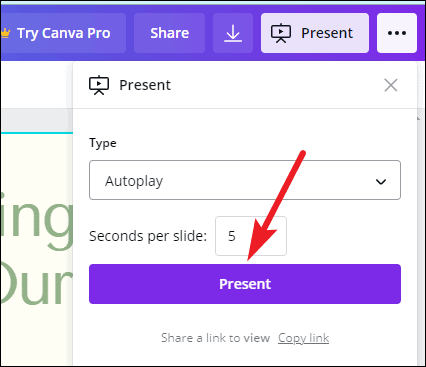
After selecting the type, click the ‘Present’ button.
Bonus Tips for your Presentation
While presenting the presentation on Canva, you can add special effects to enhance the performance with some keyboard shortcuts. All you need to do is press the associated key with each effect to bring it into action. Press the same key to stop it. You can also press multiple keys to add 2 or more special effects. With these effects, your presentation is bound to stand out to your audience and be memorable.
Drumroll : Add a drumroll before a slide by pressing the key ‘D’ before a big reveal.

Confetti : Add a shower of confetti to celebrate something with the key ‘C’ .

Countdown : Add a countdown from ‘1-9’ by pressing one of the keys.
Quiet : Bring a 🤫 emoji to screen to hush your audience with the ‘Q’ key.

Bubbles : Press down the ‘O’ key to bring bubbles on the screen.

Blur : Build tension and add drama to the atmosphere by blurring the screen with the key ‘B’.

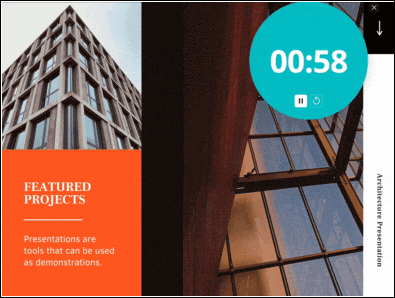
Presentations are a huge part of professional life, whether you’re presenting to your clients, doing a webinar, promoting your brand, to name a few. With Canva, you can make presentations that’ll leave a long-lasting impact but won’t take long to make.

How to Use Gemini Code Assist in VS Code

How to Code Using AI

Microsoft Copilot Pro Review: There is a lot of Unrealized Potential
Get all the latest posts delivered straight to your inbox., member discussion.

How to Use Magic Switch in Canva to Instantly Convert Your Designs

How to Use Soundraw AI Music Generator in Canva

How to Use Magic Studio in Canva to Transform Your Ideas into Videos

How to Make Artistic QR Code in Canva using Mojo AI

How to Create AI Art & Graphics Using Canva Magic Studio
How to Use Canva to Create and Give Presentations
Canva makes it easy to edit text, make GIFs , and create content for social media like Instagram . But Canva also makes it easy to create presentations and if you are in a hurry and forgot your PC, Canva allows you to give that presentation using your smartphone. Here is how you can create and give presentations using Canva while on the move.
Table of Contents
Create Presentation Using Canva Templates
One of the things that make Canva so much easier to use is templates. They offer free and paid templates for almost all sorts of content that you may think of. We will be using a free template to create a presentation on Canva’s web app.
1. Open Canva in your browser and search for Presentation in the search bar.

2. You will be taken to the presentation templates page . You can filter by category or just scroll through until you find something that catches your eye or meets the criteria. You can also click on the empty frame with +sign to create a new presentation from scratch but that would be time-consuming.
Note: Templates with a golden crown icon are paid templates.

3. Click on any template and you will see a pop-up menu with more details about the template. Click on Customize this template to begin making your template. Click on the star icon to bookmark it for later perusal.

4. Now, in the left sidebar, you will find all the slides in the presentation. When you select a slide, you will be able to edit it on the right side. Each element can be edited or removed including text, image, and various elements. It is easy to add, edit, and format text .

5. You can choose from a variety of apps from the marketplace to make your work easier including AI apps like Dall-E. Simply click on Apps in the left sidebar and choose the one that you want to use.

6. You can also draw on slides or use stock images from sources like Pixabay and Pexels without having to leave Canva.

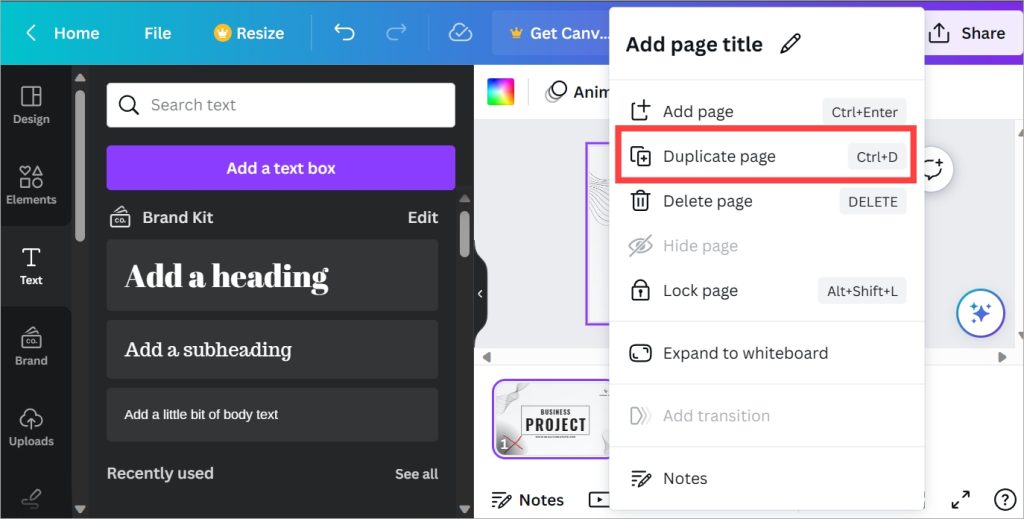
7. To add a slide, click on the plus icon at the bottom. You can also right-click on the existing slide and select Duplicate page to create an identical new slide that will retain the formatting and layout of the first slide. So all you have to do is change the text and some elements.
When you are happy with the presentation, you have a couple of options. Let’s have a look at them in the below sections.
Give a Presentation Using Canva
There are two ways to do it. You can present a presentation made in Canva using both the web app and the Android or iPhone app.
Give Canva Presentation on PC
1. Go to Canva homepage and click on Projects in the left sidebar.

2. Click on the presentation that you want to give to open it.

3. Click on the Present button in the upper right corner. You will see three options to present.
- Present full screen – this will begin a full-screen presentation for everyone to see.
- Presenter view – this presents the slides that you have created along with notes that you may have.
- Autoplay – this will let you set a timer so that once you begin the presentation on Canva, slides will change after the chosen time (in seconds) automatically.

4. Once you selected a form of presentation, click on the Present button to begin.
Have you heard of Adobe Spark? We did an in-depth comparison between Canva and Spark . Find out who won and why.
Give Canva Presentation on Mobile
If you are working remotely or traveling and don’t have your laptop on you, Canva allows you to give presentations directly from mobile.
By Sharing Presentation Link
Open the Canva app and go to the Projects tab. Now open the presentation and then select the Presentation menu (TV icon).
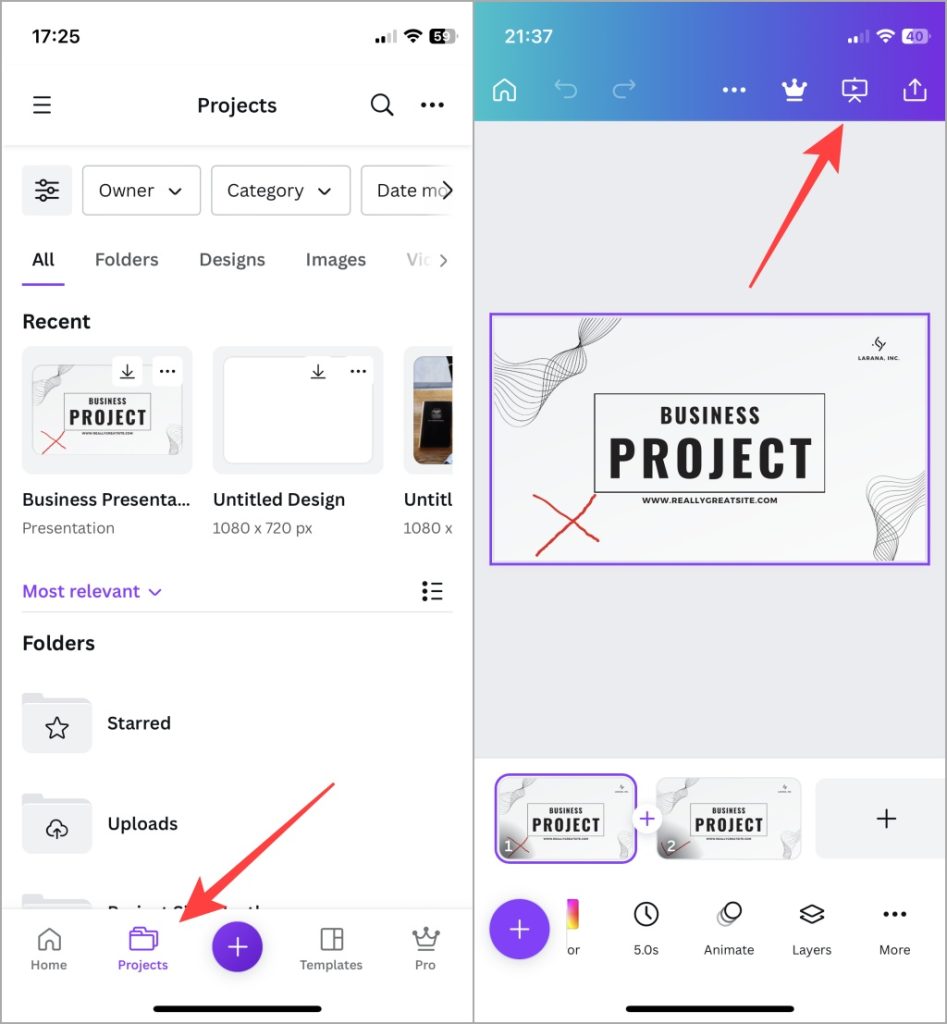
If you are casting your mobile screen on a bigger screen, this will work beautifully.
Using Phone as Remote to Give Presentations
This is one neat trick up Canva’s sleeve. You would have noticed how presenters on stage have a small remote in their hands that they use to change slides. You don’t need anything but your smartphone to give presentations saved on Canva now. And it is quite easy.
1. Open the presentation on your web or mobile Canva app. Here we are using the web app. Click on the Present button to begin the presentation.
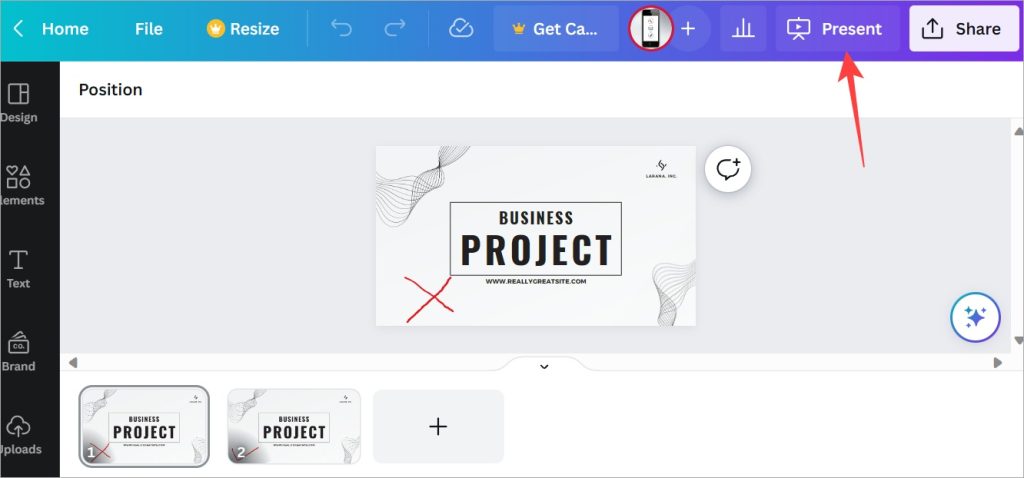
2. Select an option depending on how you want to present. We discussed the three options above. Now click on Present button.

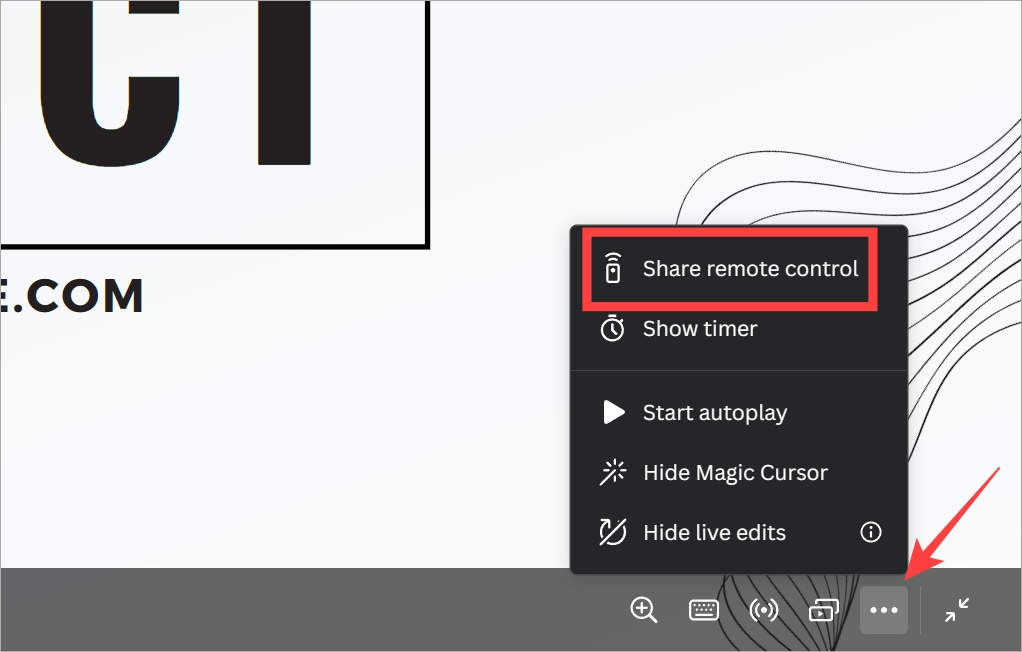
3. Once the presentation begins, click on the meatballs menu (three-dot icons) at the bottom right corner of the screen and select Share remote control option.
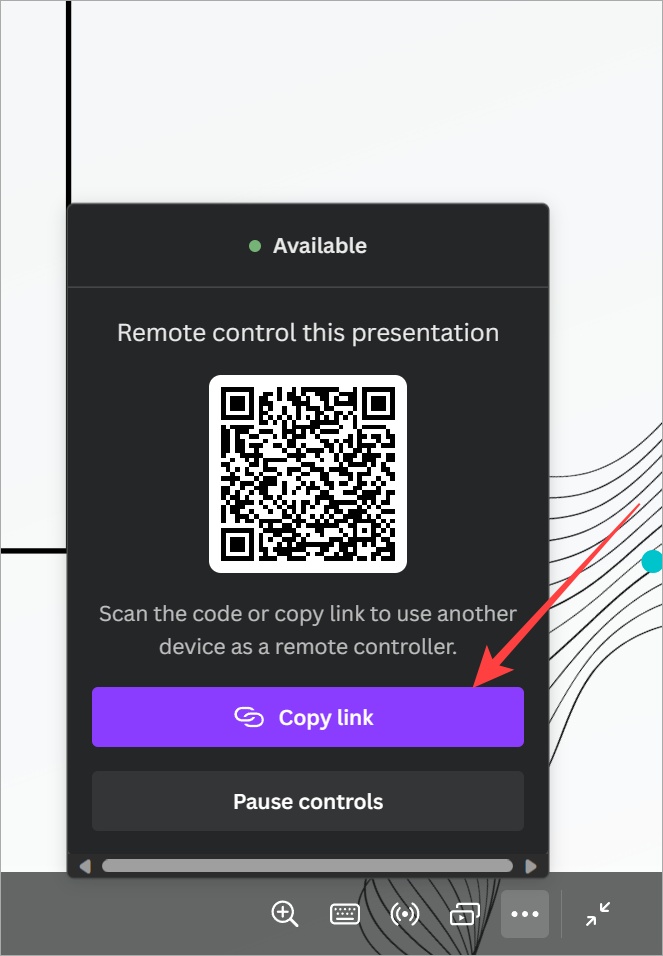
4. Either scan the QR code or Copy the link and paste it on your mobile browser. Any browser will do.
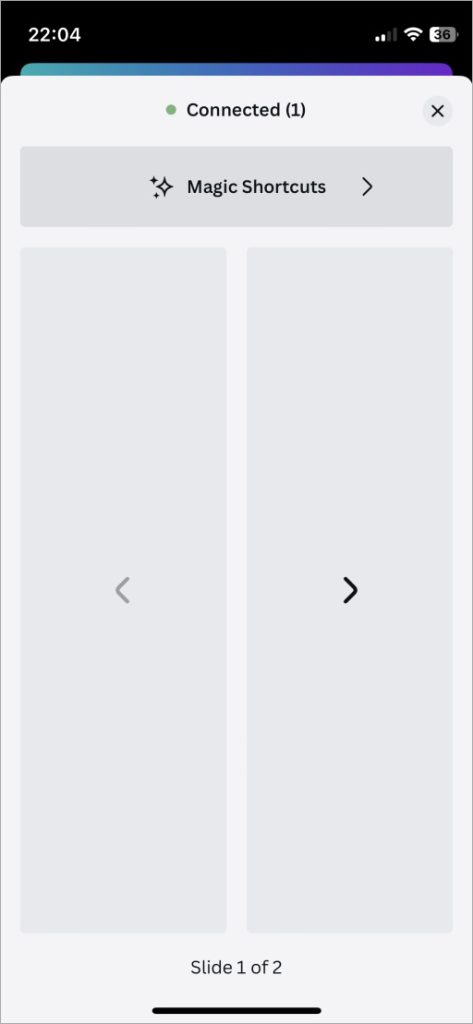
5. You can now control the presentation and slide movements right from your mobile browser. Here is how it looks. Tap on the left or right button to move slides.
Presenting, Canva!
Canva not only makes creating presentations easy thanks to the wide variety or free and paid templates, but it also offers intuitive ways to present your slides. But that’s not all that Canva can do. We use Canva to create featured images, resize images , make background transparent , and so much more.

Gaurav Bidasaria
Gaurav is an editor here at TechWiser but also contributes as a writer. He has more than 10 years of experience as a writer and has written how-to guides, comparisons, listicles, and in-depth explainers on Windows, Android, web, and cloud apps, and the Apple ecosystem. He loves tinkering with new gadgets and learning about new happenings in the tech world. He has previously worked on Guiding Tech, Make Tech Easier, and other prominent tech blogs and has over 1000+ articles that have been read over 50 million times.
You may also like
How to enable double/triple back tap on samsung..., how to check storage type and speed of..., 4 best airpods apps for android to get..., 10 ways to fix circle to search not..., this is the best way to lock whatsapp..., you’re using your galaxy phone wrong if you..., how to lock apps on your samsung galaxy..., how to switch back to google assistant from..., what do icons and symbols mean in messages..., 5 ways to mark all messages as read....
Home Blog Design How to Use Canva and PowerPoint for Presentations
How to Use Canva and PowerPoint for Presentations

Creating the perfect presentation design is a challenge that speakers often aim to achieve, only to find themselves lacking graphic design knowledge. Although high-tier options like Adobe Photoshop and Adobe Illustrator help users worldwide to put their ideas into pixels, the reality is they are not user-friendly interfaces for people outside the graphic design industry, namely business professionals, marketers, and educators. Hence, the need to find an alternative for making powerful graphics to use in our presentations – and here’s where Canva comes into the picture.
This web-based graphic design tool has quickly become the preferred choice of teachers, social media influencers, and small business owners due to its free-tier plans and pro plans at a convenient subscription-based fee.
In this article, we will see how to use Canva presentation in PowerPoint and how to export Canva to PPT, to create visually appealing presentations.
Table of Contents
Canva vs. Microsoft PowerPoint: Pros and Cons for Presenters
Designing with canva, how to export a canva presentation to powerpoint, how to use canva-made graphics in powerpoint, final words.
Although presenters often see Canva as an alternative to PowerPoint, the reality is that they differ in one single aspect: Canva is a graphic design tool, whereas PowerPoint is a presentation design software. Some of the tools available in PowerPoint are not there in Canva, and vice versa.

Going into more technical aspects, here are the Pros and Cons of working with either software as a presenter.
Pros of Canva as a Presentation Tool
User-friendly interface.
Canva’s drag-and-drop feature makes it easy for non-designers to create presentations by using its library of shapes, graphics, text styles, and other resources.
Wide Range of Templates
It offers a vast library of Canva templates, which can be easily customized in their online editor, saving time on design. There’s a con associated with this point, which we shall discuss later.
Magic Studio for Canva was released mid-Q3 this year with the idea of powering designs with AI tools. This tool is available in Canva search features and in the editor at the bottom right corner, which features the list options:
- AI text generation
- Suggested graphics to match your design
- Suggested photos to match your design
Collaboration Feature
Allows multiple users to simultaneously work on the same presentation, which is great for small team projects. Compared with PowerPoint, it does not require all users to be Premium to collaborate online.
Web-Based Platform
Being an online platform, it allows users to work from any device with Internet access without needing software installation. This particularly helps users with legacy computers who cannot install current versions of Microsoft Office.
Integrated Stock Library
Provides access to a broad selection of stock photos, illustrations, and icons within the platform. Just like with the Canva templates, there’s also a con to this point.
Customization Options
Users can upload images and fonts, enabling brand consistency across presentations. Note: The upload fonts feature is only available for Canva Pro users.
Photo Editing and Animation Features
Canva lets users tweak their graphics with simple-to-use controls. These options help us to adjust opacity, apply photo filters, add animation effects, add bevels and shadows, and more.
Cross-Platform Compatibility
Can export presentations to various formats (as a PDF document, as a video presentation in MP4 format, or even as images), making them viewable on different devices and platforms. The export options allow us to post directly into social media, create printables, post to the web, etc. While some export formats require an upgrade to a Canva Pro subscription (like the ability to export to SVG format), the basic export features are enough for simple presentations and beginners.
Cons of Canva as a Presentation Tool
Limited offline functionality.
Requires an internet connection for full functionality, which can be a limitation in areas with poor connectivity, for business people working on an airline flight, while using Airplane mode, or for people traveling in other zones without Internet access.
Fewer Animation and Transition Options
Unlike PowerPoint, the available options for animations and transitions are limited. Users can find this reiterative, which may be unappealing to using these effects in our presentations.
Premium Content
Although the Canva library is extensive in terms of assets, the reality is that most of these elements are only available for premium users. This applies to templates, shapes, images (mostly), and exporting options. Resizing the graphics you create in Canva to repurpose your design is only available to premium users.
Template Overuse
Popular templates can be overused, making presentations look similar to many others. This is of particular interest to business professionals, as people tend to easily associate some designs as being made with Canva.
Design Decisions
Unlike using a PowerPoint template , you have to work your way with Canva content, as the PPT templates tend to be quite generic and do not offer tools for data representation. Consequently, you have to know how and where to introduce those elements on your own rather than working with a presentation template that already assigned the space for such graphics.
Lack of Advanced Multimedia Integration
Integrating complex multimedia elements like videos is not as seamless as in some desktop applications. You won’t find options to link to source elements; you need to upload the content to your personal Canva library and manually add the resource to the slide. Presenters can also lose third-party integrations via plugins for some multimedia resources.
Pros of PowerPoint as a Presentation Tool
Widespread use and familiarity.
PowerPoint is the leading market tool for presentations, making most audiences and presenters are familiar with it at a basic operational level. This can help us to outsource technical issues quickly rather than aiming to use web-based interfaces to share Canva-created content.
Offline Access
PowerPoint can be used offline, which is ideal for people traveling, areas where the Internet connection is unreliable, or simply because we want to focus on creating the slides rather than facing distractions via the Internet.
Integration with Other Microsoft Office Tools
Seamlessly integrates with other Microsoft products like Excel and Word, making it easy to import data and documents. This is ideal for creating complex graphics for data representation, where the content can be synced, importing databases, working with Gantt Charts in software like Microsoft Project, and more.
Also, Microsoft PowerPoint has the same text editing capabilities as Microsoft Word – a striking contrast with Canva’s limited features.
Templates and Design Options
This is PowerPoint’s forte: the capability of using third-party presentation templates, like the ones provided by SlideModel . Users can buy pre-designed slide decks from professional vendors and ease the need to make design-related decisions. On top of that, Microsoft already includes some basic templates with its 365 subscription.
Advanced Features
Offers a broad range of features, including detailed animations and transitions, which can enhance presentations. For example, the ability to work with SVG graphics allows presentation designers to make pixel-perfect presentations without losing image quality. This is available to all users, unlike Canva, which requires a subscription to unlock certain elements.
Multimedia Capabilities
Supports embedding of various multimedia elements like audio, video, and images directly into presentations. You can use hyperlinks to embed content or work with third-party plugins for specific tasks.
Extensive Support and Resources
As a long-established tool, users can find tutorials everywhere, support communities, and additional resources available online.
Cons of PowerPoint for Presenters
Some features can be complex to use, and the interface may be overwhelming for new users. In particular, this is linked to editing PowerPoint Shapes and graphs, working with Slide Master , applying advanced animation effects and so on.
Unlike Canva or Google Slides, PowerPoint requires purchasing Office 365 or a standalone license.
Heavy Files
PowerPoint files, especially those with multimedia content, can become large and difficult to share via email. As a side effect, those heavy files can be complicated to handle in computers that lack sufficient RAM and processing power. Moreover, they require significant free disk space on your PC.
Time-Consuming
Creating a high-quality presentation with custom animations and graphics can be time-consuming. That’s the reason why we highly recommend users work their way with PowerPoint templates, and mix and match designs to create a unique slide deck .
Learning Curve
Users need to invest time in learning the software to fully utilize its advanced features. This applies to both acquiring the knowledge and practicing the skills you learned. And still, for some users, it feels frustrating not to achieve results relatively quickly.
In this section, we will learn how to use Canva to create graphics for a product presentation. The idea is to create placeholder graphics containing images of a product; then, we will export that content to continue creating our presentation in PowerPoint.
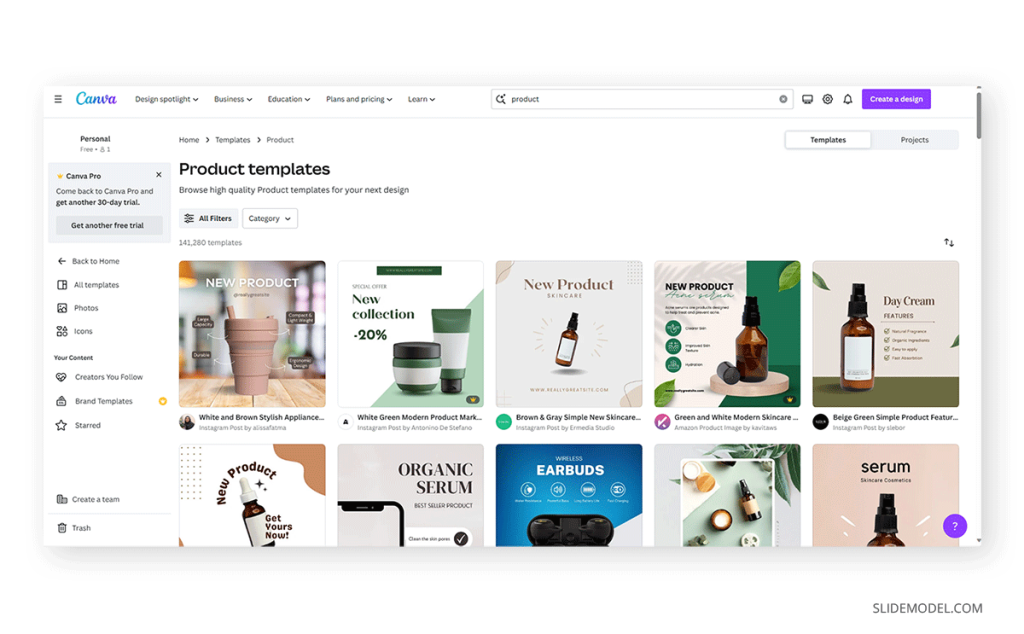
After creating our Canva account, we find ourselves at the Home screen. Go to Templates, and you will see something similar to this UI.

We can go straight to the Presentations (16:9) option or use the search bar to locate the template we want. In this case, we will opt for that scenario and search “Product.”
The images that show a little crown at the low right corner are premium templates, which means we cannot use them with a free account. We will pick a template that fits the needs of our presentation by clicking over it. At the contextual window that opens, select Customize this template .

The Canva builder may take a bit to load, especially if your internet connection is slow. You will find yourself with a window like this one, opened at the Design tab, which offers alternatives for other templates similar to the one you chose.

The Styles tab allows us to quickly change the layout, altering color themes and fonts. Sometimes, that can suit our needs immediately; sometimes, it requires extra work to customize to our preferences.

We can click on any element in this design and customize its content. Depending on the element type, the options are available for us. For this presentation, we will change the text and images, and alter font color at the button to make it stand out.

Next, it’s time to replace the images. We can drag and drop the image into Canva, or we can go to the Uploads button and add the content from there.

In this case, we’re using DALL-E-generated images for this product presentation, you can also use illustrations, photos, videos, or Midjourney illustrations . Once the images are uploaded, drag and drop them to replace the images in the placeholder areas. To complete this design, we removed the shape that came with the template – you can add a new shape by going to Elements > Graphics .

Learning how to use Canva for PowerPoint is pretty straightforward. Download your Canva design as a PowerPoint presentation, which you can do by accessing your design and going to the top-right corner to locate the button Share . Click on it, and then click on Download .
Under File Type , we will select PPTX , as it’s PowerPoint’s native format. Click on Download , and wait for the process of downloading the file to be completed. Depending on the graphic assets included, it can take a while.

At this point, don’t be surprised if you’ll be prompted to upgrade your Canva plan (if you don’t have a premium account). The reason is that Canva will charge you for exporting what they call premium graphics, and since most of the Canva presentation templates use premium graphics, this will be a limitation when exporting your Canva slides to PowerPoint.
A simple workaround is removing the premium graphics before exporting from Canva to PowerPoint. Although, take in mind this may affect the overall design of your presentation.
As you can see below, the PowerPoint file is entirely editable. Something to consider is that unless you have the font installed on your computer, PowerPoint will reassign to a generic font.

Remember the design we created before? Well, it’s time to use that image as part of a marketing deck presentation , which will represent a social media post to be used by the marketing team to promote the brand.
The first step is to download the design we created as PNG. We can close Canva after that.

We opened our PPT template, which is the Annual Marketing Plan PowerPoint Template , and customized the PowerPoint theme colors . Go to Insert > Pictures > This Device .

Select the image we created in Canva and upload it here. We will add some image shadow effects via Shape Format, and a textbox below that describes what the image is about.

And that’s how easily we can use graphics from Canva in our PowerPoint presentations. Remember, it’s best to work with PNG images rather than JPG to reduce file size and preserve image quality.
You can invite others to collaborate on your design by sharing a link to the editable design or by adding them via email as team members on your Canva account.
Canva uses standard cloud storage security measures to protect your data, but like any online platform, it’s important to use a strong password and follow good security practices.
There are two methods for this. You can upload a PPT template into Canva via the Canva Homepage by clicking on Projects , and then go to the Uploads folder. Drag and drop or click on Upload, as we’ve seen before. Once imported, you must click on that file to open it in the Canva editor. The second method is on the editor: go to the Uploads button and upload your PPT file as if it were an image or another media asset.
Yes, you can use SlideModel presentation templates in Canva. As a SlideModel subscriber, you can download .pptx files to import into Canva presentations. This way, you can enjoy the creative slide templates and graphics provided by SlideModel in your Canva presentations
Unfortunately, no, as Canva doesn’t have the same toolset to enable editing functions. That also applies to changing color, so we highly recommend you work with a final PPT file before switching to Canva.
Objects like charts, SmartArt, 3D objects, and WordArt aren’t supported in Canva and won’t be rendered if you upload a slide that contains them.
Yes, all users can download Canva presentations to PPTX format. In case the original Canva design isn’t a presentation file, like a banner or social media post, you won’t be able to resize for that output unless you have a premium account.
Yes, the file must be smaller than 70 MB, and you can import up to 300 slides.
Canva and PowerPoint can collaborate as complementary tools to help presenters overcome the limitations of each individual tool. It takes a while to create your desired workflow, but once that’s accomplished, you can elevate the quality of your PowerPoint or Google Slides presentations with Canva.
We don’t advise using Canva as an alternative to PowerPoint as the current state-of-the-art indicates it won’t support data representation or other PowerPoint stellar tools that make part of most PPT templates.

Like this article? Please share
Design, Microsoft PowerPoint Filed under Design
Related Articles

Filed under Google Slides Tutorials • April 23rd, 2024
How to Align Objects in Google Slides
Optimize your layouts by learning how to align objects in Google Slides presentations. Step-by-step guide with screenshots.

Filed under Google Slides Tutorials , PowerPoint Tutorials • April 17th, 2024
Google Slides vs. PowerPoint: A Detailed Comparison
Contrast and pick with presentation software suits your best. Check our guide on how the Google Slides vs. PowerPoint eternal debate.

Filed under PowerPoint Tutorials • April 16th, 2024
How to Insert an Equation in PowerPoint
Learn how to create easy-to-understand science slides by mastering how to insert an equation in PowerPoint. Step-by-step guide.
Leave a Reply
The best presentation software in 2024
These powerpoint alternatives go beyond the basics..

The latest presentation apps have made it easier than ever to format slides and create professional-looking slideshows without giving off a "this is a template" vibe. Even standard PowerPoint alternatives have updated key features to make it easier than ever to collaborate and create presentations quickly, so you can spend more time prepping for your actual presentation.
If, like me, you've used Google Slides unquestioningly for years, it's a whole new world out there. The newest crop of online presentation tools go way beyond the classic slideshow experience, with new features to keep your audience's attention, streamline the creation process with AI, and turn slide decks into videos and interactive conversations.
I've been testing these apps for the past few years, and this time, I spent several days tinkering with 25 of the top presentation software solutions out there to bring you the best of the best.
The best presentation software
Beautiful.ai for AI-powered design
Prezi for non-linear, conversational presentations
Powtoon for video presentations
Pitch for collaborating with your team on presentations
Gamma for conversational AI features
Mentimeter for audience engagement
Tome for generative AI features
What makes the best presentation app?
How we evaluate and test apps.
Our best apps roundups are written by humans who've spent much of their careers using, testing, and writing about software. Unless explicitly stated, we spend dozens of hours researching and testing apps, using each app as it's intended to be used and evaluating it against the criteria we set for the category. We're never paid for placement in our articles from any app or for links to any site—we value the trust readers put in us to offer authentic evaluations of the categories and apps we review. For more details on our process, read the full rundown of how we select apps to feature on the Zapier blog .
When looking for the best presentation apps, I wanted utility players. After all, slideshows are used for just about everything, from pitch decks and product launches to class lectures and church sermons. With that in mind, here's what I was looking for:
Pre-built templates. The best presentation tools should have attractive, professional-looking templates to build presentations in a hurry.
Sharing and collaboration options. Whether you plan to share your webinar slides later, or you just want to collaborate with a coworker on a presentation, it should be easy to share files and collaborate in real-time.
Flexibility and customization options. Templates are great, but top presentation apps should enable you to customize just about everything—giving you the flexibility to build exactly what you need.
Affordability. Creating compelling presentations is important, but you shouldn't have to bust your budget to make it happen. With capable free tools on the market, affordability is a top consideration.
Standalone functionality. There's no reason to use multiple tools when one can do it all, so I didn't test any apps that require and work on top of another presentation app like PowerPoint or Google Slides.
Familiar, deck-based interface. For our purposes here, I only tested software that uses slides, with the familiar deck-based editor you expect from a "presentation" tool (versus, for example, a video creation app).
While most apps now offer AI features in one way or another, it isn't a universal feature yet—and some apps' AI features leave a lot to be desired. For that reason, I opted not to make AI features a strict must-have for this year (though it probably will be a requirement next time I update the article). That means I've still included some apps that don't offer AI—if you opt for one of those, you can still easily get AI-generated images and text from a separate tool and copy them into your presentation app of choice.
Beyond that, I also looked for presentation apps that brought something unique to the table—features above and beyond what you can get for free from a legacy solution like PowerPoint or Google Slides.
Here's what my testing workflow looked like:
I went through any onboarding or guided tutorials.
I created a new deck, scanning through all available templates, noting how well-designed they were (and which were free versus paid).
I added new slides, deleted slides, edited text and images, and played around with other content types.
I changed presentation design settings, like color schemes and background images.
I reviewed and tested the sharing and collaboration options.
I tested out presenter view (when available).
After my first round of testing, I went back into the top performers to test any unique or niche features, like AI, brand settings, and interactive content. With that, these are the best presentation apps I found—each one really brings something different or radically easy to the table.
The best presentation software at a glance
The best free presentation software, canva (web, windows, mac, android, ios).

Canva pros:
Excellent free plan
Tons of amazing templates for all use cases
Feature-rich
Canva cons:
The AI tools aren't groundbreakingly useful
Canva offers one of the most robust free plans of all the presentation apps I tested. The app delays account creation until after you've created your first design, so you can get started building your presentation in seconds. Choose from an almost overwhelming number of beautiful templates (nearly all available for free), including those designed specifically for education or business use cases.
Anyone who's accidentally scrolled too far and been bumped to the next slide will appreciate Canva's editor interface, which eliminates that problem altogether with a smooth scroll that doesn't jump around. Choose from a handful of preset animations to add life to your presentations, or browse the library of audio and video files available to add. And Canva also has a number of options for sharing your presentation, including adding collaborators to your team, sharing directly to social media, and even via QR code.
Present directly from Canva, and let audience members submit their questions via Canva Live. Once you share a link to invite audience members to your presentation, they can send questions for you to answer. As the presenter, you'll see them pop up in your presenter view window, so you can keep the audience engaged and your presentation clear. Alternatively, record a presentation with a talking head bubble—you can even use an AI presenter here—to share remotely.
Canva has added a number of AI-powered tools , but I wasn't super impressed by them yet. The Magic Design tool, for example, isn't much more useful than the many pre-designed templates already available, while Magic Write is basically just white-labeled ChatGPT. These features will likely improve in time, but for now, you're better off starting from one of Canva's many great templates.
Canva pricing: Free plan available; paid plans start at $120/year for 1 user and include additional features like Brand Kit, premium templates and stock assets, and additional AI-powered design tools.
If you're looking for a capable free presentation tool with a more affordable upgrade, Zoho Show is worth a look. It's completely free for most features, offers a clean, intuitive editor, and includes a number of great templates. Plus, you can automate Zoho Show by connecting it with Zapier .
The best presentation app for AI-powered design
Beautiful.ai (web, mac, windows).
Beautiful.ai pros:
True AI design
No fussing around with alignment
Still allows for customization
Beautiful.ai cons:
No free plan
If you're like me, editing granular spacing issues is the absolute worst part of building a presentation. Beautiful.ai uses artificial intelligence to take a lot of the hassle and granular design requirements out of the presentation process, so you can focus on the content of a presentation without sacrificing professional design. If I needed to make presentations on a regular basis, this is the app I'd use.
Many apps have recently added AI design features, but Beautiful.ai has been doing it for years—and they've perfected the experience of AI design, ensuring the tool's reign as the most streamlined and user-friendly option for AI design.
The editor is a little different from most presentation apps, but it's still intuitive—and you'll start off with a quick two-minute tutorial. When creating a new slide, scroll through "inspiration slides" to find a layout you like; once you choose, the app will pull the layout and automatically adapt it to match the design of the rest of your presentation.
With 10 themes, several templated slides, over 40 fully-designed templates, and more than 20 different color palettes to choose from, Beautiful.ai strikes a perfect balance between automation and customization.
While Beautiful.ai doesn't offer a free plan, paid plans are reasonably priced and offer sharing and collaboration options that rival collab-focused apps like Google Slides. And speaking of Google, you can connect Beautiful.ai with Google Drive to save all your presentations there.
Note: I re-tested the generative AI feature (called DesignerBot) this year. It's great for adding individual slides to an existing presentation—automatically choosing the best layout and matching the design to the rest of the deck—but as with most other apps, it struggled to pull in relevant images.
Beautiful.ai pricing: Plans start at $12/month for unlimited slides, AI content generation, viewer analytics, and more. Upgrade to a Team plan for $40/user/month to get extra collaboration and workspace features and custom brand controls.
If you're a founder looking for an AI presentation tool for your pitch deck, Slidebean is a great Beautiful.ai alternative for startups. The app offers a number of templates; a unique, content-first outline editor; and a generative AI tool that builds a whole pitch deck based on your website. I didn't include it on the list mainly because of the price: the free plan is quite limited, and the paid all-access plan can only be billed annually.
The best presentation app for conversational presentations
Prezi (web, mac, windows, ios, android).
Prezi pros:
Doesn't restrict you to standard presentation structure
Lots of customization options
Prezi Video lets you display a presentation right over your webcam video
Prezi cons:
Steep learning curve
Struggling to squeeze information into a basic, linear presentation? Give Prezi a try. Unlike nearly all other presentation apps on the market, Prezi Present doesn't restrict the structure of your presentation to a straight line. The editor focuses on topics and subtopics and allows you to arrange them any way you want, so you can create a more conversational flow of information.
With the structural flexibility, you still get all the same customization features you expect from top presentation software, including fully-editable templates. There's a learning curve if you're unfamiliar with non-linear presentations, but templates offer a great jumping-off point, and Prezi's editor does a good job of making the process more approachable.
Plus, Prezi comes with two other apps: Prezi Design and Prezi Video. Prezi Video helps you take remote presentations to a new level. You can record a video where the presentation elements are displayed right over your webcam feed. Record and save the video to share later, or connect with your video conferencing tool of choice (including Zoom, Microsoft Teams, and Google Meet) to present live.
Prezi's generative AI feature works ok, but it's more useful as a wireframe. When I asked it to create a presentation about the Stanley Cup Playoffs, for example, the resulting content read a lot like a student writing a term paper in the broadest strokes possible to avoid doing any actual research.
Prezi pricing: Free 14-day trial and a free plan that includes up to 5 visual projects; paid plans start at $7/month and include additional features like private presentations and Prezi Present.
The best presentation app for video presentations
Powtoon (web, ios, android).
Powtoon pros:
Timing automatically changes based on the content on the slide
Can toggle between slideshow and video
Can orient presentation as horizontal, vertical, or square
Powtoon cons:
Limited free plan
Powtoon makes it easy to create engaging videos by orienting the editor around a slide deck. Editing a Powtoon feels just like editing a presentation, but by the time you finish, you have a professional video.
You can edit your slides at any time, and when you hit play, a video plays through your deck—the feel is almost like an animated explainer video. Each slide includes the animations you choose and takes up as much time as is needed based on the content on the slide. Powtoon figures the timing automatically, and you can see in the bottom-right of the editor how much time is used on your current slide versus the total presentation. If you ever want to present as a slide deck, just toggle between Slideshow and Movie.
You'll likely need to subscribe to a paid plan to get the most out of Powtoon—like creating videos longer than three minutes, downloading them as MP4 files, and white-labeling your presentations—but doing so won't break the bank. Plus, you'll unlock tons of templates complete with animations and soundtracks.
One of my favorite Powtoon features is the ability to orient your video: you can choose horizontal orientation (like a normal presentation) or opt for vertical (for mobile) or square (for social media). When your presentation is ready, you can publish straight to YouTube, Wistia, Facebook Ads, and any number of other locations.
Powtoon pricing: Limited free plan available; paid plans start at $15/month and include white-labeling, priority support, additional storage, and more.
The best presentation app for collaborating with your team
Pitch (web, mac, windows, ios, android).

Pitch pros:
Google levels of collaboration
Assign slides to specific team members
Excellent generative AI feature
Pitch cons:
User interface is a little different than you're used to
Need to collaborate on presentations with your team? Pitch is a Google Slides alternative that gets the job done. As far as decks go, Pitch includes all the beautifully-designed templates, customizability, and ease of use you expect from a top-notch presentation tool. But the app really shines when you add your team.
The right-hand sidebar is all about project management and collaboration: you can set and update the status of your deck, assign entire presentations or individual slides to team members, plus comment or add notes. Save custom templates to make future presentations even easier and faster.
You can also invite collaborators from outside your company to work with you on individual decks. And if you opt for a paid plan, Pitch introduces workspace roles, shared private folders, and version history.
Pitch also offers one of the most impressive generative AI features on this list. It still struggles to pull in relevant images, but I found the AI-generated written content and design to be top-notch.
Pitch pricing: Free plan offers unlimited presentations, custom templates, and live video collaboration; paid plans start at $22/month for 2 users with additional workspace features, presentation analytics, and more.
The best presentation app for conversational AI
Gamma (web).
Gamma pros:
Creates fully fleshed-out presentations from a prompt
Conversational chatbot-like experience
Can still manually edit the presentation
Gamma cons:
Not as much granular customization
I tested a lot of apps claiming to use AI to up your presentation game, and Gamma's conversational AI features were head and shoulders above the crowd.
Simply give the app a topic—or upload an outline, notes, or any other document or article—approve the outline, and pick a theme. The app will take it from there and create a fully fleshed-out presentation. It's far from perfect, but Gamma produces a very useful jumping-off point. (Last year, it was by far the best, but this year, other apps are catching up.)
Here's the key: Gamma is much more geared toward the iterative, chatbot experience familiar to ChatGPT users. Click on the Edit with AI button at the top of the right-hand menu to open the chat, and you'll see suggested prompts—or you can type in your own requests for how Gamma should alter the presentation.
Once you've done all you can with prompts, simply close the chat box to manually add the finishing touches. While you do sacrifice some granular customizability in exchange for the AI features, you can still choose your visual theme, change slide layouts, format text, and add any images, videos, or even app and web content.
Gamma pricing: Free plan includes unlimited users, 400 AI deck credits, and basic view analytics; upgrade to the Plus plan for $8/user/month to get unlimited AI credits, remove Gamma branding, and more.
The best presentation app for audience engagement
Mentimeter (web).

Mentimeter pros:
Tons of audience engagement features
Simple for participants to interact
Mentimeter cons:
Less granular customizability
Bit of a learning curve
If you need to engage with an audience during your presentation, Mentimeter makes that easy. The app is designed around interactive elements like quizzes, surveys, Q&As, sliders, and more (even a Miro whiteboard!).
Each of these is included in a number of different, professional-looking templates, so you can build a fully interactive presentation super quickly.
When it's time to present, your audience members can scan the QR code with their phone cameras or type in the URL and access code to participate. There's one code per presentation (so they won't have to do this on every slide), which gives access to each slide as you move through the presentation.
There are two main drawbacks to this one, though. First, there's a bit of a learning curve and less familiar editing interface (but I found it pretty easy to learn with some practice). The other drawback is that you can't get as granular with the visual customization as you can with many other presentation tools.
Mentimeter pricing: Free plan includes 50 participants per month and 34 different slide types; upgrade to the Basic plan for $11.99/presenter/month to get unlimited participants and slide types, private presentations, and more.
The best presentation app for generative AI

Top-tier generative AI features
Simple, customizable templates
Intuitive doc-style editor
There's definitely a learning curve
Tome is one of the new additions to this list that I'm most excited about. If you're looking for generative AI that just genuinely works , it's definitely worth a look. The editor is a bit more stripped down than most presentation apps but intuitive nonetheless—it's almost a cross between your standard deck editor and a Notion-style doc.
To generate an AI deck, click Generate with AI in the top right, and either write your own prompt or choose from the example prompts that cover a handful of common use cases, like sales enablement and company pitches. Edit or approve the suggested outline, then generate the full presentation.
From there, you can edit each slide as a doc via the right-hand menu—without limits on how much information you can include. During the presentation, you simply size down any slides that take up more than the standard amount of space. It's super simple but somehow feels revolutionary in a presentation app.
Tome pricing: Free plan available for manual editing without AI; upgrade to the Professional plan for $16/user/month to use the generative AI and design tools, plus engagement analytics, branding tools, and more.
What about the old standbys?
You might notice a few major presentation players aren't on this list, including OGs Microsoft PowerPoint, Apple Keynote, and Google Slides. These apps are perfectly adequate for creating basic presentations, and they're free if you have a Windows or Mac device or a Google account.
I didn't include them on the list because the presentation space has really developed in the last several years, and after testing them out, I found these behemoths haven't kept pace. If they weren't made by Microsoft/Apple/Google, I might not even be mentioning them. They're pretty basic tools, they're behind the curve when it comes to templates (both quantity and design), and they don't offer any uniquely valuable features like robust team collaboration, branding controls, video, and so on.
Some of these companies (think: Microsoft and Google) are openly working on some pretty impressive-sounding AI features, but they haven't really been focused on their respective presentation solutions just yet. Rest assured, I'm watching this space, and the next time we update this article, I'll re-test tools like Copilot for PowerPoint and Gemini for Google Slides to see what new features may be available.
In any case, if you're reading this, you're probably looking for an alternative that allows you to move away from one of the big 3, and as the presentation platforms featured above show, there's a ton to gain—in terms of features, usability, and more—when you do.
What about PowerPoint and Google Slides add-ons?
While I focused my testing on tools with full feature-sets—those that can serve as your sole presentation tool—there are a ton of add-on tools you can use atop big name tools like PowerPoint and Google Slides.
If you're looking to expand what you can do with PowerPoint or Google Slides, apps like Marq (formerly Lucidpress), Plus AI , Slidesgo , and Simplified can help you do things like access additional templates, save branded assets, and generate AI presentations from the app you're already using.
Related reading:
Canva AI tools to improve your design workflow
The best online whiteboards for collaboration
How to share a presentation on Zoom without sharing your browser tabs and address bar
This post was originally published in October 2014 and has since been updated with contributions from Danny Schreiber, Matthew Guay, Andrew Kunesh, and Krystina Martinez. The most recent update was in April 2024.
Get productivity tips delivered straight to your inbox
We’ll email you 1-3 times per week—and never share your information.

Kiera Abbamonte
Kiera’s a content writer who helps SaaS and eCommerce companies connect with customers and reach new audiences. Located in Boston, MA, she loves cinnamon coffee and a good baseball game. Catch up with her on Twitter @Kieraabbamonte.
- Presentations
Related articles

40+ best digital marketing tools in 2024

The 12 best productivity apps for iPad in 2024
The 12 best productivity apps for iPad in...

The 4 best journal apps in 2024

The 8 best Trello alternatives in 2024
Improve your productivity automatically. Use Zapier to get your apps working together.


Canvas Student

About this app
Data safety.

Ratings and reviews

- Flag inappropriate

- Show review history
What's new
App support, more by instructure.

Similar apps

Presentations that move audiences
Refine, enhance, and tailor your content quicker than ever before.
Prezi is good for business
Keep teams engaged and customers asking for more

Prezi is smart for education
Make lessons more exciting and easier to remember

Millions of people — from students to CEOs — use Prezi to grab attention, stand out, and capture imaginations

The most engaging presentations happen on Prezi

Create with confidence
Professionally designed templates.
Choose from hundreds of modern, beautifully made templates.
Millions of reusable presentations
Focus on your own creativity and build off, remix, and reuse presentations from our extensive content library.
Real creative freedom
Open canvas.
Create, organize, and move freely on an open canvas. Create seamless presentations without the restrictions of linear slides.
Ready-made asset libraries
Choose from millions of images, stickers, GIFs, and icons from Unsplash and Giphy.

A presentation that works for you
Present in-person.
Have the confidence to deliver a memorable presentation with presenter notes and downloadable presentations.
Present over video conference
Keep your audience engaged by putting yourself in the center of your presentation.
Your own ideas, ready to present faster
Prezi AI is your new creative partner. Save time, amplify your ideas, and elevate your presentations.
The specialists on visual storytelling since 2009
From TED talks to classrooms. In every country across the world. Prezi has been a trusted presentation partner for over 15 years.
*independent Harvard study of Prezi vs. PowerPoint
See why our customers love us
Prezi is consistently awarded and ranks as the G2 leader across industries based on hundreds of glowing customer reviews.
Prezi powers the best presenters to do their best presentations
This browser is no longer supported.
Upgrade to Microsoft Edge to take advantage of the latest features, security updates, and technical support.
What are canvas apps?
- 10 contributors
Design and build a business app from a canvas in Microsoft Power Apps without writing code in a traditional programming language such as C#. Design the app by dragging and dropping elements onto a canvas, just as you would design a slide in PowerPoint. Create Excel-like expressions for specifying logic and working with data. Build apps that integrate business data from a wide variety of Microsoft and third-party sources . Share your app so that users can run it in a browser or on a mobile device, and embed your app so they can run it in SharePoint, Power BI, or Teams.
If you don't need a custom design and your data is in Microsoft Dataverse, you can automatically generate a model-driven app from your business data and processes. This type of app can model forms, views, and other components, and the default UI automatically adjusts to phones, laptops, and other devices. For more information about this type of app, see Overview of building a model-driven app .
If you're new to Power Apps and want to learn how to convert your ideas into a fully working solution, start with Planning a Power Apps project .
Build an app
To get started, you can automatically generate an app from one of these sources, among others:
- A sample app
Sign in to Power Apps, select Create from the left-pane, and under Start from template , choose a sample app from the list of sample apps—such as Meeting Capture or Onboarding Tasks .

After you generate an app automatically, customize its default appearance and behavior based on your users' workflows. For example, change which types of data appear, how they're sorted, or even whether users specify a number by typing it or adjusting a slider. Add and customize screens , galleries , forms , and other controls.
After you've gained some experience generating an app automatically and customizing it, you can create an app from scratch based on Dataverse , Excel , or another data source. By working from the ground up, you gain flexibility in app design, flow, and controls, and you can incorporate a larger variety of data sources.
Share and run an app
When you finish the app and save it to the cloud, share it with others in your organization. Specify which users or groups can run the app and whether they can also customize and share it with additional people in the organization.
Run your own apps (and any apps shared with you) on Windows, in a web browser , or on an iOS or Android device .
- Ready to convert your ideas into an app? Start with Planning a Power Apps project .
- Explore the step-by-step, conceptual, and reference topics in the navigation pane on the left.
- Review coding standards for maximizing app performance and keeping apps easier to maintain.
- Check out the webinars and video gallery to help you leverage the features and functions of Power Apps.
Share your experience
- Read and post in the Power Apps Community , where anyone who uses Power Apps can post a question for others to answer. Before you post a question, search the community to see whether your question has already been answered.
- Submit an idea for how we can improve Power Apps in Power Apps Ideas Forum .
- Create a support ticket to get technical assistance. If you're a Power Apps administrator for your organization, you can also open a support ticket in the Power Platform admin center .
- Planning a Power Apps project
- Sign up for a free license
- Sign in to Power Apps
- Open a sample app
Was this page helpful?
Coming soon: Throughout 2024 we will be phasing out GitHub Issues as the feedback mechanism for content and replacing it with a new feedback system. For more information see: https://aka.ms/ContentUserFeedback .
Submit and view feedback for
Additional resources

Power Apps: Presentation, tutorial and feedbacks of Canvas Apps

This Chronicle presents the Canvas Apps, one of the three Apps existing in the PowerApps suite developed by Microsoft.
- The First Part introduces PowerApps.
- The Second Part specifically introduces the Canvas Apps
- The Third Part presents the main components encountered when developing a Canvas App.
- The Fourth Part focuses on the Licenses to use Canvas Apps
- The Fifth Part explains how to share a Canvas App to make it available to other users
- The Sixth Part shows different ways to use Canvas Apps
- The Seventh Part reports a concrete case of a project using Canvas Apps
Note: Canvas Apps are a very large subject. The Microsoft Documentation on Canvas Apps is already exhaustive. This Chronicle intends to be a quicker way to understand Canvas Apps. And to gather the experience acquired during projects.
Power Apps Overview
Presentation.
Power Apps is a suite of apps, services, connectors and data platform that provides a rapid application development environment to build custom apps for business needs.
There exists three types of Apps in PowerApps: Canvas Apps, Model-driven Apps, and Portals:
- Canvas apps start with user experience, crafting a highly tailored interface with the power of a blank canvas and connecting it to a choice of 200 data sources. You can build canvas apps for web, mobile, and tablet applications.
- Model-driven apps start with your data model – building up from the shape of your core business data and processes in the Common Data Service to model forms, views, and other components. Model-driven apps automatically generate great UI that is responsive across devices. The User Interface of Dynamic 365 uses Model-Driven Apps.
- Portals start to create external-facing websites that allow users outside your organization to sign in with a wide variety of identities, create and view data in Common Data Service, or even browse content anonymously.
Managing Power Apps
The development of Apps is done at this URL: make.powerapps.com It has two main components:
- Power Apps Studio is the app designer used for building canvas apps
- App designer for model-driven apps lets you define the sitemap and add components to build a model-driven app
Power Apps admin center: admin.powerapps.com Used to create and manage environments, users, roles, and data-loss prevention policies.
Power Platform admin center: admin.powerplatform.microsoft.com Used to manage environments, get real-time, self-help recommendations and support for Power Apps and Power Automate, and view Common Data Service analytics.
Canvas App Presentation
Canvas Apps are Business apps created with a low-code tool. They are described by Microsoft in the following way: “Design and build a business app from a canvas in Microsoft Power Apps without writing code in a traditional programming language such as C#. Design the app by dragging and dropping elements onto a canvas, just as you would design a slide in PowerPoint. Create Excel-like expressions for specifying logic and working with data. Build apps that integrate business data from a wide variety of Microsoft and third-party sources. Share your app so that users can run it in a browser or on a mobile device (Smartphones and Tablets), and embed your app so that users can run it in SharePoint, Power BI, or Teams." More information on the possible ways to use Canvas Apps are given in Section "Overview: where Canvas Apps can be used".
Canvas App Development
This Part presents the main components encountered when developing a Canvas App. It will give you quick marks if you ever land on this tool.
Editor Interface
As said before, Canvas Apps are created following this link: make.powerapps.com. To create a new Canvas App: on the Menu on the left: Go to Apps. Click New app -> Canvas. A form opens. It allows to choose to create a Canvas App from a blank canvas or from a Template. One can also choose either a Phone or a Tablet layout. One main difference between the two layouts is that it is possible to set a custom height and width for the App for the Tablet layout but not for the Phone Layout. After the App is created, the following window opens:

The centre of the window (1) contains the layout of the Canvas App. The Menu on the left (2) can display a Tree of the elements in the App as well as the different Data Sources that are available. The Menu on the right (3) allows to configure the properties of the element that is selected on the Canvas App The Menu on the top (4) allows to insert elements in the Canvas App, and also change some of their properties This list (5) allows to choose a property or an action of an element that is selected in the App This bar (6) contains a formula associated to the property or the action that is selected in (5) This “File” Tab (7) provides several functionalities:
- Manage Connections to Data Sources
- Manage Flows
- Settings: Name & Icon of the App, Screen Size & Orientation, and all Advanced Settings
- View of first records in the Collections
- View of variables and their values
- Media: used to import pictures, videos and audios into the App
More information will be given on these things later in the Chronicle.
Canvas Apps Language - Presentation
To define the logic of the application, the creator of a Canvas App has to write formulas using a programming language. The formulas used can make think of the ones in Microsoft Office Excel. The formulas are written for properties of the elements on the App, or for triggers linked to actions performed on these elements. When a modification occurs in the App, the properties containing formulas are directly updated, just like in Excel. To give an overview of the language, below is a part of a formula used in the Canvas App (client name blurred):

Like most programming languages, it contains Conditions (If) and Loops (ForAll). Some of the most useful functions will be mentioned in this Chronicle. Functions are separated with semi-colons. Inside a function, the arguments are separated by commas. By default, the expressions in the formulas are sequentially executed. It is possible to execute some expressions in parallel by using the Concurrent function. The use of parallelism can save a significant amount of time for instance when using it for a Data transfer. The language doesn’t provide Functions nor Classes. As will be seen later in the Chronicle, I personally found that the code lacks a lot of structure because of this and it adds a lot of complexity to the App. The whole reference for the programming language in Canvas Apps can be found here: https://docs.microsoft.com/en-us/powerapps/maker/canvas-apps/formula-reference
There are a few triggers in Canvas App that can launch the execution of a formula. Here are the main ones:
- OnSelect: Available on buttons and many controls. Runs the formula when the element is selected
- OnChange: Available on Lists. Runs the formula when the user changes the option selected in the List
- OnStart: Triggers the formula when the Canvas App starts
- OnTimerEnd: Available for Timers. Executes the formula when the Timer ends
- OnTimerStart: Same but when the Timer starts
The Canvas App can have several screens. New screens can be added in the App, in the tab Home -> New Screen. The navigation between the screens is made using the function Navigate. It can for instance be used on the OnSelect property of a button. Then, when the button is selected, the App will navigate to the specified screen.
Add a Gallery
Galleries are the equivalent of Views in a Model-Driven App. There are used to list the records of an entity. The creator can choose the fields he wants to display. Unlike a Model-Driven App, the creator can here customize all the design. To add a Gallery to the App, go to Insert -> Gallery.

Then, on the element that appears on the screen, click add a Connector and choose a Data Source. For instance, Dynamics 365. Then, choose the Environment to work in, and select an Entity. The Gallery has one section per record of the Entity. In the Editor, the modifications are done in the first section of the list. All other sections follow the same structure as the first one. Add a Label in it. Select the label object. In the Formula bar, select the property “Text”, and set the Formula to ThisItem.fullname . It now displays a list of the names of the contacts:

Other fields can be added in the sections, as well as icons or images. Below is a little improvement where the mail address, separating lines and an icon were added:

The Forms in a Model-Driven App are called the same in Canvas App. They allow to display data of a particular record and to update this Data. They can also be used to create a new record. The main functions used for Forms are:
- EditForm: Edit the data of a record
- NewForm: Create a new record
- SubmitForm: Submit the form
- ResetForm: Reset the form to his previous state
This Parts presents some of the main controls available in the Canvas Apps.
Buttons are quite simple elements. They have an OnSelect trigger that allows to runs a formula when they are selected.
The Application can take as inputs:
- Date pickers
- Audio from microphones
- Video from Camera
- Pen input: the user can write on the screen. The writing is kept as an image
The Application can show:
- Power BI tiles
Designing the User Interface
Designing the User Interface in PowerApps is extremely simple. It is very similar to the edition of slides if Microsoft PowerPoint. Elements can be designed with Drag&Drop and selections of properties in menus. To make a more precise design it is also possible to fill the properties of an element with a number: for instance the number of Pixels for the height of an element; the hexadecimal code of a color for the background of an element, etc Example of properties:
- Height, Width, Size, x-Position, y-Position, Padding
- Visibility, DisplayMode
- Border thickness
A property field can be filled with a formula. This allows to change the design of the elements on the App depending on the current context of the App. For instance, the creator of the App can write a formula to hide a button if its action has no meaning in the current context.
Responsiveness
It is possible to have responsive layouts in Canvas Apps, so that the app adapts to the actual space in which it is running. It can be activated in the Advanced Settings by turning off the app's "Scale to fit" setting.
The responsive design can also be customized by writing Formulas based on the height and width of the device. The documentation of Microsoft can be found here : https://docs.microsoft.com/en-us/powerapps/maker/canvas-apps/create-responsive-layout
Data Manipulation
In a Canvas App, the formulas can directly refer to the Table of a Data source. Very often, the creator of the Canvas App will want to create new Tables and manipulates theses Tables. In Canvas Apps, these are called “Collections”: Collections are a special kind of data source. They're local to the app and not backed by a connection to a service in the cloud, so the information can’t be shared across devices for the same user or between users. The main functions to manage Collections are:
- Clear : Clear a Collection
- Collect : Add Data to a Collection or a Data Source
- ClearCollect : Clear a Collection and then add Data to it
- Update/UpdateIf/Patch : Use to Update a Collections or a Data Source
- LookUp : Select a record in a Collection or a Data Source
- Search/Filter : Select a set of records in a Collection or a Data Source
It is possible to create variables in Canvas Apps. Variables can be global or contextual. Global variables can be used anywhere in the Canvas App. Context variables can be used only on a precise screen. The functions to set variables are: Set: Set a value to a Global variable UpdateContext: Set a value to a Context variable
Define Custom Functions
Writing custom Functions is not possible in Canvas Apps, which is really a significant drawback. However there is a way to imitate the behaviour of a function: Create a Button. Write a code on its OnSelect trigger. From somewhere else, use the Select function on this Button. It will call the code written in the OnSelect trigger of the Button. However, as said in the documentation: “Select queues the target OnSelect for later processing, which may happen after the current formula has finished being evaluated. Select doesn't cause the target OnSelect to evaluate immediately, nor does Select wait for OnSelect to finish being evaluated.” Basically, this means that the sequential order in the Formulas is not maintained with the Select function, which is not convenient in many use cases.
The signals in the Canvas Apps return information about the environment of the device. Signals are values that can change at any time, independent of how the user may be interacting with the app. Formulas that are based on signals automatically recalculate as these values change. The available signals in Canvas Apps are:
- The Acceleration signal returns the device's acceleration in three dimensions relative to the device's screen.
- The App object includes a signal that indicates which screen is showing.
- The Compass signal returns the compass heading of the top of the screen. The heading is based on magnetic north.
- The Connection signal returns the information about the network connection. For instance, whether a Network is available or not.
- The Location signal returns the location of the device.
Offline Mode
PowerApps provides functionalities to create an Offline mode in the Canvas Apps. Two functions combine to form a simple mechanism to store small amounts of data on a local device: SaveData: Saves a Collection in a local storage using a Name provided as argument LoadData: Retrieves the Data in the local storage using the Name provided, and writes the Data in a Collection.
The Signal “Connection” mentioned previously can be very useful in this case, as it allows to know if the device is connected to a Network or not. Unfortunately, it is not possible to trigger some expressions when the value of Connection.Connected changes. To catch a change in this value, a workaround could be to create a Timer with a certain duration and on the event “OnTimerEnd”, to check the value of Connection.Connected and then call a certain logic.
The available memory with this Offline mode is around 30-70 MB. Some data might be lost above this amount. The Offline mode is available for Smartphones and Tablets but doesn’t work in a Browser. The section "Project Feedback" provides information about a project made that contained an Offline mode. It explains some main points of the development of the Canvas App and presents some lessons learnt with this project.
Artificial Intelligence
Business Card Reader: Scan a Business Card and extracts information from it. This requires an AI builder license to be used. Form Processor: Detects and Extracts text in documents. Requires training on an AI model Object Detector: Detects objects in Images and draws bounding boxes around them Receipt processor: Scan a receipt and extract information from it Text recognizer: Extract printed and handwritten text from images
The trainings do not require to create a model. The models already exist but they need to be trained on a Database provided by the creator of the App.
The Canvas App can also connect to the Text Analytics API of Azure cognitive Services. This API enables to detect sentiment, key phrases, topics, and language from text.
More details can be found here: https://docs.microsoft.com/en-us/powerapps/maker/canvas-apps/cognitive-services-api
There are 2 pricing plans for PowerApps:
- CHF 9.80 /user/app/month
- Allow individual users to run applications for a single business scenario based on the full capabilities of Power Apps.
- CHF 39.40 /user/month
- Equip users to run unlimited applications based on the full capabilities of Power Apps.
The use rights of PowerApps are included in other licenses, such as licenses of Office 365 and Dynamics 365. For instance, the licenses of Dynamics 365 give the following rights for the utilisation of PowerApps:

One important feature to take care of concerns the Connectors used in the Canvas App. A Connector is the name given to the link binding a Canvas App to a DataBase or a Service. Power Apps has connectors for many popular services and on-premises data sources. Is it possible to create custom Connectors. The out-of-box Connectors can be of two types: “Standard” and “Premium”. Some licenses provide use rights to “Standard” licenses but not to “Premium” licenses. So this has to be studied carefully when choosing the License. Examples of “Standard” Connectors: OneDrive For Business, SharePoint, Outlook.com Examples of “Premium” Connectors: Dynamics 365, Salesforce, SAP ERP
Details about the Connectors can be found here: https://flow.microsoft.com/en-us/connectors/
As shows the previous table, the license of Dynamics 365 grants right to use “Premium” Connectors. However, as shows the next table, the license of Office 365 doesn’t provide an access to the “Premium” Connectors:

All the details for the licenses of PowerApps can be found in the Microsoft Power Apps and Power Automate Licensing Guide: https://go.microsoft.com/fwlink/?linkid=2085130 As licenses plans often change, it is important to check the Licensing Guides regularly.
Share Canvas Apps
The person who creates a Canvas App is the owner of the App. After creation, he is the only person who has access to it. To make the App available to other people, the App has to be shared with these people. The owner can choose to allow or not these people to share themselves the App with others. To be able to share the App, the person must also have the permissions on the data used in the Canvas App. To share an App, go to make.powerapps.com. Select “Apps” on the menu on the left. Select the App. And click “Share” on the menu on the left:

Overview: where Canvas Apps can be used
Canvas Apps can be used in many tools:
On Smartphones and Tablets
Download the free Application PowerApps on iOS and Android. When opening the Application, the user has to sign in with his credentials. Then, the user sees a list of the Canvas Apps that he owns or that were shared with him. He can then select the Canvas App that he wants to use.
In Model-Driven Apps
When editing a Form of a Model-Driven App, it is possible to insert a Canvas App. But note that this is only available in the UUI. In a Model-Driven App, the authentication in the Canvas App is automatically made. It authenticates with the credentials of the user of the Model-Driven App. So, the Canvas App has to be shared with all the users that are expected to use it. Note that a Canvas App can be put in Solutions.
In Power BI
It is possible to embed a Canvas App into a Power BI report. To do so, a visual of Power BI called “PowerApps” is used. The visual can be inserted in the report like any other visual. Then, the Canvas App to be used in this visual must be selected. One great functionality is that it is possible to send data from Power BI to the Canvas App. This allows to display data in the Canvas App that corresponds to the Filters activated in Power BI. This creates a true interaction between the Power BI report and the Canvas App. To retrieve and manipulate this data in the Canvas App, an object called “PowerBIIntegration.Data”. Like in Model-Driven Apps: the authentication in the Canvas App in the Power BI report is made using the credentials of the user. So the App has to be shared with the user. More details can be found here: https://docs.microsoft.com/en-us/powerapps/maker/canvas-apps/embed-powerapps-powerbi
In Websites as iFrames
The Canvas Apps can also be embedded in any Website as iFrames. An authentication must be made in the Canvas App. The developer of the Website can choose to let the user authenticate by himself with his credentials. It is also possible to handle the authentication automatically by writing code using the Azure Active Directory Authentication.
Canvas Apps can be integrated in SharePoint.
Project Feedback
This section describes a project of Canvas App made for a client. One main specificity of the Canvas App is that it had to implement an Offline mode. The client will be called Company AAA here.
Project Presentation
In this project for Company AAA, ELCA has put in place new developments on the CRM Dynamics 365.
Company AAA organises events (like conferences) in many countries. Among other things, the new developments concerned the management of these events and of the participants to the events. Company AAA also wanted to be able to manage this on an application on a Tablet, directly during the event or a little before, while travelling for instance. Many events occur in places where networks can’t be reached so the Application requires an Offline mode.
3 main Entities in the CRM are implicated in this Business:
- Events: The events of Company AAA
- Contacts: People in contact with Company AAA. Participants to the Events are Contacts
- EventPart: The relation between Events and Contacts is N:N. So, this entity was created to store the relationship existing for a Contact that participates to an Event
With this Application, Company AAA wants to be able to:
- Select an Event among all existing Events
- Have the list of all Contacts participating to the selected Event
- Be able to modify the information of the Contact, and specify if he was indeed present or not to the Event
- Be able to create a New Contact and add him to the Event
- When Online, be able to add an existing Contact to the Event
When Offline, a Contact and its participation to an event must be stored. It is necessary to track if a record is new or already existing (and to keep the GUID in this case).
Developing an application from scratch can be long. A Model-Driven app can be used on a Tablet, but the customisations possibilities were too limited for this use case. So it was deciced to develop the application using the Canvas Apps ! The Offline mode was clearly the main challenge of this Application.
Here is an overview of the final interface of the Canvas App that has been developed:

Presentation of Offline specifities
This Part will explain shortly how the Offline mode was handled in the Canvas App.
When using Canvas App, it is possible to handle data by referring directly to the Data Source. As mentioned before, it also possible to create Collections to manipulate the Data of the Source.
When the device is Offline, it is not possible to refer directly to the Data Source. Only Collections can be used. In consequence, the App has been designed to manipulate (almost) only Collections. When Data is uploaded from a Data Source into the Canvas App, this data is directly inserted into a Collection.
Data Consistency in Offline mode
When switching between online and offline mode, data must be synchronised between the Cloud and the local storage. The user has to click on a button to execute the synchronisation. He has to make sure that he has a steady network when making the synchronisation. If the synchronisation was automatic we were afraid that there might be issues with intermittent networks.
Also, as the offline mode only uses the local device, it is faster than the online mode. So it can be more convenient to use even when some network is available.
Use of resources external to Canvas Apps
The first specifications of the App involved 7 entities: Events, EventParts, Contacts, Projects, Accounts, Countries, Notes. Managing all these Entities in Offline mode appeared to be close to impossible due to the lack of functions and structure in the code of the App. Remember that to make it easy, the code kind of look like Excel formulas! It was then decided to remove the Accounts and the Countries from the App, at least in a 1st version. Events and Projects are read-only entities in the App so there are not too hard to handle.
At this point, 3 entities could be modified, and 2 entities were read. Again, it appeared to be extremely complex to handle in the App in Offline mode. We found a solution to overcome this. Instead of replicating the data model of the Source in Collections of the App, only one collection was used to track all the changes made on the App in Offline mode. When switching to Online mode, this Collection updates or creates records in the Entity EventPart. Then, workflows in Dynamics 365 are launched to dispatch the data contained in the EventPart to Contacts and Notes.
In the Data model, EventPart has a N:1 relationship with Contacts. The relationship had to be in this sense to be able to update the Entity Contact from a Workflow.
In fact, only two collections are used in the App. One Collection stores data about the selected Event and the Porject it is related to (called EventInfoCollection in the next Part). Another Collection stores the data about EventParts, Contacts and Notes (called EventPartsCollection in the next Part).
So, the key to solve the complexity of the App was to consider an EventPart and a related Contact as a single record in the Data model of the App. And to dispatch the data in the right records in Dynamics a using Workflows.
Design of the App
The Design of the App was elaborated by a Professional Designer at Elca, using Adobe. At that time, we still had many unknowns about the functionalities and limits of Canvas Apps. So it took some time to find a design that could fit well the needs and the constraints.
The interface finally looks great thanks to the help of the professional designer. It adds a lot of value to the Application.
In the end, we found that we had not been really limited by the visual customisation capabilities of Canvas Apps!
Lessons Learnt - Conclusion
The Canvas App allows to create Business Applications with a low-code platform and a drag & drop interface. It makes the development of Business Applications available to a large audience! It not necessary to have an advanced technical knowledge and to know programming much. They can save a huge amount of time compared to an application coded from scratch. The design of the Canvas App can be customised really well and easily.
However, it is very important to keep in mind that Canvas App can become very hard to develop for applications which involve quite complex processes, or complex features such as an Offline mode. In my opinion, it can even become impossible to develop in certain cases. One of the main reasons for this is that the code lacks structure (for instance it has no functions or classes)
A key to make a Canvas App work in complex use cases can be to use external resources (such as Workflows of Dynamics 365) to move some advanced logic outside of the Canvas App.
So, my point of view about Canvas Apps is that they are great for simple applications. But in quite complex use cases, they should be avoided and a traditional fully coded application should be developed instead.

Add new comment
Restricted html.
- Allowed HTML tags: <a href hreflang> <em> <strong> <cite> <blockquote cite> <code> <ul type> <ol start type> <li> <dl> <dt> <dd> <h2 id> <h3 id> <h4 id> <h5 id> <h6 id>
- Lines and paragraphs break automatically.
- Web page addresses and email addresses turn into links automatically.
Follow Us !
Copyright dynamics-chronicles.com © 2020
What’s it for?
Make interactive presentations
Create show-stopping presentations and clickable slide decks with Genially’s free online presentation builder. Leave boring behind and tell a story that’s interactive, animated, and beautifully engaging.
INTERACTIVE CONTENT
A presentation that works like a website
Engage your audience with interactive slides that they can click on and explore. Add music, video, hotspots, popup windows, quiz games and interactive data visualizations in a couple of clicks. No coding required!

NO-CODE ANIMATION
Make your slides pop with animation
Bring a touch of movie magic to the screen with incredible visual effects and animated page transitions. Add click-trigger and timed animations to make any topic easy to understand and captivating to watch.

INTEGRATIONS
Live from the world wide web
Embed online content directly in your slides for a media-rich interactive experience. From YouTube and Spotify to Google Maps and Sheets, Genially works seamlessly with over 100 popular apps and websites.

TEMPLATES & TOOLKIT
Genius design tools
With Genially, anyone can create a polished and professional presentation. Choose from over 2000 pre-built templates, or create your own design using the drag-and-drop resources, color palettes, icons, maps and vector graphics.

ONLINE PLATFORM
Safe and sound in the cloud
Because Genially is online, you can relax knowing that your slides are always up-to-date. There’s no risk of forgetting to save changes or accessing the wrong file. Log in from anywhere, collaborate with your team, and make edits in real time.
All-in-one interactive presentation maker
Real-time collaboration
Co-edit slide decks with others in real time and organize all of your team projects in shared spaces.
Multi format
Present live, share the link, or download as an interactive PDF, MP4 video, JPG, HTML, or SCORM package.
Engagement Analytics
See how many people have viewed and clicked on your slides and keep tabs on learner progress with User Tracking.
Import from PPTX
Give your old decks a new lease of life by importing PowerPoint slides and transforming them with a little Genially magic.
Keep content on-brand with your logo, fonts, colors, brand assets, and team templates at your fingertips.
Quiz & Survey Builder
Use the Interactive Questions feature to add a fun quiz to your slides or gather feedback from your audience.
Beautiful templates
Make your next deck in a flash with Genially’s ready-to-use slides.

OKR Presentation

School Notebook Presentation

Animated Sketch Presentation

Minimal presentation

Land Of Magic Presentation

Onboarding presentation

Visual Presentation

Animated chalkboard presentation

Online Education Guide

Terrazzo presentation

Startup pitch

Historical presentation
THEMES FOR EVERYONE
Interactive presentation ideas
From classroom materials to business pitches, make an impact every day with Genially.

Education presentations

Pitch decks

Business presentations

Thesis defense
What our community says about us

Share anywhere
Present live
From the front of the room or behind a screen, you’ll wow your audience with Genially. Heading off grid? Download in HTML to present dynamic slides without WiFi.
Share the link
Every Genially slide deck has its own unique url, just like a website! Share the link so that others can explore at their own pace, or download an MP4 video slideshow or PDF.
Post online
Embed the slides on your website or post them on social media. Upload to Microsoft Teams, Google Classroom, Moodle or any other platform.

The benefits of interactive slides
🗣️ Active participation An interactive slide deck gives your audience cool things to click on and discover, boosting learning and engagement.
👂 Multi-sensory experience Audio, video, animations, and mouse interactions make your content immersive, entertaining and accessible.
🧑🤝🧑 People-friendly format Pop-ups and embeds condense more material into fewer slides so you can break information down into digestible chunks.
🎮 Gamification Games, quizzes and puzzles make information more memorable and enable you to gather feedback and check understanding.
How to make an interactive presentation
With Genially’s easy-to-use presentation platform, anyone can make incredible visual content in moments.
Choose a template or a blank canvas

Get stunning results in less time with a ready-made template. Feeling creative? Design your own slides from scratch.
Customize the design
Add animations and interactions
Resources to become a pro presentation creator

VIDEO TUTORIAL
How to create an interactive presentation: Get started in Genially.

EXPERT TIPS
How to present data without sending your audience to sleep.

MICRO COURSE
No-code animation: Bring your slides to life with cinematic visual effects.

PRESENTATION IDEAS
The art of digital storytelling: Engage and thrill on screen.
Genially in a nutshell
How do I make a presentation interactive and how does Genially work? Find the answers to all of your slide-related questions here!
What’s an interactive presentation?
Interactive slides contain clickable hotspots, links, buttons, and animations that are activated at the touch of a button. Instead of reading or watching passively, your audience can actively interact with the content.
Genially’s interaction presentation software allows you to combine text, photos, video clips, audio and other content in one deck. It’s a great way to condense more information into fewer slides.
If you’re a teacher, you can share multiple materials in one single learning resource. Students can create their own projects using digital media and online maps. For business or training, try embedding spreadsheet data, PDFs, and online content directly in your slides.
An interactive slide deck is more user-friendly than a Microsoft PowerPoint presentation or Google Slides document. That’s because you can break information down into chunks with pop-ups, labels, voiceovers and annotated infographics.
The other benefit of interactive content is increased engagement. It’s easier to keep your audience’s attention when they’re actively participating. Try Genially’s presentation software and free slideshow maker to see how it’s better than other presentation websites. You won’t go back to standard presentation apps!
How do you make a clickable slide?
The best way to make slides clickable is to use Genially’s free interactive presentation program. Design your slide then apply an interaction. In a couple of clicks, you can add popup windows, hyperlinks, close-up images, games, animations, multimedia and other content.
Choose from the library of hotspot buttons and icons to show people what to click on. Go to Presenter View to get a preview and see how your content will appear to your audience.
How do I create presentations that look professional?
You’ve got a deadline looming and you’re staring at the screen with a blank presentation. We’ve all been there! Starting a presentation design from scratch is tricky, especially if you’re short on time.
Genially’s free online presentation maker has over 2000 ready-to-use templates for professional slide presentations, photos slideshows, and more. Each slide design has been created by our team of top graphic designers. No need to worry about fonts, centering images, or designing a matching color scheme. It’s all done for you.
Start by browsing our layouts and themes for education, business and then customize with your own text and images.
How do I share or download my slides?
Because Genially is a cloud based presentation software, you can simply share the link to your slides. Like other online presentation tools, there are no files to download or store on your computer. Everything is saved online.
When you publish your slide deck, it gets its own unique url, just like a website. Share the link with others to let them explore the content in their own time. If you’re presenting live, just click the Present button.
You can also embed your presentation on your website, company wiki, or social media. Genially is compatible with WordPress, Moodle, Google Classroom, and other platforms. If you use an LMS, you can also download your interactive design slides in SCORM format.
For slideshow videos and slideshows with music, share online or download as an MP4 video. Check out our free slideshow templates for ideas.
Can I make a free presentation in Genially?
You bet! Genially is an easy-to-use slide maker, with a free version and paid plans. The free plan allows you to create unlimited slides with interactions and animations. Subscribe to one of our paid plans for more advanced features.
Discover a world of interactive content
Join the 25 million people designing incredible interactive experiences with Genially.
You need to have JavaScript enabled in order to access this site.
- Sign in with Apple
- Login with Facebook
- Login with GitHub
- Login with Google
- Login with LinkedIn
- Login with Microsoft
- Login with Twitter
Forgot Password?
Enter your Email and we'll send you a link to change your password.
IMAGES
VIDEO
COMMENTS
Design, present, inspire with Canva Presentations. Reimagine Presentations with cinematic visuals that captivate your audience - no matter how or where you're presenting. With features to collaborate smarter, create stunning data visualizations, and deliver confidently, Canva Presentations bring impact to your ideas. Create a presentation.
Drumroll : Add a drumroll before a slide by pressing the key 'D' before a big reveal. Confetti : Add a shower of confetti to celebrate something with the key 'C'. Countdown : Add a countdown from '1-9' by pressing one of the keys. Quiet : Bring a 🤫 emoji to screen to hush your audience with the 'Q' key.
In this video Hadas will teach us how to create quick presentations in Canva. She will show us how to customize templates from the Canva library to quickly p...
And it is quite easy. 1. Open the presentation on your web or mobile Canva app. Here we are using the web app. Click on the Present button to begin the presentation. 2. Select an option depending on how you want to present. We discussed the three options above. Now click on Present button. 3.
I've made the switch! Presentations on Canva are SUPER EASY and convenient to put together. In this Canva tutorial video, I'll show you how to put a great lo...
Presentation Tutorial: How To Make a Presentation in Canva (FREE & EASY) // In this video, I'm going to show you a simple presentation tutorial on how use (F...
Download your Canva design as a PowerPoint presentation, which you can do by accessing your design and going to the top-right corner to locate the button Share. Click on it, and then click on Download. Under File Type, we will select PPTX, as it's PowerPoint's native format.
The best presentation software. Canva for a free presentation app. Beautiful.ai for AI-powered design. Prezi for non-linear, conversational presentations. Powtoon for video presentations. Pitch for collaborating with your team on presentations. Gamma for conversational AI features.
Access your Canvas courses on the go with the Canvas Student mobile app! From any device, students can now: • View grades and course content. • Submit assignments. • Keep track of course work with to do list and calendar. • Send and receive messages. • Post to discussions. • Watch videos.
Welcome to Prezi, the presentation software that uses motion, zoom, and spatial relationships to bring your ideas to life and make you a great presenter. Products. Videos. Presentations. Infographics. INTEGRATIONS. ... Open Canvas. Create, organize, and move freely on an open canvas. Create seamless presentations without the restrictions of ...
Create tools that people will love, for a platform used by millions. Amplify the power of Canva by developing new tools and integrations. Build apps. Want to work faster with your team? Power up your design toolkit with new AI design tools and simplify your workflow with Canva Apps and Integrations.
Next steps. Design and build a business app from a canvas in Microsoft Power Apps without writing code in a traditional programming language such as C#. Design the app by dragging and dropping elements onto a canvas, just as you would design a slide in PowerPoint. Create Excel-like expressions for specifying logic and working with data.
Canvas App Presentation. Canvas Apps are Business apps created with a low-code tool. They are described by Microsoft in the following way: "Design and build a business app from a canvas in Microsoft Power Apps without writing code in a traditional programming language such as C#. Design the app by dragging and dropping elements onto a canvas ...
The other benefit of interactive content is increased engagement. It's easier to keep your audience's attention when they're actively participating. Try Genially's presentation software and free slideshow maker to see how it's better than other presentation websites. You won't go back to standard presentation apps!
Medical. Marketing. Sales. Consulting. Law and Justice. Captivate your audience with our collection of professionally-designed PowerPoint and Google Slides templates. Boost your presentations and make a lasting impression!
Need a Canvas Account? Click Here, It's Free! Browse courses. Log In. Email. Password. Stay signed in. Forgot Password? Sign in with Apple.
Create your own designs with Canvas. Express yourself with natural brushes and hand-picked colors. Never lose a masterpiece with automatic syncing to your Google account.
Present with Microsoft PowerPoint. Bring Canva's brilliant presentation templates into PowerPoint by publishing your design as a PowerPoint presentation. Permissions. When this app is open in a design, it can: Read the contents of the design. Additional information. Use in a design.
Go to the Design tab on the editor. Simply type a descriptive prompt in the search bar, and the AI presentation maker will generate beautiful drafts of slides for you. You can then edit the content and use other awesome AI tools to perfect your presentation. These AI features are super helpful for people new to design, as well as pros and teams ...