Microsoft Excel
11 minute read

11 Best Excel Presentation Tips in 2024

Brandon Pfaff
Facebook Twitter LinkedIn WhatsApp Email

Join the Excel conversation on Slack
Ask a question or join the conversation for all things Excel on our Slack channel.
There’s more to a spreadsheet than just the numbers on the page. It is equally important to make your spreadsheets look professional, easy to read, and visually appealing to your viewers.
The same way a lawyer with a crooked tie and disorganized papers might raise an eyebrow in court, your Excel presentation won’t hit the right marks with your audience if it looks clumsy and bland, no matter how many hours of research goes into making it or how important the information contained within it is.
Whether you are creating a spreadsheet for personal use, to pass information to your team or share with your project manager, the secrets locked away in this post will be of immense use to you. Let’s take a look at the best Excel presentation tips to help you create standout spreadsheets .
Free Excel crash course
Learn Excel essentials fast with this FREE course. Get your certificate today!
1. Get a template online
If you are a busy person, and you cannot fit an Excel presentation design into your schedule, enter the ex machina: pre-made Excel templates. You can choose from an array of purpose-specific templates with beautiful designs, fonts, and colors. Simply enter your values to customize it, and you are ready to go.
Of course, using a template means you will not get better at designing things yourself. If getting things done is your priority instead of getting better at designing presentations, then, by all means, use a template and be done with it. On the other hand, if you want to know how to make your Excel presentation better on your own, then find someone to teach you or stick around until the end of this post.
Check out our 50 best Excel templates to make your life easier and our 33 Excel business templates for workplace productivity .
2. Name your worksheets correctly
Excel presentation is all about clarity. For this single reason, the importance of a correct and reliable project or worksheet name cannot be overemphasized. It could be a sentence, a phrase or just a word. Just make sure it is easy to understand by you or by anyone you will be sharing the file with.

You also must make sure it is distinct from the names of other worksheets stored on your computer. After all, what is the use of all the tips you will learn here today if you will not be able to find the worksheet you applied them on?
3. Define your header/title
Your header and title can be anything but it needs to stand out. Your header must be able to speak to the reader and make the reader know at first glance what the header is.

To do this, try a larger font for your header, underline and embolden it. You should center align it and use a different font color. It has to stand out but also blend with the template color scheme and overall aesthetic look. You can also use a different readable for your header. Just remember, we want to make it distinct, not isolated.
Step up your Excel game
Download our print-ready shortcut cheatsheet for Excel.
4. Dos and don'ts of fonts
Full transparency: Fonts make or break your spreadsheet. Always use a uniform font for your data, you can use the same font for your header or you can change that of the header. You can use three fonts in a single presentation and that is the recommended maximum, else you would be pushing it. In this case, less is infinitely better.
These are the guidelines to follow in selecting the right format for your font.
Here is a quick tip, fonts of the sans-serif group are the best for your Excel spreadsheet if readability is your goal. Calibri, Helvetica, Arial or Playfair are few examples. If used with the right alignment, spacing, and color, they can bring out the best in your Excel presentation.

This ultimately depends on your presentation but officially, font 12 is often advised with double spacing to improve readability. As stated earlier, the header font can be larger. The headers should be larger than sub-headers which in turn should be larger than data fonts.

You want to create a sharp contrast between the text color and the background colors e.g. a light color text on a dark background and vice versa. This is where the "zebra stripes" rule comes in, which will be discussed later in the post.
People don’t often use the alignment tool in Excel. If you want to make your presentation look beautiful and business-like , you will need to maximize the alignment feature.

5. Create space for breathing room
When you see tightly packed, clumsy or wordy text or spreadsheet, your brain automatically gets tired of reading it before you even start. But when there is breathing space and the spreadsheet is divided up into categories, it becomes more pleasant to the eyes and ripe for interpretation by the brain.
This brings us to the B2 rule. Try to start your presentation on column B, row 2. Leaving the A column and the first row blank. It works like magic. You should also make sure that the column and row dimensions are the same.

Additionally, don't autofit the height and width of your document. You need to have flexibility and creative control of your workspace. Instead, manually adjust the height and width so that they have just enough white space but not too much to give your presentation some breathing room and improve readability.
6. Add an image
Whether it’s a photograph, an artistic sketch or your logo, images go a long way in making your spreadsheet better. Images make your presentation look official and possess the professional feel in many of the beautiful presentations you have seen. Pictures speak a thousand words. While Excel is not designed to accomplish the kind of presentation you can make in PowerPoint, a picture will help you to drive the point home and make your presentation memorable.

7. Go off the grid
Do you know that erasing all grid lines apart from those of your result will have people asking how you did it and if you used the same Excel software they use? Try it today. In your spreadsheet
Go to the View tab on the ribbon.
- Under the Show section, uncheck the box next to Gridlines .

8. Zebra stripes: Excel jungle law
Zebra stripes are alternating dark and light colors on rows lying on top of each other. This helps in a number of ways. First, it has this aesthetic feel that makes your work seem orderly, especially if you are displaying hundreds of rows of data. Second, it helps correlation and readability. A reader can track a row from the right-hand side to the far left and not lose track of what row his or her eyes are set upon.

You can zebra stripe using many methods. When you create a table in Excel, by default this will be zebra striped (Tip- select your data and use the shortcut Ctrl + T on a PC or ^ + T on a Mac to quickly create a table). On the Design tab, under Table Styles, you can change the color and style of your zebra stripes.
It can also be done using a formula in conditional formatting if desired. Conditional formatting is done by highlighting values that satisfy certain requirements (e.g. all odd-numbered rows). It can be copied from cell to cell using the painter tool in the Home toolbar.
9. Use charts, tables , and graphs
Most presentations are incomplete without some form of visual representation. Whether table, graph or chart, you need to visually represent your raw data in mediums that would be understood in a single glance. Charts, graphs, and tables should not be underestimated, especially if you have cumbersome data spanning many columns and rows.
In the Excel ecosystem, the chart, graph, and table features are like symbiotic siblings. You need them to bring out the beauty in the brevity of your work.

10. Create cell styles
Excel has many preset cell styles but you can create your own custom styles that will be more customized, and easier to use and edit because you created it. This is actually an alternative to getting a template if graphics consistency is your goal. After creating a beautiful spreadsheet with the above information, you can save the style so that you can apply it to future presentations.

Now your presentation is perfect with the right feel and style. Simply highlight the cells with your design for saving, then go to the Home toolbar, click on "more" at the base of the style gallery, then select "new cell style". A style dialog box will open, name the style, edit its properties and save.
If it isn't broken and it works efficiently, why change it? You can, however, add a touch of variability by changing the color palette from time to time.
11. Show restraint
You have learned all of these tips and you are ready to start your presentation - be careful of overdoing it. Use color sparingly and don't combine too many tips at once. You need to tread the fine line between underwhelming and too much to find the "just enough" middle ground. Make sure your presentation is perfectly balanced, as all things should be.
Ultimately, the way your Excel presentation turns out depends on how well you communicate your data to your audience. Although, it does help to know the psychology of colors, good fonts. Browse beautiful spreadsheet presentations online to figure out what the "best" looks like. But at the end of the day, the ball is in your court and we hope that your dedication to practicing, sharpening and perfecting your presentation skills in Excel will be rewarded with cheers.
Ready to design your own Excel presentations?
If you would like to sum up the data on your Excel spreadsheet so that its insights are conveyed in a straight-forward manner, then follow this step-by-step guide. You’ll end up with a presentation that summarizes your data in a way that’s painless to analyze.
If you’re eager to brush up on your Excel skills, check out our Excel course and master the fundamentals to boost your productivity.
Loved this? Subscribe, and join 451,039 others.
Get our latest content before everyone else. Unsubscribe whenever.

Brandon is a full time CPA specializing in all things tax. When he is not serving clients, he enjoys spending time with his wife and son, real estate investing, and sipping fine bourbon.

Recommended
Sort Functions in Excel — How to Use SORT and SORTBY
Excel sort functions are superior to manual sorting methods because they will automatically update the sort order without user intervention.

Excel Challenge 39: Generate Unique Random Values
What is the best way to generate random values in Excel? Better yet, can you make them unique? Put your skills to the test with this Excel challenge.

Excel Challenge 38: Data Lookup From Multiple Sources
Take this Excel challenge by showing us what to do when XLOOKUP or VLOOKUP alone isn't enough to extract the values you want.
© 2024 GoSkills Ltd. Skills for career advancement
Researched by Consultants from Top-Tier Management Companies

Powerpoint Templates
Icon Bundle
Kpi Dashboard
Professional
Business Plans
Swot Analysis
Gantt Chart
Business Proposal
Marketing Plan
Project Management
Business Case
Business Model
Cyber Security
Business PPT
Digital Marketing
Digital Transformation
Human Resources
Product Management
Artificial Intelligence
Company Profile
Acknowledgement PPT
PPT Presentation
Reports Brochures
One Page Pitch
Interview PPT
All Categories
Top 30 Excel Linked Data-Driven PowerPoint Slides and Templates

Gunjan Gupta
It’s time to dump spreadsheets and move to waterfalls or even donuts for that matter to show your data in ways that people absolutely adore!
Have you ever noticed that people often groan when a spreadsheet pops up in front of them sharing brilliant data insights? No matter how useful the insights are, the reaction isn’t what a presenter wants. Rather it is far away from his imagination. Maybe it’s not the audience- or the presenter- to blame. Maybe it is the old school method that is the real culprit. Or maybe the presenter suffers from Dumb-and-Overused-Chart-Syndrome ?
Haven’t heard of this syndrome before? Unfortunately without even realizing, many presenters are suffering from this so-called syndrome wherein the charts and graphs aren’t engaging enough, thus yielding a negative reaction from the audience- groans, yawns-all at once!
Here are 30 excel linked data-driven PowerPoint slides and templates that can help in presenting data in a clever way and up your data visualization game. These charts don’t require the audience to squint; instead, they act as data visualizations tools and do the same that a photo does to everything else: Show not tell!
So, now you can stop boring your audience with the same old-school spreadsheets and try serving them some Donuts, Waterfall, Bubbles , so on and so forth.
Trust me it is more fun, and if you are still not convinced. Try it for yourself!
P.S- All these charts are data-driven and excel-linked, taking your presenting game a notch higher.
Tornado Chart For Population Excel Chart Template 1
The core of every business’s success lies in properly analyzing the data and using it to one’s advantage. Each high-quality presentation should show reliable research and analysis. We have designed this tornado chart to help you illustrate trends more easily and show important relationships between the population of males and females in a country or workplace. This diagram is a uniquely designed bar chart that performs sensitivity analysis, thus making it ideal to be presented in front of anybody depending upon your needs and requirements. Since this, a data-driven Excel linked chart you will face no difficulty in tailoring it to your current preferences.

Download Tornado Chart For Population Pyramid Excel Chart PowerPoint Layout
Global Market Statistics Pie Chart With Percentage Template 2
Visualize and compare various proportions of categories with this pie chart template. Divide categories into segments showing how individual components contribute to the total. This is an effective data visualization chart that can be used to process data efficiently. You can show various combinations of numerical data with this template that is data-driven, thus making editing and adding your personalized data a breeze. Besides this, it is the most compatible set to present a small amount of data that can be easily comprehended by the viewer.

Download Global Market Statistics Pie Chart With Percentage PowerPoint Slides
Company Net Promoter Score Template 3
Analyze customer satisfaction and promotional score with this template. This template is great for sales and marketing professionals looking for effective ways to explain the NPS in a seamless manner. This template has a diverse collection of data-driven chart illustrations that can help in depicting various components of NPS like the total number of respondents, active users, passive users, and others. Not only this, but it can also be used to present any information, visually that can be easily altered to fit your needs and requirements. Simply add your preferable data and edit this template on the go.

Download Company Net Promoter Score Survey Analysis PPT Slide
Globe With Bar Graph Data-Driven Success Template 4
It doesn’t matter if you're an HR executive, manager, entrepreneur of any other individual this chart template can be used by anybody time and again to present complex data. The data presented using this chart is very easily understandable and can be retained by the audience for a long period of time, hence individuals belonging to any sector can benefit from this template. Besides this, it is great to present demographic information with ease as it is a fully editable layout. Its data-driven quality gives you enough scope to add your personalized data and present it in a seamless manner.

Download Globe With Bar Graph Data Driven Success Indication PowerPoint Slides
Data Comparison Chart Template 5
Compare and visualize two sets of data with this template. Use it to show a comparison between products, gender, etc. The applications of this template are multiple hence it can be used to visualize all forms of data comparisons. Presented in the form of vertical and horizontal bar graphs this template provides a clear view of the comparison, thus making the judgment regarding the aspects very easy for the user and viewer as well.

Download Data Comparison Chart PowerPoint Slide
Speedometer With Three Text Boxes Template 6
This is a fully editable speedometer design that can be incorporated in any of your dashboards or used individually to present data in a seamless manner. It functions well in business presentations as it is easily comprehended by the audience. You can use it to indicate the performance level, tasks completed, reporting the status of the project, etc. The set is completely user friendly and made with high-resolution images that make the presentation of KPI’s very easy and convenient for the user.

Download Speedometer With Three Text Boxes PowerPoint Slides
Data-Driven Human Resource Management Template 7
This is a very creative template that can be used to show any data analysis depending upon the needs and requirements of the user. It is also a data-driven chart, hence you will face no difficulty in adapting it to any data analysis whether it is related to any field business, marketing, sales, or any other. It all depends on the requirements of the user which is efficiently fulfilled with this colorful template.

Data-Driven Pie Chart And Donuts For Analysis Template 8
This template is apt to present an analysis of demographic spread, global market, economic factors, and others. The chart uses a minimalist approach making it visually appealing and comprehensive. It is also a well-accepted layout in the business field to report, show percentage reviews, market share analysis, etc. Users can make use of this template to show a multitude of statistics depending upon the needs and requirements of their business. Built with user focus friendliness, this template can be used to present quality presentations to the audience.

Download Data Driven Pie Chart And Donuts For Analysis PowerPoint Slides
Waterfall Chart Showing Sales Goal Variance Template 9
This waterfall chart template is useful to get a quick overview of sales goals of your organization. It can be used to show both positive and negative values over a period of time. It can also be used to point out the initial and end values of the sales goals that can be altered as per one’s needs and requirements. Since this is a data-driven chart you will face no difficulty in modifying the data as per your presentation demands.

Download Waterfall Chart Showing Sales Goal Variance
Self Presentation Visual Resume PPT Template 10
Are you applying for a new job position wherein you need to stand out from the rest of the candidates? Make use of this visual resume template with data-driven charts and graphs, that offer a unique way of presenting your abilities, skills, qualifications, previous employment history, and other aspects of your personality. These charts and graphs provide an at-a-glance view of the jobseeker’s qualities, thus helping them get noticed. Also, this template is designed to fit your creative aesthetic style by using professional colors and high-quality images making it easily shareable.

Download Self Presentation Visual Resume PPT Template
Self Presentation Resume Format Template 11
Want a resume that leaves an everlasting impression on the employer? This set comes in handy with its data-driven content and other attributes. It comes in a uniquely designed, clean infographic layout that offers a host of benefits to the job seeker in terms of bagging great employment opportunities. Its automatic updation quality helps the user to present his preferred data in a pleasing manner, thus helping his job application stand out from the rest. This template is Excel linked so sharing it and editing it is very easy and convenient.

Download Self Presentation Resume Format Editable PPT Slide
Risk Management KPI Dashboard Template 12
Risk management is the most crucial vertical to mitigate risks. This risk management kpi dashboard template acts as a resourceful tool that can be used to identify, monitor, and minimize various kinds of risks as it provides useful information in the form of a snapshot. As such anybody can easily understand the trends of risk mitigation, thus making this design an ideal set. Professionals belonging to any sector can use this template to provide all sorts of information about adverse conditions, unforeseen events, and others that are to be measured and monitored continuously.

Download Risk Management KPI Dashboard Showing Consequence Vs Likelihood
Data-Driven 3D Interactive Bubble Chart Template 13
Uplift the overall aesthetic appeal of your boring slideshows with this bubble chart template. Present any form of data that you wish to with this data-driven chart that responds to every need of the user. Since this chart offers a wide range of applications it can be used by any professional to represent complex data in an easily understandable manner. Also, the data presented with this template can be easily retained by the audience making it beneficial for any individual downloading it.

Download Data-Driven 3D Interactive Bubble Chart PowerPoint slides
4 Quarters Track Record Template 14
Show various combinations of data analysis with this template. It can be used by HR, entrepreneurs, executives, team leaders or any other person to showcase data in a visually attractive way. Employ this chart to show quarterly track records of sales, marketing, or any other department. This is not a topic-specific template, hence any sector can benefit from it. Also, its data-driven quality enhances its versatility and flexibility as well.

Download 4 Quarters Track Record PPT Ideas
Key Performance Indicators Template 15
KPI’s are crucial to measuring the success of a project, tasks, organization etc. over a given period of time. You can use this template to measure the performance of your organization. Use it to analyze and measure various performance parameters with a single layout. Featuring all kinds of data-driven charts and graphs this template makes viewing the overall performance of the organization very easy and convenient. Hence, it can be used by project managers, strategists, or any other person. All you have to do is download this design, add your data, and see the charts getting altered.

Download Key Performance Indicators Template PowerPoint Slide Show
Project Name Status Planning Dashboards Template 16
This project dashboard is ideal for departments or executives to monitor the status of the campaigns, number of projects completed, number of projects planned, their cost, and similar other details. It also contributes to making the organization more intelligent towards attaining its goal as everything can be viewed at a single glance. Besides this, share important information or metrics with this template as it is easily comprehensible making it useful for business owners, project managers, team leaders, and others. It is data-driven which makes it easy to alter and create a well-prepared slideshow in no time.

Download Project Name Status Planning Cost Portfolio Dashboards
Workforce KPI Dashboard Template 17
This template is apt to keep a headcount of your workforce whether they are males or females. Keep track of everything pertaining to the employees such as when they started or left the organization, promotions given, grade-wise headcount, etc. This is a dashboard template showing various forms of data-driven charts that function as great visualization tools. As such everything related to the employees can be monitored at a glance, with this template. Besides this, it functions well for every organization because of its versatility.

Download Workforce KPI Dashboard Showing Starters Headcount Leavers Promotions And Joiners
Website Performance Review Template 18
Monitor website performance by tracking important metrics like online transactions, traffic source, site consumption time, and others. This is an important tool to collect, measure, and analyze data for your website that is data-driven. Hence, it will get automatically updated as soon as you add your data to it. This template can be used in many different contexts like social media marketing, digital marketing, SEO, eCommerce, and others. Since it provides a broad spectrum view of website KPI’s it will be useful for any organization or agency no matter how small or big it is.

Download Website Performance Review PPT Slide Template
Achieving Sales Target Sales Performance And Sales KPI Dashboard Template 19
Measure sales KPIs with a birds-eye view using this template. This template can be used to view key sales indicators to achieve organizational goals more efficiently. This includes metrics like weekly sales, product inventory, net sales, and many others that can be modified as per the liking of the user. Besides this data collected from various sources can be presented with this template to generate actionable insights at a much faster rate.

Download Achieving Sales Target Sales Performance And Sales KPI Dashboard PPT Icon
Data-Driven Sales KPI Dashboard Template 20
Executives who want an at-a-glance view of the sales will appreciate this professionally designed template. Showcase various sale scenarios and their corresponding data such as monthly sales, sales volume, through monthly sales comparison and others. This template provides insights into critical sales material without cluttering up the layout. Also, each chart in this template is Excel linked hence you will face no difficulty in altering the data as per your needs and requirements.

Download Data-Driven Sales KPI Dashboard For Achieving Sales Target PPT Samples
Financial Performance KPI Dashboard Template 21
This is a high-level snapshot of the financial health of your company that will help you in making responsible decisions. Use it to decide about the various resources and their proper allocation so that they prove advantageous for the company and its finances. This template covers various aspects of financial performance such as vendor expenses, payroll headcount ratio, fundraiser expenses, sales conversions and others that can be easily altered as per one’s liking. It summarizes and interprets the numbers in a very easy format that can be easily understood by the people viewing it, thus making it a highly resourceful data visualization tool.

Download Financial Performance KPI Dashboard
Project Status KPI Dashboard Template 22
This is a data-driven project status template that displays important statistics, metrics, data, and other aspects related to the health of the project. It provides a mix of various KPIs related to the project thus enhancing the overall decision-making ability of the project managers, executives, or any other individual who downloads this template. Besides this, it is a user-friendly layout that includes high-resolution charts and graphs that can be altered as per one’s desire.

Download Project Status KPI Dashboard Showing Delivery Roadmap And Resource Allocation
Workforce At A Glance PowerPoint Slide Template 23
This is a very widely used tool that helps in visualizing relevant Key Performance Indicators related to HR functions. Key performance metrics and data such as part-time staff, full-time staff, male-female ratio of the employees, etc. can be efficiently displayed with easy to understand charts and graphs used in this layout. This is a ready-made template that is 100% customizable, owing to the feature of being Excel linked.

Download Workforce At A Glance PowerPoint Slide Graphics
Procurement KPI Dashboard Template 24
This dashboard helps in keeping track of all the procuring activities with relevant and measurable metrics such as total spend profile by region, total spend profile by operation, top vendors, and many more. It provides a benchmark that can be used to analyze the quality of the warehouse and vendor from which the material has been procured. Numerous KPI’s can easily be viewed with this data-driven dashboard. All the charts and graphs used in this dashboard can be edited as per your data requirements as they are Excel linked, thus making them highly adaptable.

Download Procurement KPI Dashboard Total Spend Analysis PPT Samples
Human Resources KPI Dashboard Template 25
This is an advanced analytics tool that can be used to display important HR metrics like recruitment funnel, active pipeline, allocation sources, and many others. It provides an at-a-glance view of the important metrics to the HR department, thus helping them improve the recruiting process, optimize their work, and enhance the overall well-being and performance of the employees. With so many data visualizations that are Excel linked, this template can be adopted by any user as per his needs and requirements.

Download Human Resources KPI Dashboard Showing Recruitment Funnel Application Sources
Project Status KPI Dashboard Template 26
Project managers rarely have time to go through multiple spreadsheets to understand how well the project is progressing. The objective of this project status dashboard template is to quickly summarize various aspects of the project’s health such as task status, pending projects, completed products, etc. so that important facts can be presented at a glance. It presents a scannable view of the project, that can be used by any departmental head as per his needs and requirements. The data-driven quality of this template makes it a highly resourceful one to be used for viewing the success and failure of your projects.

Download Project Status KPI Dashboard Showing Project Timeline And Budget
KPI Dashboard Template 27
Human Resources is one of the key fundamentals of running a company successfully. This template provides a snapshot of HR metrics such as gender diversity, the average time for new hire, vacation days, and others. Use it to report the important KPIs to executives, managers, and others. Further, it can be used to make viable HR strategies that will prove beneficial for the company as well as employees.

Download KPI Dashboard Showing Overtime Cost Gender Diversity Ratio
Three Key Metrics With Business Development KPIs Template 28
Employ this reporting tool to display a summary of business development KPIs and metrics like lost work, new business, amongst others. This dashboard helps in condensing large amounts of data into a single visual representation, thus making it far more comprehensible. Also, its data-driven feature makes it easily adaptable and versatile for any user.

Download Three Key Metrics With Business Development KPIs And Proposal Success
Risk Management KPI Dashboard Template 29
Determine and mitigate risks from various verticals with this dashboard template. Use it to examine various adverse conditions and unforeseen events that may lead to various risks. Since the topic of risk mitigation is very diverse, this dashboard template can be used to provide at a glance view of risk analysis, its identification, mitigation strategies, and others with various data-driven charts and graphs. This will surely save your time in creating a dashboard from the very scratch.

Download Risk Management KPI Dashboard Showing Risk Distribution By Country Office And Business Process
Financial Ratio KPI Dashboard Template 30
This financial ratio dashboard provides an instant visual representation of the company’s financial health. The finance department can use this layout to track the company’s expenses, profit, loss, revenue, return on equity, etc. in real-time. This helps in identifying the areas that require immediate attention to improve the financial condition of the organization. This template will also help in saving the time and resources of the company as everything is pre-designed and data-driven. All you have to do is download the template, add your data and see the charts getting automatically updated.

Download Financial Ratio KPI Dashboard Showing Revenue Net Profit Margin And Debt To Equity
These are our top 30 data-driven charts and graphs and we hope you found them inspiring enough to create your own designs.
Drop your thoughts in the comment section below and download these designs for further motivation!
Related posts:
- Top 10 Metrics, Key Performance Indicators, and Dashboards Google Slides Templates For Business
- [Updated 2023] Top 35 KPI-Dashboard Templates For Performance Tracking
- Top 40 Metrics, Key Performance Indicators and Dashboard PPT Templates for Every Business
- 40 Best Lego Blocks PowerPoint Templates To Unlock Your Hidden Talent
Liked this blog? Please recommend us

Data Sucks, Says Who? 16 Creative Data Visualization Techniques to Showcase Your Numbers

Tweak it to Work it! 10 Golden Rules For Data Visualization

How to Turn Ugly Charts That Make No Sense Into Simple, Clean Visual Stories
![[Updated 2023] 30 Best Gantt Chart PowerPoint Templates For an Effective Visualization of Your Project](https://www.slideteam.net/wp/wp-content/uploads/2020/05/Banner-1-335x146.png "excel tips presentation ppt")
[Updated 2023] 30 Best Gantt Chart PowerPoint Templates For an Effective Visualization of Your Project
This form is protected by reCAPTCHA - the Google Privacy Policy and Terms of Service apply.

Digital revolution powerpoint presentation slides

Sales funnel results presentation layouts
3d men joinning circular jigsaw puzzles ppt graphics icons

Business Strategic Planning Template For Organizations Powerpoint Presentation Slides

Future plan powerpoint template slide

Project Management Team Powerpoint Presentation Slides

Brand marketing powerpoint presentation slides

Launching a new service powerpoint presentation with slides go to market

Agenda powerpoint slide show

Four key metrics donut chart with percentage

Engineering and technology ppt inspiration example introduction continuous process improvement

Meet our team representing in circular format

How to create your presentation using Excel?
Hrideep barot.
- Presentation

MS- Excel, widely known as Excel, is famous for its spreadsheets and data handling. But little has been explored of this wonderful software other than the standard features.
Do you know that you can create and give your presentation using Excel? Are you curious of how to create a presentation in Excel?
Read till the end to get familiar with the steps and bonus tips in the end!
This is our game plan for this article.
Is excel presentation a good choice?
Step 1: choose a template, step 2: create slides, step 4: remove the grids, add a background picture, add colors to your data, font size matters, make use of cells, title slide, conclusion slide, product sales, comparative analysis, financial resolution or budget proposal, who all can benefit through excel presentations, does excel have presentation mode, how to export excel presentations.
Now, you might wonder: how can a simple spreadsheet be made presentable, especially a business report or pitch?
Well, using Excel might be more advantageous than you think. Here’s why:
Although PPT or PowerPoint Presentations gives a wide variety of options and templates to choose from, it can sometimes be too stretched out or contain lots of information that can be overwhelming.
Often, the main agenda of the presentation gets blurred, as we tend to emphasize and explain each and everything on the PPT.
If you want to give a crisp, short and effective presentation, then consider going for an Excel presentation.
There are fewer chances of your audience losing focus, as you emphasize only the needed information, especially if you are presenting a business report.
You will also save time of giving and making your presentation.
Now that you know why Excel is a good choice, let us see how we can use an Excel sheet in a presentation.
Creating a presentation in Excel
Creating a presentation in Excel can be the easiest way of making a presentation.
Follow these steps to make your presentation in excel:

The first step is to choose a template that goes with the aim of your presentation.
If your aim is to give a business presentation, you can go for templates like the ones seen in the above picture.
If you aim to present a business idea or budget, then you can choose templates such as planner and checklist or expense budget.
Choosing the right template would make things easier for you and your audience.
You might wonder how can I possibly create a slide in excel? Isn’t that a feature of PowerPoint?
Well, the idea is to create one similar to PowerPoint.
By using the sheets as slides, one can easily create an impactful presentation.
Make sure to name the sheets, and arrange them in order to give a smooth presentation.
Step 3: Organize your data
Now enter your required data and arrange it.
Simply select the required data by pressing the SHIFT key and use the ARROW keys to select.
Then, click on the Insert option from the menu tab and click on the Recommended Charts.
Now, select the type of chart you want.
Here are some possible options:

If you have data that depicts a financial report, and you want to explain the profits annually, then go for Line Graphs.
Remember to name your chart. You can click on the chart title to rename it.

If you want to present a monthly report on the expenses, then go for a pie chart.
Pie charts fit well when you present on a single aspect or topic.
Tables work for almost all purposes.
However, the information presented needs to be simple and short.
You can do this by making colored tables.
You can select your data, and from the Page Layout option from the menu, browse the themes and colors.
Go for lighter tones, as they look aesthetic and professional as well.
Also, the audience won’t find it difficult to read the data, which can happen if you use darker colors.
One of the main features of Excel are the grids, i.e., rows and columns.
Our last step is to get rid of the grids, as they can distract the audience and you may also run the risk of giving a shabby presentation.
To remove grids, go to the Page Layout option in the menu tab and unselect or uncheck the boxes under Gridlines and Headings.
After this step, your presentation would seem as if it was made using a PPT!
Tips for making a creative and professional presentation using Excel

Level up your presentation by setting a background picture in your Excel sheets!
In order to do this, go to the Page Layout and click on Background.
You can choose any of your saved pictures or choose from almost infinite options by searching one.
After you choose your picture, click on insert and your background picture is ready!
Last step is to remove the gridlines for a clean presentation.
You can also remove Headings and Formula Bar by unchecking them from the View tab.
It is quite a task to locate and understand data when everything is of the same color.
In other words, when you have a single color, say white, the audience would be busy tallying the data from right to left and not be able to concentrate on your presentation.
To resolve this issue, make your tables with two color tones.
You can choose them from Themes in Page Layout.
Here is the final result:

This table would take less time to locate the data in one row, as the color makes the task easy!
I bet you took some time to read this, especially if you are looking from a laptop or PC.
Did you feel any difference?
Your eyes were strained as you tried to read what was written.
Hence, make sure to have a decently larger font for making your information visible to everyone as not everyone sees your presentation from the same proximity as you.
If you don’t want a background picture, you can go for an image.
For adding an image, go to Insert and click on Illustrations.
You can add pictures, shapes, icons, 3D models and many more.
Remember to uncheck the Gridlines and Headings, before adding the images.
Cells in a spreadsheet can be used in creative ways.
Apart from entering data and doing calculations in a breeze, they can be turned into text boxes!
So make use of them as far as you can.
You can add in the main heading in the first sheet along with a background picture.
You can also use cells for short descriptions or notes below the tables or data for better comprehension for the viewers.
This is very important for all types of presentations and not just for Excel.
The main reason to categorize is to avoid “data dump”.
This happens when you put in too much information in one chart or sheet.
You might get confused or zoned out while presenting, and it is overwhelming from an audience’s perspective as well.
So, divide your data into various sheets and name them, ensuring they are in right order.
Doing so will also give your presentation a better clarity.
Sample Excel presentation
Suppose you are from the Sales department and are asked to give a presentation to the senior executives about the current vaccination drive status and future prospects.
Considering the period to be Jan-June 2021, here is a possible sample of how you can go about giving your presentation using Excel:

Here you can talk about your views on how the organization should carry forward the vaccination drive, and give suggestions on how to do it more efficiently.

What are some good Excel presentation topics?
Excel is a good medium to present product sales. The sample presentation above is a type of product sales.
It gives the organization a clear idea of the direction of the sales of a product and planning further marketing strategy.
If you have just begun your journey as an entrepreneur or are in the sales and marketing field, here is a useful article for you to enhance your skills of giving a business pitch to your clients! Pitch Perfectly: Crucial Public Speaking Tips for Startup Founders
Some topic ideas for product sales can be:
- Annual product review in XYZ branch
- Sales review of XYZ product
- Review of top-selling products in XYZ zone
- Sales promotion review 2020-21
Comparative analysis can be presented using Excel most effectively.
You can show data in simple charts and graphs, and compare the metrics using parameters such as time( weekly, monthly, annually) or regionally( within a company or branch, across branches, or internationally).
Some topics you can consider:
- Comparative analysis of student population taking XYZ stream/course
- Analyzing weekly donations to XYZ foundation
- Regional analysis of reported crimes in XYZ state
- Health and hygiene: A correlational study
Excel is a go-to application when it comes to finances.
With its easy tools and graphics, you can present budget proposals and financial resolutions with utmost ease.
You can consider these topics:
- FDIs for the year 2018-22
- Shares review 2020-21
- Annual review: Financial department
- Funds report: XYZ branch 2020-21
Although Excel is a great tool, it is not suitable for every type of presentations and professions.
It is an excellent medium for those engaging in quantitative data such as:
- researchers
- sales and marketing
- data analysts
- corporate executives
- logisticians, etc.
You can present your data in full-screen mode or presentation mode in Excel!
To do this, go to the View tab and select Full-screen mode, or press CTRL+ SHIFT+F1.
To go back to normal mode, right-click and choose the close full-screen option, or click on the three vertical dots on the top of the screen.
To export your Excel presentation, follow these steps!
STEP 1: Go to Files tab and select Export option.
STEP 2: In Export, click on create PDF/XPS document and name your file.
STEP 3: Click on Publish. Done!
Although we went through the steps of making an Excel presentation, do not leave the other aspect out!
Your body language and delivery style also matters!
If you are confused on what approach to take regarding body language while giving a speech, follow this article! To walk or stand still: How should you present when on stage?
For preparing your voice, follow along How to prepare your voice for a speech: Step-by-step guide .
We took a look into the steps for creating a creative and effective Excel presentation in just 4 steps!
Hope that the steps and tips would make your next Excel presentation a success and completely reinvent the way Excel is seen!

Enroll in our transformative 1:1 Coaching Program
Schedule a call with our expert communication coach to know if this program would be the right fit for you

7 Keys to Emcee Like a Pro: Unlock Your Hosting Potential

8 Ways to Rise Above the Noise to Communicate Better

How to Negotiate: The Art of Getting What You Want
- [email protected]
- +91 98203 57888
Get our latest tips and tricks in your inbox always
Copyright © 2023 Frantically Speaking All rights reserved
Kindly drop your contact details so that we can arrange call back
Select Country Afghanistan Albania Algeria AmericanSamoa Andorra Angola Anguilla Antigua and Barbuda Argentina Armenia Aruba Australia Austria Azerbaijan Bahamas Bahrain Bangladesh Barbados Belarus Belgium Belize Benin Bermuda Bhutan Bosnia and Herzegovina Botswana Brazil British Indian Ocean Territory Bulgaria Burkina Faso Burundi Cambodia Cameroon Canada Cape Verde Cayman Islands Central African Republic Chad Chile China Christmas Island Colombia Comoros Congo Cook Islands Costa Rica Croatia Cuba Cyprus Czech Republic Denmark Djibouti Dominica Dominican Republic Ecuador Egypt El Salvador Equatorial Guinea Eritrea Estonia Ethiopia Faroe Islands Fiji Finland France French Guiana French Polynesia Gabon Gambia Georgia Germany Ghana Gibraltar Greece Greenland Grenada Guadeloupe Guam Guatemala Guinea Guinea-Bissau Guyana Haiti Honduras Hungary Iceland India Indonesia Iraq Ireland Israel Italy Jamaica Japan Jordan Kazakhstan Kenya Kiribati Kuwait Kyrgyzstan Latvia Lebanon Lesotho Liberia Liechtenstein Lithuania Luxembourg Madagascar Malawi Malaysia Maldives Mali Malta Marshall Islands Martinique Mauritania Mauritius Mayotte Mexico Monaco Mongolia Montenegro Montserrat Morocco Myanmar Namibia Nauru Nepal Netherlands Netherlands Antilles New Caledonia New Zealand Nicaragua Niger Nigeria Niue Norfolk Island Northern Mariana Islands Norway Oman Pakistan Palau Panama Papua New Guinea Paraguay Peru Philippines Poland Portugal Puerto Rico Qatar Romania Rwanda Samoa San Marino Saudi Arabia Senegal Serbia Seychelles Sierra Leone Singapore Slovakia Slovenia Solomon Islands South Africa South Georgia and the South Sandwich Islands Spain Sri Lanka Sudan Suriname Swaziland Sweden Switzerland Tajikistan Thailand Togo Tokelau Tonga Trinidad and Tobago Tunisia Turkey Turkmenistan Turks and Caicos Islands Tuvalu Uganda Ukraine United Arab Emirates United Kingdom United States Uruguay Uzbekistan Vanuatu Wallis and Futuna Yemen Zambia Zimbabwe land Islands Antarctica Bolivia, Plurinational State of Brunei Darussalam Cocos (Keeling) Islands Congo, The Democratic Republic of the Cote d'Ivoire Falkland Islands (Malvinas) Guernsey Holy See (Vatican City State) Hong Kong Iran, Islamic Republic of Isle of Man Jersey Korea, Democratic People's Republic of Korea, Republic of Lao People's Democratic Republic Libyan Arab Jamahiriya Macao Macedonia, The Former Yugoslav Republic of Micronesia, Federated States of Moldova, Republic of Mozambique Palestinian Territory, Occupied Pitcairn Réunion Russia Saint Barthélemy Saint Helena, Ascension and Tristan Da Cunha Saint Kitts and Nevis Saint Lucia Saint Martin Saint Pierre and Miquelon Saint Vincent and the Grenadines Sao Tome and Principe Somalia Svalbard and Jan Mayen Syrian Arab Republic Taiwan, Province of China Tanzania, United Republic of Timor-Leste Venezuela, Bolivarian Republic of Viet Nam Virgin Islands, British Virgin Islands, U.S.

Got any suggestions?
We want to hear from you! Send us a message and help improve Slidesgo
Top searches
Trending searches

teacher appreciation
11 templates

islamic history
36 templates

27 templates

memorial day
12 templates

55 templates

104 templates
How to Work on Excel Sheets Workshop
How to work on excel sheets workshop presentation, premium google slides theme and powerpoint template.
With this workshop you are going to give your students one of the best skills: mastering excel sheets. They are useful for almost everything: accounting, science, registers, coding… and employers love when new candidates can create a new sheet from scratch! Use these creative and colorful slides to show everyone how to create tables, formulas and graphs and they will leave your workshop with a smile! The slides are completely editable so, a part from showing off your math skills, you can also show off your creativity!
Features of this template
- 100% editable and easy to modify
- 21 different slides to impress your audience
- Contains easy-to-edit graphics such as graphs, maps, tables, timelines and mockups
- Includes 500+ icons and Flaticon’s extension for customizing your slides
- Designed to be used in Google Slides and Microsoft PowerPoint
- 16:9 widescreen format suitable for all types of screens
- Includes information about fonts, colors, and credits of the free resources used
What are the benefits of having a Premium account?
What Premium plans do you have?
What can I do to have unlimited downloads?
Don’t want to attribute Slidesgo?
Gain access to over 23300 templates & presentations with premium from 1.67€/month.
Are you already Premium? Log in
Related posts on our blog

How to Add, Duplicate, Move, Delete or Hide Slides in Google Slides

How to Change Layouts in PowerPoint

How to Change the Slide Size in Google Slides
Related presentations.

Premium template
Unlock this template and gain unlimited access


Excel Tips Presentation Ppt
Want to improve your Excel skills and make your presentations more impactful? Look no further than our essential guidance for enhancing your proficiency through our excel tips presentation ppt. Whether you're a beginner or an experienced user, our tips will help you master your spreadsheets and elevate your data presentation skills.
Excel is a powerful tool that offers a variety of features to help you effectively organize and analyze data. By implementing our tips, you'll be able to streamline your workflow, save time and effort, and create visually appealing spreadsheets and presentations.
Table of Contents
Key Takeaways:
- Excel offers various features, from formatting to advanced formulas, to help you efficiently organize and analyze data and create impactful presentations.
- Efficient data entry and manipulation can save you time and effort, and advanced formulas can solve complex problems and automate calculations.
- Charts and visualizations are an excellent way to convey data effectively, and Excel offers a range of chart types and customizations to suit your needs.
- Data analysis tools, such as pivot tables and filters, can help you gain insights and make informed decisions.
- Excel is not just a solo tool – it's great for collaboration too, with features that allow you to share your spreadsheets and work seamlessly with others in a team environment.
Introduction to Excel
If you're new to Excel or need a refresher, let's begin with a brief introduction to this powerful spreadsheet software . Excel is a program developed by Microsoft that allows users to organize and analyze data effectively. Whether you're working with numbers, lists, or tables, Excel offers a range of tools to help you manage your information and gain insights from it.
At the heart of Excel is the worksheet , a grid of cells where you can enter data and perform calculations. Each cell can contain text, numbers, or formulas. You can also format the cells to change their appearance, such as font size or color.
Excel also offers a range of functions , which are pre-built formulas that can perform complex calculations, such as finding averages or calculating percentages. These functions can save you time and effort when working with large datasets.
Overall, Excel is a powerful tool that can help you save time and work more efficiently. In the next sections, we'll dive into the various tips and techniques you can use to enhance your Excel skills and make your spreadsheets more impactful.
Formatting Tips
Effective data presentation is essential for making informed decisions. Proper formatting of Excel spreadsheets ensures data is easily readable and visually appealing. Below are a few tips on how to format your spreadsheets:
Adjust Column Widths
Manually adjust column widths to ensure cell data is not truncated. Double-click on a column boundary to fit the width to the longest entry or drag the boundary to increase or decrease the width.
Apply Cell Formatting
Apply cell formatting to enhance readability. Use the number format to display numbers with commas or decimals. Add borders or shading to highlight specific cells or ranges. Use the font size, color, and style to make text more visible.
Use Conditional Formatting
Use conditional formatting to highlight cells that meet specific criteria. Change the color of cells based on the value or add data bars to show the relative size of values. Apply specific formats like date-based or text-based highlighting.
"Proper formatting can transform even the dullest data into a clear and organized report"
By utilizing these formatting tips, your data presentation will be more impactful. Your Excel spreadsheets will be easy to read and visually attractive, optimized for enhanced value perception and better decision-making.
Data Entry and Manipulation
If you're dealing with large datasets, entering and manipulating data can be time-consuming and repetitive. Fortunately, Excel provides efficient ways to streamline these tasks, allowing you to focus on more critical aspects of data analysis and visualization.
AutoFill is a handy feature that enables you to fill a series of cells with data based on a pattern or sequence. For instance, you can enter a date in one cell, and then use AutoFill to populate the rest of the cells with dates for every consecutive day or month. To use AutoFill:
- Type the initial value in a cell.
- Click and drag the fill handle (a small square at the bottom-right corner of the cell) to the cells where you want to apply the sequence.
Flash Fill is a useful tool that automatically extracts and formats data based on the examples you provide. For example, if you have a list of names in a single column, you can use Flash Fill to split them into separate columns for first name and last name. To use Flash Fill:
- Enter the desired output in the adjacent column for the first data point.
- Press Ctrl + E or select Data > Flash Fill .
Excel Functions
Excel features numerous built-in functions that can manipulate, transform, and analyze data in various ways. Here are some of the most useful functions for data entry and manipulation:
By using Excel functions , you can save time and effort while enhancing your data analysis capabilities.
"Efficient data entry and manipulation are crucial for effective data analysis. With Excel's powerful features, you no longer have to waste time on repetitive tasks."
Charting and Visualization
Excel charts are an effective way to present your data visually and showcase insights that might be otherwise difficult to spot. By using chart types that best represent your data, you can convey your message more powerfully. Excel offers several chart types , including line charts, bar charts, pie charts, and scatter charts.
When creating a chart, it's essential to customize its appearance so that it resonates with your audience. Excel offers several formatting options, including chart titles, axis labels, and grid lines. Don't forget to include a chart legend to help your audience understand the data series.
With data visualization , you can tell a story using your data. Use color, size, and shapes to emphasize crucial data points, and direct your audience's attention where you want it. For example, use bright colors to make your critical point stand out. Always make sure that your chart makes sense, tells a story, and is easy to read.
Take a look at the below Excel chart for a better understanding of how properly visualized data can have a significant impact.
Note: This table is for illustrative purposes only and does not represent actual data.
Advanced Formulas and Functions
Excel is more than just a spreadsheet tool. It's a powerful software that can solve complex problems and automate calculations with ease. In this section, we'll explore advanced Excel formulas , functions and formula automation that can enhance your Excel skills significantly, making your work more efficient and productive.
Array Formulas
Array formulas are essential in dealing with large amounts of data and calculations. It performs multiple calculations on a set of values rather than handling one value at a time, saving you time and manual effort. Let’s consider an array formula that calculates the sales commission for a regional sales team:
{=SUM(B2:D2, B3:D3, B4:D4)*15%}
This array formula quickly calculates total sales across all three months for each agent and provides 15% commission. By using array formulas, you can analyze large datasets in seconds.
Nested Functions
Nested functions are formulas that use multiple functions to perform complex calculations. Combining multiple functions in a single formula not only saves time but also creates more robust calculations and decisions. Here’s an example of a nested function used to calculate the age in years based on the date of birth:
=INT((TODAY()-B2)/365.25)
Here, the TODAY() function provides the current date while the nested function calculates the number of years that have passed between the date of birth (B2) and the current date in Excel (TODAY()). Using nested functions is an excellent way to derive insights and metrics from data of varying complexity levels with ease.
Formula Auditing
When working with complex formulas such as nested functions or array formulas, it can be challenging to identify and debug errors. Formula auditing tools in Excel help you trace and review formula calculations, making it easier to identify and resolve errors. Here are some of the basic auditing tools:
- Error checking – highlights potential formula errors
- Trace precedence – displays the cell address where the current cell receives data from
- Trace dependence – displays the cell address where the current cell provides data to
- Evaluate formula – provides a step-by-step walkthrough of the formula calculation
These features simplify the process of formula auditing, making it a valuable tool for users looking to improve their Excel skills.
If you are an Excel enthusiast and want to showcase your advanced Excel skills, keep exploring the world of advanced formulas, functions, and formula automation !
Data Analysis with Excel
If you work with data, Excel offers a wealth of tools to help you make sense of it. One of the most powerful of these tools is the pivot table. A pivot table allows you to quickly summarize and analyze large amounts of data in a visually appealing and easily understandable format.
Pivot tables also allow you to filter and sort your data in a variety of ways, making it easy to focus on specific subsets of your data and analyze them more closely. Additionally, Excel provides a variety of built-in tools for data analysis, such as filters and conditional formatting, that allow you to quickly spot trends and anomalies in your data.
Excel Tools for Data Analysis
Excel includes a variety of built-in tools that can help you analyze your data more effectively. Some of the most useful tools include:
- Filters: Allows you to quickly sort and filter your data according to specific criteria
- Conditional Formatting: Allows you to highlight cells in your data based on specific conditions or values
- Data Bars and Color Scales: Allows you to add visual indicators to your data to make trends more obvious
Pivot Tables
Pivot tables are one of Excel's most powerful data analysis tools. They allow you to quickly summarize and analyze large amounts of data, making it easy to identify patterns and trends in your data. Pivot tables allow you to:
- Summarize large amounts of data in seconds
- Group data by specific criteria
- Filter and sort data based on specific conditions
- Create powerful visualizations of your data
Collaboration and Sharing
Working with others and sharing Excel files is made easy with Excel's collaboration features. By collaborating, you can create spreadsheets together and avoid duplicating work. The track changes function allows you to see who has modified the document and what changes have been made, making it simple to keep track of updates and ensure progress.
Excel also allows you to share Excel files with others quickly, either by emailing the file or by storing it in a cloud-based platform such as OneDrive. Through the use of these platforms, multiple users can work on a document at the same time, and file updates are synced in real-time, ensuring all users have access to the most current version of the document.
Teams that work on spreadsheets regularly can use teamwork to streamline the workflow and collaborate more seamlessly. By assigning permissions, you can control who can make changes to the document, making it easier to manage who can access what.
Excel supports teamwork , making it easy to manage and monitor tasks for different team members. With shared workbooks, multiple users can contribute to the same spreadsheet simultaneously, whether working on different sections or contributing to common cells in real-time. Excel also offers an external sharing option, where team members and stakeholders can provide feedback on the document without requiring a Microsoft account.
Sharing your spreadsheets and collaborating on them means you can streamline your workflow, save time, and improve productivity. Excel has made it easy to work together with others, regardless of location, making collaboration effortless and efficient.
By implementing these Excel tips , you now have the power to excel in your spreadsheet tasks and enhance your data presentation skills. Whether you're a beginner or an experienced user, these tips will take your Excel skills to the next level. With practice and persistence, you can become a proficient and efficient Excel user.
Remember, Excel is a powerful tool that can make your work easier and more enjoyable. It's also a great way to collaborate with others and work towards a common goal. So, don't be afraid to experiment and try new things.
We hope these tips have been helpful in your journey towards mastering Excel. Good luck and happy spreadsheeting!
What is Excel?
Excel is a powerful spreadsheet software that allows users to organize, analyze, and manipulate data. It provides a variety of features and functions for data management, calculations, and visualization.
How can I improve my Excel skills?
To improve your Excel skills, you can start by familiarizing yourself with the basic functions and formulas. Practice entering and manipulating data, formatting cells and worksheets, and creating simple charts. Additionally, you can explore online tutorials, attend training courses, or refer to Excel tips and tricks resources.
What are some formatting tips in Excel?
Excel offers various formatting options to enhance the visual appeal of your spreadsheets. You can adjust column widths and row heights, change font styles and sizes, apply borders and shading, and use conditional formatting to highlight specific data. Formatting also includes merging cells, adding headers and footers, and customizing number formats.
How can I analyze data using Excel?
Excel provides several data analysis tools such as pivot tables, filters, and functions. Pivot tables allow you to summarize and analyze large datasets, while filters help you narrow down data based on specified criteria. Functions like SUM, AVERAGE, and COUNT allow you to calculate and analyze data easily.
Can Excel be used for collaboration and sharing?
Yes, Excel allows for collaboration and sharing of spreadsheets. You can share Excel files with others, track changes made by different users, and even work simultaneously on the same spreadsheet. Excel also supports co-authoring features, where multiple users can edit a workbook in real-time.
Are there any advanced features in Excel?
Yes, Excel offers advanced features such as array formulas, nested functions, and formula auditing. Array formulas allow you to perform calculations on multiple cells at once, while nested functions allow you to combine multiple functions within a single formula. Formula auditing tools help you trace and debug complex formulas.
What are some common Excel shortcuts?
Excel has a wide range of keyboard shortcuts that can boost your productivity. Some common shortcuts include Ctrl+C for copying cells, Ctrl+V for pasting, Ctrl+Z for undoing actions, and F2 for editing cell contents. Learning and utilizing these shortcuts can save you time and simplify your workflow.
Can I create charts and visualizations in Excel?
Absolutely! Excel offers various chart types and customization options to create visually appealing and informative charts. You can choose from bar charts, line charts, pie charts, and more. Additionally, you can customize colors, labels, and data labels to effectively convey your information.
How can I protect my Excel files?
Excel provides several security features to protect your files. You can add passwords to prevent unauthorized access, apply file-level encryption, and restrict editing or formatting permissions. Additionally, Excel offers digital signature options for ensuring the authenticity and integrity of your files.
How can I learn more about Excel?
To learn more about Excel, you can explore online tutorials, enroll in training courses, or refer to comprehensive Excel books or guides. Microsoft's official Excel documentation and community forums are also valuable resources for finding answers to specific questions and learning new techniques.
Enhance Your Presentations with Circle Key Points in PowerPoint
Enhance your PowerPoint skills by learning to highlight critical information with circles. Tips on resizing, aesthetics, shortcuts... read more

#ez_toc_widget_sticky--1 .ez-toc-widget-sticky-container ul.ez-toc-widget-sticky-list li.active{ background-color: #ededed; } Steps To Follow
Get Trainings
Advance your Microsoft Excel & Office Skills with the MyExcelOnline Academy!

The Importance of Highlighting Key Information
Highlighting key information in your PowerPoint presentation is essential because it guides your audience’s focus to the most critical points. Emphasizing the right bits of content can transform a decent presentation into a memorable and impactful one.
Learn about Formulas with our 101 Advanced Excel Formulas & Functions Examples !
Key Takeaways
- To circle key points in PowerPoint , first select the object (text, shape, or image) that you want to emphasize.
- Use the Drawing Tools Format tab to find the Shape Outline option, and from the drop-down menu, choose the circle shape.
- Adjust the size and positioning of the circle to ensure it properly encircles the selected object and draws attention to it effectively.
Why Circle Key Points in Your Presentation?
Highlighting key points in your presentation does more than just draw the eye; it creates a visual cue that signifies importance. This technique can help underscore facts, figures, or any piece of information that you want your audience to remember. It’s like saying, “Hey, look here; this is crucial!” Plus, it adds an element of design to your slides, making them more engaging.
Table of Contents
User-Friendly Techniques for Circling Objects
Method 1: using the shape tool to create circles.
Using the Shape Tool in PowerPoint is a straightforward and precise way to circle key points in your slides. Here’s how you do it:

Method 2: Freeform Drawing for Emphasis
For a more organic feel, you can use the Freeform Drawing tool to circle key points. This method allows for a hand-drawn look that can bring personal touch and immediacy to your presentation:

Optimizing Visual Appeal
Customizing the appearance of circles.
Customizing the appearance of circles in your PowerPoint presentation ensures they complement your content and theme seamlessly. To personalize your circles, follow these tips:
- Fill Adjustments: You can tweak the fill color or add gradient effects, patterns, or pictures to make your circles stand out or blend in with the slide background.
- Line Settings: Choose the color, thickness, and style (solid, dashed, or dotted) of your circle’s outline to enhance visibility against different slide elements.
- Shadow and Glow: Add depth and emphasis by incorporating shadow effects, or use a glow option to make your circle lively and eye-catching.
Remember, consistency is key in professional presentations, so once you’ve found a style you like, stick with it across all your circles.
Animation Effects to Capture Attention
Injecting a bit of motion into your presentation can really make those key points pop. Utilizing animation effects for your circles ensures they’ll grab attention at just the right moment. Here’s how to animate them:
STEP 1: Choose your circle and head over to the “Animations” tab. Peruse the entrance effects, and decide whether a subtle “Fade” or an energetic “Fly In” best suits your content.

Animations can serve as dynamic signals, marking noteworthy information without a word, and can be an effective way to keep your audience dialed into your presentation.
Efficient Editing and Positioning
Adjusting and resizing circles.
Properly sized circles ensure that information is highlighted without overwhelming your slide. To resize a circle in PowerPoint:
STEP 1: Click directly on the circle, and drag one of the corner handles in or out to make the circle larger or smaller while maintaining its proportions.
STEP 2: For precise adjustments, right-click on the circle and select ‘Format Shape’. Here, you can input exact measurements for the height and width, offering you a high level of control.

This flexibility allows you to adjust circles to the right size quickly and ensure nothing important is obscured or looks out of place.
Aligning Circles with Presentation Content
For a polished and professional look, aligning circles with other presentation elements is crucial. It highlights the key points while maintaining a clean layout. Here’s how to align circles effectively:
STEP 1: Select your circle, and hold down the “Shift” key to select additional objects (like text boxes or images) you wish to align with.

By neatly aligning your circles, you help create a visual harmony that allows the audience to follow along effortlessly.
Advanced Tips and Tricks
Layering shapes for improved clarity.
Layering shapes is a technique that can enhance the clarity and depth of your PowerPoint slides . By stacking different objects, you can create a more dynamic and organized presentation.
- Start by creating or selecting your shapes. Use the ‘Send to Back’ or ‘Bring to Front’ functions located under the ‘Format’ tab in the ‘Arrange’ group to control the order of the shapes.
- Pay close attention to overlap and how the layers interact visually. Make sure that important information isn’t obscured by a higher layer.
- Consider the use of transparency for your top layers; this can create an intriguing visual effect without hiding the content beneath.
Layering is a simple way to add sophistication to your slides, helping you to articulate complex ideas more clearly.
Utilizing Shortcuts for Faster Creation and Editing
Speed up your PowerPoint workflow by mastering keyboard shortcuts for creating and editing shapes, including circles. Here’s a quick roundup of time-saving shortcuts:
- Insert Textbox : Alt+Shift+X
- Insert Rectangle : Alt+Shift+R
- Insert Oval : Alt+Shift+O
- Insert Right Arrow : Alt+Shift+I
- Insert Right Brace : Alt+Shift+{
These shortcuts enable you to add shapes with a simple keystroke, bypassing the need to navigate through menus. For more advanced users, PPT Productivity lets you customize these shortcuts further to tailor them to your workflow. Remember, the fewer clicks, the more time you save.
FAQ: Honing Your PowerPoint Expertise
Can i copy a circled key point across multiple slides.
Yes, you can copy a circled key point across multiple slides by selecting the circle, pressing “Ctrl+C” to copy, and then “Ctrl+V” to paste it onto other slides.
How do I ensure the circle doesn’t obscure important content?

How can I move a circle in powerpoint?
You can move a circle in PowerPoint by clicking and dragging it to the desired position. For finer control, use the arrow keys to nudge it incrementally, or set exact coordinates in the ‘Format Shape’ pane.

John Michaloudis
John Michaloudis is a former accountant and finance analyst at General Electric, a Microsoft MVP since 2020, an Amazon #1 bestselling author of 4 Microsoft Excel books and teacher of Microsoft Excel & Office over at his flagship Academy Online Course .
Related Articles
The Ultimate Guide on Yes No Dropdown for Excel
How to Group Rows in Excel for Clarity
.NET Framework Repair Tool for Excel Glitches – Step by Step Guide
Get Video Training
Dramatically Reduce Repetition, Stress, and Overtime! Exponentially Increase Your Chances of a Promotion, Pay Raise or New Job! Learn in as little as 5 minutes a day or on your schedule.
10 Quick & Easy Microsoft Excel Tips
Need to save time with Microsoft Excel? Whether you are a beginning Excel user or an expert, you will likely discover new shortcuts among these essential Microsoft Excel tips to navigate worksheets, edit cells, and format your key Excel data.

To display worksheet formulas for auditing and printing, press [Ctrl] + ` (called a grave accent or back quote and found on many keyboards to the left of the #1 key). Use this shortcut again to revert back to worksheet results. This option, Show Formulas , is also found under the Formulas tab.
2. Fast Moves Between Worksheets in a Workbook
Try these keyboard shortcuts to toggle or cycle between worksheets:
- Next worksheet: [Ctrl] + [Page Down]
- Previous worksheet: [Ctrl] + [Page Up]
These shortcuts work great in smaller workbooks but how do you quickly move to a specific worksheet especially because Excel supports up to 1,024 worksheets. For another way to easily navigate to a worksheet in an Excel workbook, try one of my favorite tricks: right-click on any of the triangle navigation buttons (located immediately to the left of the worksheet tabs) to display a pop-up menu of worksheet names. Just choose the worksheet you want. Depending on your version of Excel, the option for More Sheets… displays as needed for a complete list of worksheets in the workbook.
3. Fast Data Entry
Want to stay away from the Ribbon and mouse? Save time with these quick and easy keyboard shortcuts to enter data into an Excel worksheet:
- Enter current date: [Ctrl] + ;
- Repeat data from the cell immediately above : [Ctrl] + ‘ (single quote) or press [Ctrl] + D (think duplicate)
- Create a SUM function for cells next to your current location: [Alt] + =
4. Wrapping Text
When entering titles or long paragraphs of text, the [Enter] key will move to a new cell. Instead, press [Alt] + [Enter] to create a line break or new line in the same cell. With this shortcut, you can decide where the text breaks for column headings, text descriptions, and Excel notes and comments.
Not every long text entry needs this specific control, and so, you can anticipate and automatically format lengthy entries to wrap to multiple lines by applying the Wrap Text alignment feature to entire columns or rows even if some of your cells won’t need it. To format a selection in Excel to wrap text, pick the Wrap Text command from the Alignment group in the Home tab.
5. Go To Shortcut
Quickly move to a specific cell or range by pressing [F5] or [Ctrl] + G (Go To).
6. Editing Cells
Excel has lots of choices for editing text, values, or a formula in a worksheet cell including:
- Typing a new entry in the cell (no need to delete previous contents)
- Double-click on cell to open “in-place” or direct editing
- Press [F2] to open the current cell for editing
- Click once into the Formula Bar (above column headings)
- Press [Delete] to clear contents (cell is empty but retains formatting)
When a cell is opened for editing, click with the mouse or use arrow keys, [Backspace] , [Delete] , [Home] and [End] to navigate within the cell.
7. Keyboard Shortcut to Go To the Formula Bar
The previous Excel tip included the option to edit a cell by pressing the [F2] function key which, by default, positions the cursor in the cell instead of the Formula bar. If you really like keyboard shortcuts over the mouse, you can change the [F2] function key so it moves directly to the Formula bar:
- Pick the File tab and then select Options from the bottom of the screen.
- Select Advanced in the left pane.
- Uncheck the Allow editing directly in cell option. OK to apply.
8. Easy Cell Formatting
Try these quick Excel keyboard shortcuts to change formatting for your current selection:
- Open the Format Cells dialog box: [Ctrl] + 1
- Apply the currency format: [Ctrl] + $
- Apply the percentage format: [Ctrl] + %
9. Quickly See a Sum or Average
Do you want to see a quick total or other calculation? Just highlight some numbers in a worksheet. Next, look at the status bar at the bottom of the window. As part of a feature called AutoCalculate , Excel displays the average of the numbers, a count of the cells, and the sum. The average, count, and sum in the status bar get updated each time you click another cell. By the way, when you use this tip, Excel ignores any cells you click that contain text or graphics instead of numbers. Although you can’t automatically create fixed results from these calculations, this is an easy way to audit or review your Excel worksheets. You can also use this trick with non-adjacent cells. Just click on one cell, and then hold down the [Ctrl] key while you click on additional cells you want to add to the other selected values.
10. Quick Select All
And finally, try these Excel tips to quickly select data in an Excel worksheet. If most or all of your Excel worksheet will have the same format (font style, size, number, etc.), apply global formatting to the cells even before you type text, data, or formulas into the cells. To select all of the cells in the current range or data list, press [Ctrl] + A . Press again to select the entire worksheet (Select All) or by clicking once on the upper-right intersection (the blank rectangle) of Column A and Row 1. Then choose the cell formatting options that you want to see in your worksheet.
Discover more Excel tips and tricks plus download a handout of keyboard shortcuts at TheSoftwarePro.com/Excel .
© Dawn Bjork, MCT, MOSM, CSP®, The Software Pro® Microsoft Certified Trainer, Productivity Speaker, Certified Speaking Professional

Related Posts
Word Keyboard Shortcuts: 15+ Tips to Select Text October 23, 2023
Microsoft Excel: 6 More Tips to Work with Text May 21, 2022
Understanding Excel Cell References May 2, 2022
Join Our Tips Newsletter
Receive 477+ shortcuts & more!
27 Super Hidden PowerPoint Tips and Tricks Only The Pros Know!

Ausbert Generoso

Ever felt like your PowerPoint presentations could use a little magic? You’re not alone. Whether you’re a seasoned presenter or just getting started, there’s a world of PowerPoint tips and tricks waiting for you. In this guide, we’re diving into the nitty-gritty of Microsoft PowerPoint to uncover 30 hidden gems that’ll transform the way you create and deliver slides.
From making your designs pop to streamlining your workflow, these PowerPoint hacks are designed for real-world impact. No jargon, just practical insights that’ll have you presenting like a pro in no time.
Let’s cut through the noise and get straight to the good stuff – your next presentation is about to level up. Ready? Let’s get started.
27 PowerPoint Tips and Tricks That Put The Power in PowerPoint

1. Morph Transition for Seamless Animation

What’s it for: Elevate your presentation by seamlessly animating objects and creating smooth transitions between slides. Morph transition is your key to a dynamic and visually engaging storytelling experience, allowing you to captivate your audience effortlessly.
How to do it:
- Position the same object in different parts on multiple slides
- Select all slides, and go to the Transitions tab.
- Choose “Morph” as the transition effect.
2. SVG Image Integration

What’s it for: Did you think SVG’s only work for websites and professional photo editing tools? They do, too, in PowerPoint! Import high-quality Scalable Vector Graphics (SVG). Maintain image clarity, resize without loss, and enhance your presentations with crisp logos and icons.
- Save your chosen SVG on your device.
- Click on the Insert tab.
- Choose “Pictures” and select your SVG file.
- Adjust the size without compromising image quality.
3. Designer Feature for Quick Layouts

What’s it for: Effortlessly create professional-looking slides with the Designer feature. Receive instant layout suggestions based on your content, saving time and ensuring your presentation looks polished.
- Select a slide.
- Go to the Design tab and click Designer on the far right along the ribbon.
- Select through ready-made slide designs for instant layouts.
4. Insert 3D Models

What’s it for: Amp up your presentations with manipulable 3D models, adding a dynamic dimension. Whether it’s showcasing products or visualizing data, 3D models bring your slides to life.
- Click on the “3D Models” dropdown and proceed to Stock 3D Models.
- Search for a 3D model of your choice and insert.
- Manipulate and customize as needed.
5. SmartArt Graphics for Visual Hierarchy

What’s it for: Convey complex ideas with visual hierarchy using SmartArt graphics. These graphics offer a structured and visually appealing way to organize information, making your content more digestible.
- Go to the Insert tab.
- Select “SmartArt” and navigate through the available categories.
- Select a graphic template that fits your presentation needs.
- Enter your content and customize as needed.
6. Eyedropper Tool for Color Matching

What’s it for: Maintain a cohesive design by using the Eyedropper tool to pick colors from images or elements within your presentation. Ensure consistency and professional aesthetics in every slide.
- Select the editable, native PowerPoint object you wish to customize.
- Go to the Shape Format tab and click on the Shape Fill dropdown.
- Select “More Fill Colors…” and click the eyedropper icon to begin color appropriating.
7. Record and Insert Audio

What’s it for: Infuse personality into your presentation by recording audio directly within PowerPoint. Ideal for adding voiceovers, explanations, or personal touches that enhance audience engagement.
- Click on “Audio” and choose “Record Audio.”
- Record your audio and insert it into the slide.
8. Presenter Coach for Rehearsing

What’s it for: Elevate your presentation skills with Presenter Coach. Receive valuable feedback on pacing, filler words, and more, refining your delivery for a confident and impactful performance.
- Click on the Slide Show tab.
- Choose “Rehearse with Coach” to start practicing.
9. Hyperlink Navigation for Seamless Transitions

What’s it for: Streamline your presentation flow by implementing Hyperlink Navigation. This trick allows you to create clickable links within your slides, enabling effortless transitions between related content or external resources, enhancing the overall navigational experience.
- Select the text or object you want to hyperlink.
- Right-click and choose “Hyperlink” or use the Ctrl+K shortcut.
- Specify the destination, whether it’s another slide, a website, or a file, to create a seamless navigational experience.
10. Alt Text for Accessibility

What’s it for: Improve accessibility by adding descriptive alternative text to images and objects. Ensure inclusivity for visually impaired individuals, making your presentation accessible to a wider audience.
- Right-click on the image or object.
- Choose “Edit Alt Text” and enter a descriptive text.
11. Slide Zoom for Dynamic Navigation

What’s it for: Elevate your presentation’s navigation with Slide Zoom, offering the flexibility to jump to specific slides during a presentation without adhering to a linear sequence. This dynamic feature ensures a more engaging and tailored audience experience.
- Set a master slide where you’d like to put your “mini slides” altogether.
- Navigate to the Insert tab > Zoom dropdown > Slide Zoom.
- Select the slides you want to link onto your master slide and insert.
12. Live Captions and Subtitles

What’s it for: Foster inclusivity by enabling live captions and subtitles in multiple languages. This feature enhances accessibility, making your presentation more engaging and comprehensible for a diverse global audience.
- Go to the Slide Show tab.
- Select “Always Use Subtitles” and choose your language.
13. Password Protection for Security

What’s it for: Safeguard your presentation’s sensitive content by adding a password. This security measure ensures that only authorized individuals can access and view the information, adding an extra layer of protection.
- Navigate to the File tab.
- Select “Info” and click on “Protect Presentation.”
- Choose “Encrypt with Password” and set your password.
14. Animation Painter for Consistent Animations

What’s it for: Maintain a polished and consistent look throughout your presentation by using the Animation Painter. Copy and apply animations across different objects with ease, ensuring a cohesive visual experience.
- Select the object with the same, desired animation as the others.
- Go to the Animation tab.
- Click on “Animation Painter” and apply to other objects.
15. Linked Excel Charts for Real-Time Updates

What’s it for: Integrate linked Excel charts for real-time updates in your PowerPoint presentation. Any modifications made to the linked Excel file automatically reflect in your slides, ensuring data accuracy.
- Copy your Excel chart.
- In PowerPoint, use “Paste Special” and choose “Microsoft Excel Worksheet Object.”
16. Custom Slide Sizes

What’s it for: Tailor your presentation to various screen dimensions by customizing slide sizes. This feature, accessible through the Design tab, ensures your content fits seamlessly across different display settings.
- Navigate to the Design tab.
- Click on the “Slide Size” dropdown and choose “Page Setup”.
- Change “Slide sized for” to Custom.
17. Grid and Guidelines for Precision

What’s it for: Achieve precise object alignment with gridlines and guides. This feature, essential for creating visually polished and organized presentations, ensures your content is visually appealing and professionally structured.
- Go to the View tab.
- Check the “Grids” and “Guidelines” toggles for display options and customization.
18. Slide Master for Consistent Design

What’s it for: Establish a cohesive presentation design by utilizing the Slide Master. This time-saving feature enables you to set consistent layouts, fonts, and colors throughout your presentation.
- Click on “Slide Master” to access and customize master slides.
19. Quick Access Toolbar Customization

What’s it for: Streamline your workflow by personalizing the Quick Access Toolbar with your most-used commands. This customization ensures quick access to essential tools, enhancing efficiency during presentation creation.
- Click on the dropdown arrow on the Quick Access Toolbar.
- Select “More Commands” to customize your toolbar.
20. Ink Annotations for Handwriting

What’s it for: Personalize your presentations with a touch-enabled device using ink annotations. This feature allows you to draw or write directly on slides, adding a unique and handwritten touch to your content.
- Go to the Draw tab and click on Draw to begin drawing.
- Choose “Ink to Text” or “Ink to Shape” for handwriting annotations.
21. Crop to Shape for Image Customization

What’s it for: Unleash your creativity by utilizing the Crop to Shape feature, allowing you to create custom image shapes. This adds a distinctive flair to your presentation, providing a visually dynamic and engaging experience.
- Select the image.
- Navigate to the Picture Format tab.
- Click on “Crop” and choose “Crop to Shape.”
- Select the shape you want your image to have as frame.
22. Slide Show Recording with Narration

What’s it for: Capture your entire presentation, including narration and animations, by recording a self-running slideshow. This feature is invaluable for sharing presentations with a wider audience, ensuring a consistent and engaging delivery.
- Click on “Record Slide Show” and choose recording options.
23. Dynamic Color Scheme Switch for Vibrant Slides

What’s it for: Infuse energy into your presentation by dynamically switching color schemes. This handy trick allows you to quickly experiment with various color palettes, giving your slides a vibrant and fresh appearance in just a few clicks.
- Explore different color options by selecting “Colors” and experimenting with the available palettes. Instantly transform the look of your presentation to match your desired mood and style.
24. Smart Alignment and Distribution for Pixel-Perfect Precision

What’s it for: Attain pixel-perfect precision in your presentation design with the Smart Alignment and Distribution trick. This technique allows you to not only align objects with accuracy but also evenly distribute them horizontally, ensuring a polished and visually appealing layout.
- Select the objects you want to align.
- Navigate to the Format tab.
- Click on “Align” to access options like Align Left, Center, or Right for precise alignment.
- Further refine your layout by choosing “Distribute Horizontally,” ensuring equal spacing between objects and achieving a professional design.
25. Insert Online Videos

What’s it for: Seamlessly integrate online videos directly into your presentation. This feature eliminates the need for external players, offering a smooth and immersive viewing experience for your audience.
- Click on the “Video” dropdown and select Online Movie.
- Paste the video link and your video should be embedded onto your PowerPoint slide.
26. Embed Fonts for Portability

What’s it for: Ensure consistent visual appeal on any device by embedding fonts in your presentation. This is particularly useful when sharing your work with others who may not have the same fonts installed, enhancing portability.
- Go to the File tab.
- Select “Options” and go to the Save tab from the window popup.
- Check “Embed fonts in the file” as well as “Embed all characters”.
27. Text Transformation

What’s it for: Uncover the elegance of text transformation with the Shape Format trick. This hack allows you to access a myriad of text transformation designs, offering a swift and sophisticated way to elevate the visual appeal of your presentation.
- Select the text you want to transform.
- Navigate to the Shape Format tab.
- Click on “Text Effects” and explore the “Transform” options for a variety of stylish text designs. Instantly apply a transformation that suits the tone and style of your presentation.
5 Critical Best Practices to Implement These Pro PowerPoint Tips and Tricks for a Technically Proficient Presentation
Enhance the technical brilliance of your presentation by focusing on these crucial best practices:
1. Streamlined Font Selection
- Practice: Limit your font styles to a maximum of three per slide.
- Why: Simplifying fonts enhances readability, maintains visual consistency, and prevents distraction, ensuring your message is clear and impactful.
2. High-Resolution Images
- Practice: Source HD images from reputable free resource websites like Freepik or Unsplash .
- Why: High-resolution images prevent pixelation, ensuring clarity and professionalism. Crisp visuals contribute to a visually appealing presentation.
3. Cohesive Color Palette
- Practice: Stick to a consistent color palette throughout your slides; use the eyedropper tool for precise color matching.
- Why: A unified color scheme enhances visual harmony, reinforces brand identity, and elevates the overall aesthetics of your presentation.
4. Efficient Data Visualization
- Practice: Use charts and graphs for data-driven slides, choosing appropriate chart types for different data sets.
- Why: Visualizing data through charts improves comprehension, making complex information more accessible and engaging for your audience.
5. Transitions with Purpose
- Practice: Apply slide transitions judiciously. Choose transitions that complement the content and avoid excessive animations.
- Why: Subtle transitions maintain audience focus, while excessive animations may distract from the core message.
Final Thoughts
In presentation-making, technical practices harmonized with thoughtful design is the key to delivering an impactful message. Whether it may be as simple as considering font choices, to incorporating high-resolution visuals, you do not only get to enhance the aesthetics but also ensure your audience’s undivided attention.
Remember, a technically proficient presentation is not just a showcase of information, but also one that leaves a rather immersive experience for those who will see. But at the end of the day, it comes down to your delivery. So, no sweat! You’re doing amazing, rockstar!
Find them useful? Save them, or share these PowerPoint tips and tricks with others to make their day!
About Ausbert Generoso
Try classpoint for free.
All-in-one teaching and student engagement in PowerPoint.
Supercharge your PowerPoint. Start today.
500,000+ people like you use ClassPoint to boost student engagement in PowerPoint presentations.
- DynamicPowerPoint.com
- SignageTube.com
- SplitFlapTV.com

How to Display Excel Data from SharePoint in PowerPoint
Apr 29, 2024 | Articles , Data Dashboards , DataPoint
In today’s data-driven business environment, presentations often need to include the latest data for accurate decision-making and compelling storytelling. When that data resides in Excel files on SharePoint, incorporating it into PowerPoint presentations can seem like a challenge. However, with the right approach, it’s a straightforward process. This article will guide you through showing Excel data from SharePoint in PowerPoint, ensuring your presentations are always up-to-date and impactful. We use our DataPoint plugin for this work.
Start an Excel document on your SharePoint
Firstly, make sure your Excel file is saved on SharePoint. SharePoint is a powerful tool for team collaboration, offering centralized storage for documents, including Excel files. This makes it easier for team members to access and update data in real-time.
Use DataPoint to connect PowerPoint to your data online
With our DataPoint plugin installed, you can make a connection to almost any data source. With a data-enabled presentation, your linked data is refreshed automatically when you open the presentation. And it also allows you to generate slides and presentations, or show the information in real-time on your screen.
Click the List button from the Connections group of the DataPoint menu.

Submit a Comment
Your email address will not be published. Required fields are marked *
Pin It on Pinterest
- StumbleUpon
- Print Friendly

Excel Tips and Tricks
Mar 13, 2019
1.12k likes | 1.91k Views
Excel Tips and Tricks. Important. Learn how to use help!. Excel Tips. Working with Hyperlinks Task: create 2 .xls files, with mutual hyperlinks Shortcut to enter today’s date Ctrl + ;. Excel Tips. Right click status bar, choose ‘quick functions’ Can select multiple non-contiguous cells
Share Presentation
- custom views
- breakeven analysis
- analysis toolpak
- view custom views
- invoke locking selected cells

Presentation Transcript
Excel Tips and Tricks PgP MIS 462
Important • Learn how to use help! PgP MIS 462
Excel Tips • Working with Hyperlinks • Task: create 2 .xls files, with mutual hyperlinks • Shortcut to enter today’s date • Ctrl + ; PgP MIS 202
Excel Tips • Right click status bar, choose ‘quick functions’ • Can select multiple non-contiguous cells • AutoFill to speed up data entry • Office Button>Excel Options>Edit Custom Lists… PgP MIS 202
Excel Tips • Creating a custom template (.xlt) • \Program Files\Microsoft Office\Templates\1033 • Seven available- Billing, BloodPressure,Expenses, Loan, Budget, Sales, TimeCard • Open and examine PgP MIS 202
Breakeven Analysis • Search for template(s) at http://office.microsoft.com • 3 available • Download and examine “Breakeven analysis” PgP MIS 202
Custom Formats PgP MIS 202
Columns & Rows • What is maximum row height? • AutoFormat PgP MIS 202
Conditional Formatting • Examine CondForm.xls • Find Conditional Formatting- Edit>GoTo> special… PgP MIS 202
Page Breaks • Page Break Preview PgP MIS 202
Workbook Organization
Understand Locking and Protection • Format>Cells>Protection tab • All cells initially locked • Add protection to invoke locking selected cells PgP MIS 202
Protecting Workbook • Structure-cannot insert, delete…worksheets • Windows-prevent resizing PgP MIS 202
Protecting Worksheets • Prevent inadvertent changes to formulas… PgP MIS 202
Worksheet Tabs • Add names • Change tab colors PgP MIS 202
InterWorksheet References • Examine SalesSum.xls PgP MIS 202
Inter Workbook References • Examine SalesLnk.xls PgP MIS 202
Shared Workbooks • Create one on \\store\classes\200900..\shared • Experiment with settings, Tools>Share Workbook… • Create shared workbook on Portal, My Site PgP MIS 202
Customizing Excel
Custom Views • For current workbook • Save time • View>Custom Views… PgP MIS 202
Printing • Examine tabs in File>Page Setup… • Scaling, Header/Footer, Print titles, Gridlines, Row and column headings, comments PgP MIS 202
Panes • Freeze • Split PgP MIS 202
Options • Calculation-F9, Manual, Iteration • Formulas-R1C1 reference • Custom Lists • Security-Digital Signatures PgP MIS 202
Add-Ins, .xla, .xll • Provide special functionality • Analysis Toolpak • Analysis Toolpak-VBA • Solver PgP MIS 202
Add-Ins • Create your own • See MSDN PgP MIS 202
Formulas and Functions
Formulas vs Results • Toggle using Ctrl + ~ • Formula vs Values PgP MIS 202
Relative, Absolute and Mixed References • Examine Log.xls from Companion Content • Highlight formula bar, cycle references using F4 • Do exercise in book, Building a Formula PgP MIS 202
Operator Precedence • Search Help! • Parentheses to override! PgP MIS 202
Built-In Functions • Formulas>Insert Function… • 200 functions by category • Examine arguments • Note required, optional PgP MIS 202
Function Errors PgP MIS 202
Named Ranges • Simplify Formulas • Formulas>Name Manager • Review section material carefully, important! PgP MIS 202
Charts • Insert>Chart • Examine SalesSum.xls PgP MIS 202
Chart Planning • Data set? • Most other options can be changed later PgP MIS 202
Chart Formatting • Review options, choices • Examine SalesSum.xls PgP MIS 202
Lists, Filters, PivotTables
Lists • Examine Pivot.xls • Provided guidelines follow database theory • Note use of data entry forms • Review Sorting options PgP MIS 202
AutoFilter • Use Pivot.xls, set AutoFilter • Set up Custom AutoFilter PgP MIS 202
List Subtotals • Note levels • Note function subtotals • Sum, Count, Average… PgP MIS 202
Converting Lists to .mdb • Why? Excel has limitations • Simple to do, use Access, File>Open PgP MIS 202
PivotTables, PivotCharts • Data Analysis and Organization • Experiment with the Wizard using Pivot.xls PgP MIS 202
Lists in SharePoint • Create list with Pivot.xls • Save to WSU portal PgP MIS 202
Business Analysis
Goal Seek • Examine GoalSeek.xls PgP MIS 202
Solver • Examine Solver.xls • Make sure to install Solver Add-In • Office Button>Excel Options>Add-Ins…>click Go… • Named Ranges simplifies understanding • Follow book example PgP MIS 202
Scenario Manager for What-If • Examine Scenario.xls • Scenarios for Best Case/Worst Case • Scenario reports-Summary PgP MIS 202
Web Publishing and XML
Excel Web Page • Be aware of feature limitations • Static vs dynamic • .html snapshot • .xls file, requires IE 4.01+ PgP MIS 202
Excel Web Page • Publish Pivot.xls to your web site • Browse to and try to open it • Try to use Solver • Try to use Goal Seek • What are the benefits? PgP MIS 202
- More by User

Excel Tips and Tricks Jon Paul Progressive System Solutions, Inc. 847-295-7179 [email protected] (Note- this was produced in 1997 for the 97 version of Excel) How Cold Was It? So cold I know someone who slept with 16 sheets on their bed! Just Open 1 Sheet! Select Tools from Menu Bar
2.18k views • 132 slides

Tips, Tricks
DCI recently presented a webinar titled Tips, Tricks
613 views • 39 slides

Tips and Tricks
Tips and Tricks. Program Editor Macros – for PC SAS. Objectives. What are program editor macros? SAS code that is saved and available any time you open SAS When to use macros? Useful for templates Syntax that you rarely use How to create, save and re-use macros?
295 views • 11 slides

Excel Tips and Tricks. Gini Courter Annette Marquis TRIAD Consulting. In This Session:. Working with worksheets and workbooks Viewing Excel data Filling Summaries Working with Databases Preview of Excel 2003. Worksheets and Workbooks. Renaming Sheets Moving Sheets
333 views • 9 slides

Excel Tricks and tips
Excel Tricks and tips. Danny Puype Trainer [email protected]. Nav /Selection . Right click on sheet tabs + Ctrl PgUp / PgDn Use range name for big selection with F5 Make selections with Ctrl/End and arrows Ctrl + * Change Enter behavior Combine Tab & Enter in a list
248 views • 11 slides

Tips and Tricks. An Overview of Acrylic Painting. How to blend. http://www.youtube.com/watch?v=vEqKGKUFPiE&feature=related. How to mix colors. http://www.youtube.com/watch?v=5yzP35plW0E&feature=relmfu. Using more than one color to shade.
197 views • 6 slides

Excel Tips and Tricks. James L. Baldwin, Assistant Dean of Academic Affairs, Registrar, and Director of Science in Motion [email protected] University of Pittsburgh at Bradford 300 Campus Drive Bradford, PA 16701 814.362.7602. Objectives:
273 views • 11 slides

Tips and Tricks. Calculating age in years. As usual more than one way. Old school ageinyrs = int ((date of interest- birth date)/365.25); works fine! Newer ageinyrs = intck (‘ year’,birth date, date of interest); works, but be careful! Newer still
259 views • 9 slides

Dynamic Excel Tips & Tricks
Spokane Chapter ASWA. Dynamic Excel Tips & Tricks. By Leslie Miller, MCEd February 11, 2010. Introductions & Housekeeping. Introductions URL instructions: http://edresources.org/ASWA2012 Overview Hands On. Dynamic Excel Tips & Tricks. How are you at spinning plates?
419 views • 23 slides

Advanced Excel: Tips and Tricks
Advanced Excel: Tips and Tricks. Jennifer Hook. DD2 Adult Education ARHS: January 13, 2014 SRN 2013722903 : 2 to 3:30pm. Mission and Vision. Mission : Dorchester School District Two leading the way, every student, every day, through relationships, rigor, and relevance.
236 views • 6 slides

Excel Tips and Tricks. Presented by Darryl Geoffrey My Other Brother Software, LLC [email protected] 413-535-4244. Hands-on vs Demonstration. Microsoft Office Excel 2007. Results-oriented user interface – RIBBON Expanded number of Rows & Columns
568 views • 30 slides

Dynamic Excel Tips & Tricks. By Leslie Miller, MCE Presented to American Society of Women Accountants - Northwest Regional Conference Bellevue, WA May 31, 2008. Dynamic Excel Tips & Tricks. How are you at spinning plates? Spreadsheets are too labor intensive?
555 views • 32 slides

Metabolic Phenotyping in Disease Diagnosis & Personalised Health Care. October 26 th - 29 th 2010 Imperial College London Flowers Building, South Kensington, London SW7 2AZ, UK. Hands-on Workshops. NMR Spectroscopic Tools. Mass Spectrometry Approaches.
142 views • 2 slides

Advanced Excel: Tips and Tricks. Jennifer Hook. DD2 Adult Education Assisted by: Allison Walker SHS: January 13, 2014 SRN 2013722901: 9:45-11:15am. Mission and Vision.
266 views • 6 slides

Tips and Tricks. 2012. Tips and Tricks. Hidden Microsoft tools in MS Word Text to Speech programs (Text Aloud) Electronic Feedback tools (StyleWriter) Voice Recognition (Dragon) Collaboration tools Gadgets and SW tools General tips and tricks Q&A. Hidden Microsoft tools in MS Word.
396 views • 11 slides

5 Tips and Tricks to Excel at Diner Dash Adventures
DinerTown is in huge trouble, and you need to restore it to its older glory. Here are some tips and tricks to help you complete the levels of Diner Dash Adventures.
117 views • 7 slides

Essential Excel Tools, Tips & Tricks
Essential Excel Tools, Tips & Tricks. Nicole Soer Loras College. Why. Example 1 (demographic). Example 2 (financial). Quick Bar. Find a quick average, count or sum of selected cells. Also find maximum and minimum. Printing Column Headings on Each Page.
332 views • 30 slides

MS Excel Shortcuts 2020 | Excel Shortcut Tips And Tricks 2020 | MS Excel Tutorial l Simplilearn
Microsoft Excel is a top-rated application used for recording, analyzing, and visualizing data. Excel has several shortcut keys that help you in speeding up your work. In this video, we will look at all the essential shortcuts in excel and see how easily you can play around with data with just a few keyboard clicks. u2705Subscribe to our Channel to learn more about the top Technologies: https://bit.ly/2VT4WtH
193 views • 13 slides
Automatically Create PowerPoint Slides from Excel (3 Easy Ways)
Microsoft Excel is indeed an extremely effective software. We may perform countless operations on a given dataset using Excel’s tools and features. We frequently need to make PowerPoint slides from Excel files. When we have to do it repeatedly, copying information from Excel and making PowerPoint slides is very time-consuming. This article will discuss three unique and easy ways to create PowerPoint slides from Excel files automatically. Therefore, you should go through these 3 easy ways to Automatically Create PowerPoint Slides from Excel.
How to Automatically Create PowerPoint Slides from Excel: 3 Easy Ways
As an illustration, we will explore a sample dataset. The following dataset, for example, has sales representative Names and Areas. We are going to show the Excel data in PowerPoint slides using all 3 of the approaches. Moreover, I will go through the benefits and drawbacks of using these strategies. In addition, I have yet to mention that I have been using the Microsoft Excel 365 version for this article; You are free to choose any other edition that you find most convenient.

1. Automatically Create Slides Using Insert Command in PowerPoint
The Insert command is the simplest method. Using this Insert Command, slides are kept up to date immediately after any modifications are made to the Excel file. The issue is that we need to utilize the insert command for each slide. We will insert the Excel object using PowerPoint’s Insert command to automate the procedure. To complete the work, please follow the instructions below.
- First, launch PowerPoint.
- Then, select the Insert tab.
- Next, click Text , and later on the Object option.

- As a result, a new dialog box will pop up at this time, and you must click on Create from file .
- After that, click on Browse to find the Excel document you want to add to your slides.
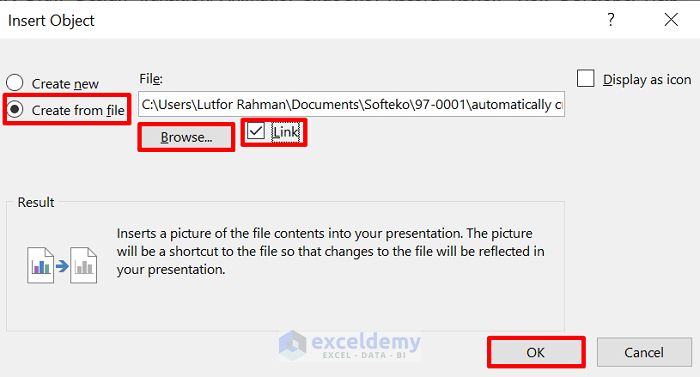
- Consequently, the Insert Object dialog box pops up again, allowing you to check the Link box and click OK .
- Hence, as demonstrated below, it will yield the desired output in MS PowerPoint.
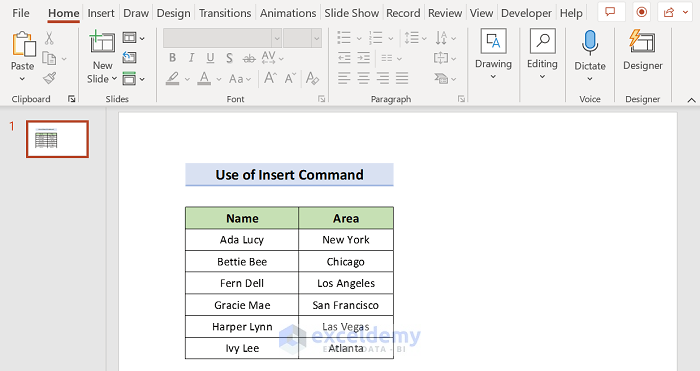
Read More: How to Insert an Excel File into PowerPoint as an Icon
2. Apply Paste Special Feature to Generate Slides from Excel
Another interesting way is to use the Paste Special feature. We can make slides in PowerPoint with the specified and selected data from Excel through the paste feature. Here, as the data in the Excel file is updated, the PowerPoint slide is also updated. To do the procedure, follow these instructions.
- First, open Excel’s saved worksheet to insert data.

- Secondly, move the mouse over the portion of the data you wish to link to PowerPoint. Then click on Copy .
- Now, open PowerPoint and click on the slide where you wish to connect the Excel data. Later on, click Paste and Paste Special feature.
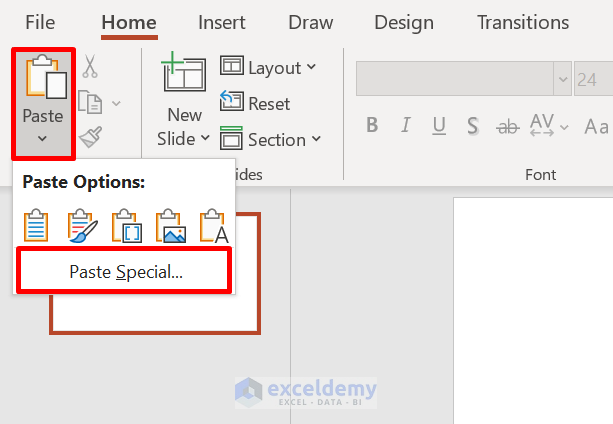
- And a new dialog box appears. Choose the Paste link After that, click As Microsoft Excel Worksheet Object and hit OK .

- As a result, it will return the required output in the PowerPoint slides, as shown below.
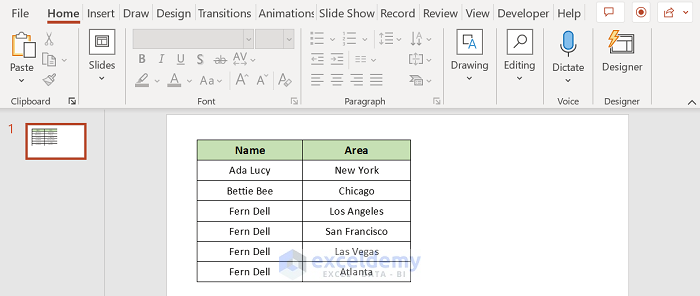
Read More: How to Copy Chart from Excel to PowerPoint Without Link
3. Create PowerPoint Slides from Excel Through VBA
There is a unique way of creating PowerPoint Slides automatically using Excel VBA. The only difference between previous methods is that slides are not updated as we change the Excel file. To use the Excel VBA Code, we must add the Microsoft PowerPoint 16.0 Object Library. However, since we are using this approach, we don’t need to create a VBA code for each presentation. Through modification of the code, we can generate dozens of slides.
- First of all, select the active sheet of the workbook to begin.

- Secondly, navigate to Developer and then Visual Basic .
- Later on, select Insert and now click on Module .

- Next, put the following code into the Module box. Remember to change the cell’s range.
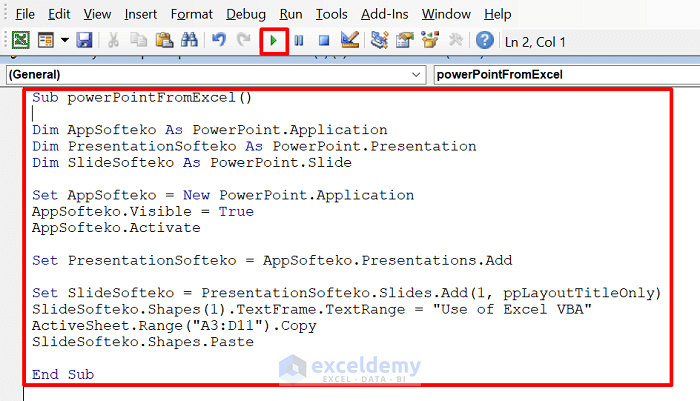
- Finally, click the Run button or press F5 .
- So, this is where the output will go.
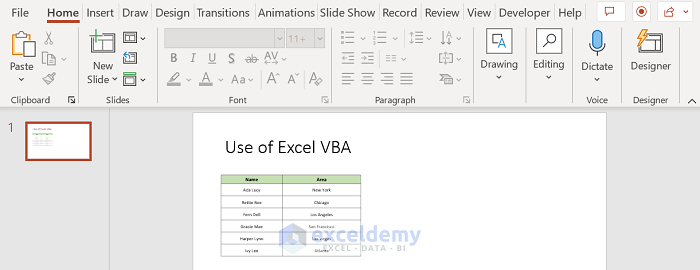
To overcome the error, follow these:
Step 1 : Hover over Tools => You will see the References option => Click on References .

As a result, the References – VBAProject window will open.
Step 2 : Check Microsoft PowerPoint 16.0 Object Library => You will see the OK button in the top right corner => Hit OK to resolve the error.

Download Practice Workbook
You can get a free copy of the example workbook that was used during the discussion which was just below here.
You can automatically create PowerPoint slides from Excel from this point forward by using the procedures that we just discussed. Keep using them, and let us know if you come up with any other strategies to get the work done or if you have any new ideas. Remember to post questions, comments, or recommendations in the section below.
Related Articles
- How to Perform Excel to PowerPoint Automation
- How to Link Excel Sheets to PowerPoint
- How to Update Charts in PowerPoint from Excel Automatically
- How to Link Excel Data to PowerPoint Chart
- How to Embed an Excel File in PowerPoint
- [Fixed!] Problems with Embedded Excel Files in PowerPoint
- [Solved] Embedded Excel in PowerPoint Not Showing All Data
- How to Link Powerpoint to Excel for Dynamic Data Updates
- How to Insert Excel Chart into PowerPoint
- How to Copy Table from Excel to Powerpoint with Formatting
<< Go Back to Excel to PowerPoint | Export Data from Excel | Learn Excel
What is ExcelDemy?
Tags: Excel to PowerPoint

Lutfor Rahman Shimanto, BSc, Information Technology, Jahangirnagar University, Bangladesh, has worked with the ExcelDemy project for over a year. He has written 50+ articles and provided solutions of 100+ comments for ExcelDemy. Currently, he works as an Excel & VBA Developer and provides support and solutions in the ExcelDemy Forum. He has solved 100+ ExcelDemy Forum problems. His work and learning interests are in developing various Excel & VBA and Desktop applications. Outside of work, he enjoys Chess... Read Full Bio

Hi and thanks for your post data;
When I use your VBA code I got this error:”user defined type not defined” How can I fix it?
Best Regards

Thanks for reaching out and posting your comment. You are right about the raised error. If you do not add the Microsoft PowerPoint 16.0 Object Library , you must see the User-Defined Type not defined error.
To solve the issue, follow these: Step 1 : Hover over Tools => You will see the References option.
Step 2 : Click on References => In the References – VBAProject window, check Microsoft PowerPoint 16.0 Object Library , and you will see the OK button in the top right corner.
Step 3 : After clicking OK , you will be able to run the code like the following GIF .
Hopefully, the solution will help you overcome your situation. Good luck.
Regards Lutfor Rahman Shimanto
Leave a reply Cancel reply
ExcelDemy is a place where you can learn Excel, and get solutions to your Excel & Excel VBA-related problems, Data Analysis with Excel, etc. We provide tips, how to guide, provide online training, and also provide Excel solutions to your business problems.
Contact | Privacy Policy | TOS
- User Reviews
- List of Services
- Service Pricing

- Create Basic Excel Pivot Tables
- Excel Formulas and Functions
- Excel Charts and SmartArt Graphics
- Advanced Excel Training
- Data Analysis Excel for Beginners

Advanced Excel Exercises with Solutions PDF
How-To Geek
6 ways to create more interactive powerpoint presentations.
Engage your audience with cool, actionable features.
Quick Links
- Add a QR code
- Embed Microsoft Forms (Education or Business Only)
- Embed a Live Web Page
- Add Links and Menus
- Add Clickable Images to Give More Info
- Add a Countdown Timer
We've all been to a presentation where the speaker bores you to death with a mundane PowerPoint presentation. Actually, the speaker could have kept you much more engaged by adding some interactive features to their slideshow. Let's look into some of these options.
1. Add a QR code
Adding a QR code can be particularly useful if you want to direct your audience to an online form, website, or video.
Some websites have in-built ways to create a QR code. For example, on Microsoft Forms , when you click "Collect Responses," you'll see the QR code option via the icon highlighted in the screenshot below. You can either right-click the QR code to copy and paste it into your presentation, or click "Download" to add it to your device gallery to insert the QR code as a picture.
In fact, you can easily add a QR code to take your viewer to any website. On Microsoft Edge, right-click anywhere on a web page where there isn't already a link, and left-click "Create QR Code For This Page."
You can also create QR codes in other browsers, such as Chrome.
You can then copy or download the QR code to use wherever you like in your presentation.
2. Embed Microsoft Forms (Education or Business Only)
If you plan to send your PPT presentation to others—for example, if you're a trainer sending step-by-step instruction presentation, a teacher sending an independent learning task to your students, or a campaigner for your local councilor sending a persuasive PPT to constituents—you might want to embed a quiz, questionnaire, pole, or feedback survey in your presentation.
In PowerPoint, open the "Insert" tab on the ribbon, and in the Forms group, click "Forms". If you cannot see this option, you can add new buttons to the ribbon .
As at April 2024, this feature is only available for those using their work or school account. We're using a Microsoft 365 Personal account in the screenshot below, which is why the Forms icon is grayed out.
Then, a sidebar will appear on the right-hand side of your screen, where you can either choose a form you have already created or opt to craft a new form.
Now, you can share your PPT presentation with others , who can click the fields and submit their responses when they view the presentation.
3. Embed a Live Web Page
You could always screenshot a web page and paste that into your PPT, but that's not a very interactive addition to your presentation. Instead, you can embed a live web page into your PPT so that people with access to your presentation can interact actively with its contents.
To do this, we will need to add an add-in to our PPT account .
Add-ins are not always reliable or secure. Before installing an add-in to your Microsoft account, check that the author is a reputable company, and type the add-in's name into a search engine to read reviews and other users' experiences.
To embed a web page, add the Web Viewer add-in ( this is an add-in created by Microsoft ).
Go to the relevant slide and open the Web Viewer add-in. Then, copy and paste the secure URL into the field box, and remove https:// from the start of the address. In our example, we will add a selector wheel to our slide. Click "Preview" to see a sample of the web page's appearance in your presentation.
This is how ours will look.
When you or someone with access to your presentation views the slideshow, this web page will be live and interactive.
4. Add Links and Menus
As well as moving from one slide to the next through a keyboard action or mouse click, you can create links within your presentation to direct the audience to specific locations.
To create a link, right-click the outline of the clickable object, and click "Link."
In the Insert Hyperlink dialog box, click "Place In This Document," choose the landing destination, and click "OK."
What's more, to make it clear that an object is clickable, you can use action buttons. Open the "Insert" tab on the ribbon, click "Shape," and then choose an appropriate action button. Usefully, PPT will automatically prompt you to add a link to these shapes.
You might also want a menu that displays on every slide. Once you have created the menu, add the links using the method outlined above. Then, select all the items, press Ctrl+C (copy), and then use Ctrl+V to paste them in your other slides.
5. Add Clickable Images to Give More Info
Through PowerPoint's animations, you can give your viewer the power to choose what they see and when they see it. This works nicely whether you're planning to send your presentation to others to run through independently or whether you're presenting in front of a group and want your audience to decide which action they want to take.
Start by creating the objects that will be clickable (trigger) and the items that will appear (pop-up).
Then, select all the pop-ups together. When you click "Animations" on the ribbon and choose an appropriate animation for the effect you want to achieve, this will be applied to all objects you have selected.
The next step is to rename the triggers in your presentation. To do this, open the "Home" tab, and in the Editing group, click "Select", and then "Selection Pane."
With the Selection Pane open, select each trigger on your slide individually, and rename them in the Selection Pane, so that they can be easily linked to in the next step.
Finally, go back to the first pop-up. Open the "Animations" tab, and in the Advanced Animation group, click the "Trigger" drop-down arrow. Then, you can set the item to appear when a trigger is clicked in your presentation.
If you want your item to disappear when the trigger is clicked again, select the pop-up, click "Add Animation" in the Advanced Animation group, choose an Exit animation, and follow the same step to link that animation to the trigger button.
6. Add a Countdown Timer
A great way to get your audience to engage with your PPT presentation is to keep them on edge by adding a countdown timer. Whether you're leading a presentation and want to let your audience stop to discuss a topic, or running an online quiz with time-limit questions, having a countdown timer means your audience will keep their eye on your slide throughout.
To do this, you need to animate text boxes or shapes containing your countdown numbers. Choose and format a shape and type the highest number that your countdown clock will need. In our case, we're creating a 10-second timer.
Now, with your shape selected, open the "Animations" tab on the ribbon and click the animation drop-down arrow. Then, in the Exit menu, click "Disappear."
Open the Animation Pane, and click the drop-down arrow next to the animation you've just added. From there, choose "Timing."
Make sure "On Click" is selected in the Start menu, and change the Delay option to "1 second," before clicking "OK."
Then, with this shape still selected, press Ctrl+C (copy), and then Ctrl+V (paste). In the second box, type 9 . With the Animation Pane still open and this second shape selected, click the drop-down arrow and choose "Timing" again. Change the Start option to "After Previous," and make sure the Delay option is 1 second. Then, click "OK."
We can now use this second shape as our template, as when we copy and paste it again, the animations will also duplicate. With this second shape selected, press Ctrl+C and Ctrl+V, type 8 into the box, and continue to do the same until you get to 0 .
Next, remove the animations from the "0" box, as you don't want this to disappear. To do this, click the shape, and in the Animation Pane drop-down, click "Remove."
You now need to layer them in order. Right-click the box containing number 1, and click "Bring To Front." You will now see that box on the top. Do the same with the other numbers in ascending order.
Finally, you need to align the objects together. Click anywhere on your slide and press Ctrl+A. Then, in the Home tab on the ribbon, click "Arrange." First click "Align Center," and then bring the menu up again, so that you can click "Align Middle."
Press Ctrl+A again to select your timer, and you can then move your timer or copy and paste it elsewhere.
Press F5 to see the presentation in action, and when you get to the slide containing the timer, click anywhere on the slide to see your countdown timer in action!
Now that your PPT presentation is more interactive, make sure you've avoided these eight common presentational mistakes before you present your slides.
How to Add Audio to PowerPoint [Step by Step]
- Updated May 2, 2024
- No Comments
Adding audio to your PowerPoint presentations can elevate them to the next level, making them more engaging and dynamic. Whether you’re incorporating background music, narration, or sound effects, audio can enhance your message and captivate your audience. In this comprehensive guide, we’ll walk you through the step-by-step process of adding audio to PowerPoint presentations, ensuring that your slides are not only visually compelling but also audibly stimulating.

Audio plays a crucial role in presentations by providing context, emphasis, and emotional resonance. It can complement visual content, reinforce key points, and cater to different learning styles. Whether it’s background music to set the mood or narration to guide the audience through the slides, incorporating audio can make your presentations more dynamic and memorable.
Selecting the Right Audio Format
Before adding audio to your PowerPoint presentation, ensure that your audio files are in a compatible format. While MP3 is the most widely supported format, WAV and AIFF offer higher audio quality but may result in larger file sizes. Consider your presentation’s needs and audience preferences when selecting the appropriate format.
Editing Your Audio File for Quality
Quality audio enhances the professionalism and impact of your presentation. Before inserting audio into PowerPoint, it’s essential to edit your audio files for clarity, volume levels, and any unwanted background noise. Use audio editing software to trim, adjust levels, and apply effects to optimize the audio for your presentation.

Adding Audio to PowerPoint
Microsoft PowerPoint provides robust features for recording audio narration directly within your presentation and exporting it as a video. Unlike recording audio in one continuous file, PowerPoint enables slide-by-slide audio recording, facilitating easy revisions and updates. This approach streamlines the creation process and empowers creators to deliver polished presentations.
For Windows Users
- Design your PowerPoint presentation with a focus on visual elements supplemented by concise text.
- Navigate to the Slide Show tab and select “Record Slide Show” to initiate the audio recording process.

- Opt for “Record from Current Slide” or “Record from Beginning” based on your presentation requirements.

- Begin recording narration for each slide by clicking the Record button, ensuring clarity and coherence in your delivery.
- Utilize the Advance Narration feature to seamlessly transition between slides and maintain synchronization.
- Once all audio recordings are complete, save the presentation as a regular PowerPoint file before proceeding to export.
- Click on File, then Export, and select “Create a Video” to generate the MP4 file format.

- Choose the desired video quality and ensure the “Use Recorded Timings and Narrations” option is selected.

- Follow the prompts to save the video in your preferred location and monitor the export progress accordingly.
It’s important to note a known issue affecting some Windows 11 users regarding PowerPoint exports to .mp4 files. Certain visuals within exported PowerPoints may appear flipped or upside down. While we’re actively collaborating with Microsoft to resolve this issue, a temporary workaround involves converting the file to a .WMV format.
For Mac Users
- Craft your PowerPoint presentation with a focus on impactful visuals and minimal text to engage your audience effectively.
- Access the Slide Show tab and select “Record Slide Show” to commence the audio recording process.

- Initiate the narration recording by clicking the red circle recording button, maintaining clarity and coherence throughout.
- Pause or stop the recording as needed, ensuring seamless transitions between slides.
- Review the recorded audio by clicking on “Play from Start” under the Slide Show tab.
- If revisions are necessary, delete the speaker icon on the respective slide to remove the audio recording and clear slide timings.

- Save the presentation as a regular PowerPoint file and proceed to export by selecting File, then Export.

- Choose the MP4 file format, select the appropriate video quality, and ensure the “Use Slide Timings” option is enabled.
- Finalize the export process by clicking Export and monitor the progress indicator until completion.
Playing the Sound with Animation
To streamline your workflow, swiftly access the Timing dialog box immediately after adding a sound file and animation.
- Begin by adding an animation to the desired object on your slide, whether it’s a text box, picture, or Excel chart.

- Once the animation is applied, insert the sound file onto the slide.

- Navigate to the Animations tab on the ribbon menu.

- In the Advanced Animation section towards the right side of the ribbon, locate and click on the Animation Pane button. This action opens the Animation Pane on the right side of your screen.

- Within the Animation Pane, locate the sound file you inserted and click the drop-down arrow next to it. From the dropdown menu, select Timing to access the Play Audio dialog box.

- In the Play Audio dialog box, switch to the Timing tab and choose Triggers.

- Select the option “Animate as part of the click sequence” and confirm your selection by clicking OK.

- To test the slideshow, either press the F5 key to initiate the show from the beginning or use the shortcut Shift+F5 to start from the current slide if it’s not the first one in the sequence. This allows you to verify that the sound plays concurrently with the animation as intended.
Tips for Sharing Presentations with Audio
- To record audio directly in PowerPoint, go to the “Insert” tab, click the “Audio” icon, and select “Record Audio.” This opens a recording toolbar for easy voice recording.
- For presentations with audio across multiple slides, select the audio icon, go to the “Playback” tab, and choose “Play Across Slides.” This ensures seamless background music or narration.
- Sync audio with slide timings by navigating to the “Slide Show” tab and selecting “Record Slide Show.” This ensures precise timing alignment, enhancing presentation coherence.
- Alternatively, add audio to slides by inserting video files with audio. Similar to adding audio files, just select the video file, and PowerPoint will extract the audio upon insertion, allowing for creative integration.
Elevate Your Audio Experience: Introducing the Hollyland Lark C1 Microphone, a versatile solution for enhancing your PowerPoint presentations with crisp and clear audio. Designed with convenience and quality in mind, the Lark C1 Microphone offers seamless integration with PowerPoint, ensuring optimal sound performance for your audience.
Whether you’re recording narration, adding background music, or incorporating sound effects, this microphone delivers professional-grade audio with ease. With its compact design and wireless connectivity, the Lark C1 Microphone provides flexibility and mobility, allowing you to move freely while delivering your presentation.
Adding audio to your PowerPoint presentations enhances engagement and makes your message more memorable. Understanding PowerPoint’s audio features and following the steps outlined in this guide allows you to seamlessly integrate audio into your slideshows. By combining audio with animations and effects, you can create dynamic presentations that inform, inspire, and captivate your audience. Whether you’re recording narration, adding background music, or incorporating sound effects, the Lark C1 Microphone ensures crystal-clear audio transmission, leaving a lasting impression on your audience.
We value your opinion! Share your thoughts and experiences with the Hollyland Lark CR Microphone. How has it improved your PowerPoint presentations? Do you have any tips or suggestions for maximizing its effectiveness? Leave your feedback below and join the conversation!
Frequently Asked Questions
What audio file formats are supported by PowerPoint?
PowerPoint supports various audio file formats, including MP3, WAV, and AIFF. These formats ensure compatibility with your presentation software, allowing you to seamlessly integrate audio into your slideshows.
How do I add spoken audio to PowerPoint?
To add spoken audio to PowerPoint, navigate to the “Insert” tab, select “Media,” then “Audio.” Choose “Record Audio,” ensure your device has a working microphone, name your audio file, and click “Record” to start speaking. This seamless integration enhances your presentation’s impact and engagement.
How can I ensure my audio plays across all slides?
To ensure that your audio plays across all slides, you can use the “Play Across Slides” option in PowerPoint. Simply select the audio file, navigate to the “Playback” tab, and check the “Play Across Slides” option. This ensures continuous playback throughout your presentation.
How to record a PowerPoint presentation with audio?
Recording a PowerPoint presentation with audio is simple. Ensure your microphone is set up correctly, then go to the “Slide Show” tab, select the starting slide, and click “Record Slide Show.” This feature adds a personal touch and context to your slides for your audience’s benefit.
Can I add audio to specific parts of a slide?
Yes, you can add audio to specific parts of a slide in PowerPoint. Insert audio objects and synchronize them with slide elements using animations and triggers to enhance your presentation’s impact.
How do I edit audio in PowerPoint?
Editing audio in PowerPoint is convenient. Click on the audio file, go to “Audio Tools,” and select “Trim Audio” in the “Playback” tab. Use playback controls to trim the audio clip precisely to your preferences.
What should I do if my audio is not playing in PowerPoint?
If your audio isn’t playing in PowerPoint, try several troubleshooting steps. Check audio settings, ensure compatibility and proper insertion of the audio file, and consider restarting PowerPoint or your computer. Update audio drivers and try converting or reinserting the audio file if needed.
- Audio , PowerPoint , step by step

I am John, a tech enthusiast with a knack for breaking down complex camera, audio, and video technology. My expertise extends to social media and electronic gadgets, and I thrive on making the latest tech trends understandable and exciting for everyone. Sharing my knowledge through engaging content, I aim to connect with fellow tech lovers and novices alike, bringing the fascinating world of technology to life.
Leave a Reply Cancel reply
Your email address will not be published. Required fields are marked *
Table of Contents

Related Posts
![How to Share Audio on Teams [Step by Step]](https://www.hollyland.com/wp-content/uploads/2024/05/how-to-share-audio-on-teams-step-by-step.jpg "excel tips presentation ppt")
How to Share Audio on Teams [Step by Step]
Microsoft Teams is a big player in the way we communicate today, especially with the rise of remote work. An important part of its functionality
![How to Find Trending Audio [Step by Step]](https://www.hollyland.com/wp-content/uploads/2024/05/how-to-find-trending-audio-step-by-step.jpg "excel tips presentation ppt")
How to Find Trending Audio [Step by Step]
Short, engaging video content rules social media these days. Instagram Reels and Stories employ catchy, trending audio to keep viewers watching, but these audio trends
![How to Turn Video into Audio on iPhone [Step by Step]](https://www.hollyland.com/wp-content/uploads/2024/05/how-to-turn-video-into-audio-on-iphone-step-by-step.jpg "excel tips presentation ppt")
How to Turn Video into Audio on iPhone [Step by Step]
Let’s say you find an old favorite song – but only on video. Or you want to rip off the audio from one video and
![How to Record Audio on Screen Recording [Step by Step]](https://www.hollyland.com/wp-content/uploads/2024/05/how-to-record-audio-on-screen-recording-step-by-step.jpg "excel tips presentation ppt")
How to Record Audio on Screen Recording [Step by Step]
Screen recordings have skyrocketed in both their prominence and utility thanks to a variety of applications you can use them for. While being especially useful

IMAGES
VIDEO
COMMENTS
6. Add an image. Whether it's a photograph, an artistic sketch or your logo, images go a long way in making your spreadsheet better. Images make your presentation look official and possess the professional feel in many of the beautiful presentations you have seen. Pictures speak a thousand words.
In Excel, select the chart or table you want to use, and press CTRL+C to copy it. In PowerPoint, go to the Home tab, click on the dropdown arrow next to Paste, and select Paste Special. Choose the Paste Link option from the dialog box, and select Microsoft Office Excel Chart Object. Click OK.
1. Use a slide with a layout that contains content and click the Chart icon, or choose Insert tab, and then Insert Chart. To change the layout of an existing slide, right-click off the slide, choose Layout, and choose Title and Content or another layout with the word "Content" in its name. 2.
P.S- All these charts are data-driven and excel-linked, taking your presenting game a notch higher. Top 30 Excel Linked Data-Driven PowerPoint Slides and Templates . Tornado Chart For Population Excel Chart Template 1 The core of every business's success lies in properly analyzing the data and using it to one's advantage.
Not every presentation has to be in PowerPoint. In fact, Microsoft Excel can be a better medium for presenting data in many cases. Let's discuss some Excel presentation tips that will help you present data in a compelling and visually appealing format. 1. Charts and Graphs. Effectively providing a visual summary of data using graphs and ...
Creating a presentation in Excel. Step 1: Choose a Template. Step 2: Create slides. Step 3: Organize your data. Line Graph. Pie chart. Table. Step 4: Remove the grids. Tips for making a creative and professional presentation using Excel.
Excel offers a quicker way. Click the first cell, hold down the Ctrl key, and click a second cell. Look at the status bar at the bottom and you'll see the sum of the cells calculated for you. Keep ...
5. Tip 3: Formatting the Chart Vertical Axis If you have plotted a graph and want to change the scale of the vertical axis to suit your needs, MS Excel allows you to customize the vertical axis. By default, Microsoft Office Excel determines the minimum and maximum scale values of the vertical (value) axis.
Premium Google Slides theme and PowerPoint template. With this workshop you are going to give your students one of the best skills: mastering excel sheets. They are useful for almost everything: accounting, science, registers, coding… and employers love when new candidates can create a new sheet from scratch! Use these creative and colorful ...
Want to improve your Excel skills and make your presentations more impactful? Look no further than our essential guidance for enhancing your proficiency through our excel tips presentation ppt. Whether you're a beginner or an experienced user, our tips will help you master your spreadsheets and elevate your data presentation skills.. Excel is a powerful tool that offers a variety of features ...
Next, point to Microsoft Office and click on Excel to start it. Excel will open a new workbook with the default name Book1 and cell A1 as the active cell. 57. Step 2: Formatting Cells A1 to F4 Select cell A1, click the left button on the mouse and drag it over cells in columns A-F and row 1-4.
Here's how to align circles effectively: See also Add Music to PowerPoint Presentations - Step by Step Guide. STEP 1: Select your circle, and hold down the "Shift" key to select additional objects (like text boxes or images) you wish to align with. STEP 2: Navigate to the "Format" tab, and in the "Arrange" group, click "Align.".
Please find the practice file and our FREE 100 Most-Useful Excel Tips below. This webinar is for anyone ready to take their Microsoft PowerPoint design skill...
Print an Excel table Click a cell within the table to activate the table. Click File, and then click Print. Keyboard shortcut You can also press CTRL+P. Under Settings, click Selected Table. (+250) 785816726. 24. Create a drop down list of items in a cell, with Excel's Data Validation feature.
Get your main point into the presentation as early as possible (this avoids any risk of audience fatigue or attention span waning), then substantiate your point with facts, figures etc and then reiterate your point at the end in a 'Summary'. 2. Practice Makes Perfect. Also, don't forget to practice your presentation.
Save time with these quick and easy keyboard shortcuts to enter data into an Excel worksheet: Enter current date: [Ctrl] + ; Repeat data from the cell immediately above: [Ctrl] + ' (single quote) or press [Ctrl] + D (think duplicate) Create a SUM function for cells next to your current location: [Alt] + =. 4. Wrapping Text.
Here's another one of our top PPT tips: tap into Envato Elements' unlimited stock photo library. People are more likely to take you seriously if your presentation is visually appealing. Users view attractive design as more usable. Similarly, they'll view a more attractive PowerPoint as more effective. 11.
Go to the Shape Format tab and click on the Shape Fill dropdown. Select "More Fill Colors…" and click the eyedropper icon to begin color appropriating. 7. Record and Insert Audio. What's it for: Infuse personality into your presentation by recording audio directly within PowerPoint.
Excel Formula And Functions. Advanced Excel (20 Slides) 17428 Views. Unlock a Vast Repository of Advanced Excel PPT Slides, Meticulously Curated by Our Expert Tutors and Institutes. Download Free and Enhance Your Learning!
Click the List button from the Connections group of the DataPoint menu. Navigate to Microsoft, Microsoft Excel Online, and click the Add connection button. At the Platform option, choose the SharePoint Online REST option. My testing document is located on our company SharePoint site, Documents folder, and the subfolder is called Shared.
Excel Tips and Tricks. Important. Learn how to use help!. Excel Tips. Working with Hyperlinks Task: create 2 .xls files, with mutual hyperlinks Shortcut to enter today's date Ctrl + ;. Excel Tips. Right click status bar, choose 'quick functions' Can select multiple non-contiguous cells. Download Presentation.
STEPS: First, launch PowerPoint. Then, select the Insert tab. Next, click Text, and later on the Object option. As a result, a new dialog box will pop up at this time, and you must click on Create from file. After that, click on Browse to find the Excel document you want to add to your slides. Consequently, the Insert Object dialog box pops up ...
Click anywhere on your slide and press Ctrl+A. Then, in the Home tab on the ribbon, click "Arrange." First click "Align Center," and then bring the menu up again, so that you can click "Align Middle." Press Ctrl+A again to select your timer, and you can then move your timer or copy and paste it elsewhere.
9. FORMATTING TEXT TO FORMAT TEXT IN BOLD, TO CHANGE THE FONT STYLE: ITALICS OR UNDERLINE: Select the cell or cells you want to Left-click a cell to select it or drag format. your cursor over the text in the Left-click the drop-down arrow next to formula bar to select it. the Font Style box on the Home tab. Click the Bold, Italics or underline Select a font style from the list. command.
To record audio directly in PowerPoint, go to the "Insert" tab, click the "Audio" icon, and select "Record Audio.". This opens a recording toolbar for easy voice recording. For presentations with audio across multiple slides, select the audio icon, go to the "Playback" tab, and choose "Play Across Slides.".