The 5 Best Apps to Make Slideshow Presentations on Your iPhone
There are lots of high-quality iPhone apps to choose from if you need to make a slideshow presentation from your phone.
Back in the day, creating a slideshow presentation meant turning on the PC and opening PowerPoint. Now, with so many great apps out there, you can create an impressive presentation right from your iPhone. Whether you need a slideshow for school, work, or just personal use, you have plenty of options.
When you’re done, you can send your slideshow presentation to your PC or share it straight from your device. If you’re wanting to know how to create a slideshow presentation on your
iPhone, this list will show you all the best apps to try.

1. Microsoft PowerPoint
The most popular program for creating slideshows, Microsoft PowerPoint, has an official app for iPhone. Like the desktop version, you can create a new PowerPoint and edit each slide. Add your pictures, text, and transitions to make it your own. With all the same features that are available on a desktop, nobody will be able to tell you made it on your iPhone.
Microsoft PowerPoint syncs with OneDrive, so if you use Outlook for school or work you can find your PowerPoint in your OneDrive account. You can also share and edit your PowerPoint presentation on the go, and even add new collaborators.
Aside from OneDrive, Microsoft PowerPoint also syncs with Box, Dropbox, Edmodo, and more. With Microsoft PowerPoint, you get all the features you want in one app.
Download: Microsoft PowerPoint (Free, subscription required)
2. Google Slides
A popular alternative to Microsoft PowerPoint, Google Slides has many of the same features with a major difference. That is, Google Slides is totally free and doesn’t require any subscription. All you need is a free Google account to access Google Slides.
Related: Microsoft PowerPoint vs. Google Slides: Which One Should You Be Using?
Google Slides also makes it easy to make a slideshow presentation on your iPhone. With great templates, plenty of effects, and easy editing, you can create something impressive in minutes.
Google Slides is also better for collaborating than Microsoft PowerPoint. The reason is that not everyone has Microsoft 360 or wants to pay for a subscription. Whereas most people have a Google account or can make one for free in under a minute. To collaborate with others, all you need to do is enter their email and they will get invited to edit the slideshow. Google Slides also syncs with your Google account, so you can access your slideshow on any device with access to Google.
For these reasons, Google Slides is a must-try if you’re looking to create a slideshow on your iPhone.
Download: Google Slides (Free)
Keynote is Apple’s presentation software, designed to compete with Microsoft PowerPoint. Keynote comes pre-installed on all iOS devices running the latest version iOS, so there’s a good chance you already have this app.
Like Microsoft PowerPoint and Google Slides, you can create a slideshow using a template and add your own text, images, and transitions. Keynote comes with 40 templates pre-installed, giving you plenty of options to choose something unique. Keynote also has some notable features that differentiate it from the competition. For example, there’s a feature called Instant Alpha that will remove the backgrounds from an image. You can also import live videos and photos to your slideshow.
Keynote is also the best slideshow app for rehearsing your presentation. Keynote has a built-in timer that shows you the time, presentation notes, and the slide on one page. You can rehearse your slides and see how long it takes to make sure you hit your time limit.
Related: The Best Slideshow Maker Apps
With all these features, Keynote is a great app to create your next slideshow. However, the collaboration feature isn’t as strong as Microsoft PowerPoint or Google Slides. So if you need several collaborators, one of the other options might work better.
Download: Keynote (Free)
Canva is one of the most popular graphic design apps in the App Store right now. With Canva, you can create flyers, brochures, and even logos. However, most people aren’t aware that Canva has a powerful Slideshow feature as well.
With many great slideshow templates available, you are sure to find something that stands out and will impress your audience. In fact, Canva has thousands of slideshow templates available—more than any other slideshow app. After you find your template, you can easily add your photos and text.
Since Canva has many customization features for photos, you can edit your images before importing them to your slideshow as well. Once your slideshow is completed, you can access it through the Canva website or save it to your device.
Canva is the best choice for a slideshow app if you don’t have any collaborators and want to make something truly unique. It works great for school projects, creative presentations, and showcasing your art or photographs.
Download: Canva (Free, in-app purchases available)
5. Adobe Spark Page
Adobe Spark Page is a beginner-friendly Adobe app that allows you to make impressive web pages, newsletters, and slideshows. Most Adobe apps like Photoshop or Premiere have a steep learning curve. For this reason, the name Adobe can scare off beginners. Thankfully, Adobe Spark Page is an exception.
Related: How to Make a Slideshow on iPhone
With a simple-to-use interface and dozens of premium theme combinations, you can make a slideshow right from your iPhone. The slideshow presentations made with Adobe Spark Page are simple, professional, and look great on large screens. All creations made on Adobe Spark Page are available on your Adobe account so you can access your slideshows anywhere. You can also create a public access link and share it over text or email.
While lacking some features like collaboration, it’s still a great slideshow app that’s simple and easy to use on the go. As long as you don’t need collaborators, this app is a must-try.
Download: Adobe Spark Page (Free, in-app purchases available)
Want to Make a Slideshow Presentation on iPhone? There Are Options
With so many apps available for creating a slideshow on your iPhone, you can certainly find something that fits your needs. Whether you need a professional slideshow for work or a creative slideshow for a class, there’s an iPhone app for you out there. Who knows, maybe you won’t ever need to make a slideshow on your computer again.
Presentations that stand out. Beautifully.
With its powerful tools and dazzling effects, Keynote makes it easy to create stunning and memorable presentations, and comes included with most Apple devices. Use Apple Pencil on your iPad to create diagrams or illustrations that bring your slides to life. And with real‑time collaboration, your team can work together, whether they’re on Mac, iPad, iPhone, or a PC.
See what’s new in Keynote
Present your story. Your way.
Keynote sets the stage for an impressive presentation. A simple, intuitive interface puts important tools front and center, so everyone on your team can easily add beautiful charts, edit photos, and incorporate cinematic effects. And Rehearse Mode lets you practice on the go, with the current or next slide, notes, and clock — all in one view.
Start with a gorgeous layout.
Choose from over 40 eye‑catching themes that instantly give your presentation a professional look. Or create your own slide designs, background images, and page‑by‑page customization.
Create next-level animations.
Add drama to your presentation with more than 100 cinematic transitions and effects. Make your words pop by adding textures, color gradients, and even photos — with just a tap. And animate objects along a path using Apple Pencil or your finger on your iPhone or iPad.
Make every slide spectacular.
Add subtle movement to your slides with dynamic backgrounds. Illustrate your point with over 700 Apple-designed shapes, or add photos, videos, music, image galleries, and charts. Easily remove backgrounds from supported images and live videos or manually refine adjustments as needed. You can even use your iPhone to take a photo or scan a document, and Continuity Camera can send it straight to Keynote on your Mac.
What’s new in Keynote.
Learn about everything you can do in Keynote
Get the updates. Then get in touch.
Stay up to date when people join, edit, or comment in collaborative presentations and easily get in touch with your team using Messages and FaceTime.
Get more done on iPad.
Quickly insert objects, find settings, and get to your favorite tools with the customizable toolbar. And Stage Manager makes it easy to multitask across multiple presentations and apps at the same time. 1
Make backgrounds disappear.
Now you can more easily remove backgrounds from supported images — and even live videos — or adjust them to your liking.
Add live video feeds to any slide.
Appear in a window, right on your slides, with a picture-in-picture display during remote presentations. Or include a live feed of your iPhone or iPad screen to show off apps.
Get started with dynamic themes.
Start with one of three beautiful new animated themes, then customize it to set the tone for each slide with 18 adjustable background presets — from understated to highly visual, monochrome to colorful, calm to energetic.
Captivate your audience with dynamic backgrounds.
Make your presentation stand out by adding stunning color and visual interest to your slides. Create motion on a title or closing slide for a bold statement, and keep viewers engaged with subtle movement throughout the presentation.
Present with your team. Seamlessly.
For slideshows with multiple presenters, you can take turns controlling a single deck — from anywhere — on Mac, iPad, and iPhone.
Play YouTube and Vimeo videos right in Keynote.
Embed a video from YouTube or Vimeo, then play it right in your presentations, without the need to download or open the video in a media player. 2
Present over video conference. Like a pro.
Play a slideshow in its own window so you can access other apps while you present. You can view your presenter notes, upcoming slides, and navigation in a separate window as well.
Outline your presentation. Easier.
With outline view for iPhone and iPad, quickly jot down your thoughts, restructure ideas, and move concepts from slide to slide. Then switch to slide view and start designing.
Present like never before. From anywhere.
With Keynote, presenting remotely can be just as seamless as presenting in person. Say goodbye to saying “Next slide, please” — now multiple people can present together, even remotely, with each person taking control of their section of the deck. Add a live video feed of yourself to any slide for a picture-in-picture experience. Or when presenting on your Mac, include a live feed of your iPhone or iPad screen to walk through your apps. You can even play a slideshow in its own window, so you can simultaneously access your notes and other apps.
Any presentation. Any device. Anytime.
You don’t work in one place on just one device. The same goes for Keynote. Work seamlessly across all your Apple devices. The slides you create using a Mac or iPad will look the same on an iPhone or web browser — and vice versa.
You can also work on presentations stored on iCloud or Box using a PC.
Start using Keynote at iCloud.com
Create and present together. Even when apart.
Work together in the same presentation, from across town or across the world. You can see your team’s edits as they make them — and they can watch as you make yours, too. You can even get notifications when people join, edit, or comment. When presenting as a team, you can also take turns controlling a single deck from anywhere.
Use Apple Pencil when inspiration strikes.
Add color, illustrations, and handwritten comments for more beautiful presentations with Apple Pencil on your iPad.
Plays well with Office.
Teaming up with someone who uses Microsoft PowerPoint? Keynote makes it a great working relationship. You can save Keynote presentations as PowerPoint files. Or import and edit PowerPoint presentations right in Keynote.
Learn more about Microsoft PowerPoint compatibility
See everything that’s new in Keynote
- What’s new in Keynote for iPhone and iPad
- What’s new in Keynote for Mac
- Keynote for iCloud release notes
Additional Resources
- Get Keynote support
- Learn about Microsoft Office compatibility
- Learn about collaboration for Pages, Numbers, and Keynote
- Use Keynote in a video conference app
Keynote User Guides
- Keynote User Guide for Mac
- Keynote User Guide for iPad
- Keynote User Guide for iPhone
- Keynote User Guide for Web
Build spreadsheets that are bottom-line brilliant.
Create documents that are, in a word, beautiful.
- Help Center
- Google Docs Editors
- Privacy Policy
- Terms of Service
- Submit feedback
- Get started with Google Slides
- Create a presentation
How to use Google Slides
Want advanced Google Workspace features for your business?
Try Google Workspace today!
You can create, view, and edit Google presentations, as well as Microsoft Powerpoint® files, with the Google Slides app for Android. Here are some things to help you use the Google Slides app:
Step 1: Download the Google Slides app
- Open the Play Store .
- In the top search bar, search Google Slides .
- Tap Install . The Google Slides app will appear on your Home screen.
Step 2: Create, view, or edit a presentation
- Insert and arrange text, shapes & lines
- Present slides
View and edit slides
- On your Android phone or tablet, open a presentation in the Google Slides app.
- Swipe up and down to scroll through the slides. You can also pinch to zoom into a slide.
- Tip : You can also double tap the slide you want to edit.
Tip : You can also connect a mouse to your Android device to scroll and click when you use the Google Slides app.
Work with different file formats
You can upload and download files with the Google Slides app for Android.
- Import : You can open and edit PPT, PPTX, and ODP files.
- Export : You can export as PPTX, PDF, TXT, and ODP files. You can also export a current slide as JPEG, PNG, and SVG.
Step 3: Share & work with others
You can share files and folders with people and choose whether they can view, edit, or comment on them.
Need more help?
Try these next steps:.
Using Google products, like Google Docs, at work or school? Try powerful tips, tutorials, and templates. Learn to work on Office files without installing Office, create dynamic project plans and team calendars, auto-organize your inbox, and more.

Keynote User Guide

Get started with a theme
All presentations begin with a theme—a set of predesigned slide layouts you can use as a starting point. Replace the theme’s images and text with your own, then add more slides as needed.
- Create a presentation

Add text, photos, drawings, and more
Add objects like text boxes, tables, charts, shapes, and media (images, audio, and video) to any slide. You can layer objects, resize them, and link them to webpages or other slides in your presentation.
- Intro to images, charts, and other objects

Lights, camera, action
Bring your presentation to life with movies, live video, recorded narration, music, and more.
- Add video and audio

Wow them with animation
Add visual effects or animations to captivate your audience. For example, add a transition so each slide dissolves into the next, or make each word in a title bounce onto the slide.
Add transitions between slides

Present in any situation
Play a slideshow over the internet, virtually with multiple presenters, as an interactive presentation, and more.
Play a presentation

Collaborate in real time
Invite others to work with you on your presentation. Everyone you invite can see changes as they’re made, but you control who can edit or only view the presentation.
- Intro to collaboration
If you need more help, visit the Keynote Support website .
Keynote User Guide for iPhone
- What’s new in Keynote 14.0
- Intro to Keynote
- Choose how to navigate your presentation
- Open a presentation
- Save and name a presentation
- Find a presentation
- Print a presentation
- Prevent accidental editing
- Undo or redo changes
- Quick navigation
- Change the working view
- Copy text and objects between apps
- Basic touchscreen gestures
- Create a presentation using VoiceOver
- Add or delete slides
- Reorder slides
- Group or ungroup slides
- Skip or unskip a slide
- Change the slide size
- Change a slide background
- Add a border around a slide
- Show or hide text placeholders
- Show or hide slide numbers
- Apply a slide layout
- Add and edit slide layouts
- Change a theme
- Add an image
- Add an image gallery
- Edit an image
- Add and edit a shape
- Combine or break apart shapes
- Save a shape to the shapes library
- Add and align text inside a shape
- Add 3D objects
- Add lines and arrows
- Add and edit drawings
- Record video and audio
- Edit video and audio
- Add live video
- Set the movie and image formats
- Position and align objects
- Use alignment guides
- Place objects inside a text box or shape
- Layer, group, and lock objects
- Change object transparency
- Fill shapes and text boxes with color or an image
- Add a border to an object
- Add a caption or title
- Add a reflection or shadow
- Use object styles
- Resize, rotate, and flip objects
- Add linked objects to make your presentation interactive
- Select text
- Copy and paste text
- Format a presentation for another language
- Use phonetic guides
- Use bidirectional text
- Use vertical text
- Change the look of text
- Use text styles
- Change text capitalization
- Add drop caps
- Make characters superscript or subscript
- Format fractions automatically
- Format dashes and quotation marks
- Format Chinese, Japanese, or Korean text
- Set tab stops
- Format text into columns
- Adjust line spacing
- Format lists
- Add mathematical equations
- Add borders and rules (lines) to separate text
- Add or delete a table
- Select tables, cells, rows, and columns
- Add or remove rows and columns
- Move rows and columns
- Resize rows and columns
- Merge or unmerge cells
- Change the look of table text
- Show, hide, or edit a table title
- Change table gridlines and colors
- Use table styles
- Resize, move, or lock a table
- Add and edit cell content
- Format dates, currency, and more
- Highlight cells conditionally
- Format tables for bidirectional text
- Alphabetize or sort table data
- Add or delete a chart
- Change a chart from one type to another
- Modify chart data
- Move, resize, and rotate a chart
- Change the look of data series
- Add a legend, gridlines, and other markings
- Change the look of chart text and labels
- Add a chart border and background
- Use chart styles
- Animate objects onto and off a slide
- Animate objects on a slide
- Change build order and timing
- Add transitions
- Present on your iPhone
- Present on a separate display
- Present on iPhone over the internet
- Use a remote
- Make a presentation advance automatically
- Play a slideshow with multiple presenters
- Add and view presenter notes
- Rehearse on your device
- Play a recorded presentation
- Check spelling
- Look up words
- Find and replace text
- Replace text automatically
- Set your author name for comments
- Highlight text
- Add and print comments
- Send a presentation
- Invite others to collaborate
- Collaborate on a shared presentation
- See the latest activity in a shared presentation
- Change a shared presentation’s settings
- Stop sharing a presentation
- Shared folders and collaboration
- Use Box to collaborate
- Create an animated GIF
- Post your presentation in a blog
- Use iCloud Drive with Keynote
- Export to PowerPoint or another file format
- Restore an earlier version of a presentation
- Move a presentation
- Delete a presentation
- Password-protect a presentation
- Create and manage custom themes
- Transfer files with AirDrop
- Transfer presentations with Handoff
- Transfer presentations with the Finder
- Keyboard shortcuts
- Keyboard shortcut symbols
'What is Keynote on iPhone?': How to use the Keynote app on your iPhone to make slideshow presentations on the go
- Keynote is a presentation-creation app for your iPhone that can be used by students, professionals, and anyone who needs to make a slideshow.
- The Keynote app comes preloaded on your iPhone , and can be downloaded for free from the Apple App Store if you delete it.
- Those familiar with Microsoft's PowerPoint program will quickly pick up on the value and the ease of using the iPhone's Keynote app.
- Visit Business Insider's homepage for more stories .
To Microsoft Word, you have Apple's Pages. To Microsoft's Excel, you have Apple's Numbers. And for PowerPoint, the Apple counterpart is Keynote, the presentation app that comes preloaded on your iPhone (and is free from the App Store if you deleted it).
Keynote is a presentation-design program perfect for everything from a report you're giving in school, to a proposal you want to share with your colleagues at the office. And once you spend some time with Keynote, you'll realize it's really not that hard to use.
Check out the products mentioned in this article:
Iphone 11 (from $699.99 at best buy), how to use keynote on your iphone.
To create a new Keynote project, open the Keynote app , which is a blue box with a white image of a lectern inside it.
Tap the "Create Presentation" icon — it's the plus (+) symbol in the top-right — then select the theme you wish to use. You can always use your own images in the slides, so don't be thrown off by the stock images.
Once inside the new project, double-tap in the various boxes on the first slide to add text or media. You can simply begin typing after double tapping, or hit the plus symbol at the top to add images, graphs, video, audio, drawings, and more.
To add a new slide, hit the plus symbol in a blue box at the bottom left corner of the screen. Slides can always be dragged into new order by tapping, holding, and moving them up or down in the pane on the left.
To add transitions between your slides (and alter various other settings) tap the three little dots in a circle in the top-right corner and select "Transitions and Builds." Then tap the slide to which you want to add a transition, tap "Add Transition," and then make your selection.
Using Keynote can be a collaborative process; just hit the "Add People" button at the top of the screen (it looks like a silhouette of a stick figure's head and shoulders in a circle), and invite others to work with you.
Once you're happy with your Keynote presentation, it's time to export it. Tap those three dots at the top-right and select "Export." You can then choose the type of file you'd like to create, which can then be shared with others, saved to your phone, sent to Google Drive, and so on.
Related coverage from How To Do Everything: Tech :
'why is my iphone slow': 7 tips to keep your iphone running like it's new, how to use whatsapp on your iphone to send private or group messages, make calls, and video chat internationally, how to turn on emergency alerts on your iphone to stay aware of local emergencies and safety warnings, how to save instagram videos to your iphone or android phone, how to get a virtual home button on your iphone screen with assistivetouch, if your iphone doesn't have a physical one.
Insider Inc. receives a commission when you buy through our links.
Watch: I'm a diehard iPhone user who switched to Android for a week — here's what I loved and hated about the Google Pixel 3 XL
- Main content
How To Make a PowerPoint On iPhone? (Here’s Your Guide)
Are you looking for a quick and easy way to create stunning PowerPoint presentations on your iPhone? Whether you’re a student, a business professional, or just someone who wants to make a presentation quickly, you’ll be glad to know that it can be done in a few simple steps.
In this guide, we’ll walk you through the process of creating a PowerPoint presentation on your iPhone from start to finish, including what you need to get started, how to download and install the PowerPoint app, and how to customize a template.
Plus, we’ll show you how to add images, sound, and video, and how to collaborate with others.
Let’s get started!
Table of Contents
Short Answer
Making a PowerPoint on an iPhone can be done using the PowerPoint app.
First, open the app and create a new presentation.
Then, select a blank presentation or choose from one of the templates provided.
After that, you can add images, add text, change the layout, and adjust the design settings.
When you’re finished, save the presentation and share it with others.
What is Microsoft PowerPoint?
Microsoft PowerPoint is a popular presentation software program developed by Microsoft.
It is used to create slideshows, which can be used to illustrate ideas, give presentations, or create multimedia projects.
PowerPoint is available for both Windows and Mac systems, and can also be used on mobile devices such as iOS and Android.
The app includes features such as the ability to add images, videos, sound, and animations to a slideshow, as well as the ability to collaborate with others in real-time.
It also has a wide range of templates to help get started quickly, as well as other features such as transitions and animations to help make your presentation stand out.
With its wide range of features and its easy-to-use interface, PowerPoint makes creating a presentation on your iPhone a breeze.
What You Need To Get Started
Making a PowerPoint on your iPhone is a breeze all you need is the Microsoft PowerPoint app and a few minutes of your time.
Once youve got the app installed, youre ready to start creating presentations.
You can use the app to create a blank presentation from scratch, or you can use one of the many templates included in the app to get you started.
You can customize the template to fit your projects needs, or you can use the blank presentation to design your slides from the ground up.
If youre looking for more than just text, the Microsoft PowerPoint app has you covered.
You can easily add images, sound, and videos to your slides, giving your presentations a more dynamic look.
You can also collaborate with others in real-time, so you can work together to create the perfect presentation.
In addition to the app itself, youll also need some content for your presentation.
Depending on the type of presentation youre creating, you may need to gather images, sound clips, videos, and text for your slides.
You can easily add these elements to your presentation using the app, so you dont need to worry about creating them yourself.
Finally, youll need a device to create and view your presentation.
The Microsoft PowerPoint app is available for both iPhone and iPad, so you can create presentations on either device.
You can also view your presentations on other devices, such as a laptop or desktop computer, so you can share them with others.
Making a PowerPoint on your iPhone is a great way to create professional-looking presentations on the go.
With the Microsoft PowerPoint app, you have all the tools you need to create stunning presentations in no time.
How To Download and Install the PowerPoint App
Making a PowerPoint presentation on your iPhone is easy and convenient with the Microsoft PowerPoint app.
To get started, you’ll need to download and install the app from the App Store.
The download and installation process is simple and straightforward.
To get the app, open the App Store on your device and search for PowerPoint.
Once you find the app, simply tap the Get button to begin the download and installation process.
The app will then be installed onto your device and ready to use.
Once the app is installed, you can open it by tapping the app icon.
You will then be taken to the main screen, where you can create a new presentation, open an existing presentation, or access the apps settings.
From here, you can start creating your presentation right away.
The PowerPoint app also offers several helpful tutorials to help you get started.
You can access these tutorials by tapping the Tutorials button on the main screen.
The tutorials cover everything from basic editing to creating complex presentations.
Whether youre a novice or an experienced PowerPoint user, the tutorials can help you make the most of the app.
How To Create a PowerPoint Presentation With a Blank Template
Creating a PowerPoint presentation with a blank template on your iPhone can be a great way to quickly and easily create a professional-looking presentation.
With the Microsoft PowerPoint app, you can start with a blank presentation and design your slides from scratch no matter where you are.
To start, open the Microsoft PowerPoint app on your iPhone and select Blank Presentation from the templates.
This will open a blank canvas where you can design your presentation from scratch.
You can add text, images, audio, and video to each slide, and customize the look and feel of each slide with colors, fonts, and animations.
Once youve created your slides, you can easily rearrange them or add new slides.
You can also add transitions and animations to your slides to make them more engaging.
When youre done, you can save your presentation to the cloud or share it with colleagues or friends.
This makes it easy to collaborate with others in real-time and ensure everyone is on the same page.
Creating a PowerPoint presentation with a blank template on your iPhone is a great way to quickly and easily create a professional-looking presentation.
So, what are you waiting for? Give it a try and create your next presentation today!
How To Customize a PowerPoint Template
Customizing a PowerPoint template on your iPhone is a simple process that can help you create an engaging and professional presentation quickly. With the Microsoft PowerPoint app, you can choose from a wide variety of templates, many of which are customizable. Once youve chosen a template, you can customize it with your own photos, sound, and videos. You can also add text boxes, shapes, and other elements to further customize the look of your presentation. Heres a step-by-step guide for customizing your PowerPoint template on your iPhone:
1. Open the Microsoft PowerPoint app and select the Create button.
2. Select Create from Template and choose from the available templates.
3. Once youve chosen a template, you can customize it with your own photos, sound, and videos.
4. To add photos, tap the Add Photo button and select from your Camera Roll, or take a photo directly from the app.
5. To add sound, tap the Add Sound button and select from your music library, or record your own sound directly from the app.
6. To add videos, tap the Add Video button and select from your Camera Roll, or record a video directly from the app.
7. To add text boxes, shapes, and other elements, tap the Insert button and select from the available options.
8. Finally, when youre finished customizing your template, tap the Save button to save your presentation.
By following these steps, you can easily customize a PowerPoint template on your iPhone to create an attractive and professional presentation.
With the Microsoft PowerPoint app, you can create presentations on the go, no matter where you are.
Start customizing today and take your presentations to the next level!
How To Add Images, Sound, and Video
Adding images, sound, and video to your PowerPoint presentation on your iPhone is easy.
With the Microsoft PowerPoint app, you can quickly upload images from your photo library, or take a new image and add it directly to your presentation.
You can also add sound effects and music to your presentation to help emphasize different points.
Finally, you can add videos directly to your slides, either from your library or from the internet.
To add an image, sound, or video to your presentation, simply tap the + icon on the top right of the app, then select the type of media youd like to add.
From there, you can choose from your library, or search for an image, sound, or video online.
Once youve found the media youd like to add, simply tap Add to Slide and it will be added to your presentation.
You can then move, resize, and rotate your media, or add additional effects like transitions and animations to help make your presentation stand out.
With the Microsoft PowerPoint app, you can quickly and easily add images, sound, and video to your presentations to make them more engaging and interesting.
How To Collaborate With Others
Making a PowerPoint on your iPhone is made even easier when you need to collaborate with others.
With the Microsoft PowerPoint app, you can work together with your team or classmates in real-time from the comfort of your own device.
You can easily share your presentation to your colleagues and friends, allowing them to make edits and comments.
The collaboration feature is especially useful when you need to simplify a complex process like designing a presentation.
You can easily add images, sound, and videos to the slides with just a few clicks.
Plus, you can keep track of changes made by other collaborators, making it easy to stay organized while working together.
The Microsoft PowerPoint app also allows you to review changes with other collaborators.
You can chat with your team in real-time, making it easy to share ideas and ask questions.
You can also set deadlines for tasks and track progress so that everyone is on the same page.
Finally, the app also enables you to securely share your presentation with anyone.
All you have to do is generate a secure link that you can share with your colleagues or friends.
They can then view and comment on your presentation without having to download the app.
This makes the collaboration process even easier, allowing you to quickly get feedback from your peers.
Final Thoughts
With the powerful capabilities of the Microsoft PowerPoint app, you can create amazing presentations on your iPhone with ease.
Whether you’re starting from scratch or customizing a template, the app makes it easy to add images, sound, and videos to your slides.
You can even collaborate with others in real-time! Now that you know how to make a PowerPoint on iPhone, the possibilities are endless! So go ahead and get started on creating your presentation today!
James Wilson
James Wilson has extensive knowledge in the information technology industry.His second love, besides dealing with computers, is smart home technology. He is continually updating information to better comprehend this problem and has a deep understanding of the apartment’s support system.
Recent Posts
Can You Make a Table on Google Keep? Here's How to Organize Your Notes effectively
Yes, you can create a table in Google Keep by using the checklist feature. To do this, open Google Keep, click on "Take a note," then select the "Checkboxes" icon at the bottom. You can then enter...
Can You Export Google Keep Notes? (A Quick Guide)
Yes, you can easily export your Google Keep notes. To do this, you can go to the Google Keep website, select the note you want to export, click on the three dots menu icon, and then choose "Send."...
Microsoft Research Blog
Advance your presentation with your phone.
Published November 18, 2013
Share this page
- Share on Facebook
- Share on Twitter
- Share on LinkedIn
- Share on Reddit
- Subscribe to our RSS feed
Posted by Rob Knies

Making a business presentation can be daunting. Interaction with the audience might require you to change the flow of your presentation by jumping to a different section in your PowerPoint (opens in new tab) presentation. Or you might want to show supporting evidence in an Excel (opens in new tab) or Word (opens in new tab) document. Either you’ve faced these challenges or you’ve seen somebody else address them, but you know the drill.
Spotlight: AI-POWERED EXPERIENCE

Microsoft research copilot experience
Discover more about research at Microsoft through our AI-powered experience
With Office Remote (opens in new tab) , a collaboration between Microsoft Research and the Microsoft Office (opens in new tab) engineering team, you can manage such modern presentation flows from the palm of your hand.
“Office Remote turns your phone into a smart remote that interacts with Microsoft Office on your PC,” says Bert Van Hoof, an Office group program manager. “The app lets you control Word, Excel, and PowerPoint from across the room so you can walk around freely during presentations.”
This all can be yours, starting Nov. 18, when the app becomes available for download from the Windows Phone Store (opens in new tab) . All you need is a Windows Phone 8 (opens in new tab) device, Office 2013 (all versions except Office 2013 RT), a Bluetooth-enabled PC, and the installation of a desktop add-in for Office Remote on your PC (opens in new tab) , available on the download site. Once thus equipped, all you need for a flawless presentation is to open the Office document you want to project, pick up your phone, and begin your pitch.
“With Office Remote,” Van Hoof adds, “you can start your PowerPoint presentation, advance the slides, see your speaker notes, and control an on-screen laser pointer with a touch of your finger—all from your phone. You can also navigate between Excel worksheets and graphs, and control data slicers from the palm of your hand. And you can scroll through a Word document or quickly jump to specific sections or comments.”
All this is a result of an ongoing collaboration between Office and Microsoft Research intended to enable more natural, seamless interaction across multiple screens and devices to help people create and communicate content more effectively.
Darren Edge (opens in new tab) of Microsoft Research explains.
“We want to make sure that we continue to create tools that deliver the best possible experiences to presenters and audiences,” he says. “It is quite amazing how many people all over the world rely on PowerPoint to add memorable, visual impact to their presentations—and how many of these presentations are delivered in meeting rooms, classrooms, ballrooms, and boardrooms every day.
“The world is constantly evolving, though, and presentations need to evolve with it. We are building partnerships between Microsoft Research and Microsoft Office that will help bring innovations to products now and into the future. Office Remote is a great example of this: It brings together your large display, PC, and mobile device using services that we can continuously improve over time with the latest research and design concepts.”
Indeed, the app, operated via convenient, touch-based control, takes full advantage of existing projectors, large-screen televisions, and Lync (opens in new tab) -meeting connections. Your Windows devices talk to each other to make things easier for you. As a result, you can show what you want when you want.
In addition, these intelligently connected devices enable you to present one experience on your PC while simultaneously controlling what you’re presenting from your phone.
Van Hoof mentioned the highlights of the Office Remote capabilities above, but those are not the only scenarios the app enables. Consider:
- PowerPoint: Large, easily accessible buttons on the phone enable you to start a presentation, advance slides forward or backward, view thumbnails and jump to a particular slide, access speaker cues while viewing the presentation time and the progress of slides, and deliver accurate, non-shaky direction with the on-screen laser pointer.
- Excel: Simple gestures enable jumping not just between spreadsheets and graphs, but also among any named objects. Spreadsheets can be changed with a mere finger swipe, and navigation is available through rows or columns. In addition, you can use PivotTables or filters and change zoom levels, all with an Office Remote-equipped phone.
- Word: Zoom control is available in this application, as well, and Word docs can be scrolled by screen or by line.
The research component of this project, by Edge and John Ransier, technical program manager, enables deeper understanding of real-world presentation practices. Such work fits squarely into Edge’s research vision.
“My research is all about high-value, long-term activities, such as language learning and presenting to an audience,” he says. “I start by choosing an activity that people really care about, then do all I can to discover ways of transforming that activity for the better. This involves broad investigations of current practices and the problems that people encounter, followed by many cycles of design and prototyping.
“Then it is time to ask the difficult question: Does it actually make a difference? At Microsoft Research, we have the additional incentive that concepts making a difference in our user studies have the opportunity to be incorporated into our next generation of products, making an even greater impact on the world at large.”
Office Remote represents just the first deep exploration in the productivity space into the realm of what Bill Buxton (opens in new tab) of Microsoft Research refers to as a “ diverse society of devices (opens in new tab) ,” where you use not only the right device for the task at hand, but, potentially, also use multiple devices together to make it easier to achieve your goals.
With the app ready for download, now it’s your turn to refine the process. Users can provide feedback on the website (opens in new tab) , which also includes a forum to provide answers to users’ questions. Let your voice be heard, and help make the presentation process better than ever.
Continue reading

What’s Your Story: Nicole Forsgren

What’s Your Story: Ivan Tashev

What’s Your Story: Desney Tan

Collaborators: Holoportation™ communication technology with Spencer Fowers and Kwame Darko
Research areas.
- Follow on Twitter
- Like on Facebook
- Follow on LinkedIn
- Subscribe on Youtube
- Follow on Instagram
Share this page:
- Pitch Decks & Investor Materials
- B2B Graphic Design
- Startup Consulting
- Trainings & Workshops
- Case studies
- Downloadable resources
Presentation Tips: How to make mobile friendly presentations
- Presentation design

Welcome back to our article series on practical and short tips to help you create better presentations.
So far, we’ve tackled the issue of compressing presentations , followed by some tips on how to make a presentation printer friendly. Now we’re going to dive into yet another topic that is often overlooked when creating a presentation and that is making sure your presentation is mobile friendly.
Why is this important?
We’re living in a world where smartphones have become ubiquitous (and for some people, their smartphone is even more than that, as it’s almost become an extension of their body). In 2020, for the first time ever, mobile internet traffic surpassed desktop traffic.
More and more businesses adopt a mobile first approach when it comes to their website, apps and overall user experience of their clients. So why don’t we apply the same logic to presentations too?
Whether we’re sending a presentation through email (either before or after a meeting), holding an online meeting or giving a webinar, high chances that someone from the audience will view it on their mobile device.
So here are some simple tips on how to create your own mobile-friendly presentation.
1. Larger Text Size
This is probably the most important guideline out of all and it makes sense why. If the text size is too small, your presentation is unreadable and people will stop paying attention.
So make sure your text sizes are large enough to be viewed on a mobile screen. But how large is “large enough” you may be wondering?
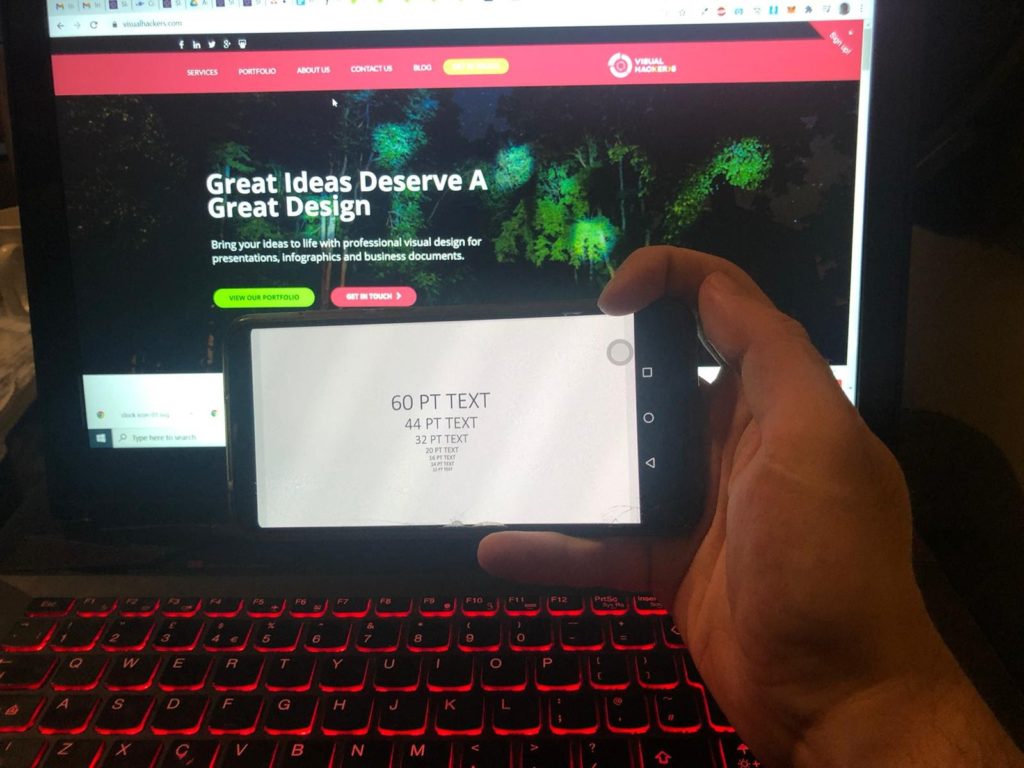
Well I’ve done this quick experiment with various font sizes on my own phone to test it out.
I put different sized-lines and took the picture from how I would see it. Feel free to judge yourself and see what is the smallest size that your eyes are comfortable with.
As a rule of thumb, I’d go with at least a 60 point size for headlines and a 30-32 point size for body content. You could probably get away with a bit smaller text, but I wouldn’t go smaller than 20 points.
2. Less is more
Due to the small size of mobile devices, you definitely don’t want to overcrowd your slides. Keep them simple, uncluttered and follow the cardinal rule of “1 idea = 1 slide”. I’d take that one step further and say even “1 sub-idea = 1 slide”
What do I mean by that? Well, let’s say you have a slide called “5 Success Factors for X” and typically you’d add all 5 points on your slide, along with some accompanying graphics like icons or numbers or pictures (we hope that by this point, you stopped using bullet points in your presentations).
But in a mobile version, after enlarging your text to be the minimum readable size, you might want to split those 5 points into 2 slides, or even have one success factor per slide.
If you’re worried that your presentation will get too long in this case, then don’t. In the end, your audience will still see the same amount of content in the same amount of time, so why not at least space out that content for a better understanding?
3. Large images
When adding images to your presentation, make sure they are large enough so that the audience doesn’t have to squint to see them.
Ideally the image should occupy the whole slide and work as a background with minimal content on top of it. But if you need to add more than one image, make sure that each image takes up at least a quarter of the slide.
Because of this, I don’t recommend using more than 4 images on your slide, and if you need to use more (for example to showcase multiple products), just remember guideline #2 and split it up across multiple slides.
4. Show & tell, don’t write
As a result of guideline #2, you’d have to keep your slide content to a minimum. When thinking whether to keep a certain word or phrase, think of it from this perspective: is this something I can visually illustrate or represent with an image or icon?
Graphics don’t even have to be a literal representation of the content, but can be more subtle and indirect in order to cover more of the slide content while you explain the context
5. Make a higher contrast
Contrast is one of design’s key principles, and it plays an even bigger role on a smaller screen size.
Make sure your slide content, whether it’s text, graphics, images or charts, has enough contrast between its different parts. Contrast doesn’t refer just to color contrast, but also contrast in size or placement.
A good way to tell if your presentation has enough contrast is to slightly squint your eyes when viewing your presentation on your mobile. If some colors get blended together or if pieces of text look the same when they shouldn’t (eg. a main point and a sub-point), then you have to increase the contrast of those elements.
6. Clean & simple charts & diagrams
Charts and diagrams can easily become overwhelming on small screens if you’re not careful. A standard chart in Powerpoint would have both axes, it would have a legend, a slide title, maybe some data labels or some trend lines and so on. If you have all of these elements, then it can become over cluttered and people won’t be able to properly distinguish them.
Try and think of any unnecessary elements and remove them. Remember that less is more. For example, if you have a bar chart, you should keep either your vertical axis or your data labels, you shouldn’t keep both.
7. No fancy stuff
For the purpose of a simpler and seamless viewing experience, don’t overdo it with animations and transitions. In fact, if they don’t serve a real useful purpose, just take them out completely (I’d argue that 80-90% of animations are useless beyond just being flashy and we rarely use them).
Without animations and transitions you will also make sure that who is viewing the presentation will have a minimum risk of the presentation lagging. Another way to achieve this is to just save your presentation as a PDF and send it like that.
Creating a mobile friendly doesn’t require a huge amount of extra work, you just have to keep these tips in mind from the very beginning.
Following these guidelines will help your presentation stand out from a mobile viewer’s perspective, giving them a better overall experience. And that in turn will better reflect back on you, as you’ll be perceived as a professional that has a high attention to details, cares about the audience and does not let things to chance.
Top articles
- Infographics
- Personal branding
- Pitch deck design
- PowerPoint tutorial
- Public speaking
- Visual communication
Sign up for our monthly newsletter
Leave a reply cancel reply.
Save my name, email, and website in this browser for the next time I comment.
This site uses Akismet to reduce spam. Learn how your comment data is processed .
Our Recommendations
- Best Small Business Loans for 2024
- Businessloans.com Review
- Biz2Credit Review
- SBG Funding Review
- Rapid Finance Review
- 26 Great Business Ideas for Entrepreneurs
- Startup Costs: How Much Cash Will You Need?
- How to Get a Bank Loan for Your Small Business
- Articles of Incorporation: What New Business Owners Should Know
- How to Choose the Best Legal Structure for Your Business
Small Business Resources
- Business Ideas
- Business Plans
- Startup Basics
- Startup Funding
- Franchising
- Success Stories
- Entrepreneurs
- The Best Credit Card Processors of 2024
- Clover Credit Card Processing Review
- Merchant One Review
- Stax Review
- How to Conduct a Market Analysis for Your Business
- Local Marketing Strategies for Success
- Tips for Hiring a Marketing Company
- Benefits of CRM Systems
- 10 Employee Recruitment Strategies for Success
- Sales & Marketing
- Social Media
- Best Business Phone Systems of 2024
- The Best PEOs of 2024
- RingCentral Review
- Nextiva Review
- Ooma Review
- Guide to Developing a Training Program for New Employees
- How Does 401(k) Matching Work for Employers?
- Why You Need to Create a Fantastic Workplace Culture
- 16 Cool Job Perks That Keep Employees Happy
- 7 Project Management Styles
- Women in Business
- Personal Growth
- Best Accounting Software and Invoice Generators of 2024
- Best Payroll Services for 2024
- Best POS Systems for 2024
- Best CRM Software of 2024
- Best Call Centers and Answering Services for Busineses for 2024
- Salesforce vs. HubSpot: Which CRM Is Right for Your Business?
- Rippling vs Gusto: An In-Depth Comparison
- RingCentral vs. Ooma Comparison
- Choosing a Business Phone System: A Buyer’s Guide
- Equipment Leasing: A Guide for Business Owners
- HR Solutions
- Financial Solutions
- Marketing Solutions
- Security Solutions
- Retail Solutions
- SMB Solutions

Online only. Expires 4/27/2024
How to Set Up a Presentation Using Your iPhone or iPad

Table of Contents
These days, we’re more reliant than ever on mobile devices for productivity and connectivity, even in work scenarios like conferences and seminars. It’s easy and convenient to power your presentations with an iPhone or iPad, but you might not know how to connect to an external display.
We’ll explain how to mirror a small screen to a more prominent display such as a smart TV, projector or monitor, whether you’re prepping for a presentation in a smart office or streaming content at home.
To share a presentation with a broader remote audience, consider uploading your presentation to YouTube .
How to give presentations from your iPhone or iPad
Bring your mobile presentation to life by connecting your iOS device to an external display. Several technologies can power mobile presentations on a larger screen, including AirPlay, which allows streaming and screen mirroring.
We’ll explain how sending your presentation to an external display works for the most common devices you’ll encounter.
1. Send an iOS presentation to an Apple TV.
Mirroring your presentation from an iPad or iPhone to an Apple TV is straightforward. Here’s how it works:
- Power on your Apple TV. Make sure it’s on the same Wi-Fi network as your iOS device.
- On your iOS device, load the presentation or content you want to share to the Apple TV.
- Tap the AirPlay icon . (It looks like a rectangular screen with a triangle at the bottom.)
- Choose your Apple TV .
- Your content will begin. To stop streaming, tap the AirPlay icon in the app you’re streaming from.
Consider accepting Apple Pay as a payment source for your business. Apple Pay is a mobile payment method that customers like using and often cite as their ideal payment method.
2. Send an iOS presentation to a smart TV.
If you have an internet-enabled smart TV, you have a few options, depending on your TV model.
AirPlay 2-compatible smart TVs
If you have an AirPlay 2-compatible smart TV, such as select Samsung models, LG TVs and Roku TVs, the process is nearly the same as using AirPlay with an Apple TV:
- On your AirPlay 2-compatible smart TV, go to Settings > General > Apple AirPlay Settings and enable AirPlay .
- Tap the AirPlay icon .
- Select your AirPlay 2-compatible smart TV.
- Play your presentation or content.
Smart TVs that aren’t AirPlay 2-compatible
If your internet-connected smart TV isn’t AirPlay compatible, consider a third-party mirroring app like AllCast. AllCast is an iOS app that wirelessly streams your phone’s content to an external monitor. Here’s how it works:
- Download AllCast from the App Store on your iOS device.
- Launch AllCast and tap the broadcast icon . It will find compatible devices on your network.
- Select your smart TV.
AllCast is also compatible with Roku devices, Amazon Fire TV devices, Apple TV, Microsoft Xbox consoles, and smart TVs from Samsung, Sony, Panasonic and more. While AllCast is free to download and use, in-app purchases allow you to remove ads and unlock features.
The Apple App store has 3.6 million apps available for download as of 2022, with Google’s Play Store offering 2.8 million. Explore our list of the best iPhone apps for business users .
3. Send an iOS presentation to a Mac.
If you want to send your iOS presentation to a larger Mac, the process is simple.
- Make sure your iOS device and Mac are on the same Wi-Fi network.
- On your iOS device, open the Control Center.
- Tap Screen Mirroring .
- Select your Mac.
- You may see an AirPlay passcode on your Mac screen. If so, enter the code on your iOS device.
4. Send an iOS presentation to a non-smart TV or projector.
Working with an old-school TV or a projector that doesn’t connect to the internet? Not a problem. Use a connector or adapter to achieve the same effect as mirroring.
Connect to a monitor with an adapter.
If you have access to a monitor and you don’t want to connect wirelessly, opt for an old-fashioned cable adapter. Apple sells a Lightning digital AV adapter with an additional power port (so you can charge your iPhone or iPad while you present from it).
At $49, Apple’s adapter is pricey for a one-off presentation, but if you travel a lot, the purchase could be worthwhile. Using Wi-Fi across various venues can be a gamble. If you’re presenting to clients, you may not want to roll the dice.
Connect to a projector with an adapter.
Many modern projectors have proprietary apps to connect to wirelessly from mobile devices, but they vary drastically in quality, availability and compatibility. If you want to be certain of your ability to connect to a specific projector, an adapter is an excellent option.
Newer projectors typically have HDMI and VGA ports. If you have a choice, opt for an HDMI adapter because it’ll be more versatile. If you need to connect to an older projector, you will probably have to connect using a VGA adapter; Apple sells one (also priced at $49) with an added charging port, so you don’t run out of juice.
There is almost always a way to connect an iPad or iPhone to an external display, though it might involve Apple-branded hardware or a stand-alone app.
FAQs about sending an iOS presentation to an external display
If you’re having trouble connecting your iPad or iPhone to a monitor or have other questions about creating a great presentation, you’ll find commonly asked questions below.
What is screen mirroring?
Screen mirroring is the process of displaying the contents of a device like an iPad or iPhone on another device, such as a television, external monitor or projector. Screen mirroring is sometimes confused with screencasting, which is the process of recording everything happening on your screen.
Why do people use screen mirroring?
Screen mirroring is helpful anytime you want to share small-screen content on a big screen. People use screen mirroring in both personal and professional settings, including watching entertainment and running through presentations.
Can you screen mirror without Wi-Fi?
The only way to screen mirror without Wi-Fi is to use a cable connection or adapter. Screen mirroring apps won’t work if you can’t access Wi-Fi. In fact, if you’re using a screen mirroring app, the device you’re mirroring from and the device you’re mirroring to have to be on the same Wi-Fi network.
One significant benefit of buying an HDMI adapter is that you no longer need to worry about Wi-Fi access when mirroring – you can plug in the cord and get started.
What are the best iPad apps for creating presentations?
There are many excellent presentation tools for all platforms. Keynote is Apple’s answer to PowerPoint, and it’s a go-to among professionals who use Apple devices because it’s a free download from the App Store. You can also use PowerPoint on Apple devices via the PowerPoint mobile app. If you want to try something different, Google Slides is the current black horse in the presentation software arena, and it’s also available through Apple’s App Store.
iPad business uses include remote desktop access, on-the-go presentations and access to Microsoft Office mobile apps.
Do I need an adapter to connect my iPad to my TV?
If you have Apple mobile devices and want to share content with a broader audience, an adapter is an excellent option. An adapter’s main advantage is allowing you to connect to nearly any external monitor. Adapters are helpful for people who want to mirror to an older TV or monitor without internet connectivity, as well as anyone who frequently hosts presentations in places without open Wi-Fi networks or smart monitors.
Can you screen mirror with an Android device?
Yes. Android and iOS both support business uses , such as screen mirroring for presentations. You can mirror your Android, PC or Google device on an external screen or projector with a built-in app, Bluetooth, a third-party app or an HDMI adapter. If you go down the app and Bluetooth route, ensure that your mobile device and the external monitor are connected to the same Wi-Fi network.
Mona Bushnell contributed to the writing and research in this article.

Building Better Businesses
Insights on business strategy and culture, right to your inbox. Part of the business.com network.
Presentation Guru
How to give a great presentation with just your phone.

Mobile devices are becoming increasingly capable of doing more than offering the means for checking emails, sending text messages, and playing frivolous games. And of course, they can also be used to make calls! There are a plethora of apps and methods that can be used for creating, editing and presenting presentations using smart devices.
Previously, we presented a few of those options in our post about the best presentation apps for Android . This time we will provide you with a comprehensive guide regarding how you can use smart devices like smartphones, tablets and phablets to present your presentations.
The methods mentioned in this post can be used for presenting a slide deck made in PowerPoint, or a web app like Google Slides or Slide Magic . Many of the below mentioned methods can also be used for displaying photos, documents, spreadsheets and video presentations on a projector, monitor or computer screen using an Android or iOS device.
Choosing Between Wireless & Wired Connectivity
Before we proceed to the ‘how’, it’s worth pointing out that you should pick out the wireless and/or wired options for presenting your presentations according to the capability of the available hardware. For example, you might opt for HDMI or VGA connectivity, an app that lets you wirelessly connect to a monitor, a default mirroring feature in a projector or SmartTV, etc.
While wireless connectivity might seem like a convenient option, you must consider the available devices at the venue, as well as the capability of your smart device. While iOS devices tend to be more uniform, Android devices are a dime a dozen. This makes the latter unpredictable.
Moreover, different projectors and monitors have different connectivity options which you must account for, therefore, the first thing you must do is to be make sure what hardware is available for presenting your presentation; including the devices available at the presentation venue, and the capability of your own smartphone, tablet or hybrid device.

Connecting & Mirroring your Device on a Projector, TV or Monitor
There are perhaps more methods for connecting a smart device than we can list down. There are several apps and devices which can allow you to connect and mirror your smart device on a projector, TV or monitor screen. We have listed down some of the commonly used methods that you can use connecting and mirroring an Android or iOS device.
Android devices tend to be quite unpredictable. There are so many companies manufacturing Android devices globally that it is likely you haven’t heard of a few dozen of them! This also means that different Android devices have very different capabilities, and many don’t support various methods and apps for wired or wireless mirroring. Here are a few common methods which should help you connect an Android device to a projector, TV or monitor screen.
Wired Connectivity
The most common method for connecting your Android device to a projector is by using MHL or HDMI. The connectivity options mentioned below may or may not be available for your smart device.

Mini-HDMI and HDMI to VGA Adapter
You can use a mini-HDMI cable to connect your smart device to a projector. In case the projector you are using does not have an HDMI cable, you might need an HDMI to VGA Adapter .

MHL is a technology used to connect mobile devices to monitors and TV screens. Provided your smartphone supports MHL, you can connect MHL to an HDMI adapter to connect to a projector. You can also use a Micro USB to VGA MHL Adapter to connect to multimedia devices.

Wireless Connectivity
Presenting a presentation wirelessly may have its pros and cons. You will require a reliable wireless connection, as any jitters caused by your wireless connection might result in unwanted disruptions. Here are a few reliable options that you can use to wirelessly present presentations via an Android smart device.

Using Chromecast, you can cast your Android device to a large screen. This method is best suited for quick connectivity to TV screens. There are many conference rooms which use TV screens instead of projectors. This makes it possible to use devices like Chromecast. With Chromecast you can mirror an Android smartphone or tablet to the big screen by using the Google Cast app. Here is a video which shows you how to cast your Android device to a TV screen.
Android Mirroring Apps
There are a number of apps which allow mirroring Android screen to a computer. You can connect your computer to a projector or monitor to present your presentations using apps like AirDroid or simply use apps like Allcast for mirroring an Android device to a SmartTV. Allcast supports a plethora of devices for casting photos and videos. Some of the devices supported by Allcast include; Amazon Fire TV, Apple TV, WDTV, Roku, Samsung, Sony and Panasonic Smart TVs, DLNA Renderers, etc.
Here is a video which shows how to mirror your Android screen using Mirror Beta, Allcast and Google Chrome. [Video Courtesy: Learn Share]
Mirror Your Smart Device to a Smart TV
If you require connecting to a SmartTV for presenting a presentation, you can make use of various SmartTV apps. It is likely that the TV in use already has apps or a mechanism for certain supported devices. For example, Samsung’s SmartTV’s provide mirroring options for mirroring Android devices from various Galaxy smartphone models. Here is a video which shows you how to mirror an Android device to a SmarTV. [Video Courtesy: GizmoBeast]
Projector Apps for Android
There are a number of projectors which have their own apps which allow sending files to a wireless projector. For example, Panasonic provides the Wireless Projector app for Android and iOS devices which enables displaying images, PDF, PowerPoint, Word and Excel files via an Android device to a Panasonic projector. The app requires a Wi-Fi connection to display content from Android devices to a supported projector.
You can look for similar apps for the projector at the presentation venue via the Google Play Store or check out the projector company’s website to find apps provided for wireless connectivity using mobile devices and tablets.

Projector Phone
While this isn’t a very common method, however, you might find it quite convenient for impromptu presentations. A projector phone is a smartphone with a built-in projector. With a projector phone you can instantly display the content of your device by projecting it on a flat surface via built-in pico projector. Back in the day Samsung’s Galaxy Beam came with a built-in HD projector, which was later followed by Galaxy Beam 2. Lately, the Akyumen Hawk projector phones and tablets have been providing HD projectors in their smart devices.

Apple’s smart devices have the ideal hardware for wireless presentations. Moreover, they tend to be more uniform, as they aren’t manufactured by dozens of companies. There are various ways by which you can present a presentation using an iPhone or iPad device. Here are a few wired and wireless options that you can use for your slide decks and video presentations.
There are only a handful of methods for wired connectivity for mirroring an iOS device and those too might require the use of an adapter.

HDMI and VGA
The most common method to connect an iOS device is to use a Digital AV or VGA adapter to connect your iPhone or iPad device to an HDMI or VGA cable connected to a projector, TV or computer. You can learn more about how to connect your iOS device to a projector, TV or computer via this Apple Support page.

The video below shows three methods for connecting your iPad device to a projector, including VGA, HDMI and via Apple TV. [Video Courtesy: Richard Hirstwood]
Document Camera
While this might not be the preferred option, however, you can use a document camera to display the content of your iOS device by connecting the camera to a projector.

Here are a few wireless connectivity options that you can use for mirroring your iOS device to a projector, TV or computer screen.

You can use Airplay to play photos and videos from an iOS device to an Apple TV or AirPort Express. Airplay is one of the most common methods to wirelessly stream content from iOS devices, however, the limited number of devices supported for Airplay reduces its utility for presenters. You can see this guide from the Apple Support page to learn all about using Airplay for wirelessly streaming your content to supported devices.

You might want to reduce the hassle of using an adapter and VGA cable by simply opting for connectivity via Apple TV. Using Apple TV you can connect your iOS device using Airplay. You can see a detailed guide for connecting an Apple TV to a projector from the video given above, which shows connectivity via HDMI, VGA and Apple TV.

Projector Apps for iOS
Just like there are projector apps for Android, there are apps for iOS provided by different companies that manufacture a range of projectors. For example, Panasonic’s Wireless Projector app for iOS provides the utility to wirelessly display files to a supported Panasonic projector using an iOS device.

AirServer is a software for mirroring your smart device to a PC, Mac or Xbox One. What’s great about AirServer is that it supports Mircast, Google Cast and AirPlay. AirServer is available for a number of platforms, including iOS and Android devices. Here is a video which provides an overview of AirServer. [Video Courtesy: Airserverapp]
Screen Mirroring Apps for iOS Devices
Mirroring360 is an app which allows wirelessly sharing an iPhone, iPad, Android, Mac or Windows screen. For iOS devices, you can install the Mirroring360 app on a Mac or PC and begin mirroring your iOS device using AirPlay. There are also other apps which provide a similar functionality such as; Reflector 2 and X-Mirage .

Here is a quick video which shows how you can use Mirroring360 to share your iOS screen during presentations and meetings. [Video Courtesy: SplashtopInc]
There are several methods that can be used for connecting your Android or iOS device to a projector, TV screen, monitor or computer to present presentations. We have covered some of the most commonly used methods, with some recommended apps and devices that can help you use a wireless or wired connection for presenting presentations and picture slideshows, video presentations and to conduct Live demos using smart devices. It is quite likely that there might be easier and more robust methods introduced for mirroring and streaming content from smart devices in the near future.
If you know of a good app, device or method for wirelessly presenting presentations using an Android or iOS device, do share your thoughts with us via our comments section.
If you liked this, you might also like
The Best Presentation Apps for iPhone and iPad
How to Present PowerPoint on iPads and iPhones
The Best Presentation Apps for Android
How to Control your Computer Using an Android Device – and it’s Free!
10 Essential Items for the Presenter On the Go
- Latest Posts
Farshad Iqbal
+Farshad Iqbal
Latest posts by farshad iqbal ( see all ).
- Let’s look at Interactive Digital Whiteboards - 6th March 2018
- Six of the Best Laptops for Presenters - 16th January 2018
- Where Can I Find Great Clip Art and More for Powerpoint? - 12th December 2017
- The Best Digital Whiteboards for Presenters - 21st November 2017
- The Best Screen Mirroring Apps and Technology for Every Occasion - 24th October 2017
3rd November 2016 at 6:07 pm
Fabulously detailed article Farshad. Thank you it’s really helpful and just what we should be doing at the Guru.
4th November 2016 at 1:43 am
Thanks Jim. I’m glad you liked it.
22nd September 2017 at 9:32 am
Thanks for posting such a helpful post.Previously i was using Apple Tv to share my ipad screen but it is compatible with Apple devices only. Can you suggests any device i.e compatible with all OS and must be cost effective. Currently am using Prijector which not only mirrors the screen but also integrated with various VC apps. Can you please suggests me a better device than Prijector ? please do give your suggestions. Thanks in advance.
22nd September 2017 at 11:21 am
Thanks for your comment. We have asked our Tech Guru, Farshad Iqbal to write an article on just this issue. We will look at prijector and other solutions and recommend the best screen sharing apps and technology for every occasion.
25th September 2017 at 1:51 pm
Hello, I enjoyed the read. I am the administrator of a school and I am looking for some sort of link that allows compatibility with ios and android. Most of my teachers have iPhones but then there is folk like me that use android. Our teachers have a projector in their rooms but I am trying to figure out if I have to buy a second device to hook up to all projectors to make it possible for any teacher to present in any room. Do you have any advice or input on the matter?
13th October 2017 at 6:10 pm
Most projectors support both Android and iOS devices and have apps for them. You might want to look into supported apps for your projector(s).
On a side note, if you wish to physically connect multiple projectors for a centralized control, you will need a KVM switch.
More device recommendations will be available in a new post I just submitted to my editor.
27th August 2021 at 8:50 am
Reflector Free Download
27th August 2021 at 8:51 am
Reflector Review is a useful tool for transferring sequences and screens from your Mac, Windows, iOS, or Android device to your computer over long-distance communication.
5th November 2021 at 5:57 am
I like your all post. You have done really good work. PE-Design Crack
Your email address will not be published. Required fields are marked *
Follow The Guru

Join our Mailing List
Join our mailing list to get monthly updates and your FREE copy of A Guide for Everyday Business Presentations

The Only PowerPoint Templates You’ll Ever Need
Anyone who has a story to tell follows the same three-act story structure to...

How to get over ‘Impostor Syndrome’ when you’re presenting
Everybody with a soul feels like an impostor sometimes. Even really confident and experienced...
- PRO Courses Guides New Tech Help Pro Expert Videos About wikiHow Pro Upgrade Sign In
- EDIT Edit this Article
- EXPLORE Tech Help Pro About Us Random Article Quizzes Request a New Article Community Dashboard This Or That Game Popular Categories Arts and Entertainment Artwork Books Movies Computers and Electronics Computers Phone Skills Technology Hacks Health Men's Health Mental Health Women's Health Relationships Dating Love Relationship Issues Hobbies and Crafts Crafts Drawing Games Education & Communication Communication Skills Personal Development Studying Personal Care and Style Fashion Hair Care Personal Hygiene Youth Personal Care School Stuff Dating All Categories Arts and Entertainment Finance and Business Home and Garden Relationship Quizzes Cars & Other Vehicles Food and Entertaining Personal Care and Style Sports and Fitness Computers and Electronics Health Pets and Animals Travel Education & Communication Hobbies and Crafts Philosophy and Religion Work World Family Life Holidays and Traditions Relationships Youth
- Browse Articles
- Learn Something New
- Quizzes Hot
- This Or That Game New
- Train Your Brain
- Explore More
- Support wikiHow
- About wikiHow
- Log in / Sign up
- Computers and Electronics
- Presentation Software
- PowerPoint Presentations
Simple Steps to Make a PowerPoint Presentation
Last Updated: April 19, 2024 Fact Checked
Creating a New PowerPoint
Creating the title slide, adding a new slide, adding content to slides, adding transitions, testing and saving your presentation.
This article was co-authored by wikiHow staff writer, Darlene Antonelli, MA . Darlene Antonelli is a Technology Writer and Editor for wikiHow. Darlene has experience teaching college courses, writing technology-related articles, and working hands-on in the technology field. She earned an MA in Writing from Rowan University in 2012 and wrote her thesis on online communities and the personalities curated in such communities. This article has been fact-checked, ensuring the accuracy of any cited facts and confirming the authority of its sources. This article has been viewed 4,322,525 times. Learn more...
Do you want to have your data in a slide show? If you have Microsoft 365, you can use PowerPoint! PowerPoint is a program that's part of the Microsoft Office suite (which you have to pay for) and is available for both Windows and Mac computers. This wikiHow teaches you how to create your own Microsoft PowerPoint presentation on a computer.
How to Make a PowerPoint Presentation
- Open the PowerPoint app, select a template and theme, then like “Create.”
- Click the text box to add your title and subtitle to create your title slide.
- Click the “Insert” tab, then “New Slide” to add another slide.
- Choose the type of slide you want to add, then add text and pictures.
- Rearrange slides by dragging them up or down in the preview box.
Things You Should Know
- Templates make it easy to create vibrant presentations no matter your skill level.
- When adding photos, you can adjust their sizes by clicking and dragging in or out from their corners.
- You can add animated transitions between slides or to individual elements like bullet points and blocks of text.

- If you don't have a Microsoft Office 365 subscription, you can use the website instead of the desktop app. Go to https://powerpoint.office.com/ to use the website version.
- You can also use the mobile app to make presentations, though it's easier to do this on a computer, which has a larger screen, a mouse, and a keyboard.

- If you don't want to use a template, just click the Blank option in the upper-left side of the page and skip to the next part.

- Skip this step if your selected template has no themes available.

- If you're creating a PowerPoint presentation for which an elaborate title slide has been requested, ignore this step.

- You can change the font and size of text used from the Home tab that's in the orange ribbon at the top of the window.

- You can also just leave this box blank if you like.

- You can also click and drag in or out one of a text box's corners to shrink or enlarge the text box.

- On a Mac, you'll click the Home tab instead. [1] X Research source

- Clicking the white slide-shaped box above this option will result in a new text slide being inserted.

- Title Slide
- Title and Content
- Section Header
- Two Content
- Content with Caption
- Picture with Caption

- Naturally, the title slide should be the first slide in your presentation, meaning that it should be the top slide in the left-hand column.

- Skip this step and the next two steps if your selected slide uses a template that doesn't have text boxes in it.

- Text boxes in PowerPoint will automatically format the bulk of your text for you (e.g., adding bullet points) based on the context of the content itself.
- You can add notes that the Presentation will not include (but you'll still be able to see them on your screen) by clicking Notes at the bottom of the slide.

- You can change the font of the selected text by clicking the current font's name and then clicking your preferred font.
- If you want to change the size of the text, click the numbered drop-down box and then click a larger or smaller number based on whether you want to enlarge or shrink the text.
- You can also change the color, bolding, italicization, underlining, and so on from here.

- Photos in particular can be enlarged or shrunk by clicking and dragging out or in one of their corners.

- Remember to keep slides uncluttered and relatively free of distractions. It's best to keep the amount of text per slide to around 33 words or less. [2] X Research source

- Slide content will animate in the order in which you assign transitions. For example, if you animate a photo on the slide and then animate the title, the photo will appear before the title.
- Make your slideshow progress automatically by setting the speed of every transition to align with your speech as well as setting each slide to Advance . [3] X Trustworthy Source Microsoft Support Technical support and product information from Microsoft. Go to source

- If you need to exit the presentation, press Esc .

- Windows - Click File , click Save , double-click This PC , select a save location, enter a name for your presentation, and click Save .
- Mac - Click File , click Save As... , enter the presentation's name in the "Save As" field, select a save location by clicking the "Where" box and clicking a folder, and click Save .
Community Q&A
- If you save your PowerPoint presentation in .pps format instead of the default .ppt format, double-clicking your PowerPoint presentation file will prompt the presentation to open directly into the slideshow view. Thanks Helpful 5 Not Helpful 0
- If you don't have Microsoft Office, you can still use Apple's Keynote program or Google Slides to create a PowerPoint presentation. Thanks Helpful 0 Not Helpful 0

- Your PowerPoint presentation (or some features in it) may not open in significantly older versions of PowerPoint. Thanks Helpful 1 Not Helpful 1
- Great PowerPoint presentations avoid placing too much text on one slide. Thanks Helpful 0 Not Helpful 0
You Might Also Like

- ↑ https://onedrive.live.com/view.aspx?resid=DBDCE00C929AA5D8!252&ithint=file%2cpptx&app=PowerPoint&authkey=!AH4O9NxcbehqzIg
- ↑ https://www.virtualsalt.com/powerpoint.htm
- ↑ https://support.microsoft.com/en-us/office/set-the-timing-and-speed-of-a-transition-c3c3c66f-4cca-4821-b8b9-7de0f3f6ead1#:~:text=To%20make%20the%20slide%20advance,effect%20on%20the%20slide%20finishes .
About This Article

- Send fan mail to authors
Reader Success Stories
Artis Holland
Sep 22, 2016
Is this article up to date?

Oct 18, 2016
Jul 23, 2016
Margery Niyi
Sep 25, 2017
Jul 21, 2016

Featured Articles

Trending Articles

Watch Articles

- Terms of Use
- Privacy Policy
- Do Not Sell or Share My Info
- Not Selling Info
wikiHow Tech Help:
Tech troubles got you down? We've got the tips you need

- SUGGESTED TOPICS
- The Magazine
- Newsletters
- Managing Yourself
- Managing Teams
- Work-life Balance
- The Big Idea
- Data & Visuals
- Reading Lists
- Case Selections
- HBR Learning
- Topic Feeds
- Account Settings
- Email Preferences
How to Make a “Good” Presentation “Great”
- Guy Kawasaki

Remember: Less is more.
A strong presentation is so much more than information pasted onto a series of slides with fancy backgrounds. Whether you’re pitching an idea, reporting market research, or sharing something else, a great presentation can give you a competitive advantage, and be a powerful tool when aiming to persuade, educate, or inspire others. Here are some unique elements that make a presentation stand out.
- Fonts: Sans Serif fonts such as Helvetica or Arial are preferred for their clean lines, which make them easy to digest at various sizes and distances. Limit the number of font styles to two: one for headings and another for body text, to avoid visual confusion or distractions.
- Colors: Colors can evoke emotions and highlight critical points, but their overuse can lead to a cluttered and confusing presentation. A limited palette of two to three main colors, complemented by a simple background, can help you draw attention to key elements without overwhelming the audience.
- Pictures: Pictures can communicate complex ideas quickly and memorably but choosing the right images is key. Images or pictures should be big (perhaps 20-25% of the page), bold, and have a clear purpose that complements the slide’s text.
- Layout: Don’t overcrowd your slides with too much information. When in doubt, adhere to the principle of simplicity, and aim for a clean and uncluttered layout with plenty of white space around text and images. Think phrases and bullets, not sentences.
As an intern or early career professional, chances are that you’ll be tasked with making or giving a presentation in the near future. Whether you’re pitching an idea, reporting market research, or sharing something else, a great presentation can give you a competitive advantage, and be a powerful tool when aiming to persuade, educate, or inspire others.
- Guy Kawasaki is the chief evangelist at Canva and was the former chief evangelist at Apple. Guy is the author of 16 books including Think Remarkable : 9 Paths to Transform Your Life and Make a Difference.
Partner Center
How-To Geek
How to make a slideshow on an iphone.
Sit back, relax, and enjoy watching your favorite photos and videos!
Quick Links
Create a slideshow for your photos and videos on iphone.
Thanks to the iPhone's built-in Photos app , you can make a slideshow and have your photos and videos play one after another without manual interaction. You can choose a custom background music track, theme, and even the speed of the slideshow.
The Photos app only lets you play your content as a slideshow; you can't save these slideshows to play at a later time on another device. However, as a workaround, you could record a video of your iPhone's screen while it plays and save it, or stream it to your Apple TV using AirPlay .
Related: How to Edit Photos on Your iPhone (Using the Photos App)
To start making your multimedia slideshow , launch the Photos app on your iPhone .
In the Photos app, select the photos and videos you'd like to include in your slideshow.
When you've selected your photos and videos, in the bottom-left corner of your screen, tap the share icon.
In the share menu, tap "Slideshow."
Your iPhone will automatically create and play a slideshow containing your photos and videos.
To customize this slideshow, then tap on the slideshow and then select "Options" in the bottom-right corner.
On the "Slideshow Options" page, choose the item you'd like to change for your slideshow. Your options are:
- Theme : Use this option to change your slideshow's theme.
- Music : Change your slideshow's background music with this option. You can load music from the Music app as well.
- Repeat : To play your slideshow in a loop, enable this option.
- Slider : Use this slider to change your slideshow's playback speed. Dragging the slider to the left decreases the speed, while dragging it to the right increases the speed.
When you've specified custom options, save your settings by tapping "Done" in the top-right corner.
And that's it. Enjoy the customized slideshow of your favorite photos and videos!
Another way to make a slideshow on your iPhone or other devices is to use Google Photos.
Related: How to Make a Slideshow on Google Photos

How to make a FaceTime call on your Android phone, tablet, or Windows PC
For years, many Android users wished they could access FaceTime due to the app's known superior video and audio quality. In an interesting turn of events, Apple gently loosened its grip on iMessage in 2021. The change allowed people with Android phones, tablets, Windows PCs, and trusty Chromebooks to use FaceTime from a web browser. In addition, Apple users can also set these browsers as their default apps , which is a big step for a company that doesn't allow replacing its native apps.
While Apple made FaceTime available via your web browser, the experience is slightly different. Features are limited when using FaceTime as a web app. It also requires owning an Apple device to initiate FaceTime calls. However, to show Android users how to access FaceTime, we've included a guide that teaches you how to use FaceTime from a web browser and the possible challenges you may encounter.
How FaceTime Works on Android and PCs
Apple has not released a FaceTime app for Android and PC users, so you can't download one from any online store. Many websites claim to have FaceTime APKs, but they're fake and contain malware that could damage your device. The only way to use FaceTime is to access it via your device's default browser, but there's a catch. You can't initiate a FaceTime call on your own. Instead, an Apple user starts the call, then shares the link with you. Clicking it opens your browser, where you can join the call.
While you won't need an Apple ID to use FaceTime on your iPhone or laptop, you will need to provide your name to allow participants to identify you. It's worth mentioning that using FaceTime on anything other than an iPhone or MacBook won't give you the full experience as Apple users. You can access basic features, such as microphone and camera, full-screen mode, and switch between front and back cameras. SharePlay and screen sharing aren't available since your device isn't an Apple product. Also, you can't use Memoji stickers, apply filters, or use the FaceTime screenshot button. To capture images on your screen , do it manually.
FaceTime video calls with Android and PC users only work if the caller uses a device running iOS and iPadOS 15 or later. macOS 14 Sonoma, as well as Ventura and Monterey also support the feature.
On Android and PC, you need a stable internet connection and the latest browser versions.
How to take a screenshot on your Android phone or tablet
How to make a facetime call to non-apple users.
Only someone with an iPhone, iPad, or MacBook can make a FaceTime call and share the invite link with non-Apple users. As a FaceTime caller, you receive a notification when someone tries to join your call via the link. You need to grant them permission. Otherwise, they can't participate even though they click the Join button repeatedly. Use the following steps to make a FaceTime call from an Apple device:
1. Open FaceTime and tap Create Link .
2. A mini screen appears. Under FaceTime Link , tap Add Name .
3. Type a name for your link, then tap OK to save it.
4. In the mini screen, select where to share your link. Alternatively, tap Copy and paste the link where you'd like to send it.
5. By default, FaceTime composes a message with the invite link. You can alter it if you want. When you're done, send the invitation.
6. You'll receive a notification whenever someone attempts to join a FaceTime call. Tap the notification to manage participant options.
7. Tap the green checkmark to allow a person to join the call.
How to join a FaceTime call on your Android phone or Windows PC
As an Android or PC user, you're limited to joining FaceTime calls via invite links. You may receive these links in your default message app or the platform the caller uses. You must provide a name to allow people to recognize you, although you mustn't use your real name. Also, you have to give FaceTime permission to access your camera and microphone to enable you to speak and allow others to see your face.
Most Android phones, tablets, or PCs have a default browser, so you don't have to install a new one. However, ensure your browser is updated to the latest version for the best experience. Use the following steps to join FaceTime calls on non-Apple devices:
1. When you receive a FaceTime call link, tap it to launch it in your default browser.
2. FaceTime asks for permission to use your camera and microphone. Tap Allow .
3. Type your name in the text box , then tap Continue .
4. The FaceTime call screen opens. Tap Join to request permission to participate.
5. Wait for the caller to grant you permission.
How to join a FaceTime call on your Pixel phone or tablet
How to use facetime on your android phone or windows laptop.
FaceTime on Android and PC is limited to basic calling features. You can turn your camera on or off, mute or unmute your microphone, and switch your camera view, among other features. Follow these steps to get the most out of FaceTime:
1. Tap the full screen button to expand the FaceTime call screen.
2. Tap the microphone to enable others to hear your voice or mute it.
3. Tap the video call button to show or hide your face from others.
4. Tap the camera to switch your view between your device's front and back cameras. You won't see this feature if your device doesn't have a rear camera.
5. Tap the three-dots icon to manage camera and microphone settings, share the call link, enable grid layout, and view other participants.
Don't let Apple's walled garden restrain you
Apple users already know the benefits of using FaceTime as a trusted video and voice calling app. The app also offers loads of amazing features. For example, SharePlay lets you watch and listen to media content with call participants via supported apps, and you can share your screen for easy work collaboration. Unfortunately, Apple didn't extend the olive branch to Android; non-Apple users cannot access any of these features. You need a supported Apple device (iPhone, iPad, Mac) to acquire the whole FaceTime experience. But if you're not ready to take the plunge, Android has other great communication tools waiting to be discovered.

Numbers, Facts and Trends Shaping Your World
Read our research on:
Full Topic List
Regions & Countries
- Publications
- Our Methods
- Short Reads
- Tools & Resources
Read Our Research On:
Table of Contents
Mobile phone ownership over time, who owns cellphones and smartphones, smartphone dependency over time, who is smartphone dependent, find out more, mobile fact sheet.
Large shares of Americans are connected to the world of digital information while “on the go” via smartphones and other mobile devices. Explore the patterns and trends that have shaped the mobile revolution below.
To better understand Americans’ smartphone and broadband adoption, Pew Research Center surveyed 5,733 U.S. adults from May 19 to Sept. 5, 2023. Ipsos conducted this National Public Opinion Reference Survey (NPORS) for the Center using address-based sampling and a multimode protocol that included both web and mail. This way nearly all U.S. adults have a chance of selection. The survey is weighted to be representative of the U.S. adult population by gender, race and ethnicity, education and other categories.
Polls from 2000 to 2021 were conducted via phone. For more on this mode shift, please read our Q&A .
Here are the questions used for this analysis , along with responses, and its methodology .
The vast majority of Americans – 97% – now own a cellphone of some kind. Nine-in-ten own a smartphone, up from just 35% in Pew Research Center’s first survey of smartphone ownership conducted in 2011.
Note: The vertical line indicates a change in mode. Polls from 2002-2021 were conducted via phone. In 2023, the poll was conducted via web and mail. For more details on this shift, please read our Q&A . Refer to the topline for more information on how question wording varied over the years. Respondents who did not give an answer are not shown.
Source: Surveys of U.S. adults conducted 2002-2023.

Substantial majorities of Americans across a wide range of demographic groups are cellphone owners. The same is true for smartphone ownership – though some differences do emerge, particularly by age, household income and level of formal education.
% of U.S. adults who say they own a __, by …
- RACE & ETHNICITY
- POLITICAL AFFILIATION
Today, 15% of U.S. adults are “smartphone-only” internet users – meaning they own a smartphone, but do not have home broadband service.
Source: Surveys of U.S. adults conducted 2013-2023. Data for each year is based on a pooled analysis of all surveys containing broadband and smartphone questions fielded during that year.
Reliance on smartphones for online access is especially common among Americans with lower household incomes and those with lower levels of formal education.

This fact sheet was compiled by Research Assistant Olivia Sidoti , with help from Research Analyst Risa Gelles-Watnick , Research Analyst Michelle Faverio , Digital Producer Sara Atske , Associate Information Graphics Designer Kaitlyn Radde and Temporary Researcher Eugenie Park .
Follow these links for more in-depth analysis of the impact of mobile technology on American life.
- Americans’ Social Media Use Jan. 31, 2024
- Americans’ Use of Mobile Technology and Home Broadband Jan. 31 2024
- Q&A: How and why we’re changing the way we study tech adoption Jan. 31, 2024
Find more reports and blog posts related to internet and technology .
1615 L St. NW, Suite 800 Washington, DC 20036 USA (+1) 202-419-4300 | Main (+1) 202-857-8562 | Fax (+1) 202-419-4372 | Media Inquiries
Research Topics
- Age & Generations
- Coronavirus (COVID-19)
- Economy & Work
- Family & Relationships
- Gender & LGBTQ
- Immigration & Migration
- International Affairs
- Internet & Technology
- Methodological Research
- News Habits & Media
- Non-U.S. Governments
- Other Topics
- Politics & Policy
- Race & Ethnicity
- Email Newsletters
ABOUT PEW RESEARCH CENTER Pew Research Center is a nonpartisan fact tank that informs the public about the issues, attitudes and trends shaping the world. It conducts public opinion polling, demographic research, media content analysis and other empirical social science research. Pew Research Center does not take policy positions. It is a subsidiary of The Pew Charitable Trusts .
Copyright 2024 Pew Research Center
Terms & Conditions
Privacy Policy
Cookie Settings
Reprints, Permissions & Use Policy
- Create an email message
- Suggested recipients
- Use @mentions
- Create a signature
- Add attachments
- Check spelling
- Add a reaction
- Out of office replies
- Delay or schedule
- Recall a message
- Automatic forwarding
- Read receipt
- Save a file or draft
- Change display name
- Create a folder
- Use inbox rules
- Conditional formatting
- Use Favorites
- Custom views
- Message font size
- Message list view
- Focused Inbox
- View as conversations
- Filter and sort messages
- Number of messages
- Chat with recipients
- Share an email
- Status in Outlook
- Phishing and suspicious behavior
- Blocked senders
- Protected messages
- Open a protected message
- More to explore

Create and add an email signature in Outlook
In Outlook, you can create one or more personalized signatures for your email messages. Your signature can include text, links, pictures, and images (such as your handwritten signature or a logo).
Note: If the steps under this New Outlook tab don't work, you may not be using new Outlook for Windows yet. Select Classic Outlook and follow those steps instead.
Create and add an email signature
On the View tab, select View Settings .
Select Accounts > Signatures .
Select New signature , then give it a distinct name.
In the editing box below the new name, type your signature, then format it with the font, color, and styles to get the appearance you want.
Select Save when you're done.
With your new signature selected from the list above the editing box, go to Select default signatures and choose whether to apply the signature to new messages and to replies and forwards.
Select Save again.
Note: If you have a Microsoft account, and you use Outlook and Outlook on the web or Outlook on the web for business, you need to create a signature in both products.
Create your signature and choose when Outlook adds a signature to your messages
If you want to watch how it's done, you can go directly to the video below .
Open a new email message.

Under Select signature to edit , choose New , and in the New Signature dialog box, type a name for the signature.
Under Edit signature , compose your signature. You can change fonts, font colors, and sizes, as well as text alignment. If you want to create a more robust signature with bullets, tables, or borders, use Word to create and format your signature text, then copy and paste it into the Edit signature box. You can also use a pre-designed template to create your signature. Download the templates in Word, customize with your personal information, and then copy and paste into the Edit signature box.

You can add links and images to your email signature, change fonts and colors, and justify the text using the mini formatting bar under Edit signature .
You can also add social media icons and links in your signature or customize one of our pre-designed temlates. For more information, see Create a signature from a template .
To add images to your signature, see Add a logo or image to your signature .
Under Choose default signature , set the following options.
In the E-mail account drop-down box, choose an email account to associate with the signature. You can have different signatures for each email account.
You can have a signature automatically added to all new messages. Go to in the New messages drop-down box and select one of your signatures. If you don't want to automatically add a signature to new messages, choose (none). This option does not add a signature to any messages you reply to or forward.
You can select to have your signature automatically appear in reply and forward messages. In the Replies/forwards drop-down, select one of your signatures. Otherwise, accept the default option of (none).
Choose OK to save your new signature and return to your message. Outlook doesn't add your new signature to the message you opened in Step 1, even if you chose to apply the signature to all new messages. You'll have to add the signature manually to this one message. All future messages will have the signature added automatically. To add the signature manually, select Signature from the Message menu and then pick the signature you just created.
Add a logo or image to your signature
If you have a company logo or an image to add to your signature, use the following steps.
Open a new message and then select Signature > Signatures .
In the Select signature to edit box, choose the signature you want to add a logo or image to.

To resize your image, right-click the image, then choose Picture . Select the Size tab and use the options to resize your image. To keep the image proportions, make sure to keep the Lock aspect ratio checkbox checked.
When you're done, select OK , then select OK again to save the changes to your signature.
Insert a signature manually
If you don't choose to insert a signature for all new messages or replies and forwards, you can still insert a signature manually.
In your email message, on the Message tab, select Signature .
Choose your signature from the fly-out menu that appears. If you have more than one signature, you can select any of the signatures you've created.
See how it's done

Top of page
Note: Outlook on the web is the web version of Outlook for business users with a work or school account.
Automatically add a signature to a message
You can create an email signature that you can add automatically to all outgoing messages or add manually to specific ones.
Select Settings at the top of the page.
Select Mail > Compose and reply .
Under Email signature , type your signature and use the available formatting options to change its appearance.
Select the default signature for new messages and replies.
Manually add your signature to a new message
If you've created a signature but didn't choose to automatically add it to all outgoing messages, you can add it later when you write an email message.
In a new message or reply, type your message.

If you created multiple signatures, choose the signature you want to use for your new message or reply.
When your email message is ready, choose Send .
Note: Outlook.com is the web version of Outlook for users signing in with a personal Microsoft account such as an Outlook.com or Hotmail.com account.
Related articles
Create and add an email signature in Outlook for Mac
Create an email signature from a template

Need more help?
Want more options.
Explore subscription benefits, browse training courses, learn how to secure your device, and more.

Microsoft 365 subscription benefits

Microsoft 365 training

Microsoft security

Accessibility center
Communities help you ask and answer questions, give feedback, and hear from experts with rich knowledge.

Ask the Microsoft Community

Microsoft Tech Community

Windows Insiders
Microsoft 365 Insiders
Find solutions to common problems or get help from a support agent.

Online support
Was this information helpful?
Thank you for your feedback.
IMAGES
VIDEO
COMMENTS
To choose a format, tap the Export button in the upper right-hand corner of the app. Select the format you want and then tap Export. Your presentation will then be saved to your device in the format you selected. Once youve saved your presentation, you can easily share it with anyone who has a Microsoft account.
💻 Download Templates Here: https://www.patreon.com/tylerstanczak🔥 PowerPoint Course (Discount): https://rebrand.ly/PowerPointCourse💌 Help me keep doing wh...
1. Microsoft PowerPoint. The most popular program for creating slideshows, Microsoft PowerPoint, has an official app for iPhone. Like the desktop version, you can create a new PowerPoint and edit each slide. Add your pictures, text, and transitions to make it your own.
Outline your presentation. Easier. With outline view for iPhone and iPad, quickly jot down your thoughts, restructure ideas, and move concepts from slide to slide. Then switch to slide view and start designing. You can also work on presentations stored on iCloud or Box using a PC. Start using Keynote at iCloud.com.
Step 2: Create, view, or edit a presentation. Swipe up and down to scroll through the slides. You can also pinch to zoom into a slide. Edit a slide: Tap on the slide Edit slide. Tip: You can also double tap the slide you want to edit. View comments: Tap on the slide View comment. Add comments: Tap on the slide Add comment.
To play the presentation, tap , then tap a slide to go to the next slide. To end the presentation, pinch closed anywhere on the screen. For more ways to show a presentation, see Play a presentation on your iPhone or iPad. To close the presentation, tap in the top-left corner of the screen. Closing the presentation doesn't quit Keynote.
Intro to collaboration. This guide helps you get started using Keynote 14.0 on your iPhone. (To see which version of Keynote you have, go to Settings > Keynote.) To explore the Keynote User Guide, tap Table of Contents at the top of the page, or enter a word or phrase in the search field. If you need more help, visit the Keynote Support website.
Start a slide show. Tap the From Current button, then swipe left to go forward, or swipe right to go in reverse. (It's just like turning pages in a book.) Tip: To start the show from the beginning, tap Show Ribbon > Home > Slide Show > From Beginning.
PowerPoint basics. PowerPoint for iPhone touch guide. PowerPoint for iPhone features. We use your feedback to update and improve these articles. Please go to the buttons at the end of these pages to let us know what you liked and what could be better. Lists PowerPoint for iPhone help topics and provides links to them.
Tap the "Create Presentation" icon — it's the plus (+) symbol in the top-right — then select the theme you wish to use. You can always use your own images in the slides, so don't be thrown off ...
Short Answer. Making a PowerPoint on an iPhone can be done using the PowerPoint app. First, open the app and create a new presentation. Then, select a blank presentation or choose from one of the templates provided. After that, you can add images, add text, change the layout, and adjust the design settings.
Watch Episodes 1 & 2 on-demand. With Office Remote, a collaboration between Microsoft Research and the Microsoft Office engineering team, you can manage such modern presentation flows from the palm of your hand. "Office Remote turns your phone into a smart remote that interacts with Microsoft Office on your PC," says Bert Van Hoof, an ...
If you want to create presentations on Android™ phone, watch this video and follow the steps to do so.-----...
Whether we're sending a presentation through email (either before or after a meeting), holding an online meeting or giving a webinar, high chances that someone from the audience will view it on their mobile device. So here are some simple tips on how to create your own mobile-friendly presentation. 1. Larger Text Size.
On your iOS device, load the presentation or content you want to share to the Apple TV. Tap the AirPlay icon. (It looks like a rectangular screen with a triangle at the bottom.) Choose your Apple ...
Better mobile experience: A vertical orientation makes more sense if you plan to view your presentation on the phone. Scrolling on vertical slides feels more intuitive than tapping them. Seamless ...
Android Mirroring Apps. There are a number of apps which allow mirroring Android screen to a computer. You can connect your computer to a projector or monitor to present your presentations using apps like AirDroid or simply use apps like Allcast for mirroring an Android device to a SmartTV. Allcast supports a plethora of devices for casting photos and videos.
This video showing Microsoft PowerPoint in Mobile or How to make PowerPoint presentation in MobileThanks for watching this videoPlease like comment share and...
1 Start your interactive presentation with an icebreaker. The first step is creating a rapport with your audience. You can do this by helping them to get to know you a little better and get to know each other as well. The way you go about this will depend on the size of your audience.
2. Embed Microsoft Forms (Education or Business Only) If you plan to send your PPT presentation to others—for example, if you're a trainer sending step-by-step instruction presentation, a teacher sending an independent learning task to your students, or a campaigner for your local councilor sending a persuasive PPT to constituents—you might want to embed a quiz, questionnaire, pole, or ...
Open the PowerPoint app, select a template and theme, then like "Create.". Click the text box to add your title and subtitle to create your title slide. Click the "Insert" tab, then "New Slide" to add another slide. Choose the type of slide you want to add, then add text and pictures. Rearrange slides by dragging them up or down in ...
Summary. A strong presentation is so much more than information pasted onto a series of slides with fancy backgrounds. Whether you're pitching an idea, reporting market research, or sharing ...
In the share menu, tap "Slideshow." Your iPhone will automatically create and play a slideshow containing your photos and videos. To customize this slideshow, then tap on the slideshow and then select "Options" in the bottom-right corner. On the "Slideshow Options" page, choose the item you'd like to change for your slideshow.
Check out this and make better presentation: https://bit.ly/3IWaz29 PDFelement provides a fast, affordable, and easy way to edit, convert, and sign PDFs. It ...
How to make a FaceTime call to non-Apple users . Only someone with an iPhone, iPad, or MacBook can make a FaceTime call and share the invite link with non-Apple users. As a FaceTime caller, you ...
Polls from 2000 to 2021 were conducted via phone. For more on this mode shift, please read our Q&A. Here are the questions used for this analysis, along with responses, and its methodology. Mobile phone ownership over time. The vast majority of Americans - 97% - now own a cellphone of some kind. Nine-in-ten own a smartphone, up from ...
#google #howXT @howxtThis video tutorial will help you How to make PowerPoint presentation on iPhone🔔 Subscribe to my YouTube channelSubscribe my Channel : ...
Under Choose default signature, set the following options.. In the E-mail account drop-down box, choose an email account to associate with the signature. You can have different signatures for each email account. You can have a signature automatically added to all new messages. Go to in the New messages drop-down box and select one of your signatures. If you don't want to automatically add a ...