How to Print an Outline of the Presentation in Powerpoint
When you are creating a slideshow in Powerpoint for school or work, someone might ask you to also make an outline.
At first, this might seem like a lot of extra work, but there is actually a way to generate this document in Microsoft Powerpoint without needing to create an entirely separate document.
Our tutorial below will show you how to print an outline of the presentation in Powerpoint by adjusting an option on the Print menu.

Summary – How to Print an Outline View in Powerpoint 2010
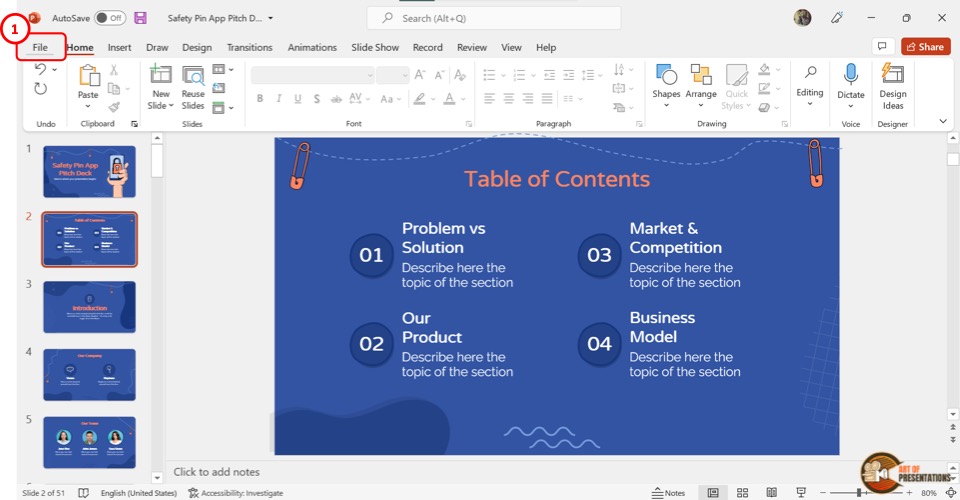
- Click the File tab at the top-left corner of the window.
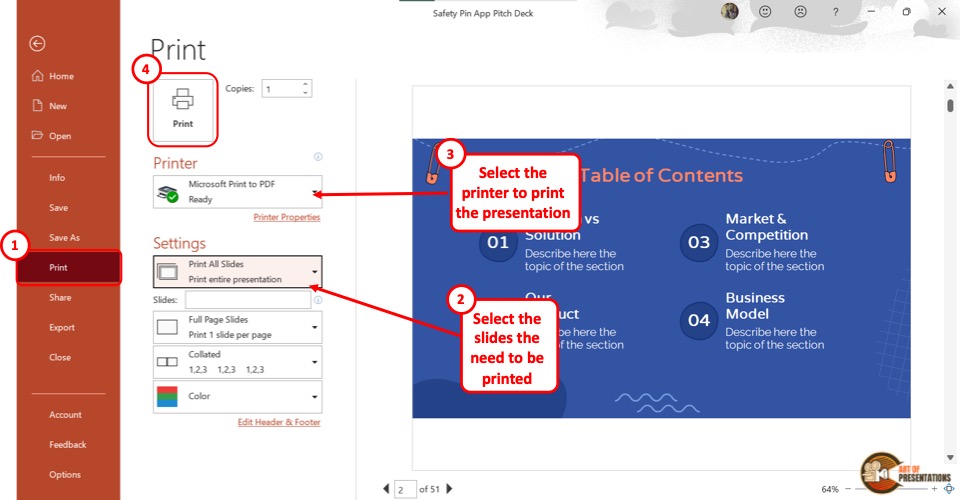
- Click Print in the left column.
- Click the second dropdown menu (it says Full Page Slides by default), then click the Outline option.
- Confirm that the outline is correct, then click the Print button.
Our guide continues below with additional information on how to print an outline of the presentation in Powerpoint , including pictures of these steps.
Learning how to print the outline view in Powerpoint 2010 is a valuable skill for someone that spends a lot of time working with Powerpoint presentations.
Many presentations can be incredibly large, and printing out every slide can be both unwieldy and unproductive.
But the outline view in Powerpoint 2010 provides a summarized version of your spreadsheet’s information, and printing an outline from Powerpoint 2010 can give you a condensed list of the slides and the information contained on them.
While we have previously discussed ways to print out handouts and speaker notes in Powerpoint 2010, one of those options might not be ideal for every situation.
Sometimes you want to print out a short summary of the information contained in your slideshow, whether it is for you or your audience.
Luckily Powerpoint 2010 also generates an outline from your slideshow information, so you will want to learn how to print an outline from Powerpoint 2010.
Generally speaking, an outline will usually be much smaller than if you printed handouts for everyone in your audience, as the outline will only include the text from your slides.
This will reduce the amount of paper that you use and will present the bulk of your slideshow information in a format that is easy to manage.
Printing Outlines in Powerpoint 2010 (Guide with Pictures)
The outline of your slideshow in Powerpoint is something that Powerpoint generates automatically. You do not need to do anything special for the outline to be created
It will take all of the text on each of your slides, then it will organize that information, by slide, into one complete outline document.
You can follow the steps below to learn how to print your outline in Powerpoint 2010.
Step 1: Double-click your Powerpoint presentation to open the slideshow in Powerpoint 2010.
Step 2: check each slide to ensure that you have included all of your text information and that everything is spelled correctly..
Note that there is a spell check utility available in the Proofing section of the ribbon on the Review tab.
Step 3: Click the File tab at the top-left corner of the window.
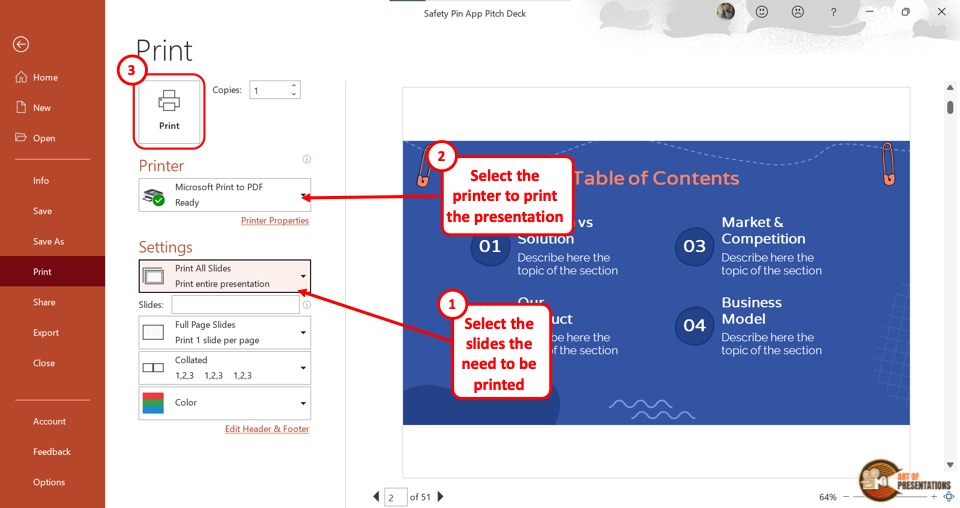
Step 4: click print in the column at the left side of the window., step 5: click the full page slides drop-down menu at the center of the window, then click the outline option in the top section..

Step 6: Check the outline document in the preview section at the right side of the window to see what information will be included on the printout.
If something is incorrect or does not make sense without also including a video or image to which it refers, then consider revising the text so that it is more helpful in the outline format.
Step 7: Click the Print button at the top of the window to print out the outline document.
Now that you know how to print an outline of the presentation in Powerpoint , you will be able to generate one of these documents whenever you need a summary or a shorter version of the complete presentation that you created.
Would a slide in your presentation, or even the entire presentation itself, look better in portrait orientation? Learn how to switch to portrait orientation in Powerpoint 2010 and look at your slide shows from a different perspective.
More Information on How to Print an Outline From Powerpoint 2010
When you follow the steps above to create a presentation outline of your PowerPoint slides, you will not only be able to see how many slides are in the presentation, but you will also get a helpful overview of the entire presentation.
This outline can be a good way to convert the presentation to a Word document if you also need to make a document from the slideshow. Since it contains only the text and none of the images, you won’t need to go through a lot of work to adjust the layout by removing all of those images or objects.
While the outline view is the main focus of this article, you can also use a similar option to create a notes page for each of the slides that you have created.
A notes page is going to include a single page for each slide, but any of the content in the Notes pane at the bottom of the slide editor.
If you need to create handouts for your audience, then you might want to select one of the Notes options rather than select Outline.
One other option that you have for viewing the presentation outline instead of going to the Print Preview is to select the View tab at the top of the window, then click Outline View in the Presentation Views group at the left side of the window.
This will open a column at the left side of the window that shows the outline. There is also a slide number next to each section of information so that you know which slide to attribute that content to.
You can click the Normal view button when you are finished working with the Outline view.

Matthew Burleigh has been writing tech tutorials since 2008. His writing has appeared on dozens of different websites and been read over 50 million times.
After receiving his Bachelor’s and Master’s degrees in Computer Science he spent several years working in IT management for small businesses. However, he now works full time writing content online and creating websites.
His main writing topics include iPhones, Microsoft Office, Google Apps, Android, and Photoshop, but he has also written about many other tech topics as well.
Read his full bio here.
Share this:
Join our free newsletter.
Featured guides and deals
You may opt out at any time. Read our Privacy Policy
Related posts:
- How to Save Powerpoint as PDF with Notes
- How to Set Time for Slides in Powerpoint
- How to Add Page Numbers in Powerpoint 2010
- Can I Convert My Powerpoint to Google Slides?
- How Do I Print Just the Notes in Powerpoint 2010?
- How to Delete a Slide in Powerpoint 2010
- How to Loop a Slideshow on Powerpoint 2013
- How to Show Speaker Notes in Google Slides
- How to Unhide a Slide in Powerpoint 2013
- How to Hide a Slide in Powerpoint 2010
- How to Change Line Spacing in Powerpoint for Every Slide at Once
- How to Check Word Count on Powerpoint 2010
- How to Insert Slides from Another Presentation in Powerpoint 2010
- How to Make a Powerpoint Slide Vertical in Powerpoint 2013
- How to Change the Font on All Slides in Google Slides
- How to Delete Multiple Slides in Google Slides
- How to End Powerpoint on Last Slide in Powerpoint 2010
- How to Change Hyperlink Color in Powerpoint 2010 (An Easy 5 Step Guide)
- How to Duplicate a Slide in Powerpoint 2010
- How to Return to Normal View in Word 2010
Leave a Comment Cancel reply
You must be logged in to post a comment.
How to Print an Outline of a Presentation in PowerPoint

Presenting information in a clear and organized manner is key to delivering a successful presentation. One way to help both the presenter and the audience stay on track is to use an outline. Microsoft PowerPoint makes it easy to create and print an outline of your presentation. In this article, we will explore why you might need to print an outline, the benefits of doing so, and how to customize and print your outline using PowerPoint.
Table of Contents
Why You Might Need to Print an Outline of your PowerPoint Presentation
Printing an outline of your presentation can be helpful in a variety of situations. It can be a useful tool for presenters as a reference during a presentation and for audience members to follow along. An outline provides a clear and concise overview of the main points of your presentation, allowing viewers to take notes and follow the flow of the presentation more easily. Additionally, an outline can be valuable for those who may not have access to the PowerPoint file or for those who prefer a hard copy to follow along with during presentations.
Another reason why you might need to print an outline of your PowerPoint presentation is for accessibility purposes. Some individuals may have visual impairments or other disabilities that make it difficult for them to follow along with a presentation on a screen. Providing an outline in a larger font size or in a format that is more accessible to them can make the presentation more inclusive and accommodating.
Finally, printing an outline can also be helpful for those who want to review the presentation after the fact. Having a hard copy of the outline can serve as a quick reference guide for the main points and key takeaways of the presentation. It can also be useful for those who want to share the presentation with others who may not have been able to attend the original presentation.
The Benefits of Printing an Outline of your PowerPoint Presentation
There are several benefits to printing an outline of your PowerPoint presentation. First and foremost, an outline allows the presenter to structure their presentation in a logical manner, emphasizing the main points. It helps to identify areas that need more attention, as well as those that may need to be cut down. Second, an outline helps to ensure that the presentation flows smoothly. The presenter can refer to the outline to stay on track and avoid veering off-topic. Finally, having an outline available creates a more focused and efficient presentation, leading to a better understanding of the information being presented.
In addition to these benefits, printing an outline of your PowerPoint presentation can also serve as a helpful reference for the audience. By providing them with a copy of the outline, they can follow along with the presentation and take notes more easily. This can lead to a better retention of the information being presented and a more engaged audience. Additionally, if the presentation includes complex or technical information, having an outline can help the audience to better understand and digest the material.
How to Access the Outline View in PowerPoint
To begin, open your PowerPoint presentation and navigate to the “View” tab. From there, click “Outline View” in the “Presentation Views” group. Your presentation will now appear as an outline, with each slide represented by a title and bullet points underneath. This view allows you to easily rearrange slides and edit the text in a more streamlined format.
Additionally, the Outline View in PowerPoint is a great tool for organizing your presentation content. By using the indent and outdent buttons, you can create a hierarchical structure for your slides and subtopics. This can help you to better visualize the flow of your presentation and ensure that your message is clear and concise. Furthermore, you can also use the Outline View to quickly navigate to specific slides by clicking on their titles in the outline. Overall, the Outline View is a valuable feature in PowerPoint that can save you time and improve the quality of your presentations.
Customizing the Layout and Formatting of Your Presentation Outline
Once you have accessed the Outline View, you can customize the layout and formatting to better suit your needs. From the “View” tab, click “Slide Master” in the “Master Views” group. Here, you can adjust the font style, size, and color of your outline. You can also add logos, footers, and page numbers to your outline. In addition, you can adjust the indentation and bullet styles to make your outline more visually appealing and easier to read.
Another way to customize your presentation outline is by using themes. From the “Design” tab, click “Themes” in the “Themes” group. Here, you can choose from a variety of pre-designed themes that will change the color scheme, font style, and background of your outline. You can also create your own custom theme by selecting “Customize Fonts” or “Customize Colors” and choosing your preferred options. Using themes can help you create a cohesive and professional-looking presentation outline.
Tips for Organizing and Structuring Your Presentation for Easier Outlining
When organizing your presentation, consider using clear and concise language. Start with an introduction that sets up the topic and what you will be discussing. From there, break down the main points into sub-points to create a clear and logical flow. Make sure to use bullet points and bold titles to emphasize important information. Finally, end with a conclusion that summarizes the main points and provides a call to action if applicable.
How to Save and Export Your Presentation Outline for Printing
Once you have customized the layout of your outline, you can save and export it for printing. From the “File” tab, click “Export” and select “Create Handouts.” Choose the “Outline Only” option, and select the layout and format that suits your needs. From there, click “Create Handouts,” and your outline will be saved and ready to print.
Troubleshooting Common Issues When Printing a PowerPoint Presentation Outline
One common issue when printing a PowerPoint presentation outline is that the text may appear to be too small or too large. To fix this, adjust the font size in the slide master. Another issue may be that images or graphs may not appear in the outline view. This can be resolved by ensuring that your images and graphs are in the proper file format and that they are inserted correctly into your presentation. Finally, make sure that your printer is properly installed and up-to-date to avoid any unexpected printing issues.
Alternative Methods for Creating and Printing an Outline of Your Presentation
In addition to PowerPoint, there are several third-party tools available for creating and printing outlines of your presentation. These include online tools and software programs that allow you to customize the layout and format of your outline. Some of these programs include MindMap, MindView, and Inspiration. These tools may offer additional customization options and features that PowerPoint does not, making them a good option for those who require more tailored solutions.
Using Third-Party Tools to Enhance the Printing Experience of PowerPoint Outlines
If you find that PowerPoint’s built-in outline printing options are not meeting your needs, consider using third-party tools to enhance the printing experience. These tools can provide additional features such as custom headers and footers, different paper sizes, and more. Some examples of these tools include Adobe Acrobat and Nitro PDF. By using these tools, you can create a more polished and professional-looking outline.
How to Use a Printed Outline to Improve the Delivery of Your Presentation
Once you have printed your outline, use it as a reference during your presentation. Refer to it to ensure that you stay on track and cover all of the key points. Use bold text and bullet points to emphasize the most important information. Finally, consider providing copies of the printed outline to your audience members to follow along with during the presentation.
Best Practices for Using Printed Outlines in Group Presentations or Lectures
When using a printed outline in a group setting, it’s important to keep a few best practices in mind. First, make sure that the outline is easy to read and understand. Use a clear and concise format that emphasizes the most important information. Second, distribute copies of the outline to your audience members, ensuring that everyone has the same understanding of the presentation. Finally, be prepared to answer any questions that may arise during the presentation. Using a printed outline can be a valuable tool in group settings, helping to keep everyone on track and engaged.
Printing Outlines on Different Paper Sizes or Formats
If you need to print your outline on different paper sizes or formats, make sure to adjust the printing settings accordingly. For example, if you need to print on legal-sized paper, adjust the page settings to that size. You can also customize the margins and page orientation to ensure that your outline fits properly on your paper. Consider using a print preview option before printing to check that your outline looks the way you want it to on the selected paper size or format.
Understanding the Role of Outlines in Effective Public Speaking and Presenting
Outlines are an essential tool in delivering effective and successful presentations. Whether you are presenting to a large group or delivering a lecture, an outline can help you stay focused, organized, and on-point. By using an outline, you can ensure that you cover all of the key points of your presentation and provide a clear and concise overview of the information being presented.
Frequently Asked Questions About Printing Outlines in PowerPoint
- Q: Can I print my outline in color?
A: Yes, you can customize the color of your outline from the Slide Master view.
- Q: Is it possible to print my outline double-sided?
A: Yes, when you go to print your handout, select the option for double-sided printing in the “Print Options” section.
- Q: Can I adjust the font size of my outline?
A: Yes, you can adjust the font size from the Slide Master view.
- Q: Is it possible to print only certain slides of my presentation as an outline?
A: Yes, you can select individual slides to print as outlines by clicking on the slide in the Outline View and selecting “Print Current Slide.”
In conclusion, printing an outline of your PowerPoint presentation can provide numerous benefits, including better organization, clarity, and engagement. By customizing the layout and format of your outline, you can create a clear and concise overview of your presentation for both yourself and your audience. By following the steps outlined in this article and using best practices, you can ensure that your presentation is successful and effective.
By humans, for humans - Best rated articles:
Excel report templates: build better reports faster, top 9 power bi dashboard examples, excel waterfall charts: how to create one that doesn't suck, beyond ai - discover our handpicked bi resources.
Explore Zebra BI's expert-selected resources combining technology and insight for practical, in-depth BI strategies.

We’ve been experimenting with AI-generated content, and sometimes it gets carried away. Give us a feedback and help us learn and improve! 🤍
Note: This is an experimental AI-generated article. Your help is welcome. Share your feedback with us and help us improve.

How to Print an Outline of the Presentation in PowerPoint

Being able to print an outline of your PowerPoint presentation can be extremely useful, both for you as the presenter and for your audience. Having an outline allows everyone to follow along with the key points and overall flow of the presentation.
In this article, I’ll walk you through the steps for printing an outline from PowerPoint, as well as provide some tips on how best to utilize presentation outlines.
Why Print an Outline
Here are some of the biggest reasons why you may want to print an outline of your PowerPoint presentation:
- Keep yourself on track – As the presenter, having an outline allows you to see the major points and progression of your presentation at a glance. You can use it to guide your speaking and make sure you hit all the key messages.
- Allow audience members to take notes – Audience members will appreciate having an outline they can scribble notes on rather than trying to keep up with slides full of text and graphics.
- Focus attention on your speech – With less detailed slides and handouts for people to read, you keep eyes and ears tuned into your actual presentation.
- Provide a takeaway – After your talk, audience members can refer back to your outline handout to refresh their memory of your key points.
Access the Outline View
The first step to printing an outline is accessing the Outline View within PowerPoint:
- Open your presentation in Normal View
- Click on the View tab
- Select Outline View in the Presentation Views group
This will display a text-based, hierarchical view of your presentation’s contents and structure.
Customize the Outline
Once in Outline View, you can customize what is included in the printed outline:
- Simplify outline – Delete secondary points so only main topics and key points are listed. This helps focus the handout.
- Add presenter notes – You can add speaking notes that will print alongside the outline topics.
- Rearrange order – Change the sequence of topics as needed by dragging and dropping them into place.
Print Options
When ready to print, go to File > Print to access printing options:
- Under Settings, choose Outline for Print Layout
- Select additional options like paper orientation, slides per page, etc.
- Click Print
Tip: Save custom print settings for outlines under Printer Properties so it’s ready to go for next time.
Make the Most of Your Outline
Follow these tips for creating and using outlines effectively:
- Focus outlines on key topics and limiting detail
- Number topics and subtopics for easy reference
- Print outlines alongside slide thumbnails when beneficial
- Have some copies on hand at your presentation for attendees
- Use bold fonts and/or colors for emphasis
- Leave plenty of white space for note taking
Outline Uses Beyond Printing
The Outline View in PowerPoint has many helpful purposes beyond printing, including:
- Navigating quickly through a long presentation
- Getting a high-level overview of content flow and structure
- Rearranging topics easily by dragging and dropping text
- Creating presenter notes linked to outline topics
- Collaborating with others on presentation development
So be sure to leverage Outline View even if you don’t end up printing handouts.
Key Takeaways
Printing an outline is a great way to enhance your next presentation. Keep these points in mind:
- Outlines help speakers, attendees, and collaboration
- Customize details to focus on key topics
- Use Outline View for organization and planning
- Set print defaults to save time later
- Focus attention on the presentation, not just slides
With the right preparation, an outline can make your presentation shine!
About The Author
Vegaslide staff, related posts.

How to Insert an Image Inside of Text in PowerPoint

How to Change PowerPoint Slide Orientation

How to Show or Hide the Speaker Notes in PowerPoint 2013

PowerPoint 2016: Inserting Audio

Home Blog PowerPoint Tutorials How to Use Outline View in PowerPoint
How to Use Outline View in PowerPoint

PowerPoint provides different views to help presenters manage their presentations and PowerPoint templates . The Normal view is often used when creating presentations, the Slide Sorter view helps sort slides easily, the Reading view gives ease of reading the slides for review purposes, whereas the Slideshow mode is used for presenting presentations. Similarly, if you need to review and manage your outlines, the Outline View in PowerPoint is the right option.
How to Switch to Outline View in PowerPoint
By going to View -> Outline View , you can see the outline for your presentation. This view displays the presentation as titles and text within slides to give you an overview of the slide content.

The Outline view can also help review your slides after you have created a basic outline and need to start working on your slides. This can help you review if the outline makes sense. You can also use it during or after the completion of your presentation for the same purpose.

There are numerous handy options in the PowerPoint Outline view accessible via the right-click context menu. This includes options to expand or collapse the list and delete, move, or add new slides.

How to Print an Outline of the Presentation
To print an outline for your slides, go to File -> Print and select Outline via Settings . Select the printer and click Print .

Final Words
When designing your outline, a few considerations should include the title, introduction to your topic, subheadings, the number of slides you intend to use, a summary of your slides to make your content memorable with key action points, and a conclusion. The Outline View in PowerPoint can be a good option to review the basic outline for your presentation to remain on track when working on your slides.

Like this article? Please share
Microsoft PowerPoint, PowerPoint Tools Filed under PowerPoint Tutorials
Related Articles

Filed under Google Slides Tutorials , PowerPoint Tutorials • April 17th, 2024
Google Slides vs. PowerPoint: A Detailed Comparison
Contrast and pick with presentation software suits your best. Check our guide on how the Google Slides vs. PowerPoint eternal debate.

Filed under PowerPoint Tutorials • April 16th, 2024
How to Insert an Equation in PowerPoint
Learn how to create easy-to-understand science slides by mastering how to insert an equation in PowerPoint. Step-by-step guide.

Filed under PowerPoint Tutorials • April 9th, 2024
How to Remove Notes from PowerPoint
Make alternative versions of your presentation files by learning how to remove notes from PowerPoint. Step-by-step guide with screeshots.
Leave a Reply
- PRO Courses Guides New Tech Help Pro Expert Videos About wikiHow Pro Upgrade Sign In
- EDIT Edit this Article
- EXPLORE Tech Help Pro About Us Random Article Quizzes Request a New Article Community Dashboard This Or That Game Popular Categories Arts and Entertainment Artwork Books Movies Computers and Electronics Computers Phone Skills Technology Hacks Health Men's Health Mental Health Women's Health Relationships Dating Love Relationship Issues Hobbies and Crafts Crafts Drawing Games Education & Communication Communication Skills Personal Development Studying Personal Care and Style Fashion Hair Care Personal Hygiene Youth Personal Care School Stuff Dating All Categories Arts and Entertainment Finance and Business Home and Garden Relationship Quizzes Cars & Other Vehicles Food and Entertaining Personal Care and Style Sports and Fitness Computers and Electronics Health Pets and Animals Travel Education & Communication Hobbies and Crafts Philosophy and Religion Work World Family Life Holidays and Traditions Relationships Youth
- Browse Articles
- Learn Something New
- Quizzes Hot
- This Or That Game
- Train Your Brain
- Explore More
- Support wikiHow
- About wikiHow
- Log in / Sign up
- Computers and Electronics
- Presentation Software
- PowerPoint Presentations
How to Print a PowerPoint Presentation
Last Updated: April 8, 2021
wikiHow is a “wiki,” similar to Wikipedia, which means that many of our articles are co-written by multiple authors. To create this article, volunteer authors worked to edit and improve it over time. This article has been viewed 133,522 times. Learn more...
Are you running a big meeting that you need to print off notes for yourself or others, from which come from a PowerPoint presentation? This article will tell you how to print off your slides so others can see these slides in a hard-based paper form.

- You can also select the "Printer" icon from the "Standard toolbar" which can also be found at the top of the screen.

- You have choices for "Slides" (full page printouts for slides), "Handouts" (which can be given to people based on all your slides, and has several slides on each page), "Notes" pages (slides and the Notes you've created from the PowerPoint program's Notes area), or Outline View (creates a set of notes in an organized outline form).

Community Q&A
- Although many printers contain options for printing in color versus black-and white, the PowerPoint Print dialog box has its own version of this box that is available for generic device driver printers (and which can be quickly used for even those which have regular software that is installed directly from the printer driver software). Thanks Helpful 7 Not Helpful 0
- Dependent on what printer you have, some printers have special software that may activate the "Properties" box, but due to differences between all printers, these boxes vary from model number to brand name to model, so these options from the "Properties" dialog box vary. Thanks Helpful 6 Not Helpful 0
- There are many other areas in the dialog box for printing slides from PowerPoint that, for most of us, would be used seldomly, including "Scale to fit paper", "Frame slides", "Print comments and ink markup" and "Print hidden slides". Thanks Helpful 5 Not Helpful 2

Things You'll Need
- computer printer
- Microsoft Powerpoint
- computer mouse and/or keyboard
- file presentation to print out
You Might Also Like

About This Article
- Send fan mail to authors
Is this article up to date?

Featured Articles

Trending Articles

Watch Articles

- Terms of Use
- Privacy Policy
- Do Not Sell or Share My Info
- Not Selling Info
Keep up with the latest tech with wikiHow's free Tech Help Newsletter
Critical PowerPoint Shortcuts – Claim Your FREE Training Module and Get Your Time Back!
How to Print PowerPoint with Notes (Step-by-Step)
- PowerPoint Tutorials
- Shortcuts & Hacks
- January 22, 2024
In this article, you’ll learn how to print your PowerPoint slides with speaker notes as handouts the way you want them.
Don’t get frustrated with PowerPoint… just get creative. That way you can get out of the office and make it to Happy Hour.
Just keep in mind that, like many things in PowerPoint, there is a variety of ways to print your notes, each producing its own result. I cover each method below.
NOTE: If you are distributing your slides to other people, I highly recommend customizing your handouts with your company information before you print them. This not only makes your handouts look more professional, but it also makes it easier for people to get in touch with you.

For help turning your PowerPoint notes (without or without note text) into PDF handouts, read our guide here .
Table of Contents
How to print powerpoint with notes (basics).

The most common way to print PowerPoint notes is with the thumbnail image of the slide at the top of the page, and the notes directly beneath (as pictured above). To print your notes like this, simply:
- Hit Ctrl+P for Print (or click File then Print)
- Open the Print Layout options
- Select the Notes Page layout
- Click Print
If you want to print your notes only (without the thumbnail image), see further below.
As you can see in the live preview on the right in the picture above, I have already formatted the Notes Master to include my company’s logo, and my contact information.
If you have lots of speaker notes for a particular slide, the text may run off onto a second or third page. If this happens, keep in mind that your slide thumbnail only appears on the first page of notes.
Also keep in mind that the page number at the bottom of your handouts represents the slide number in your presentation, not the number of pages you are printing.
That means that if you have ten (10) pages of speaker notes for slide number 2 in your deck, each of those ten pages of speaker’s notes will have a number 2 on them.
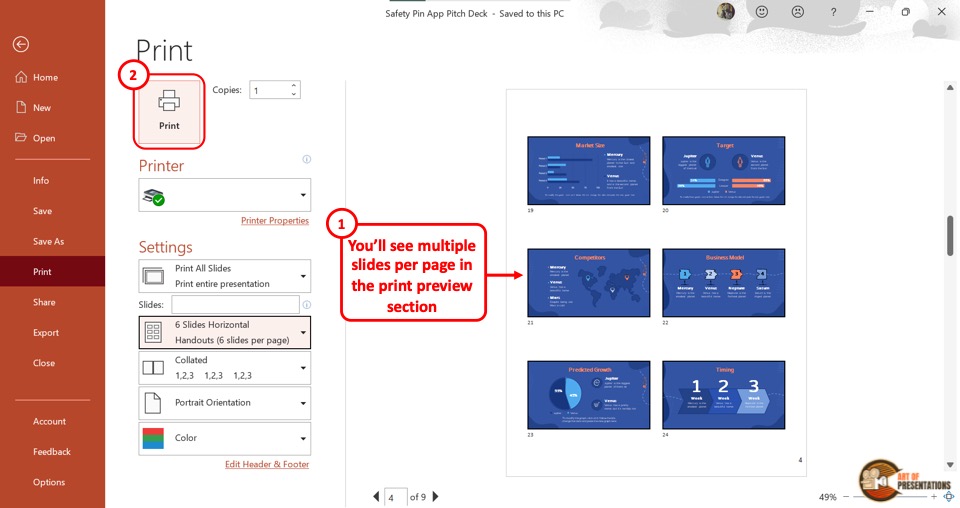
To learn how to print multiple slides on one page in PowerPoint, read our guide here .
NOTE: If you are distributing your notes as handouts before or after your presentation, I recommend customizing your Notes Master .
Take your PPT skills to the next level
Formatting the notes master for professional handouts.

To customize your notes page before you print it in PowerPoint first navigate to the Notes Master view.
- Click the View tab
- Select the Notes Master
The View tab in PowerPoint is also where you can find the Handout Master view (discussed further below), and the Slide Master view. These master views control the default formatting of your slides, handouts, and notes.

Once you are in the Notes Master view, you can select which placeholders you want to include in your handouts. In this view, you can also add any images, shapes, or other design elements to jazz up your handouts. I recommend adding things like:
- Your company logo
- Your email address (or contact information)
- Your company website
When it comes to formatting your handouts, more is not better. I recommend adding enough to make your handouts look professional and make it easy for people to contact you.
Printing PowerPoint Notes with multiple slides per page
To print your PowerPoint notes as handouts with multiple slides per page, you need to first export your PowerPoint slides to Microsoft Word using the Create Handouts command.

To convert PowerPoint to Word using the Create Handouts command, simply:
- Click the File tab
- Select Export
- Select Create Handouts
- Click the Create Handouts command
- Select Notes next to slides
Doing so turns your PowerPoint presentation into a Word document, with all your slides and speaker notes in a table format that you can then update and edit in Microsoft Word. The length of your notes affects how many slides you can have on a single page in Word.

Table of Contents: If you have a lot of slides you are converting into a Word document, you can make your Word document easier to read and navigate by inserting a table of contents. To learn how to make a table of contents in Word, read our guide here .
How to print PowerPoint notes only
Yes, you can print just your PowerPoint notes (no slide thumbnail images) without messing up your presentation. I don’t recommend deleting things on your Notes Master, simply follow the steps listed below.
To see how to pull this off using a combination of the Create Handouts command and the Outline View in PowerPoint, see the short PowerPoint video tutorial below (it will make the most sense that way).
1. Push your PowerPoint slides to Microsoft Word
The first step is to push your slides and speaker notes into Microsoft Word. To do that, follow these steps:
- From within PowerPoint open the File menu
- Click Export on the left
- Select Create Handouts in the middle
- Click Create Handouts on the right
- Select Notes next to slides
PowerPoint then exports all your slides and speaker notes to Word in a table format. To make it easier to edit our table, let’s add borders to it.
2. Add table borders to your table to see what you are working with

Once PowerPoint finishes exporting your slides to Microsoft Word, I recommend adding table borders to see what you are working with. To do that, simply:
- Select the table in Word
- Click the Table Design tab
- Choose a table border style
While this is an optional step, it makes formatting your notes in Word a lot easier.
3. Format your PowerPoint notes in Word
As a last step, you simply need to make the formatting adjustments you want to your notes. These can include:
- Delete the thumbnail image column
- Resize the column widths
- Paste your slide title names in from the Outline View in PowerPoint
- Customize your handouts with your contact information
- Continue formatting in order to get your desired result
How to print PowerPoint with comments

Assuming you have comments in your presentation, you can print those in either the Handout view or the Outline view.
To print your PowerPoint slides with comments:
- Hit Ctrl+P for print
- Open the Slide Layout options
- Choose how many slides you want per page (I recommend 6 or 9 so you don’t waste paper)
- Select Print Comments
- Click Print
It’s important to note that PowerPoint comments always print on the second page. Your first page will be the handouts themselves (with the comments marked on the slide). The second will be the actual comments.
As this tends to waste a lot of printer paper and ink, I recommend using the 9-slide layout unless you have a specific reason to do otherwise.
How to print PowerPoint with lines for notes
There are two different ways to print your slides as Handouts with lines for notes:
The easy way: This involves directly printing your slides from PowerPoint with the default blank lines for taking notes.
The customizable way: This involves converting your PowerPoint slides to Word, where you can then adjust and customize the lines for your notes.
Both options are covered below.
1. The easy way

To print your slides with non-customizable lines for notes (in PowerPoint):
- From within PowerPoint, hit Ctrl+P for print
- Open the Slide Layout options
- Choose the 3-slide layout with lines (you’ll see a live preview on the right)
NOTE: You can customize this layout using the PowerPoint Handout Master the way I described above .
2. The customizable way

To print your slides with customizable blank lines for notes (Converting PowerPoint to Word):
- Navigate to the File tab
- Click Export
- Click on the Create Handouts button
- Select either Blank lines next to slides or Blank lines below slides (depending on what you want)
Once your slides export to Microsoft Word, you can do whatever you want with the lines. For example, you can decrease the paragraph spacing to add more lines if you like. You can also format them and make them bold.
To expand your knowledge and learn more about exporting your PowerPoint slides to Microsoft Word (and the different options you have), read our guide here .
Printing an outline of PowerPoint
Before you get too excited about printing your PowerPoint outline, it’s important to note that only information that is within your content placeholders prints. That means that text inside regular shapes and text boxes doesn’t appear.
On top of that, an outline can only print text. That means that none of your graphics, charts or pictures show up in your printed document.
There are two different ways to print your outline: You can directly print your outline out of PowerPoint, or you can export your outline to Microsoft Word so that you can edit it before you print it. Choose the option below that works best for you.
1. Directly printing your outline from PowerPoint

To print your PowerPoint slides as an outline only outline, simply:
- Hit Ctrl+P on to open the print options
- Open the Slide Layout options
- Select Outline
Note: If you don’t see all the content in your outline (you only see the slide titles, for example) that means that your Outline View is collapsed.
To expand your Outline View, simply:
- Navigate to the View tab
- Click on the Outline View
Within the Outline View (click into that actual Outline View on the left), hit the expand keyboard shortcut: Alt+Shift+9 . To learn more about working in the Outline view in PowerPoint, read our guide here .
2. Exporting an editable version of your Outline to Microsoft Word

If you want to customize your PowerPoint outline in Microsoft Word before you print it, simply:
- Click on the Create Handouts button
- Select Outline only
Pushing your outline into Microsoft Word like this allows you to customize and edit the outline before you print it.
So those are all the different ways you can print your notes in PowerPoint.
If you intend to print your notes as handouts for a business meeting or client presentation, I highly recommend formatting your Notes Master and/or Handout Master.
That way you can include your contact information and/or your company formatting, making your handouts look more professional.
If you enjoyed this in-depth PowerPoint tutorial, you can learn more about our online training courses and other presentation resources here .
🔒 Unlock the PowerPoint Shortcuts Trusted by Industry Leaders KKR, American Express, HSBC, and More!
Join over 114,880 professionals from diverse fields including consulting, investment banking, advertising, marketing, sales, and business development who have supercharged their PowerPoint game with our proven methods.
✅ Customize compelling presentations effortlessly.
✅ Master time-saving techniques for faster deck creation.
✅ Boost your career prospects with top-notch PowerPoint skills.
Get FREE access to the Critical PowerPoint Shortcuts module of our premium training course by entering your name and email below.
DISCLAIMER: PC Users Only!
We respect your privacy and will keep your info safe and confidential.
Related Articles
About the author.

This Post Has 2 Comments

Thank you for this useful guide! Is there a way to print the outline with the notes per slide, too?

Hi Juliah and thanks for the question. Unfortunately not. The notes are tied to the slides and not the outline, so there’s no way that we know of to print the outline + notes together.
Comments are closed.
Popular Tutorials
- How to Strikethrough Text (l̶i̶k̶e̶ ̶t̶h̶i̶s̶) in Word, Excel & PowerPoint
- How to Make Animated Fireworks in PowerPoint (Step-by-Step)
- Strikethrough Shortcut (l̶i̶k̶e̶ ̶t̶h̶i̶s̶) for Word, Excel & PowerPoint
- How to Create a Flash Card Memory Game in PowerPoint (Like Jeopardy)
- Keyboard Shortcuts Not Working: Solved
PowerPoint Tutorial Categories
- Strategies & Opinions
- Presentation Design
- Pictures, Icons, Videos, Etc.
- New Features
- Miscellaneous
- Charts & Data Viz
We help busy professionals save hours and gain peace of mind, with corporate workshops, self-paced courses and tutorials for PowerPoint and Word.
Work With Us
- Corporate Training
- Presentation & Template Design
- Courses & Downloads
- PowerPoint Articles
- Word Articles
- Productivity Resources
Find a Tutorial
- Free Training
- For Businesses
We help busy office workers save hours and gain peace of mind, with tips, training and tutorials for Microsoft PowerPoint and Word.
Master Critical PowerPoint Shortcuts – Secure Your FREE Training Module and Save Valuable Time!
⌛ Master time-saving expert techniques.
🔥 Create powerful presentations.
🚀 Propel your career to new heights.
We value your privacy – we keep your info safe.
Discover PowerPoint Hacks Loved by Industry Giants - KKR, AmEx, HSBC!
Over 114,880 professionals in finance, marketing and sales have revolutionized their PPT skills with our proven methods.
Gain FREE access to a full module of our premium PowerPoint training program – Get started today!
We hate spam too and promise to keep your information safe.
You are currently viewing a placeholder content from Facebook . To access the actual content, click the button below. Please note that doing so will share data with third-party providers.

How to Outline a Presentation: A Complete Guide From a Pro
- Filed under: Public speaking articles , Speaking tips , Speech preparation
When you’re writing an important speech, you must start with a clear outline. However, I find that many speakers are uncertain of how to write a good outline for their presentation. This is why I decided to write a guide for you, in hopes that learning to perfect your outlines will help you give better presentations in the future.
How do you outline a presentation? Always start with your introduction and end with your powerful closing. Flesh out the body by listing topics in the order that you want to cover them in. Never skimp on the important details of your speech. Remember that an outline is only a draft.
I know at this point that you still have questions, and that you still be confused at how to write the best outline for your speech. But writing a good outline for your presentation does not have to be stressful! This is my complete guide from a pro for you, in hopes that you can take the stress out of this important step.
Table of Contents
How to Outline a Presentation
Outlining a presentation can be done with a regular piece of paper, or on a word processing program on your computer. If you are hosting a PowerPoint presentation, you may prefer to do the entire thing from the comfort of your computer. But if you do decide to write your outline on a piece of paper, make sure you use a pencil and eraser so that you can make changes as you go along.
The very first step in creating an outline is to ask yourself what the purpose of your presentation is.
Write your main message or a one-sentence summary of your thesis at the top of your outline when you get started. This may help you stay on task, and it will keep the purpose of your speech right in your eye’s sight. After all, you don’t want to stray too far off the main topic of your presentation !
Remember, a quality outline is meant to enhance the purpose of your presentation. If you do not write a proper outline, you may risk not properly conveying the right message to your audience.
Or you may even forget to cover essential points that you wanted to talk about. A thorough outline is especially important if you are planning to speak without notes.
You should remember to properly summarize what you want to say with every sentence of your outline. After all, this is not a full script, so a summary is all you really need. Remember to rehearse and practice with your outline, so that you can remember what you have written.
Start With a Strong Beginning
Your introduction is where you start strong by grabbing your audience’s attention from the very beginning. But if that makes you feel stressed out, just remember to stay calm! Creating a great first impression from the beginning of your speech is not as difficult as you might be worrying.
When you create a strong beginning, you should try some of the following:
- Start with an attention-grabbing statement that captures your audience from the start. If you have a few ideas but are not sure what to use, try running your ideas by a trusted friend or mentor.
- Give a strong signal that you are beginning your speech. You don’t want your audience unsure of whether you’ve actually begun or not.
- Give the main thesis statement about the purpose of your presentation.
- You could start by giving a brief preview of all of the things that you are going to talk about in the body of your speech.
- Talk about your credentials at the beginning. However, you should make sure to find a way to do it that is entertaining. You don’t want to risk boring your audience from the very beginning of your speech!
- Thank your audience from the very beginning! This is not only a good way to begin your speech, but a good way to end it, as well.
- If there are any current events or famous historical events that relate to the purpose of your presentation, you can start by talking about these. However, pick only one so that you do not draw your introduction out too long.
- Ask your audience a question at the beginning. You could draw out their interest by answering this question at a later point in your speech.
- Whenever possible, make sure you begin your speech on a positive note . This sets a good tone for the rest of the presentation.
- Start by telling a story that relates to your presentation. A good reason to start with a story is that it helps you form a strong connection with your audience from the beginning. Write some of the main details of your story in your outline so that you remember them.
Be reminded thought, that sometimes it is wise to write your introduction last as only you know what you’ll be introducing. This way, you’ll also avoid including something in your introduction that you won’t be actually talking about.
Once you have written out your introduction, you have completed the first step in creating an excellent outline for your presentation.
Create a Powerful Ending
In my experience, it can be easier to create ending before you flesh out the body of your presentation. However, it is up to you if you prefer to create your outline in a different order.
If you are a regular reader, you might have realized that I already posted an in-depth article here about how to end a presentation in a powerful way . Right now we are going to talk about the same thing in somewhat less detail.
Recommended books
How to Deliver a TED Talk: Secrets of the World's Most Inspiring Presentations
Jeremy Donovan
Resonate: Present Visual Stories that Transform Audiences
Nancy Duarte
Confessions of a Public Speaker
Scott Berkun
Talk Like TED: The 9 Public-Speaking Secrets of the World's Top Minds
Carmine Gallo
The Checklist Manifesto: How to Get Things Right
Atul Gawande
The First 20 Hours: How to Learn Anything... Fast!
Josh Kaufman
Just like with your beginning, make sure that you’ve made it obvious you are ending. After all, few things are more awkward than your audience sitting there long after you’ve finished, feeling confused about whether they should leave or not.
If the point of your speech is to motivate your audience to do something, you might consider ending your speech with a call to action . A call to action is simply an instruction that you give your audience about something you want them to do.
You could also potentially end your presentation with a powerful quote or an entertaining story . And if you have a unique tagline that exists to help promote your personal brand, consider ending with it.
But if you are planning to have a question and answer period at all, make sure you are not directly ending with one. Plan to wrap up your question and answer period before delivering your speech’s closing at the end.
This is because ending with a question and answer period is not only not memorable, but a negative question from an audience member can leave a bad taste in everyone’s mouth . This is not the last thing you want your audience members to remember as they’re leaving!
And as always, you should thank your audience at the end of your speech. This will make them feel valued, and impressed with your gratefulness.
Flesh Out the Body of Your Presentation
So, you’ve got your beginning and ending all figured out, but now what else do you do with your outline? This is the stage where you work on the body of your speech. That is, you will want to think about what you want to say in between your beginning and end. Here are some speech writing tips I have written about previously.
Write the main points of your outline in order
It may be easier for you to write bullet points or even a numbered list. List your main points in order of what you want to talk about. If at first glance the topics don’t seem to flow, it is okay to re-arrange them.
You can also decide at this point if there is anything you want to add or subtract. If you feel like you’ve made a mistake, don’t worry! It is okay to make any changes along the way.
Add sub-points and transitions to your topics
Add sub-points to your main points in order to further flesh out your outline. Even if you want to keep it simple, sub-points may help you to stay on track and remember what you were going to say.
You can also add to the ideas that your main points present. Make sure that the transitions from one point to another flow smoothly from one thing to the next.
Don’t forget the essential details!
Are there any special details that you need to remember for your presentation? Put these in your outline so that you don’t forget them. This can include important names, dates, and locations that you need to remember.
Write down how long will it take
If your speech is supposed to cover a certain amount of time, try listing times for each of your main points. This may help you not go over or under your time.
Also, take a look at these articles:
- 11 Great Tips How to Write a Great Persuasive Speech
- How to Deliver a Perfect Elevator Speech
How to Outline a PowerPoint Presentation?
You may be thinking that you don’t need an outline for your PowerPoint presentation. However, don’t rely on your slides alone ; you need a proper outline, too. An outline for a PowerPoint presentation should also include images that you intend to use for your slides.
Fortunately, the PowerPoint program itself also allows you to view an outline of your slides. This can help give you a visual of your overall presentation.
Remember, This is Only a Draft!
If your outline isn’t the way you want it to be, remember that it is only your very first rough draft. Your outline doesn’t have to be perfect, because it is not your final product. While you should work hard to make your outline as good as possible, you don’t need to stress about it.
And remember that if you finish your outline, and you are not satisfied with how it looks? It is okay for you to scrap it and start all over again. There is no reason that you should stick with an outline that you don’t feel confident about.
An outline is a great place to start whether you intend to read from a full script, read from cue cards, or speak without notes. If you are an avid reader of Speak and Conquer, you’ll remember that I recommend creating an outline in many of my articles.
Get Feedback From Others About Your Outline
There is no reason that you have to go any of this by yourself. If you have a friend or mentor who is experienced with public speaking , why not ask them to take a look at your outline for you? They may see something that needs to be changed that never even occurred to you.
You could also give a practice round of your speech in front of a friend, family member, or mentor. Give them a chance to make suggestions about whether or not there’s anything that you should change. After all, it’s better for you to realize if something needs to be done differently before the actual day of the presentation.
If you don’t have someone who you can rehearse in front of in person, try recording your presentation in front of a video camera . Show it to someone you trust via email or social media. If they have any suggestions for change, you can alter your outline accordingly.
Why is a Presentation Outline so Important, Anyway?
While reading this article, you may be wondering why you even need an outline for your presentation. This may be especially puzzling to you if you are planning to give a speech without notes . But I find that an outline can be incredibly useful no matter what kind of presentation you are planning to give to your audience.
Like I said before, the main point of an outline is to enhance the main purpose of your speech further. But I’m also going to give you a list of some more reasons why I believe an outline is absolutely essential.
Some other good reasons for creating an outline for your presentation are:
- You will have an easy visual to look at the order of the topics you are talking about. This way, you can see if anything looks out of place.
- The proper outline will help to keep your speech organized.
- You will be able to look at the connections between your ideas . This may even help you realize you need to add or subtract certain things from your speech.
- A good outline will help you remember to t ouch on every important point that you need to cover in your presentation.
- Outlining helps you see whether or not your main points and sub-points flow smoothly . If you create your outline and realize that some of your points do not flow, you can easily re-write key parts.
- Using an outline instead of a full script will give you more freedom to improvise during your presentation. This is why creating an outline is a great first strategy if you are speaking without notes, or trying to memorize a speech in a short period of time.
- If you’re not sure where to start preparing for your speech, then writing a loose outline is a good first step to help you out.
- Practicing with an outline will help enhance your memory about the main points and sub-points of your presentation.
No matter what kind of presentation you are planning to give, a solid outline with help you be prepared and ready to go.
Conclusion: How do you make an outline for a talk?
Today, I have compiled a thorough guide about writing a quality outline. We discussed creating a good beginning, ending, and body of your presentation. We have even talked about why a good outline is important, too. If you have any other tips to share about creating an outline for your presentation, make sure to share them in the comments section.
If you are looking to improve your public speaking and presentation skills, check out the rest of my articles on Speak and Conquer. The purpose of my site is to help you succeed in becoming a better public speaker. For example, I have covered popular topics such as how to memorize a speech in less than an hour , and how to use hand gestures effectively during a presentation .
Related Questions
What software should I use to outline my speech? Preferably, you should have a program that allows you to use bullet points or numbered lists. Bullet points and lists are a good place to start when you are outlining. Microsoft Word, Word Processor, or Notepad are acceptable for basic outlines.
How do I decide what the purpose of my speech is? Decide if you are there to inform, educate, motivate, or entertain your audience. When you have narrowed it down to just one of those, you will be able to decide the main idea of your speech. You should preferably speak about a topic that you are well-educated about.
How do I write a speech? Start with a purpose, and then create a detailed outline. Flesh out the points and sub-points from your outline. Decide very early on if you want to give your speech with or without notes. Revise your drafts as much as possible until you have created a full speech. If you are going to speak with notes, write some of the information from your outline onto cue cards.
Useful reading
- 16 secret ways how to speak to a bored audience
- How to Use Your Voice Effectively in a Presentation?
- 13 Effective Ways How to Make Speech Pauses
Posts about public speaking you may also like

How to make a speech? Frequently asked questions
There’s an FAQ section in every area, and public speaking is no exception. I’m often asked how to make a speech or what making a

12 effective impromptu speech tips you should use
An impromptu speech is something most people are afraid of even more than public speaking. There’s hardly any time to prepare, and, sometimes, this speech

Retirement Speech: 14+ Secret Tips on How To Go Out With A Bang
Congratulations you’re about to retire. That’s good news, I hope, for you. And now you have the opportunity to give a farewell speech. This may
- Tags: Effective speaking , Good speech , Pauses in speech , Speech preparation process , Speech skills , Speech tips , Unprepared speech , Unprepared speech topics
Recommended gear

Best Portable Speakers For The Presentations

Best Video Cameras for Public Speakers

Best rresenter remotes for public speakers

Best Portable Thumb Drives And Hard Drives for the Presentations
Who is janek tuttar.
My name is Janek Tuttar , and I am the founder and author of Speak and Conquer website.
I have been teaching public speaking at Estonian Entrepreneurship University of Applied Sciences
Here, I am sharing the wisdom of how to cope in different public speaking situations.
More information about Janek »

Share this post

Hi! My name is Janek Tuttar, and I am the founder and author of SpeakAndConquer.com.
I have been teaching and blogging about public speaking since spring 2007. Here, I am sharing the wisdom of how to cope in different public speaking situations.
Send me an e-mail: [email protected]
LEGAL INFORMATION
This site is owned and operated by Janek Tuttar. SpeakAndConquer.com is a participant in the Amazon Services LLC Associates Program, an affiliate advertising program designed to provide a means for sites to earn advertising fees by advertising and linking to Amazon.com.
This site also participates in other affiliate programs and is compensated for referring traffic and business to these companies.

Best teleprompters

Best Computer Mice for the Presentations

Best Laptop Backpacks for Public Speakers
- Slidesgo School
- PowerPoint Tutorials
How to Print Presentations in PowerPoint

Printings made with PowerPoint can be useful for you or your public in some cases. We thus prepared this tutorial where you will learn step by step how to print your PowerPoint presentations to have a physical copy of the whole document or only a few slides.
PowerPoint offers an easy, user-friendly printing panel with multiple options that can be configured according to your preferences. Let's see how to use it:
Printing Your Presentation
Selecting which slides to print, printing hidden slides, printing with notes, printing as an outline, printing two or more slides per page, printing on both sides, printing in black and white.
- Open your presentation in PowerPoint.
- Click File → Print.
- Click the Printer drop-down arrow to select a printer from the list.
- In case no printer appears on the list, you will have to add one following these steps:
- Windows 10 : Click Start → Settings → Devices → Printers and scanners.
- Windows 7 or 8 : On the Control Panel, click Hardware and Sound → Add printer → Add network, wireless or Bluetooth printer → Next.
- If you cannot find the device, check if your computer is connected to the equipment through some network (cable or wireless). Consult the printer manual for more details on how to connect the equipment.
- Settings → Print all slides.
- Settings → Print selection.
- Settings → Print current slide.
- Settings → Custom range.
- Click the Print button.
- Settings → Select the option according to the number of slides → click Print hidden slides.
- Click the Print button at the top to complete printing your presentation in PowerPoint.
- Settings → Notes pages.
- Type the number of copies you need and click the button Print at the top of the window.
- Settings → Outline. The presentation will be printed as a schematic overview.
You can select the number of slides you want to print per page (2, 4, 6…), and whether you want them to be printed horizontally or vertically and with or without notes.
- Settings → Full page slides → Documents.
- Type the number of copies and click the Print button.
- Settings → Print one sided.
- Settings → Print on both sides.
- Open your PowerPoint presentation.
- Settings → Color.
- Settings → Grayscale.
- Settings → Pure black and white.
- If you want to print more than one copy of your presentations, type the number of copies and click the Print button.
Do you find this article useful?
Related tutorials.

How to Download Google Slides Templates
When preparing a presentation, many people start panicking because they realize how much time it will take to edit each and every slide. Creating them from scratch, filling them in, looking for pictures, moving the elements...How stressful! But there is a solution that saves you a lot of time. We're sure that you've browsed the internet for templates, or basically, pre-established designs and elements, that can be downloaded for free and can be edited to your liking. Are we right? Then, we have some good news for you!

Discover our collection of printable templates
With the advance of technology, printing has become something that is no longer a necessity. Smartphones have made the paper format less and less frequent, but there are still certain cases in which having physical resources is much more convenient. Whether it's for taking notes, handing out assignments, making worksheets or handing out business cards or invitations, it's necessary to print your customized designs.From now on, in every Slidesgo printable presentation that you download, you will find the instructions for printing on the third slide. Depending on the style, colors or format of each presentation, we will tell you if you can...

How to Add Superscript and Subscript in Google Slides
Let’s take the most famous formula: E=mc^2, Einstein’s relativity equation. It wouldn’t be the same if it was E=mc2, right? Okay, yes, some people write it like that because it’s very famous and it won’t be misunderstood. But technically… It can! This is where the sophistication of superscript or subscript enters the room! Do you know how to write them in equations, copyright brands or even footnotes in your presentations? Let’s figure out how.

How to Add Superscript and Subscript in PPT
It can be a registered brand, a footnote or a math formula that you need to properly write. “2^2+2” is not the same as “22+2”, is it? Using superscript or subscript in a proper way makes a whole difference in texts. If it’s for your mathematical or physics complex formulas or just an anecdotic footnote, let’s figure out how to write them in a powerpoint presentation!
How to Print a PowerPoint Presentation? [A Complete Guide!]
By: Author Shrot Katewa
If you use Microsoft PowerPoint to create your presentations, there will be a point in time when you will need to print the presentation that you have created! Regardless of whether you print a physical copy or a PDF version of your presentation, you need to know the steps required to print a PowerPoint presentation!
To print a PowerPoint presentation, click on the “File” tab. Then, click on the “Print” tab in the “Backstage View”. Choose the slides that you need to print, adjust the settings, select the printer, and click on the “Print” button.
In this article, we shall understand the process to print a PowerPoint presentation in further detail. We will look at things like how to print your presentation with notes, how to create handouts, and how to print multiple slides on a single page!
That, and much more in this detailed article on printing a PowerPoint presentation!
So, let’s get started, shall we?
1. How to Print a PowerPoint Presentation?
Let’s get straight to the important part of this article! How exactly does printing in PowerPoint work?
Microsoft PowerPoint offers a simple and quick printing feature. By default, one slide will print on a single sheet of paper. However, there are options provided that can help you save paper by printing multiple slides on a single sheet of paper. We shall take a look at all these settings in a little while.
You can also choose to print notes along with the slides. This can be super helpful when you want to prepare for your presentation and you don’t have access to the soft copy of the presentation file!
But, how exactly does the process to print a presentation work? Let’s explore the step involved for both Windows and Mac in the below sections –
1a. How to Print a PowerPoint File on PC
In a Windows PC connected to a printer, you can print a PowerPoint file very easily. All you have to do is follow the 3 simple steps.
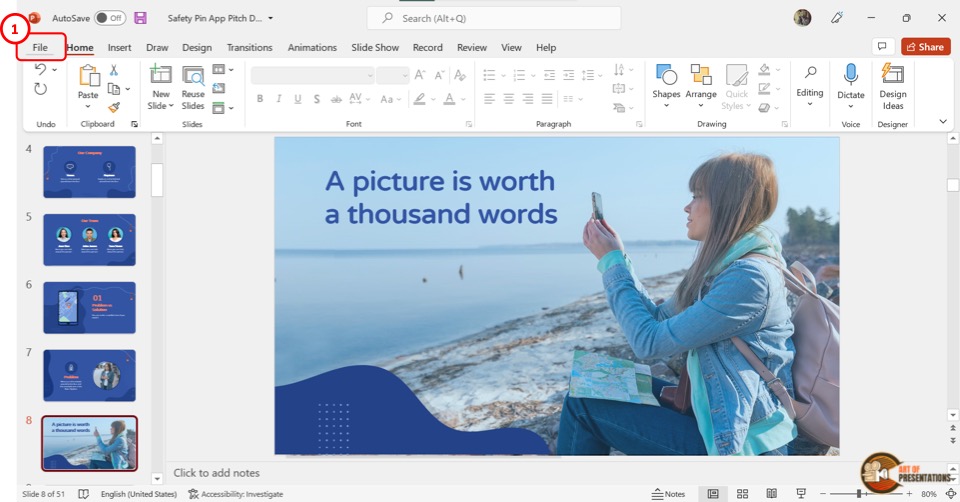
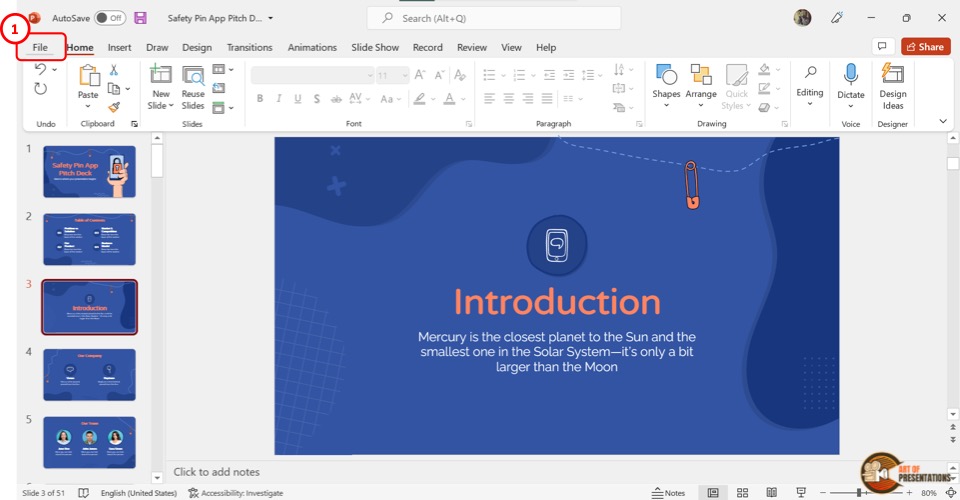
Step-1: Click on the “File” tab
In the Microsoft PowerPoint document, click on the “File” tab. It is located on the left side of the menu bar at the top of the screen.
In the “File” menu, click on the “Print” option from the sidebar on the left side of the screen.
Step-2: Select preferred settings
The “Print” option will show you a print preview as well as print settings on the screen. Under the “Settings” option, you can select your preferred settings.
If you don’t have a printer connected to your computer, you may need to first set it up. If you don’t know how to do that, check out this article on how to set up your printer .
Click on the “Print All Slides” box to select the specific slides that you want to print. You can also click on the “Full Page Slides” button to select the number of slides you want to print on each page.
Step-3: Click on the “Print” button
Now all you have to do is click on the “Print” button at the top of the screen to print a copy of your PowerPoint presentation (as shown in step 2).
1b. How to Print a PowerPoint Presentation on Mac?
Microsoft PowerPoint has a quite simple process for printing a presentation on Mac. Follow the 4 easy steps.
Step-1: Click on “File”
In the menu bar located at the top of the screen, click on the “File” tab to access the dropdown menu. Select the “Print” option from the dropdown menu. This will open a “Print” dialog box.
Step-2: Click on the “Show Details” option
The next step is to click on the “Show Details” option located at the bottom of the “Print” dialog box.
Step-3: Select your preferred settings
Now all you have to do is change the settings according to your preference. You can select how many copies to print by clicking on the “Copies” box.
There are also other settings that you can change like “Paper Size” , “Layout” and “Orientation” . You can also click on the “Slides” option to select which slides to print.
Step-4: Click on the “Print” option
The final step is to click on the “Print” option in the right corner at the bottom of the “Print” dialogue box.
2. Shortcut to Print a PowerPoint Presentation
For printing out a PowerPoint presentation very quickly, you can use the shortcut keys. All you have to do is follow the 2 easy steps.
Step-1: Press the “Ctrl+P” keys
The first step is to open the PowerPoint presentation that you want to print. Then press the “Ctrl+P” keys on your keyboard to open the “Print Preview” screen.
Alternatively, you can press the “Ctrl+Shift+F12” keys on your keyboard to access the print option.
Step-2: Click on “Print”
Now all you have to do is click on the “Print” button at the top of the “Print Preview” screen. This will print the presentation slides with the default settings.
3. How to Print Multiple Slides Per Page?
Using the “Handouts” feature in Microsoft PowerPoint, you can print multiple slides per page. All you have to do is follow the 3 quick steps.
Step-1: Click on the “File” menu
The first step is to click on the “File” option in the menu bar located at the top of the screen. In the “File” menu, click on the “Print” option from the sidebar on the left side of the screen.
This will open the “Print Preview” screen.
Step-2: Click on the “Full Page Slides” box
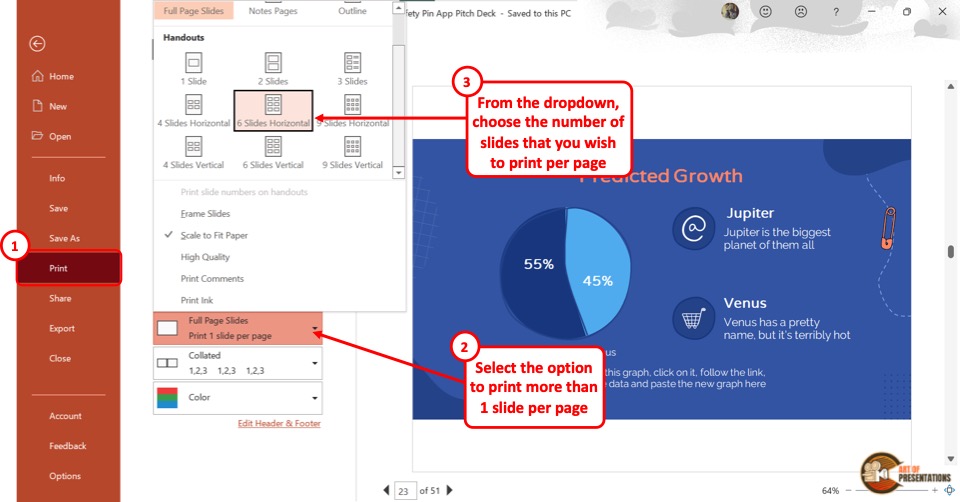
Now you have to click on the “Full Page Slides” box under the “Settings” option in the “Print Preview” screen. This will open a dropdown menu. Click on any option under “Handouts” that you prefer. There are nine different options to choose from.
You can print from one to nine slides per page.
Step-3: Click on “Print”
After selecting your preferred number of slides per page, all you have to do is click on the “Print” button at the top of the screen to print the PowerPoint presentation.
4. How to Print PowerPoint Slides with Notes?
Microsoft PowerPoint offers the feature to take notes for each slide. These notes can be helpful for both the presenter and the audience.
The steps for printing PowerPoint slides with notes are slightly different on PC and Mac.
To print PowerPoint slides with notes on PC, follow the 3 easy steps.
Step-1: Click on the “Print” option
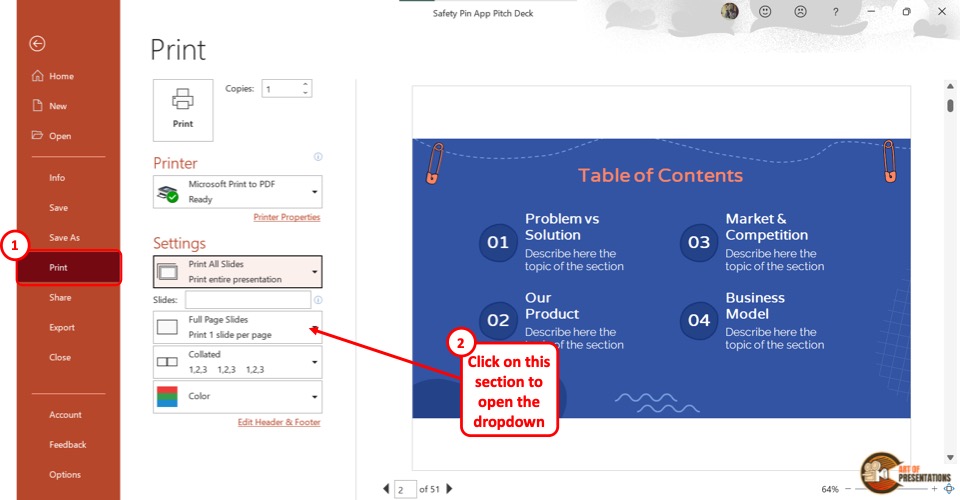
In the Microsoft Powerpoint presentation, click on the “File” tab from the menu bar. Then click on the “Print” option to access the print settings.
Step-2: Click on the “Notes Pages” option
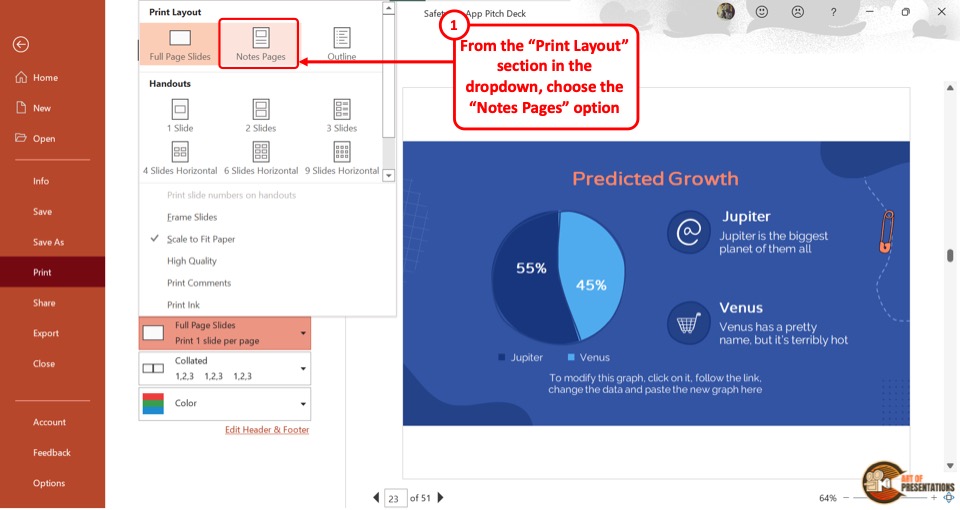
Under the settings option, click on the “Full Page Slides” box to open a dropdown menu. Under the “Print Layout” option, click on the “Notes Pages” button.
You can see the slide as well as the notes on the “Print Preview” screen.
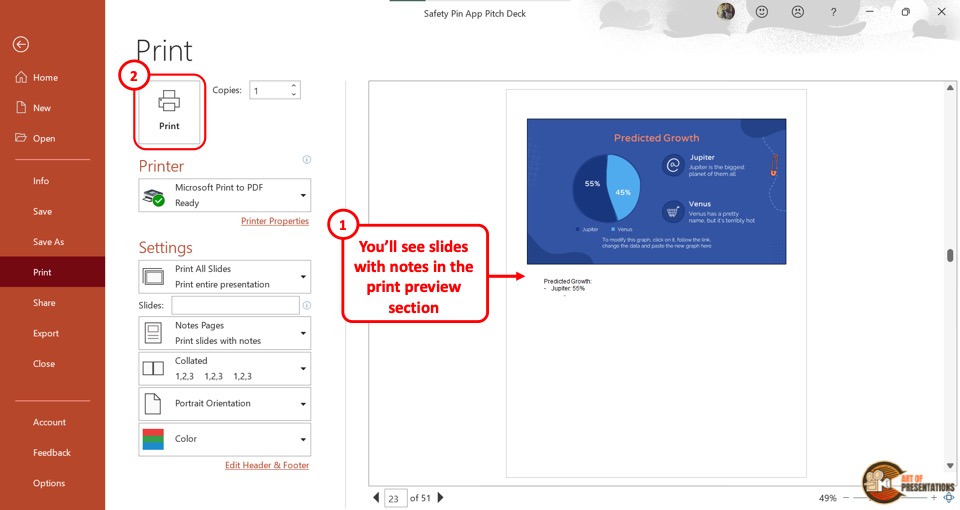
The final step is to click on the “Print” button at the top of the screen to print the slide along with the notes.
To print PowerPoint slides with notes on Mac, follow the 4 simple steps.
On a Mac device, you have to first open the PowerPoint presentation. Then click on the “File” tab located at the top left corner of the screen. From the dropdown menu, click on the “Print” option.
This will open a dialog box.
In the dialog box, click on the “Show Details” option located at the bottom. You will now be able to see the settings for printing the PowerPoint presentation slides.
Step-3: Click on the “Notes” option
The next step is to click on the “Layout” option in the dialog box to open a dropdown menu. Click on the “Notes” option from the dropdown menu to include the notes with the slides.
Step-4: Click on “Print”
Now all you have to do is click on the “Print” button located at the bottom right corner of the dialog box to print the slides with notes.
5. Printing Multiple Slides Per Page with Notes
Microsoft PowerPoint provides a “Create Handouts” option which you can use to fit notes with multiple slides on a single page.
Here’s a step-by-step process to print multiple slides per page with notes –
The first step is to click on the “File” menu in the menu bar located at the top of the screen. In the “File” menu, click on the “Export” option in the sidebar located on the left side of the screen.
Step-2: Click on the “Create Handouts” option
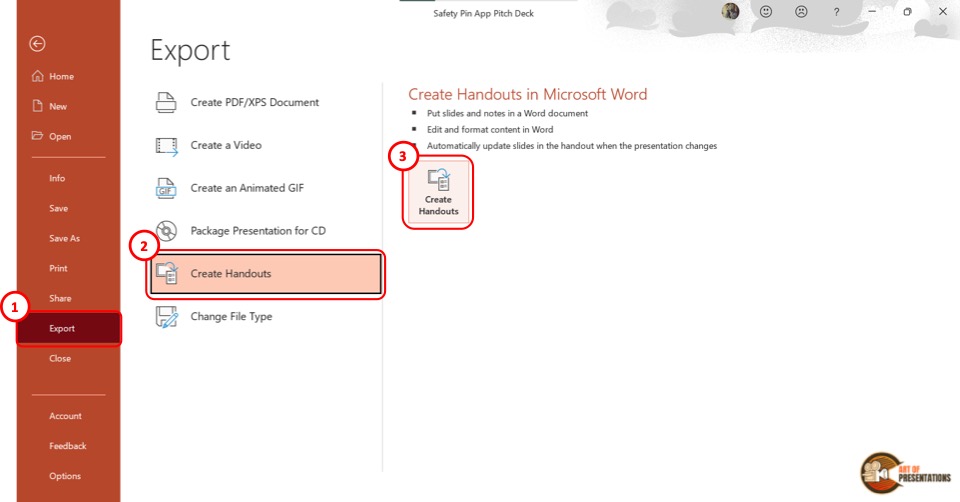
In the “Export” screen, click on the “Create Handouts” option at the secondary sidebar on the left side. Then you have to click on the “Create Handouts” button located in the middle of the screen.
This will prompt a dialog box.
Step-3: Select the “Notes next to slides” option
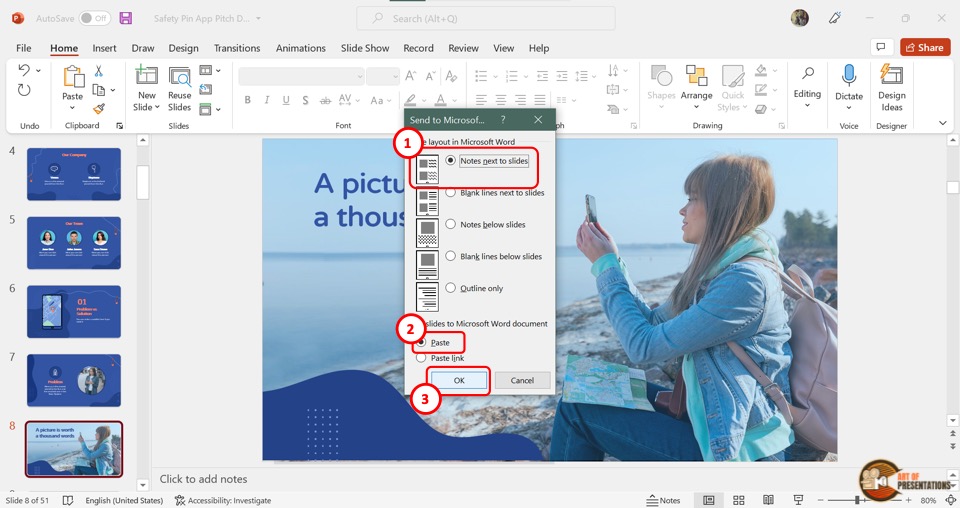
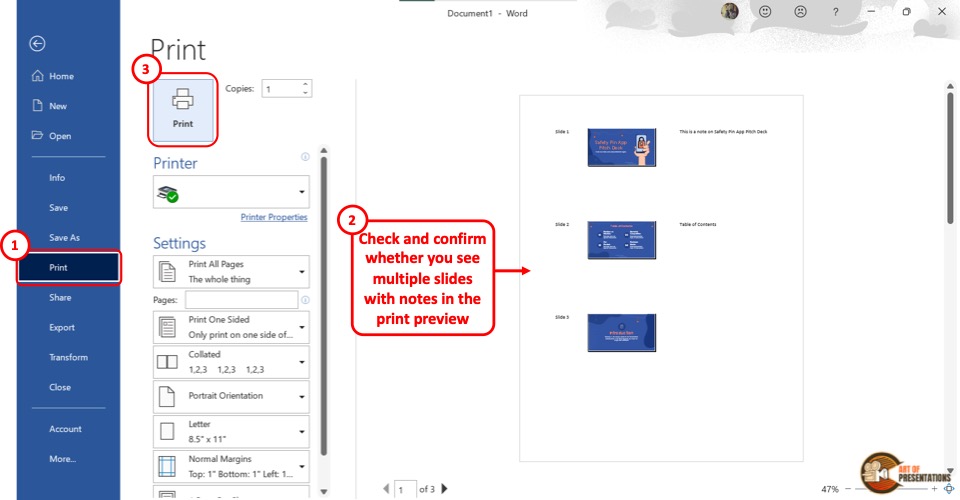
In the “Send to Microsoft Word” dialog box, you have to select two options. First, click on the “Notes next to slides” option under the “Page layout in Microsoft Word” settings.
Then click on the “Paste” option under the “Add slides to Microsoft Word document” settings.
Step-4: Click on the “OK” button
Now all you have to do is click on the “OK” button at the bottom of the dialog box (as shown in the image in step 3).
This will open a new Microsoft Word Document containing multiple slides per page along with notes.
Step-5: Click on “File”
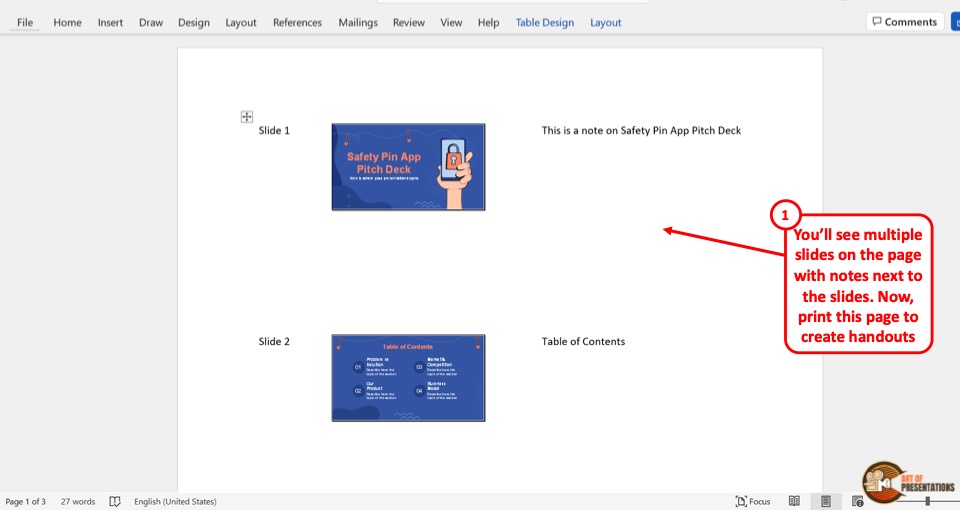
In the Microsoft Word document, you can preview the slides as well as the motes. You can also edit the notes and the slide arrangement.
Then click on the “File” tab in the menu bar at the top of the screen and click on the “Print” option.
Step-6: Click on the “Print” button
In the “Print” screen, you can change the settings options according to your preference. Now all you have to do is click on the “Print” button to print the multiple slides per page with notes.
6. Can You Print Just Slide Notes in PowerPoint?
In Microsoft PowerPoint, there is currently no feature that allows you to print just slide notes without the slides. However, you can remove the slide thumbnails manually before printing the notes pages.
Here’s how to do it –
In the menu ribbon at the top of the screen, click on the “File” tab. Then click on the “Export” option in the sidebar located at the left side of the screen.
The next step is to click on the “Create Handouts” option from the sidebar in the “Export” screen. Then click on the “Create Handouts” button under the “Create Handouts in Microsoft Word” option.
Step-3: Click on the “Notes below slides” option
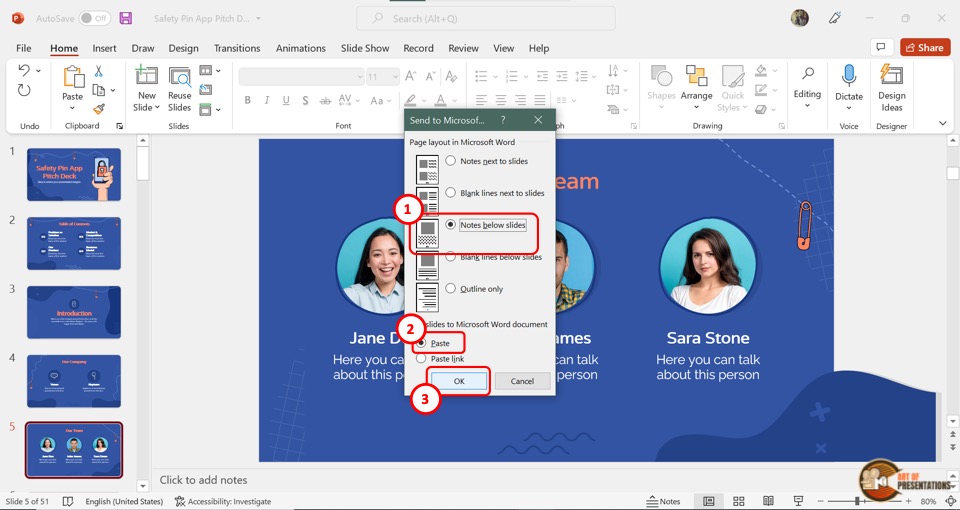
In the “Send to Microsoft Word” dialog box, click on the “Notes below slides” option under “Page Layout in Microsoft Word” .
Then select the “Paste” option under “Add slides to Microsoft Word document” .
This will open a new Microsoft Word document containing all the slides and the notes below each slide.
Step-5: Delete the slide thumbnails

In the Microsoft Word document, you have to delete each slide thumbnail manually. To do so, click on each image and press the “Delete” key on your keyboard.
Alternatively, you can press the “backspace” key on your keyboard. Repeat the process until you have deleted all the slide thumbnails.
Step-6: Click on the “Print” option
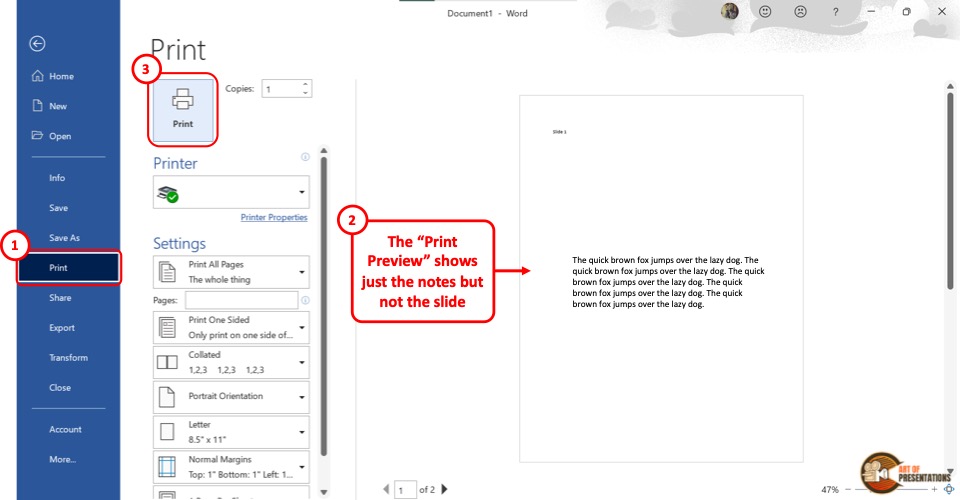
The final step is to click on the “File” tab and select the “Print” option from the sidebar on the left side of the screen in the “File” menu.
Now all you have to do is click on the “Print” button at the top of the screen to print just the notes without the presentation slides.
7. How to Print PowerPoint as an Outline?
Microsoft PowerPoint allows you to print only the slide outline of a presentation without printing the slide itself. To print the PowerPoint presentation as an outline, follow the 3 simple steps.
The first step is to click on the “File” tab in the menu ribbon located at the top of the screen. In the “File” menu click on the “Print” option to open the “Print Preview” screen.
Step-2: Click on the “Outline” option

The next step is to click on the “Full Page Slides” box under the settings. From the popup menu, click on the “Outline” option under the “Print Layout” section.
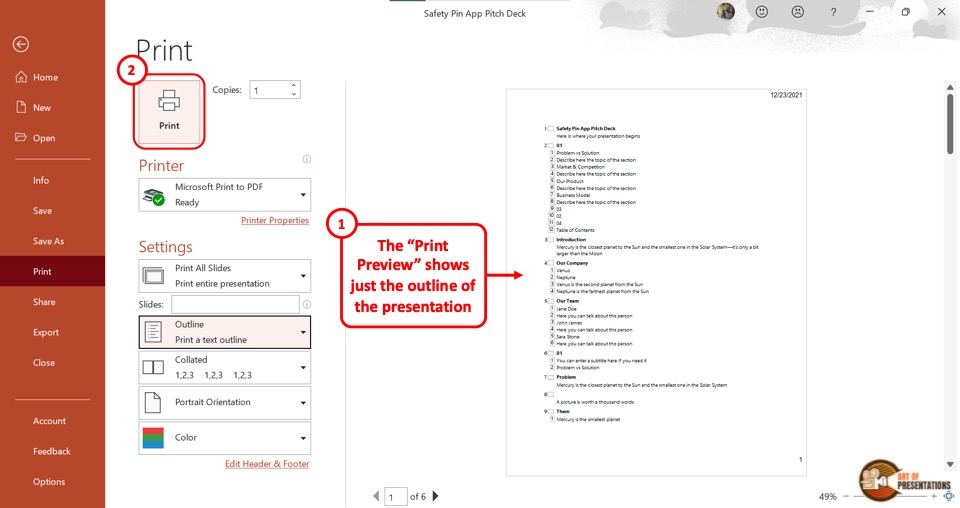
In the “Print Preview” screen, you can see the slide outline. Now all you have to do is click on the “Print” button at the top of the screen to print the presentation as an outline.
8. How to Print PowerPoint as a Handout?
Printing a PowerPoint presentation as a handout helps you compile multiple slides on a single sheet of paper. This is helpful when you have to distribute paper copies of your presentation among the audience.
To print a presentation as a handout, follow the steps mentioned below –
The first step is to click on the “File” tab in the menu ribbon located at the top of the screen. In the “File” menu, click on the “Print” option.
Step-2: Click on the “Print Layout” option
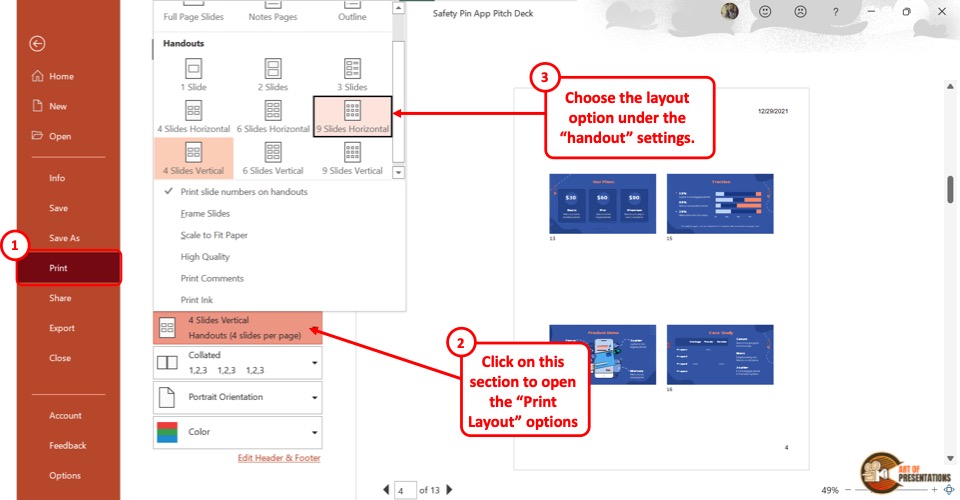
The next step is to click on the “Print Layout” option. It is the second box in the “Settings” section of the “Print” menu.
In the “Print Layout” pop-up menu, you will see 9 different layouts under the “Handouts” section. Click on your preferred handout layout.
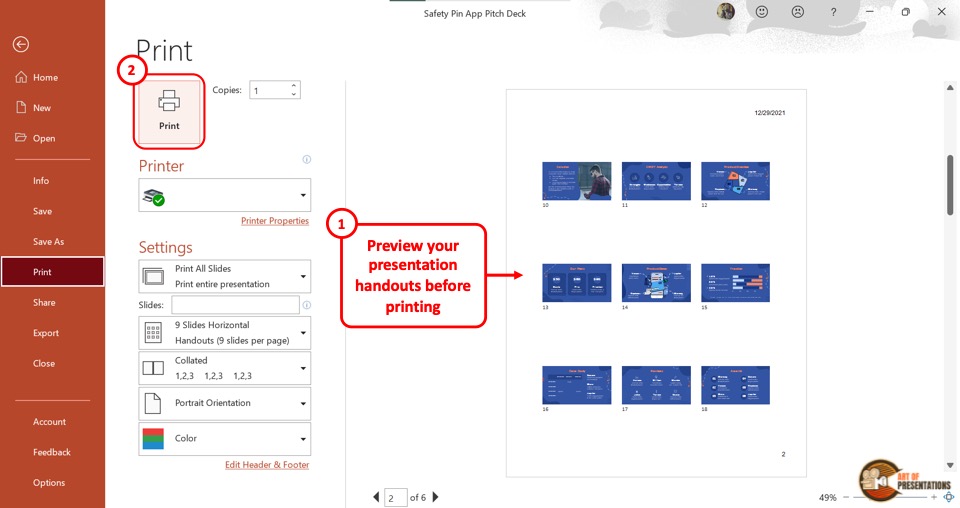
The final step is to click on the “Print” button at the top of the screen. Make sure that you are connected to a printer to print the PowerPoint as a handout.
8a. Adding Slide Numbers on Handouts
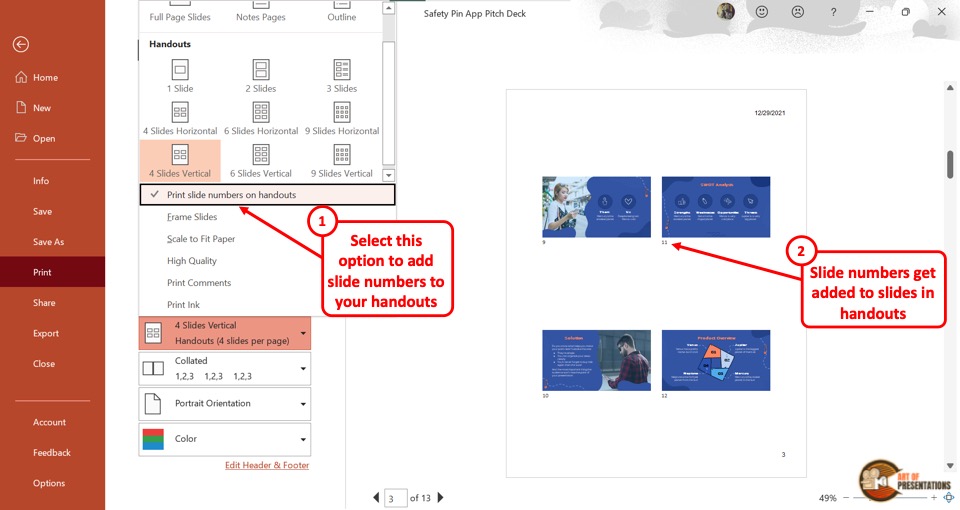
After selecting a handout layout, you can add the slide numbers on the handouts. All you have to do is click on the “Print slide numbers on the handouts” option under the layouts in the “Print Layout” pop-up menu.
A checkmark will appear on the left side of the option. You can also see the slide number showing under each slide on the preview screen.
8b. How to Frame Handout Slides
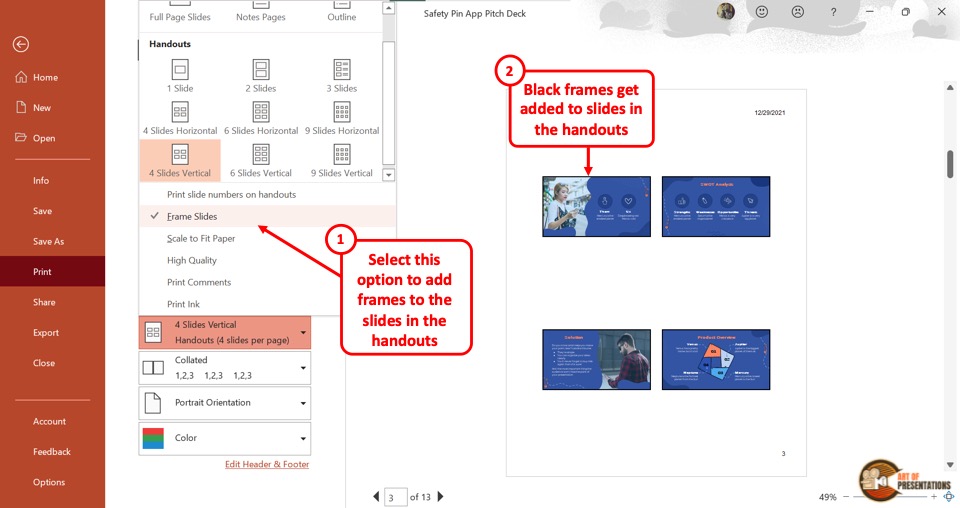
To frame handout slides, you have to first select a handout layout from the “Print Layout” option. Then click on the “Frame Slides” option under the layouts.
You will notice a checkmark showing on the left side of the “Frame Slides” option. Black frames will appear around each slide on the preview screen.
9. How to Print PowerPoint Full Page?
Microsoft PowerPoint offers various layouts for printing the presentation slides. You can print the presentation using the “Full Page Slides” option, where each paper will be printed with single slides on them.
Here’s what you need to do to print full-page slides –
Step-1: Click on the “File”
First, you have to open the “Print” screen. To do so, click on the “File” tab in the menu ribbon. Then click on the “Print” option from the sidebar in the “File” menu.
Step-2: Click on the “Full Page Slides” option
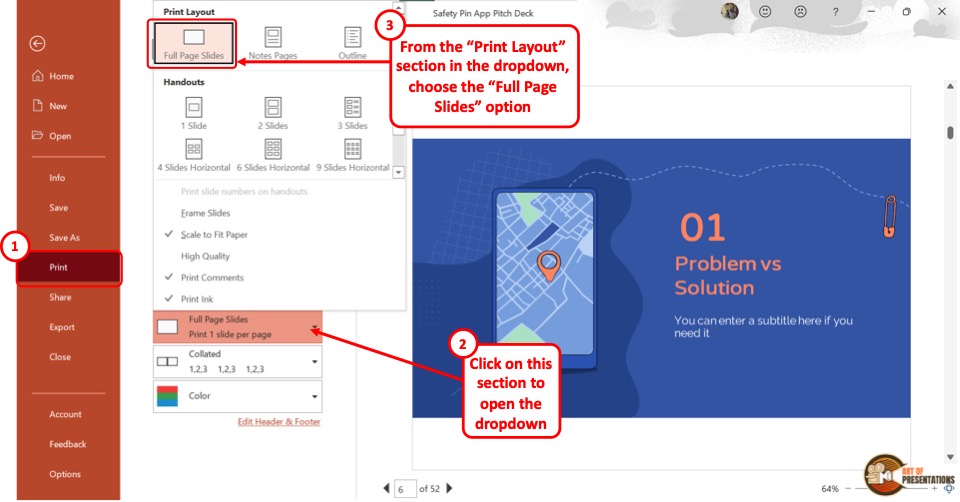
In the “Print” screen, click on the “Print Layout” option which is the second option under the “Settings” section. In the pop-up menu, click on the “Full Page Slides” option.
You can see the full page on the preview screen on the right side.
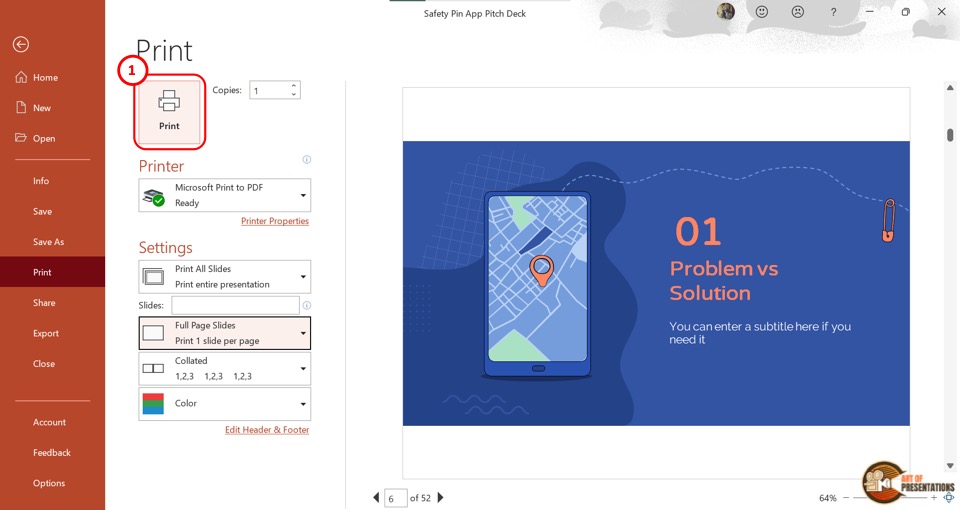
Finally, you have to ensure that the device is connected to a printer. Then click on the “Print” button at the top of the screen to print the full page slides.
Shortcut Method
In the “Print” option of Microsoft PowerPoint, the default setting for printing the slides is to print the full page. So all you have to do is press the “Ctrl+P” keys on your keyboard to open the “Print” screen.
Then click on the “Print” button at the top of the screen.
10. How to Print PowerPoint with Comments?
In Microsoft PowerPoint, the editor as well as other reviewers can leave comments on the objects in a slide. To print a PowerPoint presentation with the comments alongside the slides, follow the 3 simple steps.
Step-1: Open the “Backstage View” using the “File” Tab
In the open PowerPoint presentation, click on the “File” tab from the menu ribbon. Then you have to click on the “Print” option in the “File” menu.
Step-2: Click on the “Print Comments” option
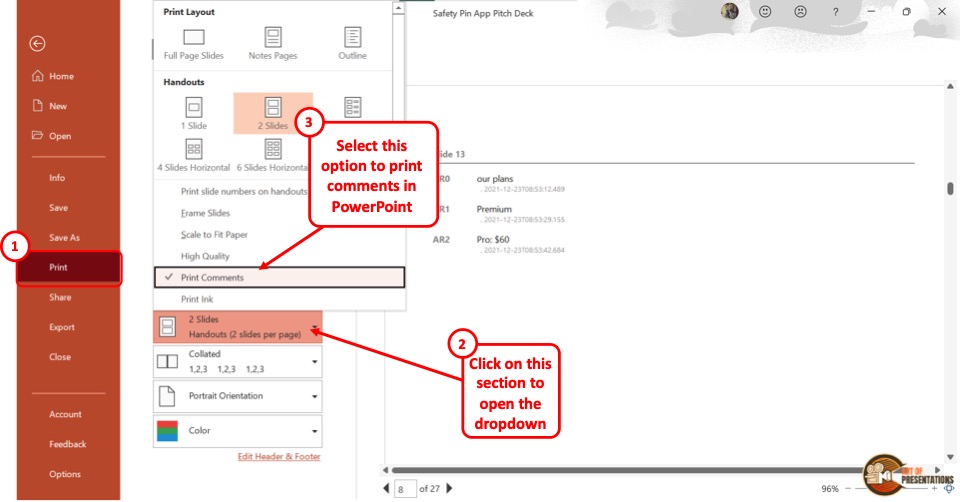
In the “Print” menu, click on the “Print Layout” option which is the second option in the “Settings” section. This will open a pop-up menu. Click on the “Print Comments” option from the pop-up menu.
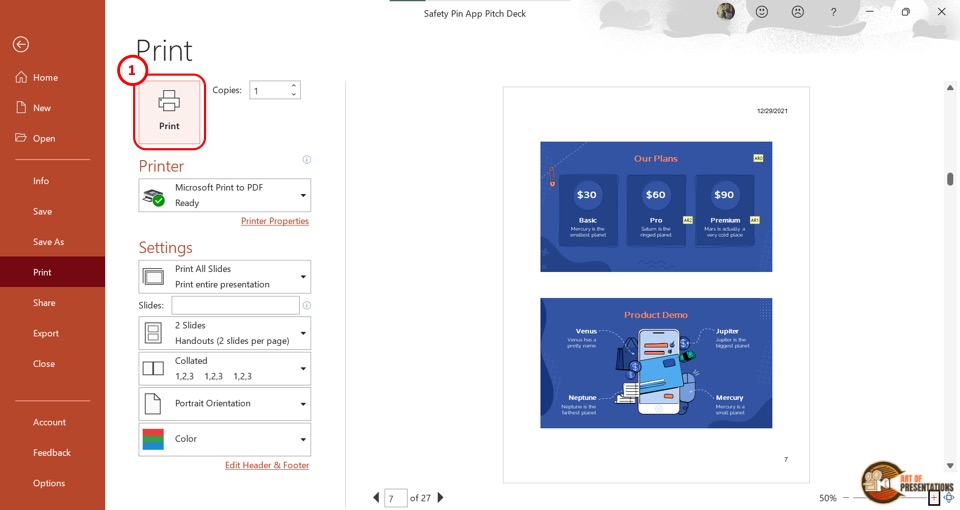
On the preview screen, the comments in a slide will show on a separate page after that slide. Now all you have to do is click on the “Print” button to print the presentation slides with comments.
11. How to Print PowerPoint Slides as a Booklet?
Sometimes, printing a presentation as a booklet may be more convenient. Unfortunately, Microsoft PowerPoint currently does not have any feature that allows you to print the PowerPoint slides as a booklet.
However, you can commonly find this feature in your printer device. All you have to do is click on the “Printer Properties” option in the “Printer” section of the “Print” screen and look for any booklet feature.
If the printer does not have any feature to print booklets, you can save the PowerPoint document as a PDF file. Follow the steps in section 14 to print the PowerPoint as PDF. Then use the “Print as Booklet” option in the PDF viewer.
12. How to Print PowerPoint Presentation in Portrait?
In Microsoft PowerPoint, you can change the orientation of the slides to print them in “Landscape” or “Portrait” .
To print a PowerPoint presentation in portrait orientation, here’s what you need to do –
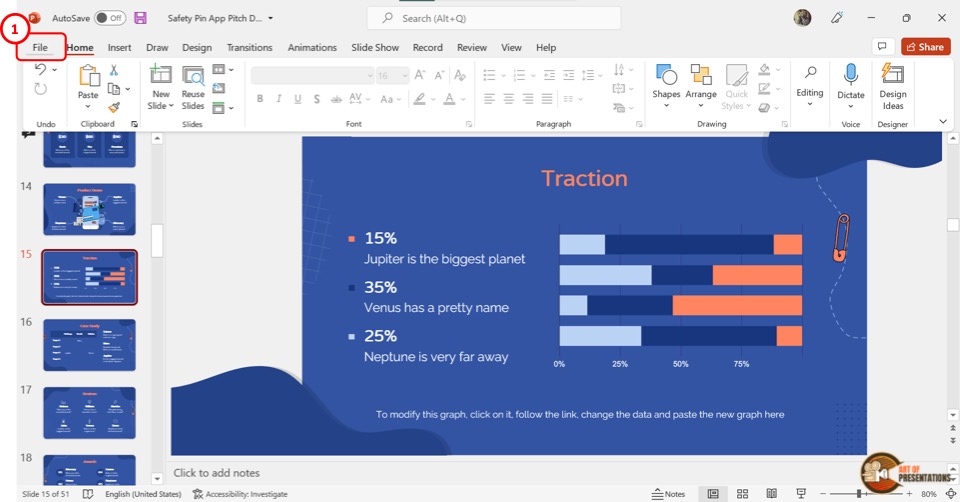
In the menu bar at the top of the screen, click on the “File” tab located in the left corner. In the “File” menu, click on the “Print” option. Alternatively, you can press the “Ctrl+P” keys on your keyboard.
Step-2: Click on the “Portrait Orientation” option
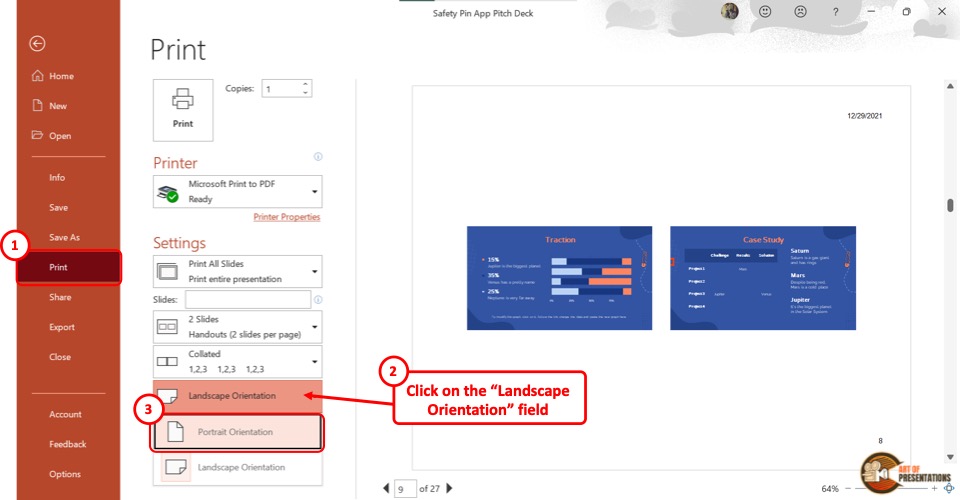
In the “Print” menu, click on the “Orientation” box. It is the fourth option in the “Settings” section. Then click on the “Portrait Orientation” option from the dropdown menu.
In PowerPoint, the “Portrait Orientation” is the default orientation.
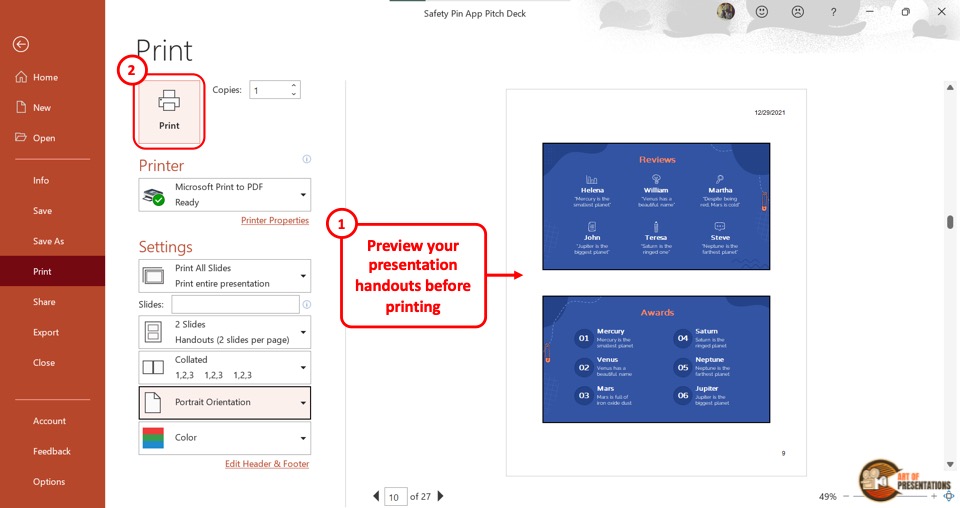
You can now see the slides in portrait orientation on the preview screen on the right side. All you have to do is click on the “Print” button. This will print the slides in portrait orientation.
13. How to Print PowerPoint Presentation with Ink Annotations?
Ink Annotations are drawings or handwritten notes on slides. You can show or hide the ink annotations in a PowerPoint presentation using the “Draw” tab.
You can also print your presentation along with ink annotations. Here’s how to do that –
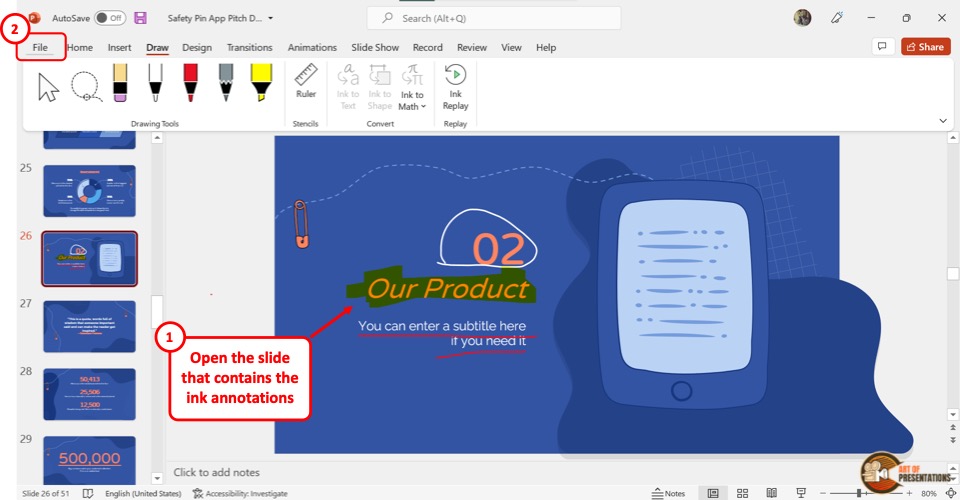
The first step is to open the “Print” screen. To do so, press the “Ctrl+P” keys on the keyboard. You can also click on the “File” tab from the menu ribbon and then click on the “Print” option from the sidebar of the “File” menu.
Step-2: Click on the “Print Ink” option

The next step is to click on the “Print Layout” option. In the “Settings” section, the “Print Layout” option in the box that shows “Full Page Slides” .
In the “Print Layout” pop-up menu, click on the “Print Ink” option at the bottom. A checkmark will appear on the left side of the “Print Ink” option and the ink annotations will show on the preview screen.
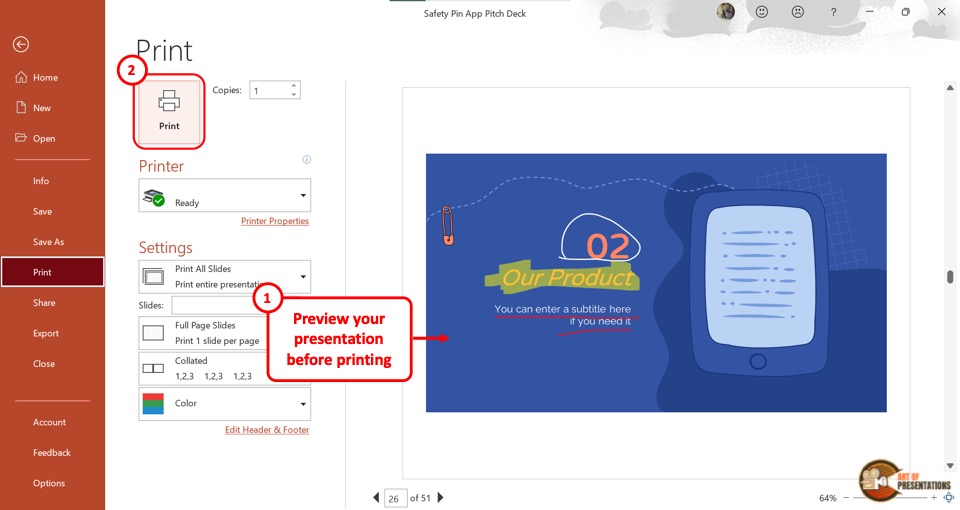
Finally, you have to ensure the device is connected to a printer. Then click on the “Print” button to print the slides with ink annotations.
14. How to Print PowerPoint as a PDF?
In Microsoft PowerPoint, you can use the “Microsoft Print to PDF” option to save your presentation as a printable PDF document. To do so, follow the 4 easy steps mentioned below –
You have to first click on the “File” tab located at the left corner of the menu ribbon. This will open the “File” menu. Click on the “Print” option in the sidebar on the left side of the “File” menu.
Alternatively, you can press the “Ctrl+P” keys on your keyboard.
Step-2: Click on the “Microsoft Print to PDF” option
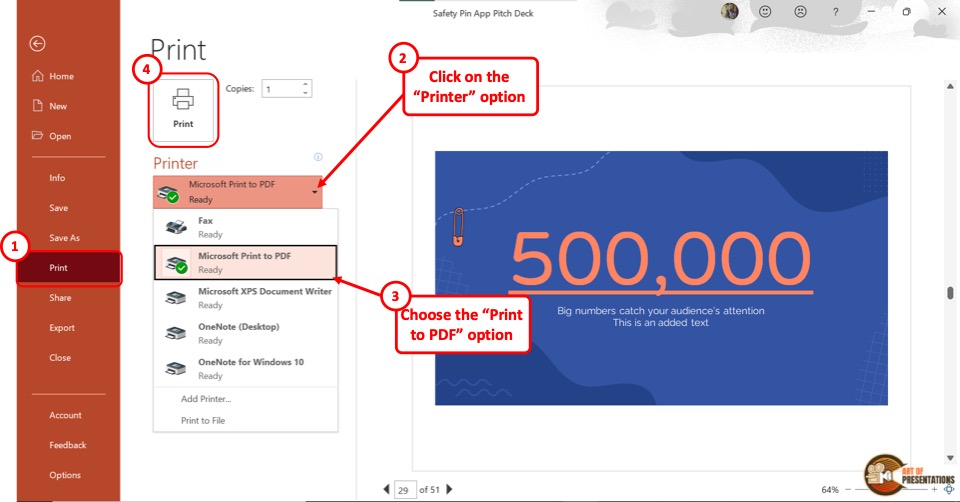
Now you have to click on the box under the “Printer” option. This will open a dropdown menu. Click on the “Microsoft Print to PDF” option from the dropdown menu.
Now all you have to do is click on the “Print” button at the top of the “Print” screen (as shown in the image in step 2). This will prompt a dialog box.
Step-4: Click on the “Save” option
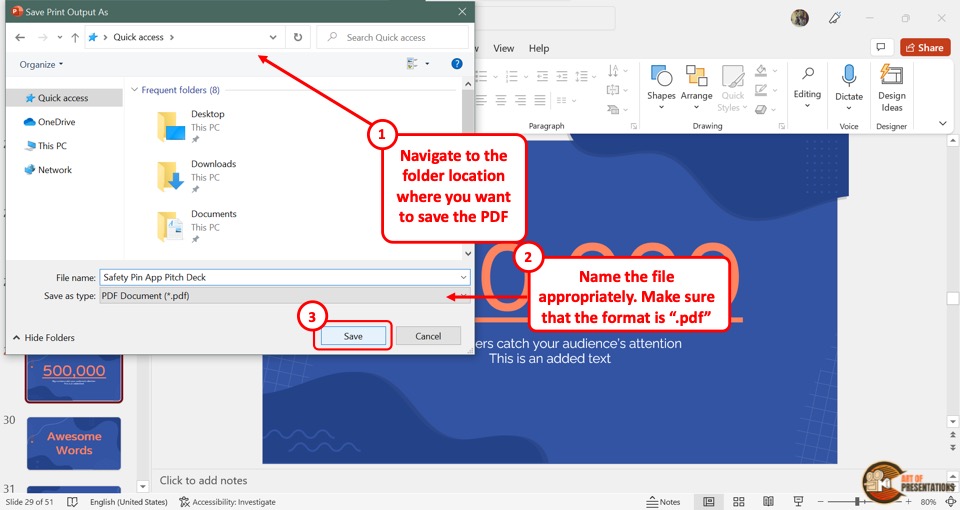
In the “Save Print Output As” dialog box, select the preferred file location for the PDF. Then click on the “Save” option at the bottom of the dialog box to save the PowerPoint presentation as a PDF file.
- Insert WordArt Article
- Add a hyperlink to a slide Article
- Create a PowerPoint presentation from an outline Article
- Check spelling in your presentation Article
- Create and format a table Article
- Insert a linked Excel chart in PowerPoint Article
- Add slide numbers, page numbers, or the date and time Article
- Set text direction and position in a shape or text box Article

Create a PowerPoint presentation from an outline
If you've already jotted down an outline of your presentation in Word and now need a quick way to add it to your slides, you can import a Word outline into PowerPoint.

Create an outline in Word
Select View > Outline . This automatically generates an outline and opens the Outlining tools:
If your document has headings (any heading levels from H1-H9), you’ll see those headings organized by level.
If your document doesn’t have headings and subheadings yet, the outline will appear as a bulleted list with a separate bullet for each paragraph or body text. To assign or edit headings, heading levels, and set up your document structure:
Select a bulleted item. Or press the Ctrl key to select several lines.
In the Outline Level box, select a heading Level 1 for slide titles, Level 2 for bullet points on that slide.
When finished or to edit your document, select Close Outline View .
If you need help creating an outline, see Create an outline in Word .
Save an outline in Word
To save your document, select Save , name your file, and then select Save once more. Select Close to close your document.
Note: Your Word document must be closed to insert it into a PowerPoint presentation.
Import a Word outline into PowerPoint
Open PowerPoint and select New Slide > Slides from Outline .
In the Insert Outline dialog box, find and select your Word outline and select Insert .
Note: If your Word document contains no Heading 1 or Heading 2 styles, PowerPoint will create a slide for each paragraph in your content.
Guidelines for importing an outline
PowerPoint can import an outline in .docx, .rtf, or .txt format.
If your outline is a Word document Apply a heading format to any text you want to include in a slide. For example, if you apply the Normal style to a block of text, Word won't send that text to PowerPoint.
If your outline is a .txt file Use indentation to indicate heading levels. Any unindented lines of text will become titles of new slides.
For PowerPoint to successfully convert your outline to slides, you must follow these guidelines:
If your outline is a Word document:
Apply a heading format to any text you want to include in a slide. For example, if you apply the Normal style to a block of text, Word won't send that text to PowerPoint
Save the Word document as an .rtf file. In PowerPoint for macOS, you can only import Word documents that are saved in Rich Text Format. Click File > Save As , and in the File Format box, select Rich Text Format (.rft) ).
If your outline is a .txt file: Use indents to indicate heading levels. Remember that any un indented lines of text will become titles of new slides.
Insert outline text into a PowerPoint presentation
In a new PowerPoint presentation file, click the first slide. Or, in an existing presentation file, click the slide that you want the outline to appear after.
On the Home tab, click the arrow next to New Slide , and then click Outline .

Locate the outline file (.rtf or .txt) that you want to insert, and then double-click it or click Insert .
New slides are inserted in the presentation based on the text in the outline file you selected. You are now ready to edit the slides and the presentation as you see fit.
Creating a presentation from an outline isn't support in PowerPoint for the web. It requires a desktop version of PowerPoint.

Need more help?
Want more options.
Explore subscription benefits, browse training courses, learn how to secure your device, and more.

Microsoft 365 subscription benefits

Microsoft 365 training

Microsoft security

Accessibility center
Communities help you ask and answer questions, give feedback, and hear from experts with rich knowledge.

Ask the Microsoft Community

Microsoft Tech Community

Windows Insiders
Microsoft 365 Insiders
Was this information helpful?
Thank you for your feedback.
IMAGES
VIDEO
COMMENTS
Open the presentation that you want to print. Click File > Print. In the Print dialog box, under Settings, select the second box (which by default is set to Full Page Slides) to expand the list of options. Then, under Print Layout, select Outline. You can choose a page orientation (Portrait or Landscape) in the Printer Properties dialog box.
Click the File tab at the top-left corner of the window. Click Print in the left column. Click the second dropdown menu (it says Full Page Slides by default), then click the Outline option. Confirm that the outline is correct, then click the Print button. Our guide continues below with additional information on how to print an outline of the ...
Print Layout: Choose to print just the slides, just the speaker notes, an outline, or handouts. The number of slides per page is also an option, an effective way to save paper. The Outline prints only the text in the slides, without images. The Notes of a presentation show the slide and the related speaker notes below it.
How to Save and Export Your Presentation Outline for Printing. Once you have customized the layout of your outline, you can save and export it for printing. From the "File" tab, click "Export" and select "Create Handouts.". Choose the "Outline Only" option, and select the layout and format that suits your needs.
Access the Outline View. The first step to printing an outline is accessing the Outline View within PowerPoint: Open your presentation in Normal View. Click on the View tab. Select Outline View in the Presentation Views group. This will display a text-based, hierarchical view of your presentation's contents and structure.
Navigate to the Print Options. On your keyboard, hit CTRL+P to open up the print options for your presentation. 2. Navigate to the Outline View. Within the print options, select the 'Full Page Slides' dropdown (the default setting) and within the menu in the upper right-hand corner, select the Outline View.
To save your PowerPoint as a PDF, click on the File option in the toolbar at the very top of your screen. When you click on File, a menu drops down. Choose the Save As… option. After clicking on this option, a window appears. Next, in the File Format: field, choose the PDF option.
In this tutorial, we will see how to print a PowerPoint presentation. In PowerPoint, you can print the slides, speaker notes, an outline, as well as create h...
The PowerPoint screenshots that you'll see in this section use a template called Brusher from Envato Elements . Brusher PowerPoint Template is an advanced design tool that makes it easy to create great presentations. Now let's look at how to create PowerPoint outlines: 1. Close PowerPoint (If It's Already Open)
There are numerous handy options in the PowerPoint Outline view accessible via the right-click context menu. This includes options to expand or collapse the list and delete, move, or add new slides. How to Print an Outline of the Presentation. To print an outline for your slides, go to File -> Print and select Outline via Settings.
1. Open Microsoft Powerpoint with whatever procedure you prefer to use. 2. Open your file you'd like to print. 3. Select the "File" option from the Menu toolbar at the top of your screen. 4. Click "Print" button. You can also select the "Printer" icon from the "Standard toolbar" which can also be found at the top of the screen.
The most common way to print PowerPoint notes is with the thumbnail image of the slide at the top of the page, and the notes directly beneath (as pictured above). To print your notes like this, simply: Hit Ctrl+P for Print (or click File then Print) Open the Print Layout options. Select the Notes Page layout.
Print your presentation. Select the File > Print. For Printer, select the printer you want to print to. For Settings, select the options you want: Slides - from the drop-down, choose to print all slides, selected slides, or the current slide. Or, in the Slides box, type which slide numbers to print, separated by a comma.
All you have to do is follow the 3 simple steps. Step-1: Click on the "File" tab. In the open PowerPoint presentation, click on the "File" tab from the menu ribbon located at the top of the screen. In the sidebar of the "File" menu, click on the "Print" option. Step-2: Click on the "Print Layout" option.
Open your saved Slides file with PowerPoint. Once the presentation opens in PowerPoint, look for the File tab at the top of the page and click it. At the bottom of this drop-down menu, you'll see the Print command. Click it. The print outline option on PowerPoint. A separate Print window will open.
Follow these steps when creating an outline for your presentation: 1. Consider the purpose of your presentation. When creating a presentation outline, determine your goal. To find this, think about what you want your audience to obtain or support after your discussion. For example, a nonprofit that builds wells for impoverished communities may ...
Body. Create a skeleton outline of your presentation by breaking down this main message into smaller parts. Use bullet points or headings to organize these bits of information. Think of the main points as the big chapters and the subpoints as the smaller sections within those chapters.
Flesh out the points and sub-points from your outline. Decide very early on if you want to give your speech with or without notes. Revise your drafts as much as possible until you have created a full speech. If you are going to speak with notes, write some of the information from your outline onto cue cards.
Print Preview. See Printing and print preview for information about preview features. Troubleshooting. If you've having trouble being able to print, see My Print button and some printer settings aren't available. See also. For more information about printing in PowerPoint, check out the following: Create or change a presentation's handout
Open your PowerPoint presentation. Click File → Print. Printing options. In Settings you can select if you want to print your presentation in colour or black and white. Click the icon at the bottom of the window to the right to select among the options: To print in color: Settings → Color. To print in grayscale: Settings → Grayscale.
Step-1: Click on the "Print" option. In the Microsoft Powerpoint presentation, click on the "File" tab from the menu bar. Then click on the "Print" option to access the print settings. Step-2: Click on the "Notes Pages" option. Under the settings option, click on the "Full Page Slides" box to open a dropdown menu.
Open the presentation that you want to print. Click File > Print. In the Print dialog box, under Settings, select the second box (which by default is set to Full Page Slides) to expand the list of options. Then, under Print Layout, select Outline. You can choose a page orientation (Portrait or Landscape) in the Printer Properties dialog box.
Locate the outline file (.rtf or .txt) that you want to insert, and then double-click it or click Insert. New slides are inserted in the presentation based on the text in the outline file you selected. You are now ready to edit the slides and the presentation as you see fit.