How to Write Up an Elementary Volcano Science Project
Jennifer tolbert, 27 jun 2018.
The baking soda and vinegar volcano is a favorite science experiment among elementary students. It is important to make your presentation stand out from the other students at the science fair with an exceptional presentation. Also be sure to follow the teacher's guidelines or science fair guidelines to ensure that your score is as high as possible.
Write an introduction. The introduction is your first impression. Be sure it is concise and accurately introduces exactly what you studied in the experiment. This is also an excellent place to include fun facts, background information or general volcano information. The reaction is due to the properties of bases and acids and would be important to include in your experiment. Identify the variable that you are testing, such as the ratio to vinegar and baking soda. Or maybe you would like to see what other base-acid combinations would produce similar eruptions.
Write a hypothesis. Remember a hypothesis is an educated guess or prediction. Explain what you believe will happen during the experiment based upon your previous knowledge or research. The hypothesis should be written in a declarative sentence.
List your materials. Provide a detailed list of all of the materials you used when you conducted the experiment. Be sure to also include how much of each material was used. Explain whether you made your own volcano or bought a kit.
Write your procedure. The procedure should be written step-by-step, in detail. If someone else could easily reproduce your experiment, you have probably written a fairly clear procedure. Be detailed, accurate and logical in your explanation. Procedures are usually written in a numerical list format.
Explain your results. Be sure your results reflect exactly what you were testing. You can provide observations or measurements. If applicable, you can create a chart or graph to describe any numerical data you may have taken. You may want to describe what the eruptions looked like, how long they lasted or how explosive the reactions were.
Write a conclusion. Basically, sum up what you learned during the experiment. Say whether or not your hypothesis was correct. Point out patterns in your data and explain if they were consistent with your previous knowledge of the subject. Also, do not forget to relate how that information can be used in the real world. This would also be a good spot to place recommendations if there are changes you would make to the experiment.
- 1 Discovery Education: Science Fair Center
- 2 Science Buddies: Science Fair Project Final Report

About the Author
Jennifer Tolbert currently resides in Magnolia, Texas. She holds a Bachelor of Science in agricultural communications from Texas Tech University and a Master of Science from Texas A&M University. She has written several award-winning special sections as a marketing writer and is currently a special education teacher.
Related Articles
How to Write a Grade 10 Lab Report
How to Write an Essay Regarding a Science Experiment
How to Write a Research Report for a Science Fair
What Do You Do if Your Hypothesis Is Wrong?
Penny Cleaning Science Fair Project for Eighth-Graders
How to Write a Math Report
How to Collect Data From a Science Project
How to Write a Discussion for an APA Style Paper
How To Write a Graph Essay
How to Write an Analysis/Discussion for a Science Project
How to Write Up a Science Experiment in 3rd Grade
How to Test for Bronze With a Magnet
How to Make a Good Presentation of a Case Study
How to Write a Summative Report
What Kind of Human Errors Can Occur During Experiments?
How to Write an Evidence-Based Paper
How to Write a Fieldwork Report
How to Put Together an Ethnographic Research Paper
How to Write the Introduction and Literature Review...
Activities to Teach Students About Seashells
Regardless of how old we are, we never stop learning. Classroom is the educational resource for people of all ages. Whether you’re studying times tables or applying to college, Classroom has the answers.
- Accessibility
- Terms of Use
- Privacy Policy
- Copyright Policy
- Manage Preferences
© 2020 Leaf Group Ltd. / Leaf Group Media, All Rights Reserved. Based on the Word Net lexical database for the English Language. See disclaimer .
It’s a wonderful world — and universe — out there.
Come explore with us!
Science News Explores
Study acid-base chemistry with at-home volcanoes.
Baking soda volcanoes are a fun demonstration, and with a few tweaks they can be an experiment, too

A few kitchen chemicals can give you an at home volcano. But you’re going to need more than one volcano for an experiment.
PeopleImages/E+/Getty Images
Share this:
- Google Classroom
By Bethany Brookshire
October 7, 2020 at 6:30 am
This article is one of a series of Experiments meant to teach students about how science is done, from generating a hypothesis and designing an experiment to analyzing the results with statistics. You can repeat the steps here and compare your results — or use this as inspiration to design your own experiment.
It’s a science fair staple: the baking soda volcano. This simple demonstration is easy to do. That clay mountain “smoking” in front of a poster board can be kind of sad, though. The whole thing looks like it was put together the morning of the fair.
But it’s not too difficult to turn this easy science demo into a science experiment. All that’s needed is a hypothesis to test — and more than one volcano.
A baking soda volcano’s foamy rush is the result of a chemical reaction between two solutions. One solution contains vinegar, dish soap, water and a little food coloring. The other is a mix of baking soda and water. Add the second solution to the first, stand back and watch what happens.
The reaction that occurs is an example of acid-base chemistry. Vinegar contains acetic acid . It has the chemical formula CH 3 COOH (or HC 3 H 2 O 2 ). When mixed with water, acetic acid loses a positively charged ion (H+). The positively charged protons in the water make the solution acidic. White vinegar has a pH of about 2.5.
Baking soda is sodium bicarbonate. It has the chemical formula NaHCO 3. It is a base , which means that when mixed with water, it loses a negatively charged hydroxide ion (OH-). It has a pH of about 8.
Acids and bases react together. The H+ from the acid and the OH- from the base come together to form water (H 2 O). In the case of vinegar and baking soda, this takes two steps. First the two molecules react together to form two other chemicals — sodium acetate and carbonic acid. The reaction looks like this:
NaHCO 3 + HC 2 H 3 O 2 → NaC 2 H 3 O 2 + H 2 CO 3
Carbonic acid is very unstable. It then breaks apart quickly into carbon dioxide and water.
H 2 CO 3 → H 2 O + CO 2
Carbon dioxide is a gas, which makes the water fizz like soda pop. If you add a little dish soap to your acid solution, the bubbles will catch in the soap. The reaction produces a big fwoosh of foam.
Acids and bases will react together until there are no excess H+ or OH- ions present. When all the ions of one type are all used up, the reaction is neutralized. This means that if you have a lot of vinegar, but very little baking soda (or vice versa), you’ll get a small volcano. Varying the ratio of ingredients can change the size of that reaction.
This leads to my hypothesis — a statement I can test. In this case, my hypothesis is that more baking soda will produce a larger explosion .
Educators and Parents, Sign Up for The Cheat Sheet
Weekly updates to help you use Science News Explores in the learning environment
Thank you for signing up!
There was a problem signing you up.
Blowing it up
To test this, I need to make volcanoes with different amounts of baking soda while the rest of the chemical reaction remains the same. The baking soda is my variable — the factor in the experiment that I am changing.
Here’s the recipe for a basic baking soda volcano:
- In a clean, empty 2-liter soda bottle, mix 100 milliliters (mL) of water, 400mL of white vinegar and 10mL of dish soap. Add a few drops of food coloring if you want to make your explosion a fun color.
- Place the bottle outside, on a sidewalk, driveway or porch. (Do not put it on grass. This reaction is safe, but it will kill the grass. I learned this the hard way.)
- Mix together half a cup of baking soda and half a cup of water. Pour the mix into the 2-liter bottle as quickly as you can and stand back!
(Safety note: It’s a good idea to wear gloves, sneakers and eye protection such as glasses or safety goggles for this experiment. Some of these ingredients can be uncomfortable on your skin, and you don’t want to get them in your eyes.)
To turn this demonstration into an experiment, I’ll need to try this again, with three different amounts of baking soda. I started small — with just 10 mL, mixed with 40 mL of water. My middle dose was 50 mL of baking soda mixed with 50 mL of water. For my last amount, I used 100 mL of baking soda, mixed with about 50 mL of water. (Baking soda has a similar volume and mass, in that 10mL of baking soda weighs about 10 grams, and so on. This meant I could weigh the baking soda on a scale rather than have to measure it by volume.) I then made five volcanoes with each amount of baking soda, for a total of 15 volcanoes.
The explosion happens very quickly — too fast to mark its height accurately on a wall or yardstick. But once the eruption happens, the foam and water fall outside the bottle. By weighing the bottles before and after the reaction, and adding in the mass of the baking soda and water solution, I can calculate how much mass got ejected from each eruption. I could then compare the mass lost to show if more baking soda produced a larger explosion.

When I used only 10 grams of baking soda, the bottles lost 17 grams of mass on average. The eruptions were so small that most never made it out of the bottle. When I used 50 grams of baking soda, the bottles lost 160 grams of mass on average. And when I used 100 grams of baking soda, the bottles lost almost 350 grams of mass.
But that’s not quite the whole story. Because I added different amounts of baking soda and water to the bottles, there might not be as big of a difference here as I think. The extra mass from the 100-gram bottles, for instance, could just be because the reaction started out heavier.
To rule that out, I converted my numbers to the percent of mass lost. The 10-gram bottles lost only about three percent of their mass. The 50-gram bottles lost 25 percent of their mass, and the 100-gram bottles lost more than half of their mass.

To confirm that these results are different, I need to run statistics. These are tests that will help me interpret my results. For this, I have three different amounts of baking soda that I need to compare to each other. With a test called a one-way analysis of variance (or ANOVA), I can compare the means (in this case, the average) of three or more groups. There are calculators on the internet where you can plug in your data to do this. I used this one .

The test will give me a p value. This is a probability measure of how likely I would be to get a difference between these three groups as large as the one I have by chance alone. In general, scientists think of a p value of less than 0.05 (five percent probability) as statistically significant . When I compared my three baking soda amounts, my p value was less than 0.00001, or 0.001 percent. That’s a statistically significant difference that shows the amount of baking soda matters.
I also get an F ratio from this test. If this number is around one, it usually means that the variation between the groups is about what you would get by chance. An F ratio bigger than one, though, means the variation is more than you’d expect to see. My F ratio was 53, which is pretty good.

My hypothesis was that more baking soda will produce a larger explosion . The results here seem to agree with that.
Of course there are things that I could do differently next time. I could make sure that my bottle weights were all the same. I could use a high-speed camera to measure explosion height. Or I could try changing the vinegar instead of the baking soda.
I guess I’m just going to need to make more explosions.
- White vinegar (2 gallons) ($1.92)
- Food coloring: ($3.66)
- Nitrile or latex gloves ($4.24)
- Small digital scale ($11.85)
- Roll of paper towels ($0.98)
- Dish soap ($1.73)
- Glass beakers ($16.99)
- Baking soda (three boxes) ($0.46)
- Two-liter soda bottles (4) ($0.62)
More Stories from Science News Explores on Chemistry

At last: How poison dart frogs ship defense toxins to their skin

Let’s learn about graphene

Chemists make device to destroy planet-warming methane pollution

Scientists Say: Calorie

Analyze This: Stonehenge’s ‘Altar Stone’ has mysterious origins

Pollution power? A new device turns carbon dioxide into fuel

New ultrathin materials can pull climate-warming CO 2 from the air

Particles from tree waste could prevent fogged lenses, windshields

How to Create a Volcano Science Fair Project: Step-by-Step Guide to Investigating Volcanic Phenomena
Volcanoes are fascinating natural phenomena that have captured the attention of scientists and the general public alike for centuries. A volcano is an opening in the Earth’s surface through which molten rock, ash, and gas can escape. Volcanoes can be found all over the world, and they come in many different shapes and sizes.
What Causes Volcanoes?
Volcanoes are caused by the movement of tectonic plates. When two plates collide, one can be forced under the other, creating a subduction zone. The subducting plate melts and rises to the surface, causing a volcano to form. Volcanoes can also form at hotspots, where magma rises from deep within the Earth and creates a volcano.
Why Study Volcanoes?
Studying volcanoes can help us understand more about the Earth’s interior and the processes that shape our planet. It can also help us better predict and prepare for volcanic eruptions, which can have devastating consequences for people and communities living near active volcanoes.
In this article, we will provide a step-by-step guide to creating a volcano science fair project. Whether you are a student looking for a fun and engaging project or a teacher looking to inspire your students, this guide will provide you with all the information you need to investigate volcanic phenomena.

Step 1: Research
When it comes to creating a volcano science fair project, research is essential. Before you can start building your volcano, you need to understand the science behind it. This will not only help you create a more accurate and impressive project, but it will also help you understand the significance of your findings.
Why Choose a Volcano Science Fair Project?
Volcanoes are fascinating natural phenomena that have captured human interest for thousands of years. Studying volcanoes can help us understand the Earth’s structure, the processes that shape our planet’s surface, and the potential dangers associated with volcanic activity.
Additionally, creating a volcano science fair project can be a fun and engaging way to learn about science. It allows you to get hands-on experience with scientific concepts and can help spark a lifelong interest in STEM (science, technology, engineering, and math) fields.
Finding Reliable Resources
When researching for your volcano science fair project, it’s important to use reliable resources. This ensures that the information you gather is accurate and up-to-date. Here are a few tips for finding reliable resources:
- Use reputable science websites, such as National Geographic, NASA, and the Smithsonian.
- Check the author’s credentials and affiliations.
- Look for sources that have been peer-reviewed or published in reputable scientific journals.
By using reliable resources, you can be confident in the accuracy of your research and ensure that your volcano science fair project is based on sound scientific principles.

Step 2: Formulating a Hypothesis
Once you have gathered all the necessary background information on volcanoes, it’s time to start formulating your hypothesis. Your hypothesis should be a statement that explains your prediction or explanation for the phenomenon you are investigating. A hypothesis is not a guess, but rather an educated prediction based on your research and observations.
What is a Hypothesis?
A hypothesis is a statement that explains your prediction or explanation for the phenomenon you are investigating. It is a tentative explanation for an observation or phenomenon that can be tested through further investigation.
How to Formulate a Hypothesis
To formulate a hypothesis, start by identifying the problem or question you want to investigate. Then, review your research and observations to come up with a statement that explains your prediction or explanation for the phenomenon you are investigating.
For example, if you are investigating the effect of different types of lava on volcanic eruptions, your hypothesis could be:
- If the viscosity of the lava is higher, then the eruption will be more explosive.
- If the temperature of the lava is lower, then the eruption will be less explosive.
Remember, your hypothesis should be testable and falsifiable. This means that you should be able to design an experiment or observation that can either support or refute your hypothesis.
Why is a Hypothesis Important?
A hypothesis is important because it guides your investigation and helps you stay focused on your research question. It also helps you design an experiment or observation that will test your prediction or explanation.
Additionally, a hypothesis allows you to make predictions about what you expect to find during your investigation. This can help you identify potential sources of error and plan for how to address them.

Step 3: Materials and Equipment
Before you start creating your volcano science fair project, it is important to gather all the materials and equipment you will need. Below are the essential and optional materials and equipment you will need for this project.
Essential Materials
- Baking soda
- Red food coloring
- Vegetable oil
- Large mixing bowl
- Small plastic bottle
- Measuring cups and spoons
- Newspaper or plastic tablecloth
- Small funnel
Optional Materials
- Modeling clay
- Decorative materials (e.g., fake grass, rocks, trees)
- Plastic dinosaurs or other animals
Most of the equipment you will need for this project is basic kitchen equipment. However, if you want to create a more elaborate volcano, the following equipment may be useful:
By gathering all the essential and optional materials and equipment, you can ensure that you have everything you need to create a successful volcano science fair project.

Step 4: Experimentation
Now that you have built your volcano model and created the eruption, it’s time to record and analyze your data. This is where experimentation comes in.
Recording Data
When recording data, it is important to keep track of all the variables involved in the experiment. This includes the amount of baking soda and vinegar used, the time it took for the eruption to occur, and the height and width of the eruption. You can record this information in a notebook or on a spreadsheet.
Analyzing Data
Once you have collected your data, you can begin to analyze it. Look for patterns and trends in your results. For example, does the amount of baking soda used affect the height of the eruption? Does the temperature of the vinegar affect the time it takes for the eruption to occur?
You can also create graphs and charts to help visualize your data. This can make it easier to identify any correlations between the variables you tested.
Experimenting with Variables
If you want to take your experiment to the next level, you can try experimenting with different variables. For example, you can try using different types of vinegar or adding food coloring to the mixture to see how it affects the eruption.
Remember to only change one variable at a time, so you can accurately determine its impact on the eruption. Keep detailed records of your experiments and results, so you can compare them later.
By experimenting with different variables, you can gain a better understanding of the volcanic phenomena and how it works. This will make your science fair project stand out and impress the judges!

Step 5: Conclusion
Interpreting the results of your volcano science fair project is crucial in drawing conclusions. At this stage, you need to analyze your data and observations to determine the significance of your findings. This process involves identifying patterns, trends, and relationships that exist in your data.
Interpreting Results
When interpreting your results, you should consider the following questions:
- What patterns or trends do you see in your data?
- Are there any significant differences or similarities between your experimental and control groups?
- What factors may have influenced your results?
Answering these questions will help you to understand the implications of your findings and their relevance to your hypothesis.
Drawing Conclusions
Once you have interpreted your results, you can draw conclusions based on your findings. Your conclusions should be based on the evidence you have gathered and should be supported by your data and observations.
When drawing conclusions, you should consider the following:
- Do your findings support or refute your hypothesis?
- What new insights have you gained from your research?
- What are the implications of your findings for future research in this area?
By answering these questions, you can develop a clear understanding of your findings and their significance. This will help you to communicate your results effectively and to make a valuable contribution to the field of volcanology.

Tips for Success
Creating a volcano science fair project can be a fun and exciting experience, but it’s important to keep some key tips in mind to ensure success. Here are some tips to help you create a standout project:
Practice and Patience
Practice makes perfect, and this is especially true when it comes to creating a volcano science fair project. Take the time to practice building and testing your volcano before the big day. This will help you identify any potential issues and make any necessary adjustments. Additionally, be patient during the process. Creating a volcano can be a bit messy and time-consuming, but the end result will be worth it.
Safety First
When creating a volcano science fair project, safety should always be your top priority. Be sure to read and follow all instructions carefully, and use caution when handling any materials or substances. Always wear protective gear, such as gloves and goggles, and work in a well-ventilated area. Keep in mind that some chemicals and materials can be harmful if ingested or inhaled, so be sure to keep them out of reach of children and pets.
Be Creative
Creating a standout volcano science fair project means being creative and thinking outside the box. Consider using unique materials, such as colored sand or glitter, to make your volcano stand out. You can also experiment with different eruption methods, such as using baking soda and vinegar or dry ice and water. The more creative and unique your project is, the more likely it is to catch the judges’ attention.
Present with Confidence
Finally, when presenting your volcano science fair project, be sure to do so with confidence. Practice your presentation beforehand and be prepared to answer any questions the judges may have. Remember, the more confident and knowledgeable you appear, the more likely you are to impress the judges and earn a top prize.
Leave a Comment Cancel Reply
Your email address will not be published. Required fields are marked *
Save my name, email, and website in this browser for the next time I comment.
- Earth Science
- Physics & Engineering
- Science Kits
- Microscopes
- Science Curriculum and Kits
- About Home Science Tools
Science Projects > Earth & Space Projects > Volcanic Eruption Science Project
Volcanic Eruption Science Project
Volcanoes erupt when magma, red-hot liquid rock, seeps up through a vent in the earth. These vents can be at the top of a mountain or on a flat area. Volcanoes can even erupt underwater if there is a vent in the ocean floor. Magma is formed when part of the earth’s mantle gets hot enough to melt. Violent eruptions can occur when pyroclastic material—a mixture of magma, rocks, ash, and hot gases—explodes upward by pressure caused by underground gases and magma.
There are over 1,500 volcanoes around the world today that are considered active, meaning it can erupt at any time. A dormant volcano (like the one in Yellowstone National Park) may become active again, but not for many hundreds or even thousands of years. An extinct volcano no longer has a lava supply and is very unlikely to ever erupt again.
Volcanic Eruption Science Projects
#1: volcano in a bottle (baking soda + vinegar).
You can demonstrate a volcanic eruption using some simple household items. Kids usually have a great time doing this experiment, and may want to repeat it several times!
To make a big eruption, use a small plastic bottle (the size 20-oz soft drinks come in works well). Fill the bottle halfway (1 to 1.5 cups) of vinegar. To start the eruption, drop a baking soda ‘bomb’ into the bottle—wrap one tablespoon of baking soda into a small piece of tissue paper, tying the ends with string.
You should see an instant eruption—’lava’ will spurt out of the mouth of the bottle. The baking soda, a base, neutralizes the acid in vinegar. This releases carbon dioxide gas, which causes the fizzing action in your volcano.
If you want your volcano to look more realistic, use clay or playdough to make a ‘mountain’ around the bottle. Or, if you’re working outside, you might want to use dirt and pebbles. You can also add red food coloring to the vinegar solution to make it look more like lava.
To learn more about volcanoes, take a look at our Introduction to Volcanoes Science Lesson (includes two more Volcano Science Projects).
#2: Volcano in a Beaker
You can create an erupting volcano using wax, sand, and water!
What You Need:
- 400 ml glass beaker
- Wax candle (A red or orange candle works best!)
- Sand , well rinsed (so as not to cloud the water)
- Alcohol burner or alcohol lamp
- Safety goggles
Safety Note: Only use a high-quality glass beaker or liquid measuring cup (such as Pyrex) for this experiment! An ordinary glass jar or drinking glass will likely crack under this amount of heat. Never put a glass container directly onto the stovetop!
What You Do:
1. Light the candle wick and let it burn for about 20 seconds. Carefully tilt the candle over the beaker, dripping wax inside. You’ll need 2-3 teaspoons of wax at the bottom of the mug. Blow out the candle.
2. Allow the melted wax to cool and harden. Then pour enough sand into the beaker to cover the wax in a thin layer (about an inch).
3. Carefully fill the beaker up with water, taking care not to disturb the sand. Allow the sand to settle until the water appears clear again (about 30 seconds).
4. Light the alcohol lamp using a wooden match (Or use an alcohol burner for more speedy results!) and wait for the flame to stabilize (about one minute).
5. Place the stand over the alcohol lamp and put the beaker on the stand. Wait for the contents of the beaker to be heated slowly. For the most dramatic results, heat slowly over low heat.
6. As the wax melts, you’ll hear a faint hissing sound and see a bulge in the sand layer. Eventually the bulge will erupt, and hot wax will flow through the sand and the water to the top of the beaker.
What Happened:
Volcanoes erupt when red-hot magma seeps up through a vent in the earth’s crust. In this experiment, the wax represents magma from the earth’s mantle, and the sand represents the earth’s crust. The water is where the crust and the air meet. Once a volcano has broken through the earth’s crust lava can flow all over the earth, or it can even be forced out into an ocean. When the wax “magma” reaches the water, it becomes “lava.” Just as the wax hardened once it reached the water in this experiment, real lava cools and hardens once it reaches earth’s surface.
If you want to see the volcanic reaction again, melt a few drops of wax to stick the used wax to the bottom of a clean beaker. Cover with sand and water, then heat slowly as before. The kind of reaction you will get depends on the levels of sand and wax, as well as how slowly or quickly the alcohol lamp melts the wax. Try to keep the heat as steady as you can for a more dramatic result.
Earth & Space Science
Welcome! Read other Earth & Space Science articles or explore the rest of the Resource Center, which consists of hundreds of free science articles!
Shop for Earth & Space Science Supplies!
Home Science Tools offers a wide variety of earth science products and kits. Find earth science products and space educational supplies for labs and classrooms.
Related Articles

50 Super Summer Science Projects
School’s out! Now what? Make it the best summer yet with these 50 simple science projects to do at home.

Cloud Types Worksheet
Use this Cloud Types Worksheet with the "Types of Clouds" Science Lesson to review the basic types of clouds and what kind of weather they bring. Find weather science projects here and here.

Earth Day Science Worksheet: Word Search
Print this Earth Day word search for your kids.

Solar Energy Matching Game
Print out this page on a sheet of heavy paper or cardstock. Kids can color the pictures and cut out the squares to make a matching game. Half of the squares show a way to use solar energy as an alternative to the picture shown on the other squares. Place all the...

Simple Spring Break Science Projects
Spring break is here! What will you do with your time off? Perhaps you're looking forward to a family vacation, or a few days of down time at home. Either way, find a quick and easy project that's sure to put a sparkle in the eye of any science lover, or win over a...
JOIN OUR COMMUNITY
Get project ideas and special offers delivered to your inbox.
- Free Resources
- Project Search
- Featured Projects
- Member Benefits
1059 Main Avenue, Clifton, NJ 07011
The most valuable resources for teachers and students
(973) 777 - 3113
1059 Main Avenue
Clifton, NJ 07011
07:30 - 19:00
Monday to Friday
123 456 789
Goldsmith Hall
New York, NY 90210
- Why We’re Unique
Make a Volcano Model
Introduction: (initial observation).
Volcano is an opening in the earth’s crust through which molten lava, ash, and gases are ejected. Some volcanoes are on dry land and some others are under water in deep oceans. Some islands are entirely formed by volcanic material. Volcanoes are constantly changing the landscape on the earth.
As the world’s population grows, more and more people are living in potentially dangerous volcanic areas. Volcanic eruptions continue–as they have throughout history–posing ever-greater threats to life and property.

In this project you make a model of a volcano and display the eruption process and and release of lava or magma.
Dear This project guide contains information that you need in order to start your project. If you have any questions or need more support about this project, click on the “Ask Question” button on the top of this page to send me a message.
If you are new in doing science project, click on “How to Start” in the main page. There you will find helpful links that describe different types of science projects, scientific method, variables, hypothesis, graph, abstract and all other general basics that you need to know.
Project advisor
Information Gathering:
Information about volcano models are available at:
- http://volcano.und.nodak.edu/vwdocs/volc_models/models.html
- http://www.madsci.org/experiments/archive/854444893.Ch.html
- http://www.aeic.alaska.edu/Input/lahr/taurho/volcano/volcano.html
- http://www.rockhoundingar.com/pebblepups/volcano.html
- http://userwww.service.emory.edu/~ekrauss/
Inside the earth, hot magma and gasses look for weak spots to push through. Magma and gasses will push up through not only the main conduit, but also through any cracks (vents) it can find. Once magma (molten rock) leaves the inner earth and finds its way to land, then we call it lava.

Question/ Purpose:
What do you want to find out? Write a statement that describes what you want to do. Use your observations and questions to write the statement.
We want to see what happens that a volcano erupts. A review of current and past volcano eruptions indicates some kind of under ground pressure that forces the lava out of a volcano. Can we simulate such underground pressure?
Also find out what ratio of vinegar/ baking soda produces the highest amount of gas for your volcano experiment.
Identify Variables:
When you think you know what variables may be involved, think about ways to change one at a time. If you change more than one at a time, you will not know what variable is causing your observation. Sometimes variables are linked and work together to cause something. At first, try to choose variables that you think act independently of each other.
We use the reaction of vinegar and baking soda to produce carbonic gas and use it to create a display similar to a real volcanic eruption.
The independent variable (also known as manipulated variable) is the ratio of vinegar to baking soda.
The dependent variable (also known as responding variable) is the amount of gas produced by the reaction.
Control variable is the ambient temperature (room temperature).
Hypothesis:
Based on your gathered information, make an educated guess about what types of things affect the system you are working with. Identifying variables is necessary before you can make a hypothesis.
Baking soda and Vinegar can produce enough gas to simulate a volcanic eruption. This is a sample hypothesis for the ratio of the vinegar to baking soda.
The highest amount of gas will be produced when equal amounts of baking soda and vinegar are used
Experiment Design:
Design an experiment to test each hypothesis or construct a model to display how a volcano is erupted when the pressure of gases push out molten lava.
Experiment 1:
Make a Volcano model that can erupt. Eruption can be simulated by a chemical reaction between vinegar and baking soda. Model can be constructed using paper, aluminum foils and clay.
We mix baking soda and vinegar in a plastic bottle in different ways and see which combination and rates of mixture will create the best model for a volcanic eruption.
When we find the best setup and combination, we cover the bottle by papers, aluminum foil, clay and other material to make it look like real volcano. So in the center of our volcano will be a bottle with chemicals that create the eruption.
In our first experiment we use a small cup of vinegar and start adding baking soda to that. Initially baking soda will release gas as soon as it gets to the vinegar. But if we continue, at some point there will be no gas any more. In this way we record the amount of baking soda and vinegar that create gas with each other.
In the second experiment we check to see which should be at the bottom to create a better and faster reaction, baking soda or vinegar.
In the third experiment we add some liquid detergent and some red food coloring to vinegar before reaction with baking soda. Liquid detergent may help the foams last longer and food coloring gives a better look to the erupting volcano. You may also add some flour to the baking soda that you are using to create a more viscose lava.
When the chemical composition is experimented successfully, we mount the bottle on the center of a card board and cover it with newspaper and aluminum foil to look like a real volcano.
Baking soda and vinegar are frequently used for volcano projects simply because they are easily accessible and less dangerous. Personally I prefer other methods that create better display and of course have more risk. In one example you fill up your volcanic cone with Ammonium bichromate and light it up at the display. Ammonium bichromate is a flammable solid and burns very similar to a volcano. It has a nice display and creates a lot of smoke. Use heavy aluminum foil to cover your card board and construct your cone and do your display in an open area. If you want to do this, make your volcano as small as possible (about 2″ high).
The other method that I like is using a solid acid instead of vinegar. Citric acid for example, specially if you get it in powder form can be a good choice. You can mix it dry with baking soda, paint powder such as Iron oxide (red) and detergent powder. So when you are ready to do your demonstration you just add some water and reaction starts.
Experiment 2:
Compare the number of volcanic eruptions in the past seven years. Draw a graph to show how has the number of annual eruptions changed in the past seven years.
Introduction:
When a volcano is restless, scientists collect and record different data about the volcano. Such data include the earthquakes, ground deformation, and sulfur dioxide gas around each specific volcano. By comparing data from several sources, scientists are able to get a more complete picture of what is happening under the ground than they would by analyzing only one data type. Collected data about volcanic activities can be found on the Internet and Geological publications.
For a list of current volcanic activities search the Internet or visit http://volcano.und.edu/vwdocs/current_volcs/current.html . A copy of this data ia also available here . You can compile the data provided in this website to determine specific regional volcano information and enter them in a table. You can then use such table to draw a graph. (You may also try http://www.swvrc.org/research.htm for volcano data)
Compile the data in the current volcanic activities table and determine how many volcanic eruptions has happened in each of the last seven years. Record your data in the following table. You have choice to select world wide volcanoes or just the volcanoes in one continent.
Use the above table to make a bar chart.
Experiment 3:
In this experiment you will try to find out what ratio of vinegar and baking soda will produce the most amount of gas.
- Get a small measuring spoon or measuring cup. The cap of a soda bottle may be used as a measuring cup.
- Get 9 Styrofoam cups and label them as vinegar. Also number them from 1 to 9. Add one spoon of vinegar in the cup number 1. Add two spoons of vinegar in the cup number 2. Add three spoons of vinegar in the cup number 3. Continue until you add 9 spoons of vinegar to the cup number 9.
- Get 9 empty soda bottles. Label them from 1 to 9. Add 9 spoons of baking soda in the soda bottle number 1. Add 8 spoons of baking soda in the soda bottle number 2. Add 7 spoons of baking soda in the soda bottle number 3. Continue until you add 1 spoon of baking soda in the soda bottle number 9.
- Transfer the vinegar from the cup number 1 to a balloon and then place the balloon over the soda bottle number 1. Heavy vinegar will hold the balloon hanging and no vinegar will enter the bottle at this time. Wrap a cotton string on the bottle neck to hold the balloon securely. Make a knot. No gas must be able to leak from the bottle.
- Repeat this with all cups and all soda bottles that have the same number.
- Carefully start to lift the balloons one at a time so the vinegar in the balloon will enter the bottle and produce gas. Produced gases will inflate the balloons. Measure the circumferences of all balloons and record them in your results table.
- Your results table may look like this:
The “Unit” may be measuring spoon; however, if you have access to a gram scale, it is best if you use one gram as your unit. In this way 4 Unit vinegar will really be 4 grams of vinegar.

To calculate the radius of a spherical balloon divide the circumference of the balloon by 6.28.
The volume of the balloon is =4/3¶r3
To calculate the volume of the balloon multiply 4/3 x 3.14 x radius x radius x radius. Write the volume of the balloon for each ratio in the gas volume column.

Materials and Equipment:
- Plastic bottle (Wide mouth, 5 to 9 inches tall)
- Baking soda
- Liquid detergent
- Food coloring (red)
- Aluminum foil
- Masking tape
Results of Experiment (Observation):
Experiments showed that the reaction between baking soda and vinegar creates some gas, but it is not fast enough to create a violent reaction and simulate a real volcanic reaction. We can stir or shake the mixture to create more gas, but it is not very realistic to shake a volcano to cause eruption.
To speed up the reaction we must fill up the plastic bottle with baking soda while leaving an empty hole in the center of that for adding vinegar. This hole should be as wide as possible so your bottle will hold more vinegar than baking soda. To do this you need to make paste of baking soda. Take one spoon liquid detergent, two spoons water, a few drops of food coloring and start adding baking soda slowly while mixing. Continue adding baking soda until you get a sticky paste. If your bottle is very small and your volcano is small too, this should be enough. For larger bottles you may need to repeat this part to make more paste. Apply a thin layer of this paste to the inner sides of your bottle (about 1/4″ tick).

The reason that we add liquid detergent is that bobbles are unstable and disappear very fast. Liquid detergent will make bubbles last for a few seconds. Do this a few times and add vinegar to see how much foam comes out. After a few experiments you will be ready for your final product. When your bottle is ready for final volcano, take a card board and using a masking tape secure the bottle in the center of the card board. Before you start building your volcanic mountain around the bottle, you may also want to use some glue or masking tape around the neck of the bottle. This will prevent the foam from going inside your mountain.

You can almost use anything that can look like a mountain to cover your bottle. I used some packing paper and cut a cross on the center of that to make it easier to be attached to the neck of the bottle.

Cover the bottle with your mountain material such as paper or aluminum foil and paint it. Since my paper was not large enough, I has to use some extra magazine paper to give more body to the mountain.
Before painting, cover the the bottle with something to make sure that paint will not enter the bottle. I used spray paint, but you can use any latex paint as well. (Don’t add water).

I painted my volcano in the backyard, spray paints release harmful fumes and it’s better not to use them inside a building. While the paint was still wet, I also spread some sand to make it more natural. Paint will act like a glue and holds sand in place.
When your volcano is ready and it is your turn to display, fill up a small bottle or a test tube with vinegar and pour it in to your volcano. The eruption will start in a few seconds and lasts for a few minutes.
Remember you can do it only once and when the volcano erupts, it gets wet and you can not repeat your display unless you build everything from the beginning.

Final display that will last only a few seconds may look like this. As you notice I did not use food coloring and my lava is white. Also I used black color to paint the mountain that is not the best choice. If you have enough time for your project, you may use multiple colors and food coloring to get a better display.

Number of worldwide eruptions from 1989 to April 4, 2004
Calculations:
Calculate what ratio of baking soda and vinegar produce the most gas.
Summary of Results:
Summarize what happened. This can be in the form of a table of processed numerical data, or graphs. It could also be a written statement of what occurred during experiments.
It is from calculations using recorded data that tables and graphs are made. Studying tables and graphs, we can see trends that tell us how different variables cause our observations. Based on these trends, we can draw conclusions about the system under study. These conclusions help us confirm or deny our original hypothesis. Often, mathematical equations can be made from graphs. These equations allow us to predict how a change will affect the system without the need to do additional experiments. Advanced levels of experimental science rely heavily on graphical and mathematical analysis of data. At this level, science becomes even more interesting and powerful.
Conclusion:
Using the trends in your experimental data and your experimental observations, try to answer your original questions. Is your hypothesis correct? Now is the time to pull together what happened, and assess the experiments you did. The pressure of underground gases in a volcanic mountain will force the molten material out of the volcanic mountain.
Related Questions & Answers:
Q. How can we make a volcano that errupts more than once?
A. Instead of attaching the bottle to the base board, make and attach a cylinder from heavy paper that can hold the bottle. In this way you will be able to remove the bootle for refill or just use a second bottle that you have already prepared to repeat the erruption test.
When you do one eruption experiment, your volcano will get wet. So for multiple eruptions make your volcanic mountain from more durable material. Heavy paper with lots of paint can resist a few tests, but for more tests, make your volcanic mountain from plastics, aluminum foil, wood or even chalk (Plaster of Paris) that will be much heavier.

Possible Errors:
If you did not observe anything different than what happened with your control, the variable you changed may not affect the system you are investigating. If you did not observe a consistent, reproducible trend in your series of experimental runs there may be experimental errors affecting your results. The first thing to check is how you are making your measurements. Is the measurement method questionable or unreliable? Maybe you are reading a scale incorrectly, or maybe the measuring instrument is working erratically.
If you determine that experimental errors are influencing your results, carefully rethink the design of your experiments. Review each step of the procedure to find sources of potential errors. If possible, have a scientist review the procedure with you. Sometimes the designer of an experiment can miss the obvious.
References:
Visit your local library and find books related to volcano and the earth science (geology). Review and list such books as your references (bibliography) in addition to this website and other Internet resources.
Following are some Internet resources:
- http://www.madsci.org/experiments/archive/854444893.Ch.html
Volcano Paper Model
To make a volcano paper model, print this page and follow the instructions. You may enlarge this page by a copy machine and print it in heavy paper for better results. You may also do your own drawing and paint it as well. To print only the picture, high-light it with mouse then click on “print” and choose “selection” and click “ok”.
It is always important for students, parents and teachers to know a good source for science related equipment and supplies they need for their science activities. Please note that many online stores for science supplies are managed by MiniScience.
Testimonials
" I called School Time and my husband and son came with me for the tour. We felt the magic immediately."
- Robby Robinson
" My husband and son came with me for the tour. We felt the magic immediately."
- Zoe Ranson
Contact Info
Our address, working hours.
Week Days: 07:00-19:00
Saturday: 09:00-15:00
Sunday: Closed
Science Project
1. Learn about volcanoes
2. prepare your crater, 3. make your volcano erupt, 4. form the lava flow, 6. make more eruptions, 7. trade your volcano, 8. take core samples, 9. record your findings, 10. compare your map.
Learning Space
Teachable Moments
Stay Connected

Make a Volcano
Make a volcano with baking soda, vinegar and play dough. Then, add multiple layers that you can investigate like a NASA scientist. Test your family and friends to see if they can guess what's inside your volcano!
Watch the Tutorial
See below for materials and step-by-step instructions. For more video tutorials and activities like this one, visit Learning Space .
Watch en Español : Seleccione subtítulos en Español bajo el ícono de configuración.
In this episode of Learning Space, you will make a volcano with baking soda, vinegar and play dough. Then, add multiple layers that you can investigate like a NASA scientist. | Watch on YouTube
Piece of cardboard OR a cookie sheet
3 or more colors of play dough ( download recipe ) or soft clay
Baking soda
Paper towels
Colored pencils OR crayons (ideally matching the colors of the play dough)
2 sheets of graph paper OR plain paper
1-3 clear plastic drinking straws

Find out how volcanoes form and what causes them to erupt . Then click the planets in this interactive image to learn about volcanoes on planets throughout our solar system. Get inspired before you create your own volcano by checking out these images of volcanoes on Earth .
› Learn more about this image

Cut off the top of the paper cup so it's only about 0.5 inches (1-2 cm) tall. Place the paper cup at the center of your piece of paper and trace around the bottom to make a circle. The circle and the cup represent the crater inside your volcano. Tape the cup to the piece of cardboard or a cookie sheet. Mark north, east, south and west on both the paper and the cardboard or cookie sheet.

Fill the cup with a spoonful of baking soda. Then, slowly pour in enough vinegar to make the mixture foam up and flow out of the cup. This simulates an eruption and lava flowing out of your volcano.

If possible, use a colored pencil to trace around the edge of where the lava flew out of your volcano. Dab up the fluid with a paper towel. Then, cover the area inside the line you traced with a thin layer of one color of play dough to mark where the lava flowed.

On your graph paper, use a colored pencil that matches the color of the play dough you put down to draw the shape of your lava layer. This is the start of a map that will show where lava flowed during each eruption of the model volcano. Be sure the orientation of the cardinal directions on your map match the ones on your model volcano.
Repeat steps 3-5 three or four more times. Each time, put down a new layer of play dough and then map it out by drawing the shape of that layer on your graph paper. If you have more than one color of play dough, change colors between eruptions so it's easier to see the different layers.
If possible, trade your volcano with another person, so you can investigate one that is unknown! If you can't trade with anyone, find a family member who didn’t watch you build the volcano and challenge them to do the next steps.

Cut a plastic straw into thirds or fourths. Push an open end of the straw straight down through the play dough lava flows until you reach the bottom. Twist the straw in place and lift out a sample. This is what's called a core sample.
Looking through the clear straw, you can see the layers underneath the surface of the volcano. You can use this sample to investigate how the layers of the volcano formed over time. Repeat this step with each of your three or four straw pieces. Think about the best places to collect samples so that you can get as much information as possible.
On a blank piece of graph paper, draw a circle and cardinal directions like you did in Step 2. Use your core samples to make a prediction of where each layer of the volcano you’re studying begins and ends.
Then, use colored pencils that match the colors you find in the volcano to draw the layers on your graph paper. Try to get as close as you can with as few samples as possible!
Once you’ve created a map of your predictions, compare it with the known map from steps 2-6.
Science Projects on Hypothesis for Volcanoes
Table of Contents:
Massive beds of ancient lava found around the world depict an Earth 65 to 70 million years ago where volcanic eruptions were commonplace. According to the volcanism hypothesis, this global-scale volcanic activity spewed so much gas, ash, and dust into the atmosphere that it kept sunlight from reaching Earth’s surface.
Underwater Volcano Science Experiment
Watch out, our science volcano is about to erupt! This cool science experiment creates a fun visual and demonstrates the scientific fact that hot water rises and cold water sinks. Gather your materials, read and print out detailed instructions, and discuss the science with our easy to understand explanation of how it works below. Continue (…)
Video advice: Vinegar Volcano Science Experiment by HooplakidzLab
LAB 360 is back with a brand new science experiment video, Volcano of Vinegar. I hope you like the new style.

This experiment is a great way to introduce the concept of hydrothermal vents found on the deepest parts of the ocean floor. Hydrothermal vents are the result of seawater seeping down through fissures (cracks) in the ocean crust. The cold seawater is superheated by hot magma below the Earth’s crust and comes back to the surface to form the vents.
- Instructions
More Science Fun
The “underwater volcano” is created because hot water rises and cold water sinks. The particles of the hot water are moving faster and are further apart than those particles of the cold water. As a result, when we placed the bottle into the container filled with cold water, the hot water in the bottle started to rise out of the bottle and circulate to the top of the container because it is less dense than the surrounding cold water. Less dense fluids rise and more dense fluids sink. The red hot water then remained at the top of the container and created what looked like an erupting volcano.
Erupting Apple Volcano – Try this fun erupting apple science experiment for kids! Create an erupting apple volcano using simple household ingredients.
Our erupting apple science activity is an awesome example of a chemical reaction, and kids will love this amazing chemistry just as much as adults! This erupting apple science experiment uses baking soda and vinegar for a classic chemical reaction experiment. You could also try lemon juice and baking soda and compare the results! Check out our lemon volcanos too.
How to Write Up an Elementary Volcano Science Project
After creating a volcano science project, it’s important to write a clear presentation. This should include an introduction, hypothesis, materials list, procedure description, results, and conclusion.
The sodium bicarbonate and vinegar volcano is really a favorite science experiment among elementary students. You should help make your presentation stick out in the other students in the science fair by having an exceptional presentation. Also make sure to stick to the teacher’s guidelines or science fair guidelines to make sure that your score is up to possible. Write an intro. The introduction is the first impression. Make sure it’s concise and precisely introduces precisely what you studied within the experiment. This is a great spot to include fun details, history or general volcano information. The response is a result of the qualities of bases and acids and could be important to incorporate in your experiment. Find out the variable that you’re testing, like the ratio to vinegar and sodium bicarbonate. Or possibly you want to see the other base-acidity combinations would produce similar eruptions. Write a hypothesis. Remember a hypothesis is definitely an educated guess or conjecture. Explain what you consider may happen throughout the experiment based on your previous understanding or research.
Science Fair Entries That Look Beyond The Baking Soda Volcano
When you think of school science fair projects, you might think of baking soda volcanoes or Styrofoam models of the planets. More to the point, that’s what a lot of students think of – and what they enter – in science fairs. But to a lot of real scientists, projects like that are a missed opportunity. They say that rather than just building models, children as young as eight or ten can do actual science and discover new things. When 14 year old Kyle Gazzillo was getting ready for this year’s school science fair in Dalton, Mass., he had a pretty good idea what he wanted to enter. “I was hoping to combine inside a bottle baking soda and vinegar and seeing which ones explode the best,” Gazzillo said. Of course, it’s easy to understand why teenagers gravitate toward projects that explode. Those baking soda rockets and volcanoes are old standards at science fairs, so popular that you’ll find more than a hundred videos on YouTube of kids making them. But the more Kyle thought about building effervescent bottle bombs, the less excited he became.
Video advice: volcano eruption experiments for science fair project
volcano eruption experiments for science fair project | howtofunda

Lemon Volcano Science Experiment
The Lemon Volcano Science Experiment is a simple and fun way to get kids excited about science and engaged and learning while at home.
purposeful play – The Erupting Lemon Volcano Science Experiment is really a favorite within our house and will certainly be a favorite in your house too! Kids love any type of sodium bicarbonate and vinegar experiment. This lemon volcano experiment isn’t any exception and it is a colourful, hands-on method to explore early chemistry concepts. The erupting lemon volcano demonstrates the results of blending basics (sodium bicarbonate) by having an acidity (fresh lemon juice) to make a gas (co2)! Continue studying for that tutorials and also to shop this project!
Volcano Experiment Worksheets & Teaching Resources
Browse volcano experiment resources on Teachers Pay Teachers, a marketplace trusted by millions of teachers for original educational resources.
My Mouth is really a Volcano is a superb book for to school and understanding how to control the blurts or interrupting. This resource features a craftivity having a volcano craft and three options of writing the things they can perform when they feel like going to erupt. You will find anchor chart headers for sophistication discusBring science for your speech sessions! I produced this resource to become a companion towards the simple sodium bicarbonate & vinegar volcano experiment (I added food coloring and glitter to my recipe for additional drama). This is ideal for whole group training or for a meeting activity (I actually do activities likThis experiment gives students hands-on knowledge about scientific analysis because they mix various solids (flour, sugar, epson salt, and sodium bicarbonate) with vinegar to look for the best solid-liquid mixture to create a gas. Students will predict the things they think may happen, collect data because they folloApple Experiment: APPLE VOLCANOES – This type of FUN activity to complete during APPLE WEEK!!! MATERIALS NEEDED – – A dish for that experimentBody Granny Cruz AppleBody Red Scrumptious Apple- Sodium Bicarbonate- VinegarVOCABULARY – (Listed here are words you might like to review before beginning): – Conjecture- HypoThis worksheet will accompany your volcano experiment.
Scientific Method for Volcano Science Projects
Hypothesis – Model volcanoes have been a standby of science fair projects for many students. The displacement of gas that is formed from the reaction has to go somewhere, typically out the opening to the environment. The scientific method gives scientists a form to follow when asking questions about an observation they make. The scientific method guides students through a thinking process in an attempt to explain what happens to a volcano during an explosion. Observation The first step in the scientific process is to make an observation about an event. A question typically arises from the process that needs to be answered. The question can be as simple as “Why does the eruption come out the top of the volcano?” Hypothesis A hypothesis is an educated guess or prediction based upon past knowledge of other events. In a volcano project, a hypothesis may try to explain why a volcano erupts. This idea will be supported or discounted in the experimental phase of the scientific process. A well-formed hypothesis is one that can be measured either qualitatively or quantitatively.
Video advice: Erupting Volcano Easy Science Projects Experiments for Kids
What a fun science experiment for kids! Here we are doing the Erupting Volcano, kids science project. It’s so easy that you can do it at home with household ingredients. All you need is baking soda, vinegar, food coloring (optional), glitter (optional) and an empty water bottle. For added effect, we used a piece of brown foam paper and cut it into the shape of a cone, and placed over our bottle (to look like a real volcano). And we also used red food coloring to look like lava coming out of the volcano. It was such a fun and easy project for kids and they had a blast doing it! Comment below to let us know if you tried it and how it turned out! And don’t forget to SUBSCRIBE!!

What do you need for a volcano science project?
Things You Need For The Volcano Science Project
- 100 ml of warm water.
- 10 ml of dish soap.
- 400 ml of white vinegar.
- Empty 2-litre soda bottle.
- 2 drops of red food coloring.
- Baking soda slurry ( ½ cup baking soda and ½ cup water)
What is the hypothesis for a baking soda volcano?
When all the ions of one type are all used up, the reaction is neutralized . This means that if you have a lot of vinegar, but very little baking soda (or vice versa), you'll get a small volcano. Varying the ratio of ingredients can change the size of that reaction. This leads to my hypothesis — a statement I can test.
What is the science behind the volcano experiment?
Stand the soda bottle in the baking pan and mold the dough around it into a volcano shape . ... The red lava is the result of a chemical reaction between the baking soda and vinegar. In this reaction, the carbon dioxide gas is produced, pressure builds up inside the plastic bottle until the gas bubbles out of the volcano.
Is a volcano a science project?
The baking soda and vinegar volcano is a classic science project that can help kids learn about chemical reactions and what happens when a volcano erupts.
What is a good science fair project?
Does the color of a room affect human behavior? Do athletic students have better lung capacity? What brand of battery lasts the longest? Does the type of potting soil used in planting affect how fast the plant grows?
Related Articles:
- Paper Chromatography Science Projects Having a Hypothesis
- Fifth Grade Projects on Volcanoes
- Crafting a Hypothesis to have an Egg Drop Science Project
- Classification of Volcanoes
- How Can Volcanoes Cause Erosion?
- What Characteristics Do Volcanoes Have?

Erwin van den Burg
Stress and anxiety researcher at CHUV2014–present Ph.D. from Radboud University NijmegenGraduated 2002 Lives in Lausanne, Switzerland2013–present
You may also like

How’s Graphite Extracted?

How you can Pan for Gold inside your Backyard

What’s the Melting Reason for Pewter?
Add comment, cancel reply.
Your email address will not be published. Required fields are marked *
Save my name, email, and website in this browser for the next time I comment.
Latest Editorial Articles

Why Is Thermodynamics Unaffected By Quantum Mechanics

How To Calculate Degrees Of Freedom Robotics

How To Build A Science Lab In Minecraft

How To Use Scheduler In Java For First Robotics Compeitition
- Algebra 1518
- Biology 1090
- Chemistry 1859
- Geology 659
- Innovation 501
- Life Science 466
- Nature 3435
- Physics 3662
- Probability & Statistics 385
Random news

How To Plot A Route On Google Earth
Science Fun
How to make a Volcano
- 10 ml of dish soap
- 100 ml of warm water
- 400 ml of white vinegar
- Food coloring
- Baking soda slurry (fill a cup about ½ with baking soda, then fill the rest of the way with water)
- Empty 2 liter soda bottle
Instructions:
NOTE: This should be done outside due to the mess.
- Combine the vinegar, water, dish soap and 2 drops of food coloring into the empty soda bottle.
- Use a spoon to mix the baking soda slurry until it is all a liquid.
- Eruption time! … Pour the baking soda slurry into the soda bottle quickly and step back!
WATCH THE QUICK AND EASY VIDEO TUTORIAL!
How it Works:
A chemical reaction between vinegar and baking soda creates a gas called carbon dioxide. Carbon dioxide is the same type of gas used to make the carbonation in sodas. What happens if you shake up a soda? The gas gets very excited and tries to spread out. There is not enough room in the bottle for the gas to spread out so it leaves through the opening very quickly, causing an eruption!
Extra Experiments:
1. Does the amount of vinegar change the eruption? 2. Does the amount of water change the eruption? 3. Does the amount of baking soda change the eruption?
EXPLORE TONS OF FUN AND EASY SCIENCE EXPERIMENTS!
SUBSCRIBE AND NEVER MISS A NEW SCIENCE FUN VIDEO!
previous experiment
Next experiment.

- Science Notes Posts
- Contact Science Notes
- Todd Helmenstine Biography
- Anne Helmenstine Biography
- Free Printable Periodic Tables (PDF and PNG)
- Periodic Table Wallpapers
- Interactive Periodic Table
- Periodic Table Posters
- How to Grow Crystals
- Chemistry Projects
- Fire and Flames Projects
- Holiday Science
- Chemistry Problems With Answers
- Physics Problems
- Unit Conversion Example Problems
- Chemistry Worksheets
- Biology Worksheets
- Periodic Table Worksheets
- Physical Science Worksheets
- Science Lab Worksheets
- My Amazon Books
5 Ways To Make a Volcano

There is more than one way to make a chemical volcano. Actually, there are several methods. Here are some of the best, from the tried-and-true baking soda and vinegar volcano to the most exotic dry ice volcano.
Make the Volcano Cone
You can use a bottle or can or really any container for your volcanic eruption, but it’s easy to make the volcano shape by coating your container with clay or papier mache. Here is a simple recipe for a homemade clay volcano:
- 6 cups flour
- 2 cups salt
- 2 cups water
- 4 tablespoons cooking oil
- Mix the ingredients together in a large bowl. It’s easiest if you stir the flour, salt, and oil together first and then mix in the water. You can add more water if needed. You want a firm, smooth dough.
- Stand an empty soda bottle or can in a pie tin or baking pan (so your ‘lava’ won’t make a mess) and mold the dough into a volcano shape. Be sure you don’t drop dough into the bottle or cover the opening.
- If you want to paint the volcano, wait until the dough is dry.
Now for the recipes! Most use common ingredients that you have at home.
Baking Soda and Vinegar Volcano
This is the classic science fair project volcano. The baking soda (sodium bicarbonate) reacts with the vinegar (weak acetic acid) to produce carbon dioxide gas. The detergent traps the gas, which is heavier than air, so it flows down the side of the volcano.
- liquid dishwashing detergent
- red or orange food coloring
- baking soda
- Pour warm water into the volcano until it is 1/2 to 3/4 of the way full.
- Add several drops of food coloring.
- Add a squirt of detergent. This helps the ‘lava’ foam up and flow.
- Add a couple of spoonfuls of baking soda.
- When you are ready to start the eruption, pour vinegar into your volcano.
- You can recharge the volcano with more baking soda and vinegar.
Note: If you don’t have vinegar, you can use another acidic liquid, like lemon juice or orange juice.
Yeast and Peroxide Volcano
- packet of quick-rise yeast
- hydrogen peroxide (3% sold in stores or can use 6% from beauty supply stores)
- food coloring
- Pour the hydrogen peroxide solution into the volcano until it is nearly full. The 3% household peroxide is safe to handle, but wear gloves and use extreme caution if you use the 6% peroxide, which can give you chemical burns!
- Add several drops of food coloring for your lava.
- When you are ready for the eruption, add the packet of yeast to the volcano.
Ketchup and Vinegar Volcano

This volcano bubbles and oozes lava. The eruption is not so dramatic, but is interesting and long-lasting. The acidity of the vinegar and tomatoes in the ketchup reacts with the baking soda to produce carbon dioxide gas, which gets trapped as bubbles by the detergent.
- dishwashing liquid
- Mix together ketchup, warm water, and a squirt of detergent to make lava.
- Pour the mixture into the volcano so it is nearly full.
- When you are ready for the eruption, add baking soda.
Mentos and Diet Soda Volcano

This volcano erupts instantly and spectacularly. For a truly memorable volcano, use diet tonic water instead of diet cola and shine a black light on the volcano. This produces a vivid blue glowing eruption!
- diet soda (regular soda works too, but produces a sticky mess)
- Mentos candies
- Fill the volcano full of soda (or you could have molded the volcano around a full soda bottle.
- When you are ready for the eruption, drop all of the Mentos candies into the mouth of the bottle at once. One easy way to do this is to roll a sheet of paper around the candies, put your finger beneath them to hold them in place, and release the candies over the hole. Be prepared for a major splash!
Dry Ice Volcano
This volcano appears to smoke, releasing a cascade of bubble lava.
- Fill the volcano with warm water.
- Add a bit of dishwashing liquid.
- When you are ready to start the eruption, use gloves or tongs to drop a piece of dry ice into the volcano.
Do you need more ways to make a volcano ? You can bake a souffle to model the geological processes or make a realistic wax volcano .
Related Posts
Easiest Science Fair Project Ever! Make a Playdough Volcano
Categories Science Experiments
Learn about the science behind volcanic eruptions and lava flows while you learn how to build a volcano out of playdough. Conduct a series of tests on your playdough volcano and use it to explain the properties of different materials, how a play doh volcano works, and how to create a display board volcano science fair project hypothesis to use for your volcano science project.
This simple and classic volcano science experiment will help you create your very own volcanic landscape and create the best volcano science fair project display board at the science fair!

Easiest science fair ever! With our tips, the classic baking soda and vinegar playdough volcano experiment will be the talk of the science fair!
The Easiest Science Fair Project- Playdough Volcano
Have you ever wondered how volcanoes erupt and what causes lava flows? Get ready to create your very own volcanic landscape and learn about the properties of different materials, earth science, and a whole lot more!
The play doh volcano is a classic science fair project for a reason, but with our added tips and tricks, your volcano science fair project will be the best one ever.
How Does a Volcano Work?
Volcanic eruptions occur when magma rises to the surface of the earth through a volcano’s vent. Magma is molten rock that is located beneath the earth’s surface and is composed of various minerals, gases, and fluids.
When magma rises, it can encounter different obstacles along the way, such as solid rock or water. When it encounters these obstacles, pressure builds up within the magma chamber.
This pressure causes the magma to become more buoyant and eventually burst through the surface, resulting in an eruption.
The type of eruption that occurs is determined by the type of magma and the amount of gas that is present.
If the magma is runny and has low levels of gas, it will likely result in a more gentle, effusive eruption. If the magma is thick and has high levels of gas, it can result in a more explosive eruption.
Understanding the science behind volcanic eruptions is essential when deciding on a hypothesis for your science fair project.
With this knowledge, you can create a hypothesis that is both feasible and scientifically sound.
What You Need for a Playdough Volcano Science Fair Project
In order to conduct a successful experiment about playdough volcanoes, you will need a few specific materials.
The type of playdough you choose can affect the consistency of the lava flow. So, if you want to test the impact of the playdough on your experiment, consider using different brands or types of playdough.
Additionally, if you want to measure the height of the eruption, you may want to consider using a ruler or measuring tape.
- Air dry clay
- Non-drying clay
- Polymer clay
- Safety goggles
- Food coloring
- Baking soda
- Vinegar (and other types of acid safe to handle, like lemon juice)
- Measuring tape
- Measuring cups and spoons
- Science fair notebook
- Science fair project planner
- Camera for recording results
Science Fair Project Requirements
Most science fairs require similar things to compete in a science fair. There will always be variations, so always follow the specific guidelines set by your science fair.

But most science fair projects will need the following sections in your final report:
Before starting your playdough volcano science fair project, take time to learn about how volcanoes work. Volcanoes are fascinating in how they work, and even modern scientists can’t fully explain everything about how volcanoes work.
Research volcanoes, and then create a question that you think you can prove or disprove with your play doh volcano.
Here is a video about the science of volcanoes to begin your research:
Formulate a Hypothesis
To create a successful science fair project about volcanoes, it’s important to have a strong hypothesis. Your hypothesis should be based on a clear understanding of the science behind how volcanoes erupt.
For example, you might hypothesize that adding baking soda to the vinegar and playdough mixture will increase the height of the eruption. Or you might hypothesize that changing the type of playdough used will affect the thickness of the lava flow.
Whatever your hypothesis, make sure it is grounded in scientific principles and can be tested through experimentation.
Data Collection
Gather information about the chosen volcano and its eruption. Look at pictures, videos, and other visuals related to the eruption.
Use the gathered information to create a hypothesis about the eruption.
Set up an experiment to test the hypothesis. The experiment should be designed to accurately observe the conditions that you want to test to learn more about your question about volcanoes.
Carry out the experiment and take precise measurements or record video and other visual evidence.

Organize and Analyze Data
Analyze the data collected from the experiment and determine the accuracy of the hypothesis.
Take note of the differences in consistency and color of the lava flow depending on the type of Playdough used.
Did certain colors create a more vibrant lava display? Did softer or harder Playdough affect the flow of the lava in any way?
These observations will help you draw conclusions about the experiment and make for a stronger science fair project.
Write a Data Summary
Compile a report or presentation that summarizes the findings and discusses the implications of the playdough volcano experiment and its results.
Once you have recorded and analyzed your results, it’s time to create your playdough volcano display board for the science fair.
More Science Fair Project Ideas
If you’re looking for a science fair project that will impress judges and classmates alike, consider experimenting with some of these other fun science fair project ideas!
- Science Fair Planner Project Planner
- 15 Easy, Frustration-Free Elementary School Science Fair Projects
- 30+ Classic Science Fair Projects for Elementary School
- 30 Science Fair Ideas that Wow
How to Set Up a Volcano Science Fair Project Display Board
There are many ways to set up a volcano science fair project display board, but here is an example to get you started!
Modify each section as required to follow the rules for your specific science fair and the variables and hypothesis of your own project.
If you need help, check out the STEAMsational Science Fair Project Planning Checklist below!
Section 1: Introduction
Introduce your project, why you chose to make a playdough volcano and the question that inspired your hypothesis.
Section 2: Hypothesis
Write your hypothesis and be prepared to explain why you chose it.
Section 3: Playdough Volcano Science
Explain the scientific concept that you wanted to test to prove or disprove your hypothesis.
Section 4: Experiment
Explain how you set up your playdough volcano experiment and what variables you tested along with other details about your project.
Section 5: Results
Summarize the results of each variable test. Was your hypothesis proven or disproven? Discuss what other testing may be required to fully answer your question about volcanoes.
How to Make a Volcano with Playdough- Step-by-Step Instructions for the Science Fair
Follow along with these directions to make your own playdough volcano science fair project!

How to Make a Volcano with Playdough
Get ready to learn about earth science and create a spectacular playdough volcano science fair project display board for your science fair! We’ve got all the tips and tricks to make sure that your playdough volcano project is the best ever. Try it today!
- Different types of play dough (non-hardening clay, air dry clay, polymer baking clay, play doh, etc)
- Vinegar and other types of acid
- Clay shaping tools
- Science project journal
- Science project planner
Instructions
1. Create a volcano using play dough.
2. Set your volcano in a pan to contain the “lava.”
3. Add a spoonful of baking soda to your volcano along with a few drops of dish soap.
4. Mix about one-half cup of vinegar with 3 drops of food coloring.
5. Pour the vinegar into your volcano and watch it erupt!
6. Record the data to prove or disprove your hypothesis.
7. Change your chosen variables and run the experiment again.
8. Once all variables have been tested, create a full data report to use in your volcano science fair project display.
Recommended Products
As an Amazon Associate and member of other affiliate programs, I earn from qualifying purchases.

Want to save this project?
Please leave a comment on the blog or share a photo on Instagram
Share this project with a friend!

Sciencing_Icons_Science SCIENCE
Sciencing_icons_biology biology, sciencing_icons_cells cells, sciencing_icons_molecular molecular, sciencing_icons_microorganisms microorganisms, sciencing_icons_genetics genetics, sciencing_icons_human body human body, sciencing_icons_ecology ecology, sciencing_icons_chemistry chemistry, sciencing_icons_atomic & molecular structure atomic & molecular structure, sciencing_icons_bonds bonds, sciencing_icons_reactions reactions, sciencing_icons_stoichiometry stoichiometry, sciencing_icons_solutions solutions, sciencing_icons_acids & bases acids & bases, sciencing_icons_thermodynamics thermodynamics, sciencing_icons_organic chemistry organic chemistry, sciencing_icons_physics physics, sciencing_icons_fundamentals-physics fundamentals, sciencing_icons_electronics electronics, sciencing_icons_waves waves, sciencing_icons_energy energy, sciencing_icons_fluid fluid, sciencing_icons_astronomy astronomy, sciencing_icons_geology geology, sciencing_icons_fundamentals-geology fundamentals, sciencing_icons_minerals & rocks minerals & rocks, sciencing_icons_earth scructure earth structure, sciencing_icons_fossils fossils, sciencing_icons_natural disasters natural disasters, sciencing_icons_nature nature, sciencing_icons_ecosystems ecosystems, sciencing_icons_environment environment, sciencing_icons_insects insects, sciencing_icons_plants & mushrooms plants & mushrooms, sciencing_icons_animals animals, sciencing_icons_math math, sciencing_icons_arithmetic arithmetic, sciencing_icons_addition & subtraction addition & subtraction, sciencing_icons_multiplication & division multiplication & division, sciencing_icons_decimals decimals, sciencing_icons_fractions fractions, sciencing_icons_conversions conversions, sciencing_icons_algebra algebra, sciencing_icons_working with units working with units, sciencing_icons_equations & expressions equations & expressions, sciencing_icons_ratios & proportions ratios & proportions, sciencing_icons_inequalities inequalities, sciencing_icons_exponents & logarithms exponents & logarithms, sciencing_icons_factorization factorization, sciencing_icons_functions functions, sciencing_icons_linear equations linear equations, sciencing_icons_graphs graphs, sciencing_icons_quadratics quadratics, sciencing_icons_polynomials polynomials, sciencing_icons_geometry geometry, sciencing_icons_fundamentals-geometry fundamentals, sciencing_icons_cartesian cartesian, sciencing_icons_circles circles, sciencing_icons_solids solids, sciencing_icons_trigonometry trigonometry, sciencing_icons_probability-statistics probability & statistics, sciencing_icons_mean-median-mode mean/median/mode, sciencing_icons_independent-dependent variables independent/dependent variables, sciencing_icons_deviation deviation, sciencing_icons_correlation correlation, sciencing_icons_sampling sampling, sciencing_icons_distributions distributions, sciencing_icons_probability probability, sciencing_icons_calculus calculus, sciencing_icons_differentiation-integration differentiation/integration, sciencing_icons_application application, sciencing_icons_projects projects, sciencing_icons_news news.
- Share Tweet Email Print
- Home ⋅
- Science Fair Project Ideas for Kids, Middle & High School Students ⋅
5th Grade Projects on Volcanoes

How to Add a Variable to a Volcano Science Project
Volcano science projects are staples of 5th grade classrooms. Studying volcanoes gives students a chance to explore concepts related to geology (plate tectonics, the composition of the earth, etc.), history (Mt. St. Helens and Mt. Vesuvius), chemistry and more. There are a wide range of ideas for volcano-specific 5th grade projects.
Build a Volcano
Having students build their very own volcano offers an informative view of the composition of the earth. Using a piece of cardboard or plywood as a base, students will use an empty plastic bottle to create the cone of the volcano. After the bottle is secured to the base, arrange crumpled up pieces of newspaper around it forming a rudimentary cone. Make several layers of newspaper, using glue to secure the layers to the bottle and one another. Once the cone is built use papier mache (essentially just a pulp of toilet paper and water) to paint on ridges and relief on the volcano's cone. Once the whole thing has dried (this might take a few days) use different kinds of paint to make the volcano look real. Adding sand and or rocks to the base is a nice touch. Voila! Now you have a volcano.
Volcano Research Project
In this project, students select a volcano somewhere in the world, research the volcano and present their findings to the class. Have students pick a volcano they want to know more about -- each student should select a unique volcano. In their written report (about two pages in length) they should tell the name and location of the volcano. They should include a brief bit of information about the country where the volcano is located and include the date (may be approximate) of the last known eruption. Students should be able to identify and discuss the different parts of the volcano and any facts that makes their volcano unique. Additionally, students may create a PowerPoint or poster-board presentation to present their findings to the class.
Salt Volcano
Combine about 3 inches of water and 1/3 of a cup of vegetable oil in a glass jar. Let the students observe the location of the water and oil. What kind of relationship do they seem to have? Now, add a drop of food coloring and see what happens. Next, add some salt and observe what happens. This project allows students to learn about the relationships between different liquids and get a peek at the science behind a piece of decorative lighting they might be familiar with -- the Lava Lamp -- which operates on the same principles demonstrated here.
Volcano Reactions Science Project
This experiment uses either a home-made or store-bought model of a volcano to examine the reaction strengths of different chemicals. A basic mixture of baking soda, water, soap flakes and food coloring is added to the volcano's "eruption chamber" (usually a plastic bottle). To this mixture, a student will add lemon juice, vinegar or hydrogen peroxide respectively. Each time an acid is added to the baking soda mixture an "eruption" will follow. Students should measure the distance that the "lava" flows from the base of the volcano. By repeating this action with each of the different acids and measuring the results students will be able to analyze which acid is fomenting the strongest and weakest reactions with the baking soda mixture.
Related Articles
Step-by-step directions for making a volcano for a..., how to make a "volcano experiment" easy and fun, school project: how to make a volcano that blows ash, science projects that have to do with pop rocks, volcano eruption experiments, facts on & causes of volcanoes, how to make a volcano for kids using mud, how to make volcanoes with spray foam, how to make a volcano out of cardboard, easy science projects for kindergarten, boom here's how to create your own volcanic eruption..., volcano science fair project for kids, how to make a volcano, how to do cool science experiments with rubbing alcohol..., science projects on hypothesis for volcanoes, science projects with dishwashing liquid, homemade volcano alternative to baking soda & vinegar, activities for teaching constructive & destructive..., how to make an erupting volcano science project for....
- Science Project Lab: Volcano Science Project
- San Jose Teach: Volcano Research Project
- Exploratorium: Salt Volcano
Photo Credits
Ryan McVay/Digital Vision/Getty Images
Find Your Next Great Science Fair Project! GO
We Have More Great Sciencing Articles!
Step-by-Step Directions for Making a Volcano for a School Project
Take Your Volcano Science Project to the Next Level
Fun Ways to Make the Chemical Volcano Project More Exciting
- Projects & Experiments
- Chemical Laws
- Periodic Table
- Scientific Method
- Biochemistry
- Physical Chemistry
- Medical Chemistry
- Chemistry In Everyday Life
- Famous Chemists
- Activities for Kids
- Abbreviations & Acronyms
- Weather & Climate
- Ph.D., Biomedical Sciences, University of Tennessee at Knoxville
- B.A., Physics and Mathematics, Hastings College
The classic baking soda and vinegar volcano science project is fun, but you can make the eruption more interesting or realistic. Here is a collection of ideas of ways to take the volcanic eruption to the next level. No more boring volcano science projects!
Make a Smoking Volcano
One of the simplest additions to a model volcano is smoke . If you add a chunk of dry ice to any liquid mixture, the solid carbon dioxide will sublimate into a chilly gas that will condense water in the air to produce fog.
Another option is to place a smoke bomb inside the cone of the volcano. The smoke bomb won't burn if it's wet, so you need to place a heat-safe dish inside the volcano and avoid getting it wet when adding liquid ingredients. If you make the volcano from scratch (e.g., out of clay), you can add a pocket for a smoke bomb near the top of the cone.
Glowing Lava Volcano
Use tonic water instead of vinegar in the baking soda volcano, or mix equal parts vinegar and tonic water to make lava that will glow blue under a black light . Tonic water contains the chemical quinine, which is fluorescent. Another simple option is to mold a volcano shape around a bottle of tonic water and drop Mentos candies into the bottle to start the eruption.
For glowing red lava, mix chlorophyll together with vinegar and react the mixture with baking soda. Chlorophyll glows red when exposed to ultraviolet light.
Make a Vesuvius Fire Volcano
A more advanced volcano, suitable for a chemistry demonstration, is Vesuvius fire. This volcano results from combustion of ammonium dichromate to produce sparks, smoke, and a glowing cinder cone of ash. Of all the chemical volcanoes, this one looks the most realistic.
Make a Smoke Bomb Volcano
Another advanced volcano science project is a smoke bomb volcano , which produces a fountain of purple sparks. This volcano is formed by wrapping a smoke bomb in a paper cone, to direct the eruption upward. It's a simple project, but meant for outdoors.
Lemon Juice and Baking Soda Volcano
Baking soda reacts with any acid to produce simulated lava -- it doesn't need to be acetic acid from vinegar. Mix together lemon juice, a few drops of detergent, and a bit of food coloring to make the lava. Start the eruption by spooning in baking soda. The lemon volcano is safe and smells like lemons!
Color Changing Lava Volcano
It's easy to color the lava of a chemical volcano with food coloring or soft drink mix, but wouldn't it be cooler if the lava could change colors as the volcano erupts? You can apply a bit of acid-base chemistry to achieve this special effect.
Realistic Wax Volcano
Most chemical volcanoes react chemicals to produce gases that get trapped by detergent to form foamy lava. The wax volcano is different because it works like a real volcano. Heat melts wax until it presses against sand, forming a cone and finally an eruption.
Yeast and Peroxide Volcano
One disadvantage of the baking soda and vinegar volcano is that it erupts instantly. You can recharge it by adding more baking soda and vinegar, but this can run you out of supplies quickly. An alternative is to mix yeast and peroxide to cause an eruption. This reaction proceeds more slowly, so you have time to appreciate the show. It's easy to color the lava, too, which is a nice plus.
Erupt a Ketchup Volcano
Another way to get a slower, more realistic eruption is to react baking soda and ketchup . Ketchup is an acidic ingredient, so it reacts with baking soda to produce carbon dioxide gas, just like vinegar or lemon juice. The difference is that it's thicker and natural lava-colored. The eruption burps and spits and releases an odor that may make you crave french fries. (Tip: Adding baking soda to a ketchup bottle also makes for a messy prank.)
More Ideas to Make Your Volcano Special
There's more you can do to make your volcano the best it can be. Here are some ideas to try:
- Mix phosphorescent pigment in with the lava ingredients to make a volcano that truly glows in the dark. Another option is to paint the rim of the volcano with glow in the dark paint.
- Add glitter to the lava for a sparkle effect.
- You don't have to make the volcano out of paper mache or clay. If it's winter, take the project outside and perform the eruption in the snow. Mold snow around a bottle to keep your ingredients separate and make clean-up easier.
- Make the effort to shape and decorate the volcano. Technically, all you need is a glass or bottle to make an eruption, but how boring is that? Paint the cinder cone. Consider adding trees and plastic animals. Have fun with it!
- How to Make a Baking Soda Volcano
- You've Got Ingredients for a Chemical Volcano
- Baking Soda and Vinegar Chemical Volcano
- Easy Science Projects
- Baking Soda Science Projects
- Ketchup and Baking Soda Volcano
- How to Make a Volcano Using Pop Rocks
- Top Chemistry Projects for Bored Kids
- Safe Science Experiments
- How to Make a Mentos & Diet Soda Chemical Volcano Eruption
- 10 Fun Chemistry Demonstrations and Experiments
- Kitchen Science Experiments for Kids
- Equation for the Reaction Between Baking Soda and Vinegar
- Fizzy Sherbet Powder Candy Recipe
- Fizzy Sparkling Lemonade Made With Science
- Exothermic Reaction Examples - Demonstrations to Try
share this!
March 25, 2024
This article has been reviewed according to Science X's editorial process and policies . Editors have highlighted the following attributes while ensuring the content's credibility:
fact-checked
peer-reviewed publication
trusted source
Scientific drilling unravels historical mystery surrounding Santorini volcanic archipelago
by Ilka Thomsen, Helmholtz Association of German Research Centres
. DOI: 10.1038/s41561-024-01392-7")
An international team of scientists co-led by Dr. Steffen Kutterolf from GEOMAR Helmholtz Center for Ocean Research Kiel has found evidence of a historical submarine eruption of the Kameni volcano on Santorini for the first time. In their paper, published today in the journal Nature Geoscience , they describe newly discovered pumice and ash deposits that support historical records of an underwater eruption in 726 CE.
The Greek island group of Santorini, famous for its picturesque white houses with blue roofs, is not only a popular tourist destination but also one of the most thoroughly explored volcanic archipelagos in the world. The islands, arranged in a circular pattern, form the rim of a sea-flooded caldera—the basin-shaped depression left by past eruptions.
At its center is the currently active Kameni volcano, whose peaks form the islands of Palea Kameni (Old Burnt Island) and Nea Kameni (New Burnt Island). The archipelago was formed after the devastating Late Bronze Age Minoan eruption some 3,600 years ago, when the previous volcano erupted vast amounts of ash and pumice and eventually collapsed, creating the iconic caldera walls of Santorini.
However, this wasn't the first caldera collapse in Santorini's history. "We now know of at least five such events within the last half million years," says lead author Dr. Jonas Preine, who completed his doctoral studies on the Christiana-Santorini-Kolumbo volcanic field at Universität Hamburg.
"Like other large volcanic systems, Santorini goes through caldera cycles. After a very large caldera-forming eruption, the new cycle is thought to begin with small but frequent eruptions as the volcanic system recharges. It then continues to mature, and eruptions become larger but less frequent before the system is ready to produce another caldera-forming eruption."
This typically occurs over periods of tens of thousands of years. Santorini is currently in a phase of magma accumulation but is still a long way from another caldera collapse. At this stage, no major explosive eruptions are expected.
However, the new seismic and drilling experiments and the subsequent geochemical analyses at GEOMAR challenge this hypothesis: an eruption in the early summer of the year 726 has been detected and reconstructed at various points in the drill cores from inside and outside the caldera.
Historical writings recount witnessing the sea boiling "as if heated by an incandescent furnace." Large blocks of pumice were ejected in such quantity that they covered the sea surface of the sea over a vast area and were carried by the wind to the coasts of Asia Minor and Macedonia.
It has been suggested that the sudden appearance of floating rocks in the Aegean Sea may have prompted Emperor Leo III of Constantinople, fearing divine displeasure, to impose iconoclasm, a ban on the display of religious symbols, which caused severe socio-economic instability in the Byzantine Empire. Aside from these historical accounts, concrete evidence for this eruption has been lacking until now.
Were the reports exaggerated? Or had the historical writers confused Santorini with another volcano?
The international IODP Expedition 398 "Hellenic Arc Volcanic Field" set out aboard the drilling vessel JOIDES Resolution to uncover remnants of this historical eruption. High-resolution seismic reflection data collected previously hinted at thick sediment layers of unclear origin.
Through drilling to depths of up to 300 meters, the team managed to gather evidence of the massive underwater eruption in 726 CE: The investigations revealed a layer of gray pumice and ash, up to 40 meters thick, unequivocally linked to a single eruption.
"This eruption must have taken place largely underwater within the flooded caldera, as almost no deposits from the eruption were found on land," says Dr. Jens Karstens, marine geophysicist at the GEOMAR Helmholtz Center for Ocean Research Kiel and second author of the study. "This is in line with the historical eyewitness reports."
Jonas Preine emphasizes that the 726 CE eruption was 30 times smaller than the famous Minoan eruption and says, "There is no indication that a similar eruption will occur in the near future."
Nevertheless, the new insights into Santorini's volcanic behavior have significant implications for hazard assessment, as the research suggests that even during the early phases of the caldera cycle, larger explosive eruptions can occur. Additionally, the results highlight the need for greater attention to submarine eruptions.
Preine says, "If we were unaware of the deposits of such a large eruption from a volcano as well studied as Santorini, we must assume that our global eruption records have a significant blind spot for submarine explosive eruptions."
Recognizing the potential for dangerous explosive eruptions in the early stages of caldera formation can be crucial in developing more comprehensive risk mitigation strategies.
Journal information: Nature Geoscience
Provided by Helmholtz Association of German Research Centres
Explore further
Feedback to editors

GPT-4 for identifying cell types in single cells matches and sometimes outperforms expert methods
3 hours ago

Stunning James Webb images show birth and death of massive stars
4 hours ago

Species diversity found to be directly correlated with productivity in eastern US forests
5 hours ago

Scientists deliver quantum algorithm to develop new materials and chemistry

Pushing back the limits of optical imaging by processing trillions of frames per second

How many zebrafish constitute a school? 'Three,' say physicists
6 hours ago

How wild is the Bengal cat genome?

Astronauts have surprising ability to know how far they 'fly' in space

Quantum interference could lead to smaller, faster, and more energy-efficient transistors

Caller ID of the sea: Novel method of simultaneous acoustic tagging provides insight into whale communication
Relevant physicsforums posts, unlocking the secrets of prof. verschure's rosetta stones.
Mar 21, 2024
Iceland warming up again - quakes swarming
Higher chance to get lightning strike by large power consumption.
Mar 20, 2024
A very puzzling rock or a pallasite / mesmosiderite or a nothing burger
Mar 16, 2024
Earth's earliest forest discovered in SW England
Mar 8, 2024
La Cumbre volcano eruption, Fernandina, Galapagos Islands
Mar 4, 2024
More from Earth Sciences
Related Stories

Evidence of one of the largest explosive eruptions ever recorded in the Aegean Sea
Jan 15, 2024

Study re-evaluates hazards and climate impacts of massive underwater volcanic eruptions
Apr 11, 2023

Volcanic tsunami hazards: What can the Santorini seafloor tell us?
Jun 8, 2023

Minoan eruption survey improves volcanic risk assessments
May 4, 2023

Mysterious eruption came from Campi Flegrei caldera
Apr 25, 2019

Mystery of volcanic tsunami solved after 373 years
Oct 26, 2023
Recommended for you

Rainforest response to deglaciation impacted by Australian Indigenous populations, study finds
10 hours ago

Scientists discover methods to regulate carbon storage in humus layer of forest in north China
7 hours ago

New modeling shows the intensity of CO₂ uptake is higher in coastal seas than in the open ocean

Study documents slowing of Atlantic currents
9 hours ago

New study reveals unintended consequences of fire suppression
12 hours ago

New findings shed light on finding valuable 'green' metals
Mar 23, 2024
Let us know if there is a problem with our content
Use this form if you have come across a typo, inaccuracy or would like to send an edit request for the content on this page. For general inquiries, please use our contact form . For general feedback, use the public comments section below (please adhere to guidelines ).
Please select the most appropriate category to facilitate processing of your request
Thank you for taking time to provide your feedback to the editors.
Your feedback is important to us. However, we do not guarantee individual replies due to the high volume of messages.
E-mail the story
Your email address is used only to let the recipient know who sent the email. Neither your address nor the recipient's address will be used for any other purpose. The information you enter will appear in your e-mail message and is not retained by Phys.org in any form.
Newsletter sign up
Get weekly and/or daily updates delivered to your inbox. You can unsubscribe at any time and we'll never share your details to third parties.
More information Privacy policy
Donate and enjoy an ad-free experience
We keep our content available to everyone. Consider supporting Science X's mission by getting a premium account.
Fossil Trove From 74,000 Years Ago Points to Remarkably Adaptive Humans
An archaeological site in Ethiopia revealed the oldest-known arrowheads and the remnants of a major volcanic eruption.

By Carl Zimmer
In 2002, a crew of paleoanthropologists were working in northwestern Ethiopia when they came across chipped stones and fossilized animal bones — telltale signs of a place where ancient people had once lived.
After years of excavations, the researchers discovered that hunter-gatherers had indeed lived there 74,000 years ago. As described in a study published Wednesday in Nature, these ancient humans were remarkably adaptable. They made arrows to hunt big game. And when their world was turned upside down by a giant volcanic eruption, they adapted and survived.
That flexibility might help explain why humans of the same era successfully expanded out of Africa and settled in Eurasia, even when many earlier forays had failed. “This points to how sophisticated people were in this time period,” said John Kappelman, a paleoanthropologist at the University of Texas who led the new study.
At the site, known as Shinfa-Metema 1, the researchers uncovered thousands of bones, some covered in cut marks, from gazelles, warthogs and even giraffes, suggesting that the humans were hunting these species.
The team also found 215 fragments of ostrich eggshells. It’s possible that the people who occupied the site ate the eggs, or used the shells as canteens for storing water. The scientists were able to precisely date the shell fragments, which held trace amounts of decaying uranium, to 74,000 years ago.
Around the same time, a volcano in Indonesia called Toba unleashed vast amounts of ash and toxic gases that spread around the world, blocking the sun for months.
Dr. Kappelman inspected Shinfa-Metema 1 for signs of the eruption. By grinding rocks and dissolving them in acid, his team found tiny bits of glass that could only have formed in a volcano. The scientists realized that they had an extraordinary opportunity to study people who had survived this giant environmental shock.
After analyzing 16,000 chipped rocks, the researchers concluded that they were arrowheads, not spear points. If that holds true in future studies, it will push back the record for archery by several thousand years. The invention of archery meant that hunters didn’t have to approach their prey at close range. Even children could hunt with arrows, and Dr. Kappelman suspects they used them to kill the frogs whose bones he and his colleagues also found at the site.
When Toba erupted, the conditions at Shinfa-Metema 1 immediately turned harsh. The brief rainy season became far shorter, and the rivers ran low.
Many researchers have assumed that such brutal changes forced people into refuges where the environment was more forgiving, and where they could continue to survive using their old practices. But that’s not what happened at Shinfa-Metema 1. There, the fossil record shows, humans adapted by giving up mammal-hunting as their prey died out and instead fishing in the newly shallow waters.
Dr. Kappelman and his colleagues gathered clues to how ancient people might have fished by looking at the practices of modern Ethiopians living in the area. During dry seasons, fish can get trapped in isolated water holes, for example. “It literally looks like fish in a barrel,” he said. “We think it would have been very easy to catch these fish.”
At Shinfa-Metema 1, it looks as if Toba’s environmental effects lasted only a few years. Rains returned, as did mammals, and the people at the site started hunting them again. Fish bones became rare.
Dr. Kappelman thinks this snapshot of a single site could help address the mystery of how humans expanded out of Africa. Scientists have long wondered how people could have made their way through the Sahara and the deserts of the Arabian Peninsula to reach other continents. They have speculated that it could have happened only during wet periods when these regions were covered with plants. Humans could have then used their old survival tactics while traveling these so-called “green highways” to reach other continents.
But Dr. Kappelman and his colleagues proposed that humans survived in arid climates by quickly coming up with new ways to find food, such as fishing.
During dry periods, they might have moved along seasonal rivers as they fished. Instead of traveling along green highways, the researchers argued, they traveled blue ones.
Michael Petraglia, the director of the Australian Research Center for Human Evolution, said the study’s combination of archaeological and environmental evidence from the time of the Toba eruption was extraordinary. “It is incredibly rare anywhere in the world,” he said.
While Dr. Petraglia found the interpretation of the site convincing, he still favors the green highway hypothesis.
He argued that between 71,000 and 54,000 years ago, hyper-arid deserts stretched across the Sahara and the Arabian Peninsula. “Blue-highway corridors were pretty much nonexistent,” Dr. Petraglia said.
Dr. Kappelman questioned whether the deserts were quite so harsh, observing that the Nile brought some water through the Sahara to the Mediterranean. And while he acknowledged that a single site couldn’t speak for all of humanity 74,000 years ago, it offered a point of comparison for other researchers who might find similar ones.
“It’s a testable hypothesis that we’re putting out there,” he said.
Carl Zimmer covers news about science for The Times and writes the Origins column . More about Carl Zimmer
Surviving a Volcanic Supereruption May Have Facilitated Human Dispersal Out of Africa

AUSTIN, Texas — Researchers working in the Horn of Africa have uncovered evidence showing how Middle Stone Age humans survived in the wake of the eruption of Toba, one of the largest supervolcanoes in history, some 74,000 years ago. The behavioral flexibility of these Middle Stone Age people not only helped them live through the supereruption but may have facilitated the later dispersal of modern humans out of Africa and across the rest of the world.
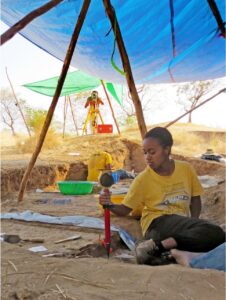
Modern humans dispersed from Africa multiple times, but the event that led to global expansion occurred less than 100,000 years ago. Some researchers hypothesize that dispersals were restricted to “green corridors” formed during humid intervals when food was abundant and human populations expanded in lockstep with their environments. But a new study in Nature led by scientists at The University of Texas at Austin suggests that humans also may have dispersed during arid intervals along “blue highways” created by seasonal rivers. Researchers also found stone tools that represent the oldest evidence of archery.
The team investigated the Shinfa-Metema 1 site in the lowlands of present-day northwestern Ethiopia along the Shinfa River, a tributary of the Blue Nile River. Based on isotope geochemistry of the teeth of fossil mammals and ostrich eggshells, they concluded that the site was occupied by humans during a time with long dry seasons on par with some of the most seasonally arid habitats in East Africa today. Additional findings suggest that when river flows stopped during dry periods, people adapted by hunting animals that came to the remaining waterholes to drink. As waterholes continued to shrink, it became easier to capture fish without any special equipment, and diets shifted more heavily to fish.
The supereruption occurred during the middle of the time when the site was occupied and is documented by tiny glass shards whose chemistry matches that of Toba. Its climatic effects appear to have produced a longer dry season, causing people in the area to rely even more on fish. The shrinking of the waterholes may also have pushed humans to migrate outward in search of more food.
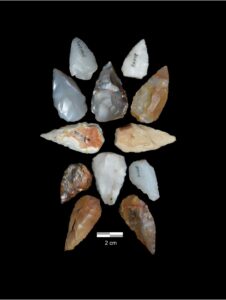
“As people depleted food in and around a given dry season waterhole, they were likely forced to move to new waterholes,” said John Kappelman, a UT anthropology and earth and planetary sciences professor and lead author of the study. “Seasonal rivers thus functioned as ‘pumps’ that siphoned populations out along the channels from one waterhole to another, potentially driving the most recent out-of-Africa dispersal.”
The humans who lived at Shinfa-Metema 1 are unlikely to have been members of the group that left Africa. However, the behavioral flexibility that helped them adapt to challenging climatic conditions such as the Toba supereruption was probably a key trait of Middle Stone Age humans that allowed our species to ultimately disperse from Africa and expand across the globe.
The people living in the Shinfa-Metema 1 site hunted a variety of terrestrial animals, from antelope to monkey, as attested to by cut marks on the bones, and apparently cooked their meals as shown by evidence of controlled fire at the site. The most distinctive stone tools are small, symmetrical triangular points.
“Analyses show that the points are most likely arrowheads that, at 74,000 years in age, represent the oldest evidence of archery,” Kappelman said. “The Ethiopian Heritage Authority has made 3D scans of the points available so that anyone anywhere in the world can download the files and evaluate the hypothesis for themselves.”
Explore Latest Articles
Mar 21, 2024
At Work, Online Communications Leave Impressions

Machine ‘Unlearning’ Helps Generative AI ‘Forget’ Copyright-Protected and Violent Content

Justin Dyer Named Dean of the School of Civic Leadership

IMAGES
VIDEO
COMMENTS
Determining where the most hazardous volcanoes are located in the world is a good project hypothesis. First, students would need to determine the main hazards of a volcano and consider factors such as human life, plant and animal life, air quality and damage to property. Data would need to be collected on volcanoes in different parts of the ...
A hypothesis is an educated guess or prediction based upon past knowledge of other events. In a volcano project, a hypothesis may try to explain why a volcano erupts. This idea will be supported or discounted in the experimental phase of the scientific process.
After creating a volcano science project, it's important to write a clear presentation. This should include an introduction, hypothesis, materials list, procedure description, results, and conclusion.
Here's the recipe for a basic baking soda volcano: In a clean, empty 2-liter soda bottle, mix 100 milliliters (mL) of water, 400mL of white vinegar and 10mL of dish soap. Add a few drops of food coloring if you want to make your explosion a fun color. Place the bottle outside, on a sidewalk, driveway or porch.
In this project you learn about the parts of a volcano, different kinds of volcano and volcanic eruption. You will also make a model of a volcano and display the eruption process and the release of lava or magma caused by the pressure of gases. Dear. This project guide contains information that you need in order to start your project.
The Classic Volcano Science Experiment for Kids. Every child should get to make a volcano as a science project at least once! Follow along with these instructions if you're making a ketchup and baking soda volcano! How to Turn the Volcano Science Experiment into a Science Fair Project. A science fair project requires variables.
Abstract. The papier-mâché volcano is a real classic, but there are many other ways to make an even more exciting and interesting science project focused on volcanoes! To get started on your own volcano-based science project, you will want to first have an understanding of how volcanoes form. This is related to tectonic plates.
Step 2: Formulating a Hypothesis. Once you have gathered all the necessary background information on volcanoes, it's time to start formulating your hypothesis. ... Creating a volcano science fair project can be a fun and exciting experience, but it's important to keep some key tips in mind to ensure success. Here are some tips to help you ...
Volcanic Eruption Science Project. Volcanoes erupt when magma, red-hot liquid rock, seeps up through a vent in the earth. These vents can be at the top of a mountain or on a flat area. Volcanoes can even erupt underwater if there is a vent in the ocean floor. Magma is formed when part of the earth's mantle gets hot enough to melt.
A series of scientific papers by Harry Hess, Robert Dietz, Fred Vine, Drummond Matthews, and others brought together a growing body of evidence that massive pieces of the earth's surface were constantly on the move. Subduction of one plate beneath another could provide the massive force to produce uplift of mountain ranges.
Add 8 spoons of baking soda in the soda bottle number 2. Add 7 spoons of baking soda in the soda bottle number 3. Continue until you add 1 spoon of baking soda in the soda bottle number 9. Transfer the vinegar from the cup number 1 to a balloon and then place the balloon over the soda bottle number 1.
Week 3: Sample Week A Volcano Hypothesis and Analyses. Last week you did PBL Steps 1-6. This reading provides sample responses that someone could have made after reading the Volcano Scenario and applying the ESS and PBL approaches. In Week 2 you were to read and analyze the Volcano Scenario (PBL Step 1), which contains an event and situation ...
Make the Chemical Volcano. Start by making the cone of your baking soda volcano by mixing 6 cups flour, 2 cups salt, 4 tablespoons cooking oil, and 2 cups of water. The resulting mixture should be smooth and firm (add more water if needed). Stand the soda bottle in the baking pan and mold the dough around it to form a volcano shape.
2. Prepare your crater. Cut off the top of the paper cup so it's only about 0.5 inches (1-2 cm) tall. Place the paper cup at the center of your piece of paper and trace around the bottom to make a circle. The circle and the cup represent the crater inside your volcano. Tape the cup to the piece of cardboard or a cookie sheet.
Scientific Method for Volcano Science Projects. Hypothesis - Model volcanoes have been a standby of science fair projects for many students. The displacement of gas that is formed from the reaction has to go somewhere, typically out the opening to the environment. The scientific method gives scientists a form to follow when asking questions ...
Materials: 10 ml of dish soap 100 ml of warm water 400 ml of white vinegar Food coloring Baking soda slurry (fill a cup about ½ with baking soda, then fill the rest of the way with water) Empty 2 liter soda bottle Instructions: NOTE: This should be done outside due to the mess. Combine the vinegar, water, dish soap and 2 drops of food coloring into the empty soda bottle. Use a spoon to mix ...
The detergent traps the gas, which is heavier than air, so it flows down the side of the volcano. warm water. liquid dishwashing detergent. red or orange food coloring. baking soda. vinegar. Pour warm water into the volcano until it is 1/2 to 3/4 of the way full. Add several drops of food coloring. Add a squirt of detergent.
A hypothesis is a tentative, testable answer to a scientific question. Once a scientist has a scientific question she is interested in, the scientist reads up to find out what is already known on the topic. Then she uses that information to form a tentative answer to her scientific question. Sometimes people refer to the tentative answer as "an ...
The Hypothesis in which I guess upon in this experiment is that when there is a lower ratio of baking soda in the volcano than the vinegar there is a faster speed of the increase of the liquid and a higher pressure with in the volcano where as when there is a higher ratio of the baking soda than the vinegar then there will be a slower speed and and lower pressure within the volcano therefore a ...
Learn about the science behind volcanic eruptions and lava flows while you learn how to build a volcano out of playdough. Conduct a series of tests on your playdough volcano and use it to explain the properties of different materials, how a play doh volcano works, and how to create a display board volcano science fair project hypothesis to use for your volcano science project.
By Roger DelVenado. Volcano science projects are staples of 5th grade classrooms. Studying volcanoes gives students a chance to explore concepts related to geology (plate tectonics, the composition of the earth, etc.), history (Mt. St. Helens and Mt. Vesuvius), chemistry and more. There are a wide range of ideas for volcano-specific 5th grade ...
Here are some ideas to try: Mix phosphorescent pigment in with the lava ingredients to make a volcano that truly glows in the dark. Another option is to paint the rim of the volcano with glow in the dark paint. Add glitter to the lava for a sparkle effect. You don't have to make the volcano out of paper mache or clay.
However, the new seismic and drilling experiments and the subsequent geochemical analyses at GEOMAR challenge this hypothesis: an eruption in the early summer of the year 726 has been detected and ...
Instructions. Use a butter knife and spoon to break up/partially scoop out the inside of the lemon. Add a few drops of food coloring to the inside of the lemon. Pour some baking soda on top of the lemon. Use the butter knife to mix the baking soda with the inside of the lemon. Watch it go!
While Dr. Petraglia found the interpretation of the site convincing, he still favors the green highway hypothesis. He argued that between 71,000 and 54,000 years ago, hyper-arid deserts stretched ...
Projectile points from a Middle Stone Age archaeological site, Shinfa-Metema 1, in the lowlands of northwest Ethiopian dating from the time of the Toba supereruption at 74,000 years ago provide evidence for bow and arrow use prior to the dispersal of modern humans out of Africa. Photograph by Blue Nile Survey Project.